Sedona Christmas 2018: Sedona’s Scenic Cruise, The Mace Original Route, Dr. Rubo’s Wild Ride, Mars Attacks, Coyote Tower, Waterfall Wall Cragging

Sedona Christmas 2018

Routes:

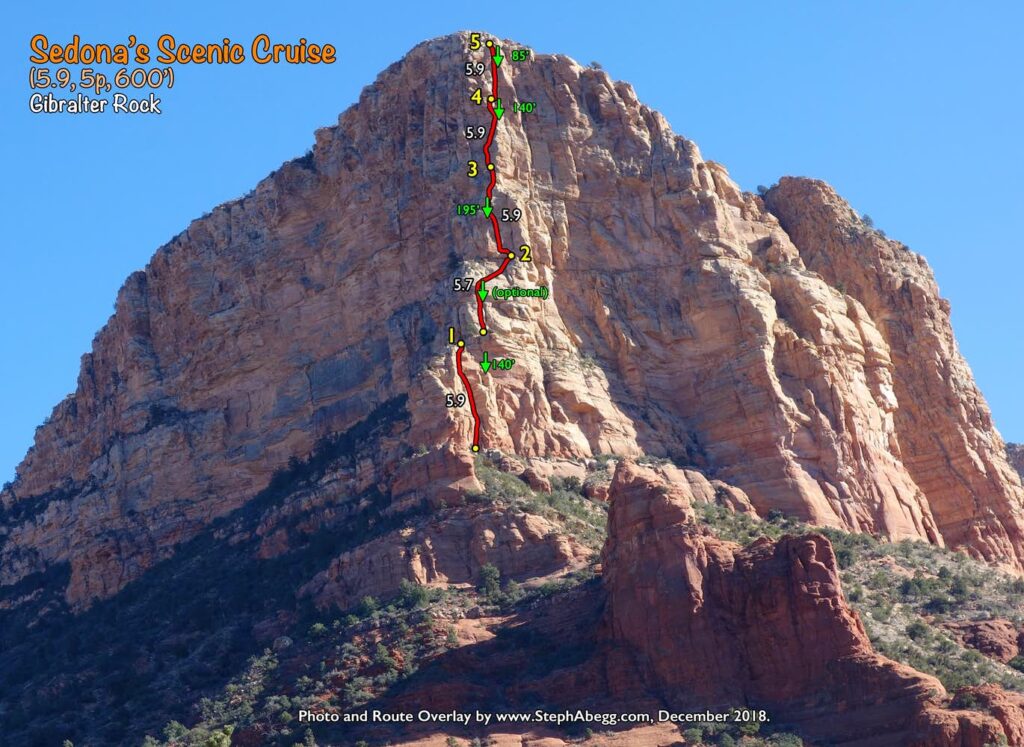
- Sedona's Scenic Cruise (5.9, 5p, 600')
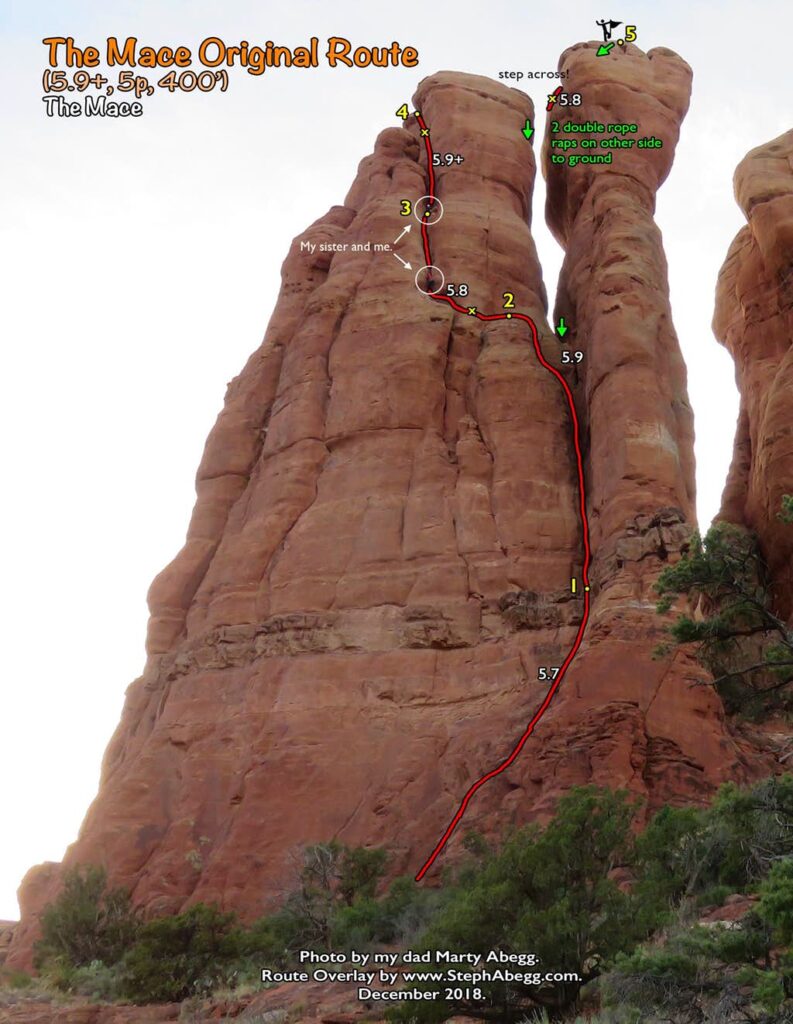
- The Mace Original Route (5.9+, 5p, 400')
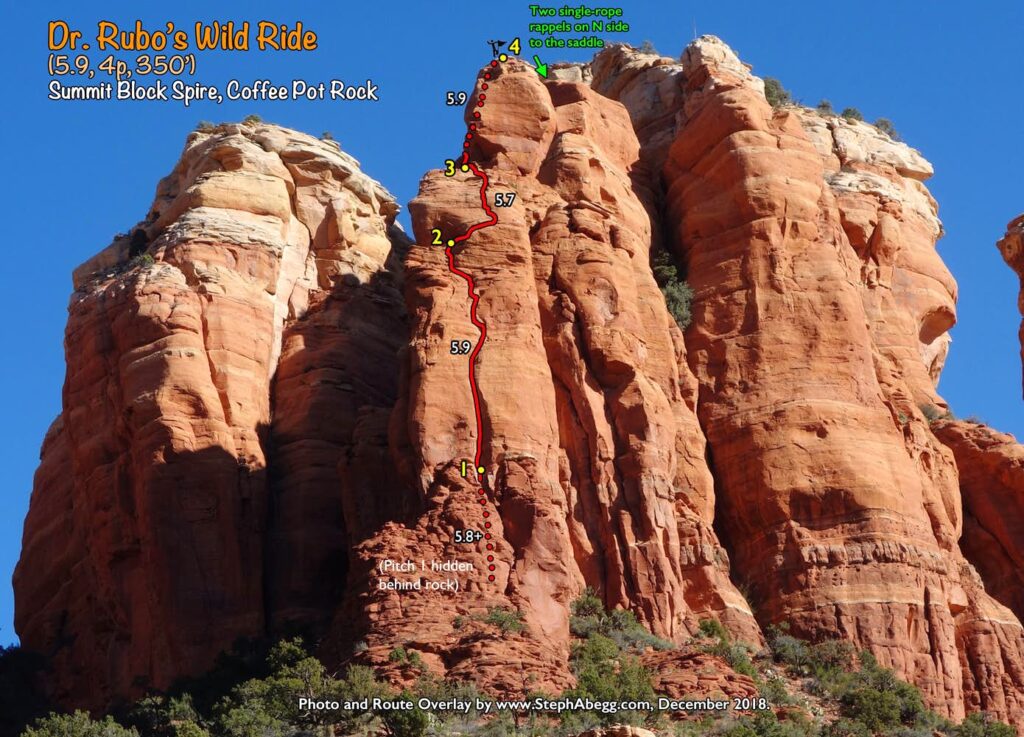
- Dr. Rubo's Wild Ride (5.9, 4p, 350')
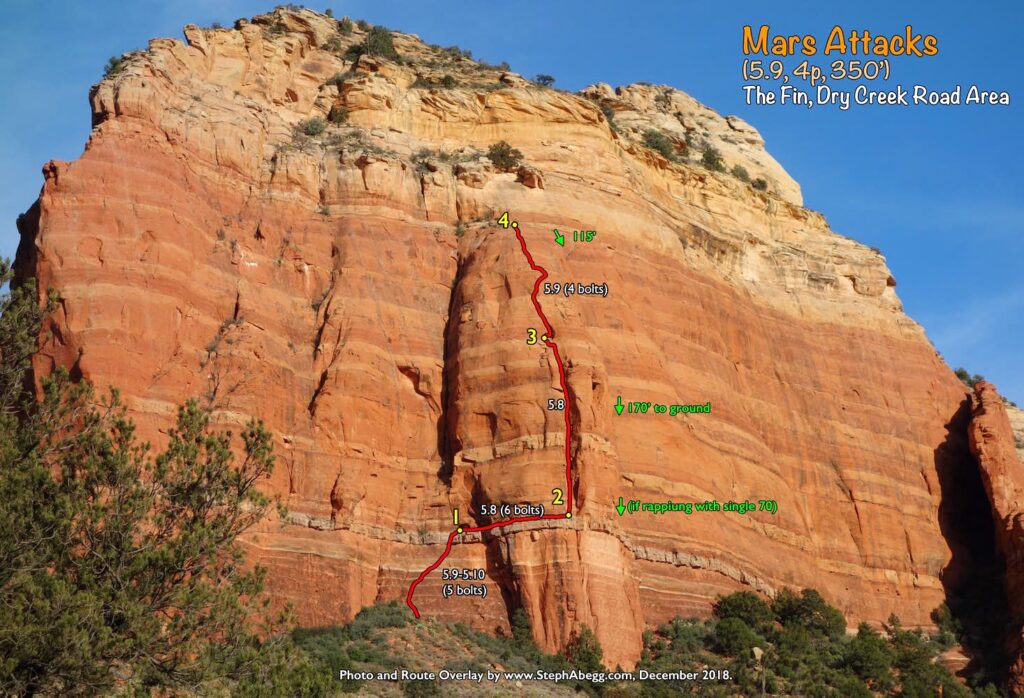
- Mars Attacks (5.9, 4p, 350')
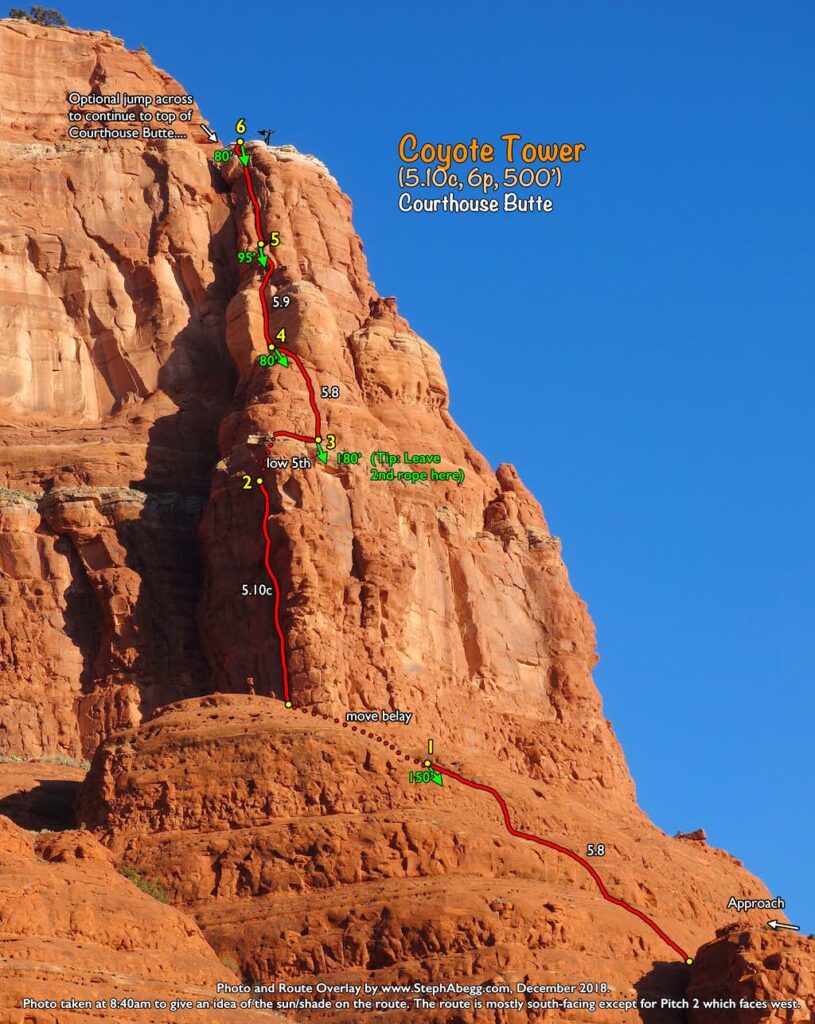
- Coyote Tower (5.10c, 6p, 500')
- Waterfall Wall Cragging

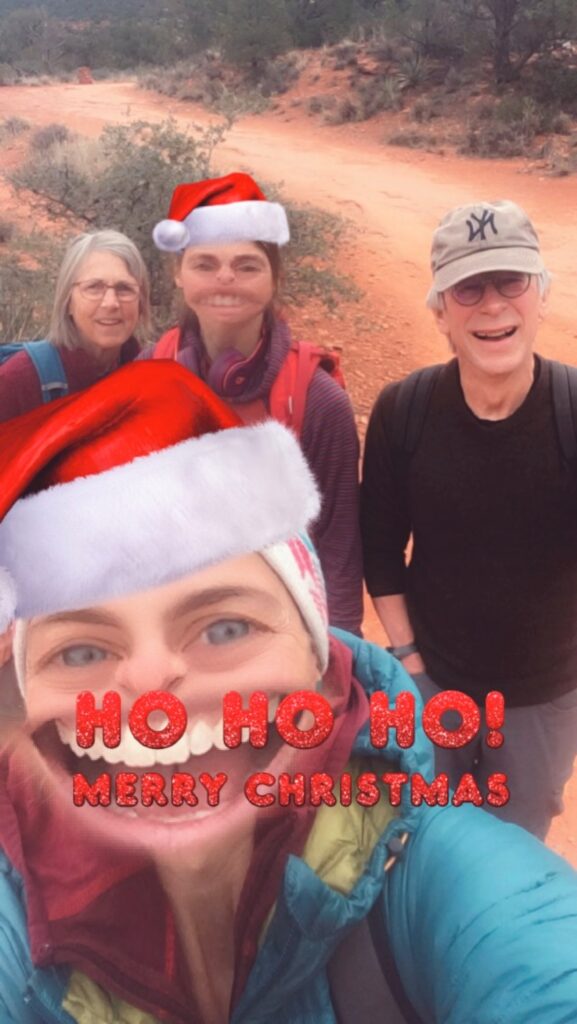
Another climbing family Christmas.

Region: Arizona
Elev: ~4,500 ft
Rock type: Sandstone (most of Sedona) and Basalt (Waterfall Wall)
Type: 
Date(s): December 23-28, 2018 (Sun-Fri)
Partner(s): Jenny Abegg, Marty Abegg, Sue Abegg

Related trip reports:

Route Overlays

CLICK TO ENLARGE

Intro

THIS TRIP REPORT IS STILL MOSTLY IN THE EMBEDDED HTML FORMAT OF MY OLD WEBSITE.

The previous Christmas, my parents, sister, I went to Joshua Tree. While my sister and I climbed together, our parents hiked and explored; we spent the evenings at a nice airbnb we had found, enjoying the rare chance to be together as a family. It was so much fun that we decided to plan a similar adventure for Christmas 2018. Wanting to check out somewhere new, we decided to go to Sedona. Neither Jenny nor I had climbed there before.

Climbers know Sedona for its beautiful orange sandstone spires and towers. While the rock is often soft, there are still numerous great climbs and adventures to be hand. Plus, Sedona is situated on the southern end of the Colorado Plateau, between Flagstaff and Phoenix in central Arizona, so it is a great place to go to find some warm and dry rock in the winter.

We spent six full days in Sedona. Three and a half out of these six days, Jenny and I climbed while our parents hiked. We climbed several of the area's classic moderate multipitch routes, which were all fun adventures. The other two and a half days were Christmas day (when we slept in and went on a short hike as a family), an afternoon being tourists in Sedona when it started to snow on us during our climb, and a day visiting the Grand Canyon (which my mom had never seen). For the first few days of our trip, temperatures were warm enough to climb in t-shirts, but by the end of the week temperatures had cooled enough to snow a bit. In the evenings, we hung out together at our airbnb. It was one of the best Christmas's yet. We are already making plans for next year's adventure!

(Update: The following year we just ended up hanging out at my parent's place in British Columbia for Christmas instead of doing a family climbing trip — this was largely due to the fact that I had moved to Boulder that summer and I hadn't been back to BC since then. But after I returned to Boulder, I drove down to Arizona and ended up climbing 7 routes in sunny Sedona for 4 days).

Climbs We Did

CLICK ON ROUTE TO DROP DOWN PHOTOS

A classic climb ascending the prominent sun/shade arete on Mount Gibralter. Lots of well-protected 5.9 climbing. Gear we used: Doubles to #3, one #4. Two ropes. Faces: Southwest.

Route Overlay

Pitch-by-Pitch Photos


Photos: Notes:

APPROACH

(Bell Rock Trail - Little Horse Trail - Llama Trail - climbers path, 70 min)
1.    
2.    
3.    
4.    
5.    


1. The approach starts at the Bell Rock Trailhead, and links up pieces of the Bell Rock Trail, Little Horse Trail, and the Llama Trail before cutting off towards the buttress on a climbers' path.
2. Approaching Mt. Gibralter.
3. Morning sun on Cathedral Rocks on the other side of the highway.
4. Morning sun creeping towards the town of Sedona.
5. Morning sun on Twin Buttes / Church area.

PITCH
1
(5.9, 140')
6.    
7.  
6. At the base of Pitch 1. Psyched to climb!
7. Fun corner crack climbing on Pitch 1.

PITCH
2
(5.7, 160')
8.  8. Pitch 2 is mostly bolted featured face.


PITCH
3
(5.9, 160')
9.  9. The airy start to Pitch 3.

PITCH
4
(5.9, 100')
10.  10. Pitch 4 ascends the steep featured face (up and right in the photo).


PITCH
5
(5.9, 100')
11.  11. Jenny starting off Pitch 5. This pitch was the most characteristic "desert climbing" style on the route.


TOP

12.    
13.    
14.  
12. Summit register and gnome at the top of Pitch 5.
13. Jenny signing the summit register on the ledge at the top of Pitch 5.
14. The view.

DESCENT

(Rap the route: 4 double-rope raps from rappel anchors)
15.    
16.   
15. The final rappel ends just right of Pitch 1 (on the left side of the photo, you can see a climber on Pitch 1).
16. Looking back at the route on the hike out. The route follows the shade/sun line.

OTHER PHOTOS


17.    
17. Mt. Gibralter as seen from Courthouse Butte area, on a Christmas Day hike with our parents. Sedona Scenic Cruise follows the skyliine.

One of the "Triple Crown" spires. The climbing has a burly old-school flavor, and the summit position is memorable and awesome. Gear we used: Doubles to #3, 1#4, 1#5. Two ropes (although I think you could rap with a single 70). Faces: Northeast.

Route Overlay

Pitch-by-Pitch Photos


Photos: Notes:

APPROACH

(21 min)
1.    


1. Slogging through a sea of tourists on the approach. 

PITCH
1
(5.7)
2.    
3.    
4.  
2. Jenny leading the chimney on Pitch 1. There's not much opportunity to place gear until the top of the chimney, but the climbing is not hard.
3. An apropos text message Jenny received from a friend as we were climbing the route.
4. Most belay spots on the route are equipped with beefy eye bolts.

PITCH
2
(5.9)
5.    
6.  
5. The start of Pitch 2.
6. A #5 is nice to have for this pitch.


PITCH
3
(5.8)
7.    
8.    
9.  
7. Jenny on the airy start of Pitch 3.
8. The second half of Pitch 3.
9. A photo of Jenny and me on Pitch 3, taken by my dad who was watching us climb from below.

PITCH
4
(5.9+)
10.    
11.    
12.    
13.   
10. Jenny starting up Pitch 4.
11. Another photo taken by my dad. Jenny is near the crux here. Great work Jenny!
12. Pitch 4. A burly pitch.
13. A scenic window at the start of this pitch.


PITCH
5
(5.8)
14.    
15.    
16.    
 
17.    
18.    
19.  
14. Looking across the gap.
15. Going for it!
16. Made it!
17. Photo taken by my dad.
18. Another photo by my dad.
19. To the top!


TOP

20.  20. Late afternoon light on Sedona.

DESCENT

(Rap to lower summit, then 2 double-rope rappels to saddle behind tower)
21.    
22.   
21. Rapping off the summit register on the summit.
22. Rappelling to the saddle behind the tower.

One of the "Triple Crown" spires, featuring a splitter crack on the second pitch and lots of fun climbing. Gear we used: Doubles to #3, 1#4. One 60m rope. Faces: South.

Route Overlay

Pitch-by-Pitch Photos


Photos: Notes:

APPROACH

(21 min)
1.    
2.    


1. Approaching Dr. Rubo's Wild Ride. 
2. We had stopped to pick up Santa Hats at the Dollar Store the day before. 

PITCH
1
(5.8+)
3.    
4.    
5.   
3. Looking up Pitch 1 from the base of the route.
4. Jenny following Pitch 1.
5. Cool limestone band at the top of Pitch 1.


PITCH
2
(5.9)
6.    6. Looking up Pitch 2. Probably the best pitch of the route.

PITCH
3
(5.7)
7.    
8.    
9. 
7. Jenny starting off the face traverse on Pitch 3.
8. Pounded pitons protect the first half of this pitch.
9. Pounded into the soft rock. I wouldn't want to fall on any of these pitons, but they give mental support on lead.

PITCH
4
(5.9)
10.   10. Jenny starting up Pitch 4. I had led the first two pitches (crack) and she led the last two pitches (face).

TOP

11.    
12.   
11. Summit Santas on Christmas Eve Day!
12. Summit Santas on Christmas Eve Day!

DESCENT

(Rap from anchors on N side to saddle: 2 raps with a single 60 or 1 double-rope rap)
13.    
14.    
15.  
13. The rappel anchor at the north end of the summit.
14. Rappelling into the notch.
15. Rappelling into the notch.

Pitch 1 climbs sandy slab (key footholds are slowly disappearing with traffic); Pitch 2 makes an exciting exposed horizontal traverse over a bolted juggy limestone band; Pitch 3 climbs a beautifully-featured hand crack; and Pitch 4 romps up the face to the top. Gear we used: Singles to #0.75, doubles #1 to #3, 1#4. Two ropes (a single 70 would also work). Faces: South.

Route Overlay

Pitch-by-Pitch Photos


Photos:Notes:

APPROACH

(50 min from parking lot before rough dirt road)
1.    
2.    
3.    


1. Approaching Mars Attacks on the dirt road FSR 152 to Devil's Bridge parking area. Our little rental car could not handle the rough road, so we walked. This added about 30 minutes to the approach.
2. Our first view of the route in the distance.
3. About 0.15 miles after the Devil's Bridge trail turnoff, cut right on a wash marked with a cairn. There is a good climbers' path to the base of the route.

PITCH
1
(5.9/5.10)
4.    
5.  
4. Jenny starting up Pitch 1.
5. The crux slab at the top of Pitch 1. It's kind of sandy so feels a bit insecure.


PITCH
2
(5.8)
6.    
7.    
8.  
6. The exciting horizontal traverse along the juggy limestone band.
7. Memorable.
8. Following the traverse. We decided that this pitch is just as hard to follow as to lead.

PITCH
3
(5.8)
9.    
10.  
9. Looking up Pitch 3. 
10. Beautiful features (alveolar weathering) on Pitch 3. This was probably my favorite pitch on the route.

PITCH
4
(5.9)
11.   11. Bolted slab near the top of Pitch 4. It's a long pitch, so use long runners on gear at the beginning of the pitch to minimize drag on the slab at the top of the pitch. 

TOP

12.    
13.    
14.    
12. Jenny at the top of the route. I took this photo from the first rap anchor, which is about 50 feet to the right of the top of Pitch 4.
13. View of the Dry Creek area from the top of the route.
14. A beautiful winter day.

DESCENT

(2 double-rope raps down the right side of the feature)
15.  15. Two double rope rappels will get you down to the ground, about 100 feet to the right of where you started. It was so warm and sunny on this wall, it was hard to believe it was Christmas Eve!

An exceptional route with lots of great pitches, sunny aspect, cool summit, and a sweeping view. Gear we used: Singles #0.1 to #0.4, doubles #0.5 to #3, one #4. Two ropes. Faces: South except for Pitch 3 which faces west.

Route Overlay

Pitch-by-Pitch Photos


Photos:Notes:

APPROACH

(~45 min)
1.    
2.    
3.    


1. Approaching Coyote Tower via the trail from Bell Rock Vista trailhead.
2. This photo was taken shortly after turning left off the main trail. You hike past the route until you get to the slick rock area and then head up a grassy ramp towards the base of the climb.
3. The climb starts on top of a buttress. This is the view out.

PITCH
1
(5.8)
4.    
5.    
6.    
7.    
8.    
9.    
4. Jenny starting up Pitch 1. The first piece of gear was about 50 feet up.
5. Higher up on Pitch 1.
6. Enjoying the warm sun at the belay.
7. A pocket near the start of Pitch 1.
8. Higher up on Pitch 1.
9. Steph following Pitch 1.


PITCH
2
(10c crux)
10.    
11.    
12.  
10. Jenny starting up Pitch 2. This is the crux pitch of the route. The climbing is quite good - better than it looks from below.
11. A cruxy section on the pitch. Maybe this is the 10c part. 
12. Fun splitter after the crux.

PITCH
3
(low 5th)
13.    
14.    
15.    
16.    
17.    
18.    
13. Pitch 3 climbs behind the tower and pops out up on top of the tower at the limestone band.
14. Pitch 3 ends by traversing right along the limestone band. You can see the belay bolts in the photo.
15. Tip: Leave your second rope here. You can rap the last three pitches with a single 60.
16. Jenny traversing to the anchors on Pitch 3.
17. Our parents hiked by as we were climbing this pitch. My dad took this photo from below.
18. Another photo Pitch 1 to base (~150')

Waterfall Wall is a broad columnar basalt amphitheater stacked with steep splitter cracks. It is considered by many to be world class in the single pitch trad game. Faces: South and West.

Routes we climbed: Flashflood (5.10-, 100'); Thick and Thin (5.11, 100'); Spite and Malice (5.10+, 115'), The Sword (5.10, 80')

Photos


Photos:Notes:

APPROACH

(Climbers' trail, 30-40 minutes)
1.    
2.    
3.    
4.    


1. Waterfall Wall from the road.
2. Waterfall Wall from the road.
3. Crossing the creek on the approach.
4. Headed up the wash on the approach.

CLIMB 1

Flashflood 
(5.10-, 100')
5.    
6.  
5. Starting up Flashflood.
6. Fun crack climbing.


CLIMB 2

Thick and Thin 
(5.11, 100')
7.   7. Toproping Thick and Thin just left of Flashflood.

CLIMB 3

Spite and Malice 
(5.10+, 115')
8.    
9.    
10.   
8. Looking up Spite and Malice. This is one of the best 5.10's at Waterfall Wall.
9. Awesome climbing on Spite and Malice.
10. Looking down Spite and Malice.

CLIMB 4

The Sword
(5.10, 80')
11.    
12.    
11. The Sword climbs through the splitter above.
12. It started to snow halfway through the lead....


OTHER PHOTOS FROM THE DAY

13.    
14.    
15.    
video.  VIDEO CLIP BELOW.
13. Christmas finally brought us some snow!
14. Wet rock. Time to go meet the parents and become tourists in Sedona.
15. Waterfall Wall, Right.
video. Current weather update video we sent to our parents before bailing and meeting up with them for the rest of the wintery afternoon. (Scroll below to access playable embedding of the video.)

Video:  Snowing in Sedona

The final day of the trip, I joined my parents on a daytrip to the South Rim of the Grand Canyon, which is about 2 hours north of Sedona. We hiked along the rim for the afternoon. It was cold (high of 23°F) but beautiful!

Photos

Photos: Notes:
1.    
2.    
3.    
4.    
5.    
6.    
7.    
8.    
9.    
10.    
11.    
12.    
1-5. Photos from our hike of the South Rim.
6-12. Mather Point, a popular viewpoint. I found a forlorn cute pink stuffed dog watching the sunset. Maybe the young girl in the red boots gave it a new home before it spent the night by its lonesome.

Comments Pertaining to this Page / Trip Report

Useful beta. Updated route information. Corrections. Historical notes. Interesting facts. No fluff please.
Leave a Reply

Your email address will not be published. Required fields are marked *