Les Cornes, Springbok Arete (/w direct start) (5.11a, 1600′, ~13p) (5.11a, 1600′, ~13p)
Les Cornes
Route:
Springbok Arete (/w direct start)
5.11a, 1600', ~13p
You have to work a bit for this one. But the climb is worth it.
Region: British Columbia
Elev: 2,000 m / 6,500 ft
Rock: Granite
Mode:
Date(s): August 18, 2016 (Thu)
Partner(s): DR
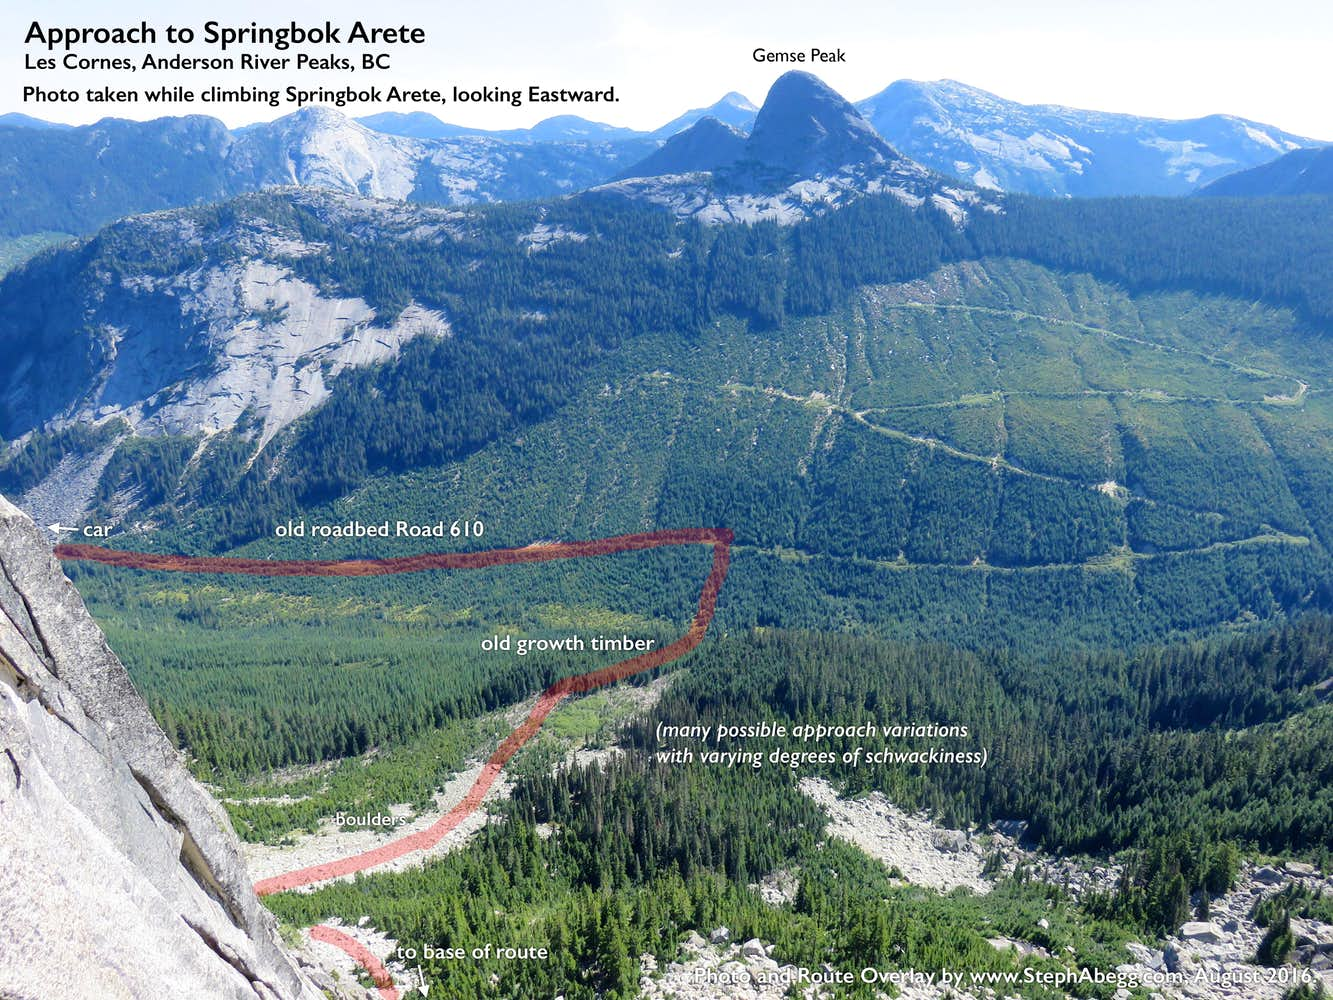
Route Overlay
CLICK TO ENLARGE
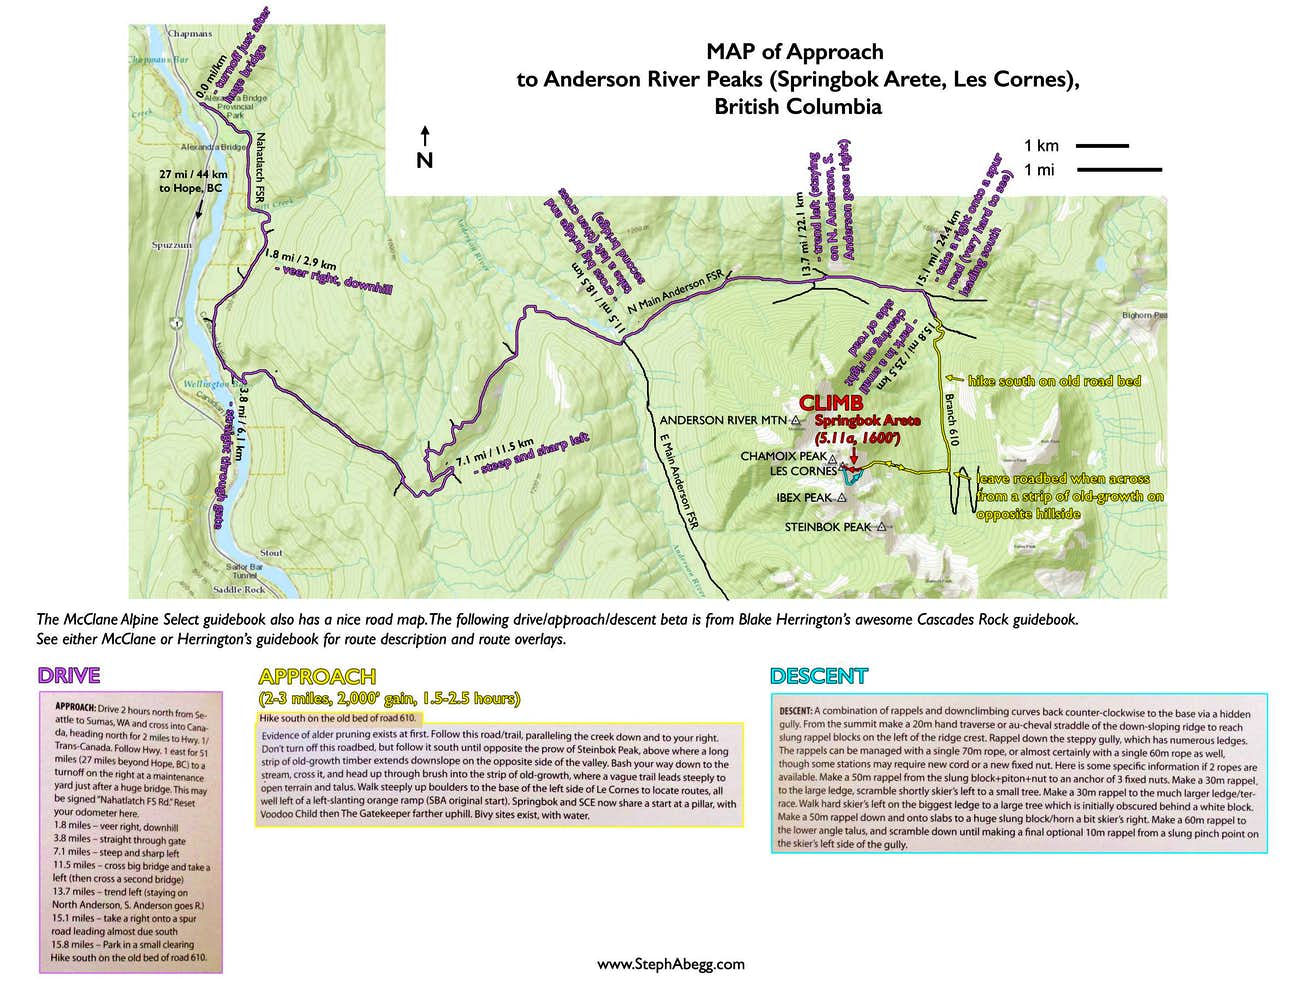
Map & Approach Beta
CLICK TO ENLARGE
Intro
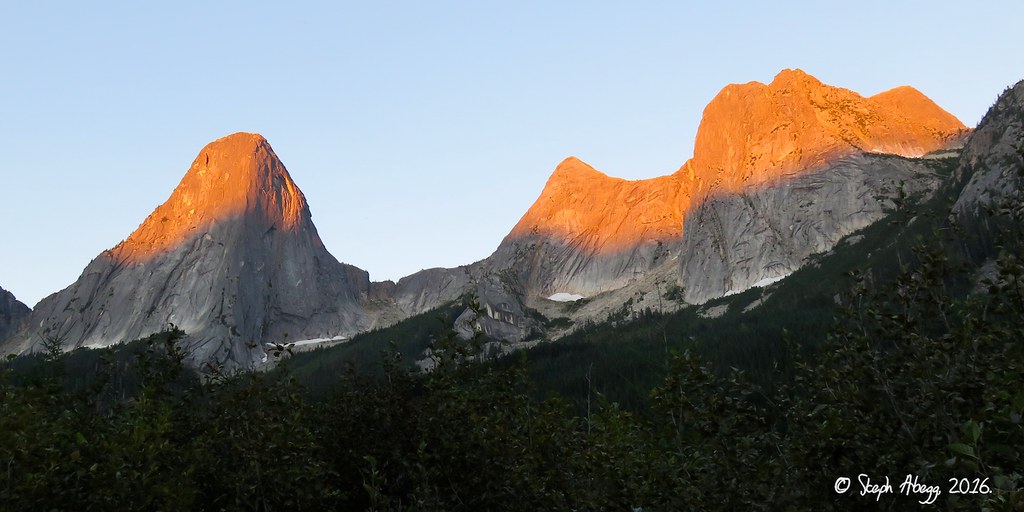
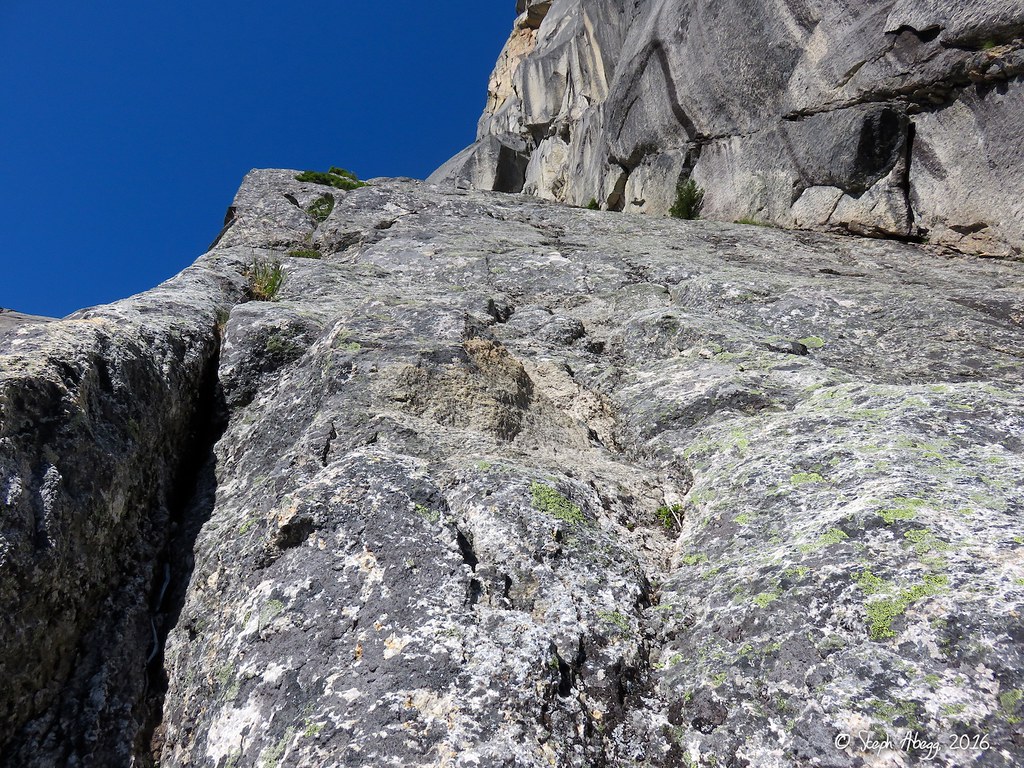
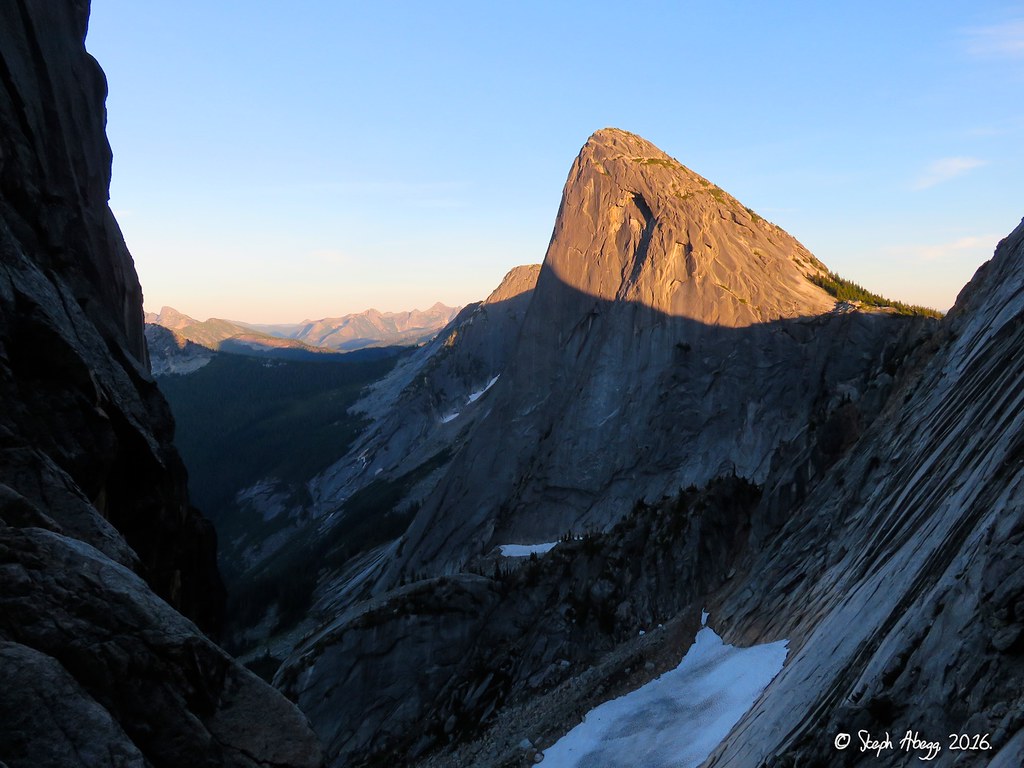
Soaring white granite peaks and walls of the Anderson River Valley rise out of the low-elevation woods east of Hope, British Columbia. The most popular and oldest route in the area is Springbok Arête, on the striking south prow of Les Cornes, a long east-facing wall of pinnacles (Les Cornes, i.e. "pinnacles") between Ibex Peak and Chamois Peak. Springbok Arête is a demanding route, being over 1600' tall and involving several pitches of 5.10 climbing. The rock is generally superb, especially with the direct start which avoids the traditional first three pitches up a chossy ramp by climbing steep solid rock to the left of the ramp. (This direct start came into being in 2006, as it shares the first three pitches of Sprung Cock Erect, FA 2006.) As the route climbs upward, it heads towards and finishes on the spectacular exposed crest of the arete.
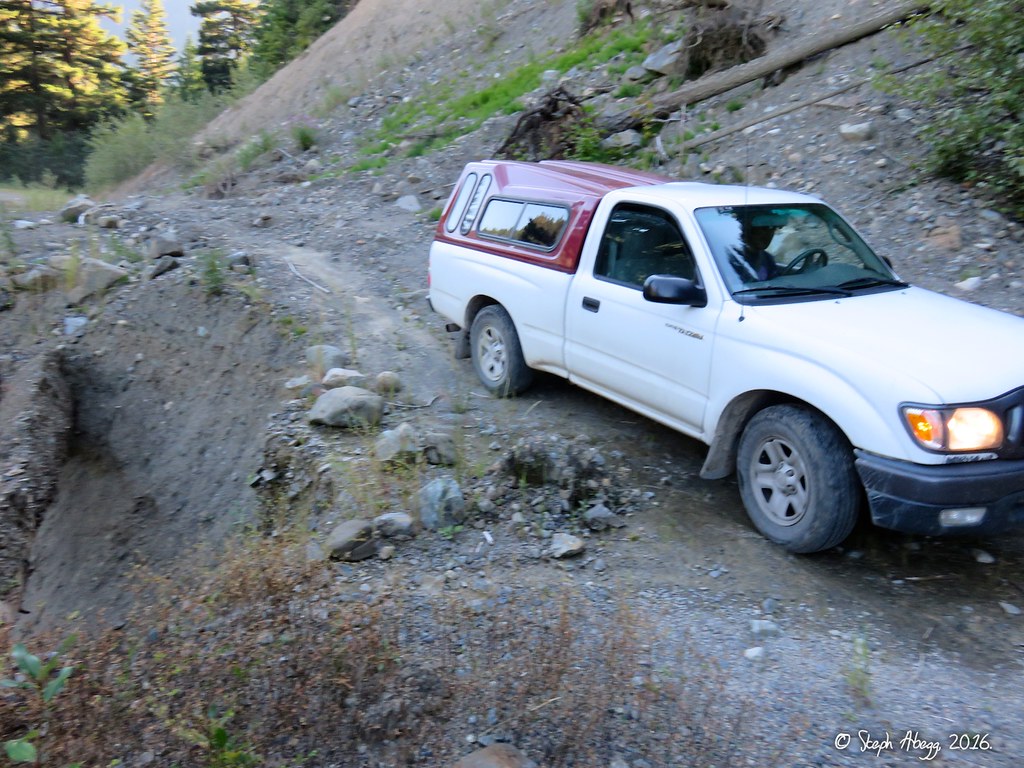
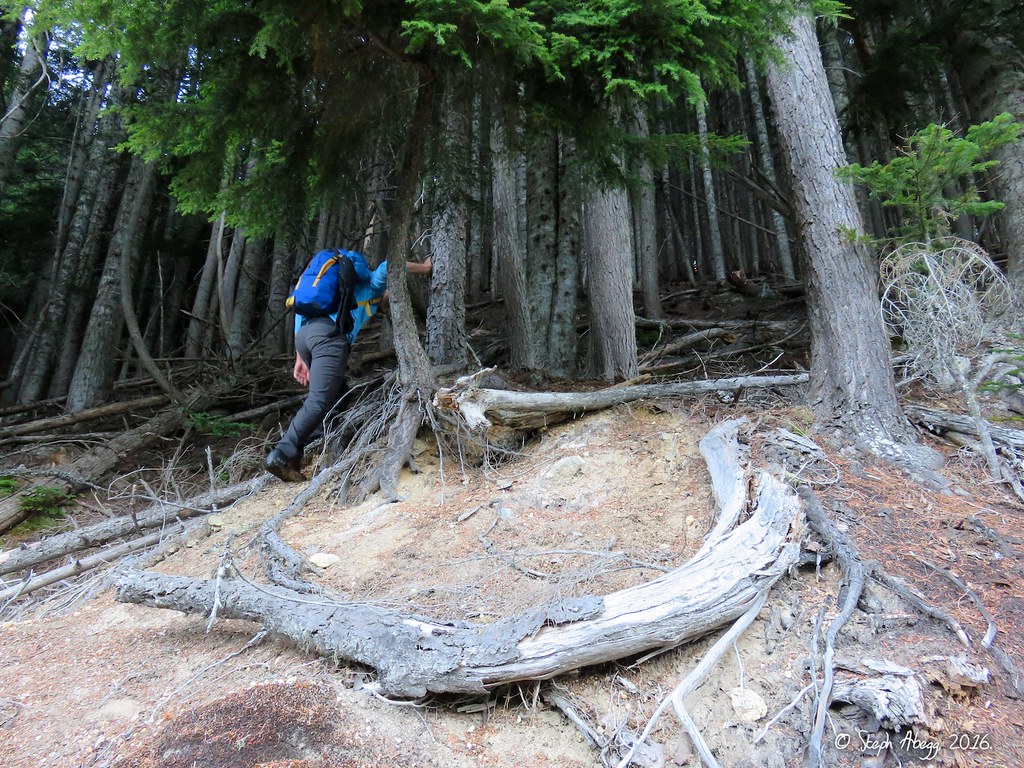
Despite the quality climbing and awesome climbing, Springbok Arête is not climbed often. (In fact, we saw no tire treads on the road, suggesting no one had been up there for awhile, perhaps the entire summer.) The involved approach turns many climbers away. This entails a 15.8 mile (25.5 km) logging road and then a brushy and burly hike up old road bed and then timbered hillside andcboulderfields. See my approach map (below) for detail.
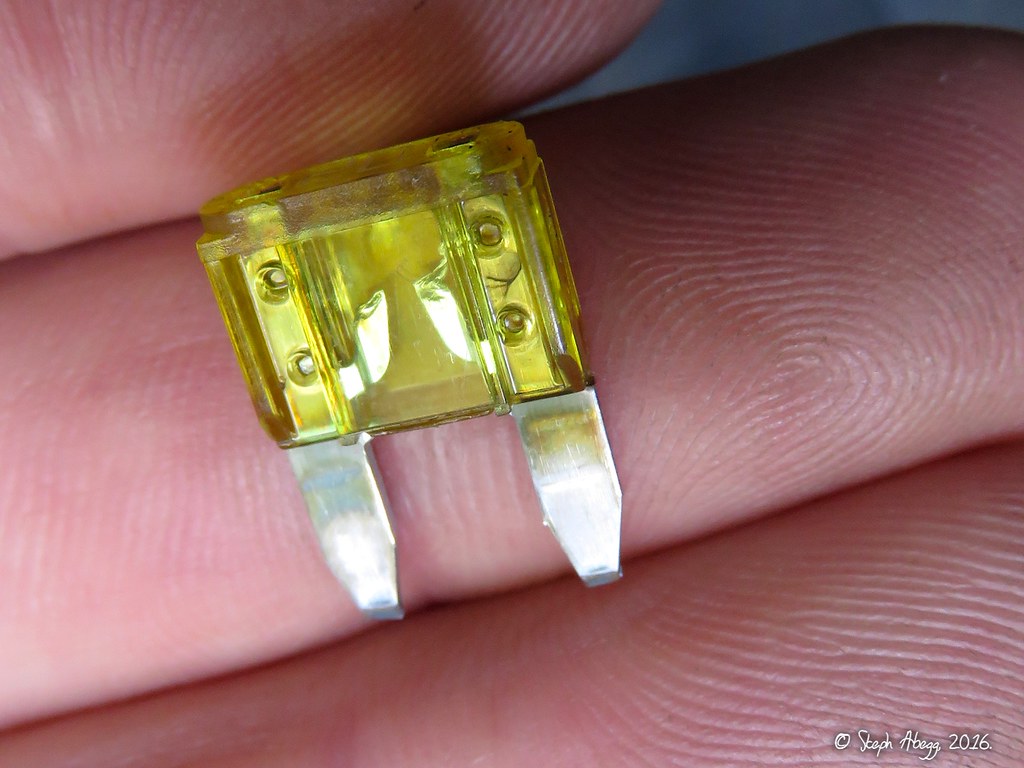
We initially set off for this adventure as a team of three: Wes Dyck, DR, and me. Uncertain about the condition of the logging road, we opted for Wes's 4WD Explorer. For the most part, the road was in excellent condition, apart from 4 or 5 short rough sections due to washouts or slides, which the Explorer overcame easily (it was the high clearance, rather than the 4WD, that we found essential). But then a quarter mile from the trailhead, we came to a sudden halt. There was an alder lying across the road. Okay, no problem, we have a machete. But then the Explorer oddly sputtered and died. Fearing our climbing plans were in jeopardy, us three non-mechanics jumped into action, spending the next couple of hours frantically trying to figure out what had gone wrong (gas leak, oil leak, fuses, ...). At midnight, we decided to get a few hours of sleep and then re-assess the situation in the morning, with the irrational hope that the car would heal itself overnight. In the morning, the car still would not start (no surprise). We had accepted by now that we would not be climbing. We started preparing for a 15 mile hike out; once we got to Highway 1, we would try to hitch a ride to Hope and find a tow truck to come in and get Wes's car. Just before we left, Wes had gone off for a few minutes; I popped the hood again just for something to do, and spotted a box of fuses we had not yet checked...lo and behold there was a blown fuse (we hypothesized this occurred when Wes removed the machete from his back trunk, briefly compressing some wires in an electrical box). Not long after, we were driving back to Abbotsford to drop Wes off (unfortunately, he had to work the next day), pick up DR's truck, and drive back out that evening, now motivated more than ever to climb Springbok Arête.
The following page contains photos, details, and a couple of route overlays for our climb.
DR and I thoroughly enjoyed this adventure—the athletic nature of a 16 hour car-to-car push, the stellar alpine climbing, the novelty of a new area, and working together as an efficient team. We swung leads for the first half of the climb, and then block led for the second half of the climb to take advantage of our climbing strengths (DR led the two somewhat-wide Pitches 7 and 8 which go up the flaring offwidth and then up the memorable 10+ 4-inch crack through the steep orange rock, while I led the two pitches after that involving a wild 5.8 traverse left around the arete followed by the 11a fingery crux pitch). Overall, we thought the climb had some superb climbing for alpine rock (there were some rotten sections on Pitches 4-7 in particular, but these sections were short and were trumped by the splitter cracks and solid rock that dominated the route). We found the route to be very protectable the entire way, and all of the cruxes were protectable too. Overall, an awesome full-value day of climbing.
Also, here are some of our time stats from the drive, hike in, climb, and descent. The logging road and hiking took more time than the actual climb. You have to work a bit to get to this climb, but it is worth it.
Time Stats
US-Canada Border to logging road turnoff: 1 hour 15 min Logging road turnoff to parking area at start of old Road 610: 1 hour 30 min Car to base of route: 2 hours 38 min The climb, base to summit: 9 hours 12 min Summit to first rap station (au-cheval section): 25 min First rap station to base of route: 2 hours, 17 min Base of route to car: 2 hours 39 min Total descent summit to car, including break to pick up gear at base or route and repack: 5 hours 54 min Total car to car, including breaks: 18 hours 7 min
Pitch-by-Pitch Photos
THIS TRIP REPORT IS STILL MOSTLY IN THE EMBEDDED HTML FORMAT OF MY OLD WEBSITE. MOBILE Tip: Try Landscape mode. It is generally more mobile friendly.
Photos:
Photo descriptions:
Approach
Map:
(click to enlarge)
Photo Overlay:
(click to enlarge)
1.
2.
3.
4.
5.
6.
7.
8.
9.
10.
11.
12.
13.
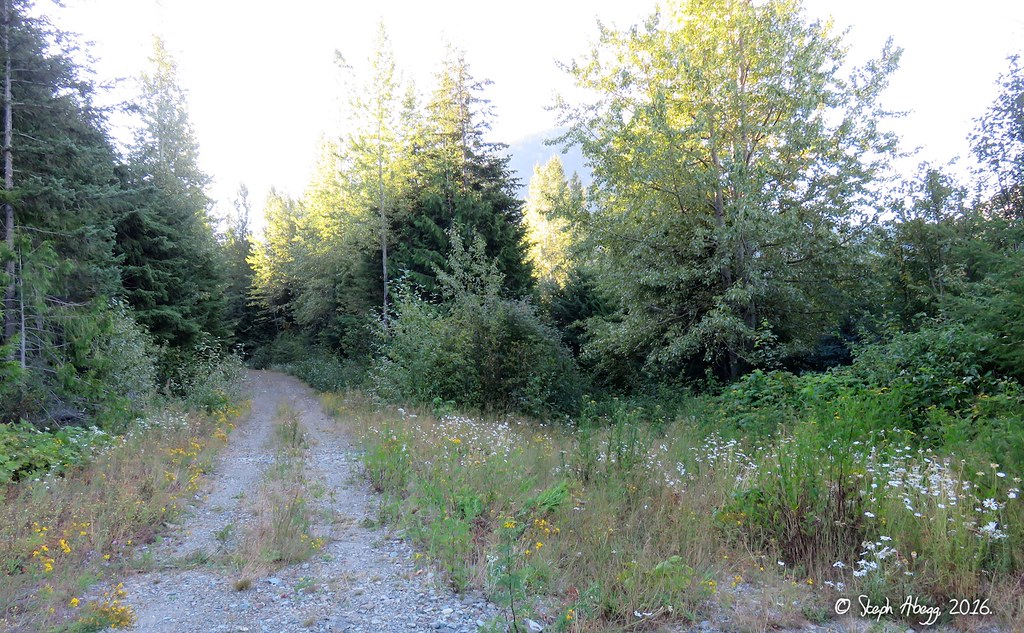
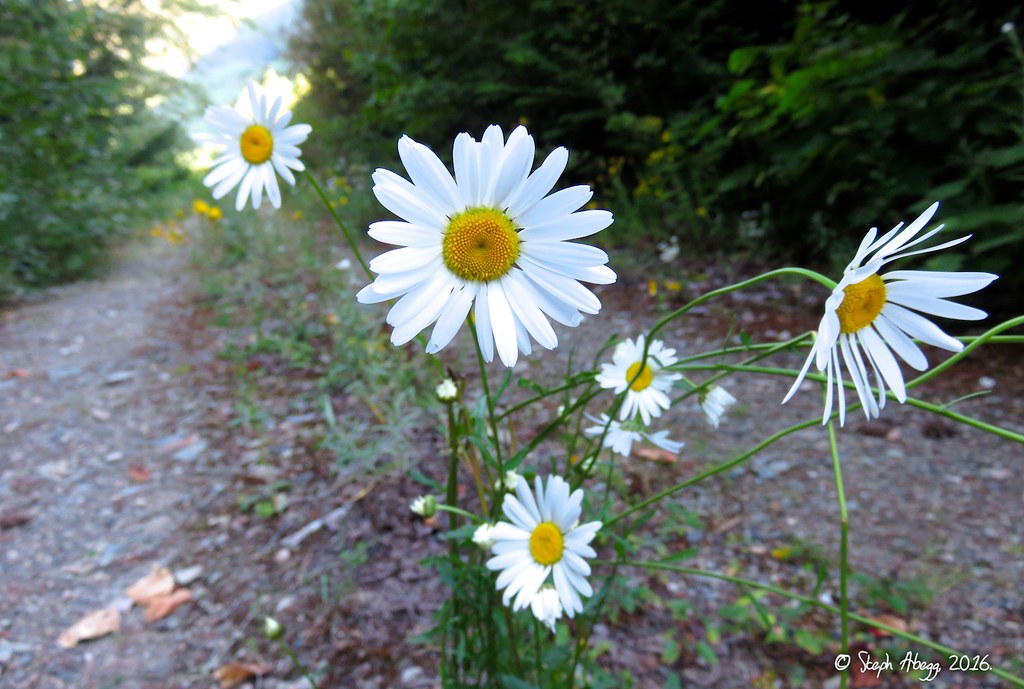
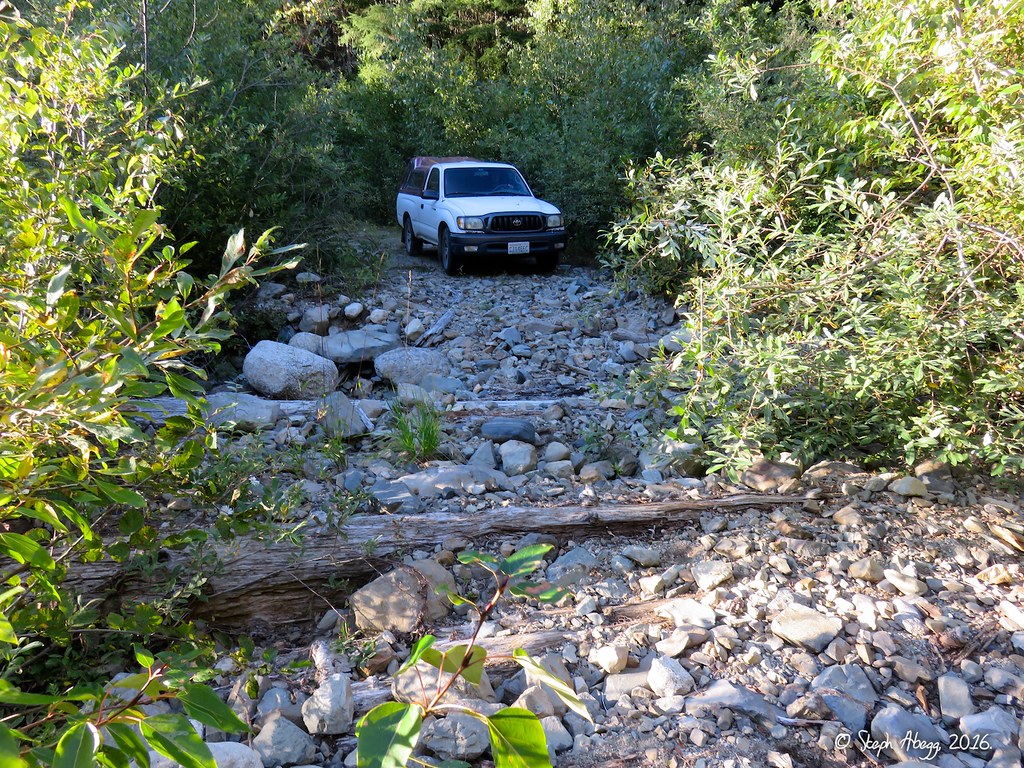
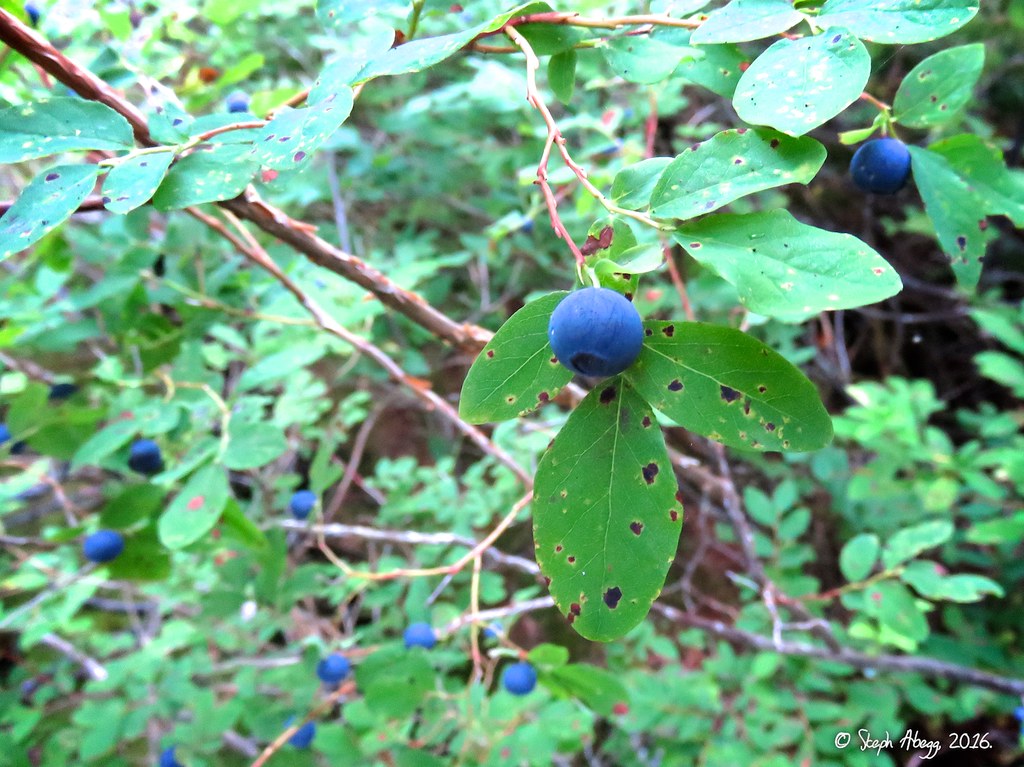
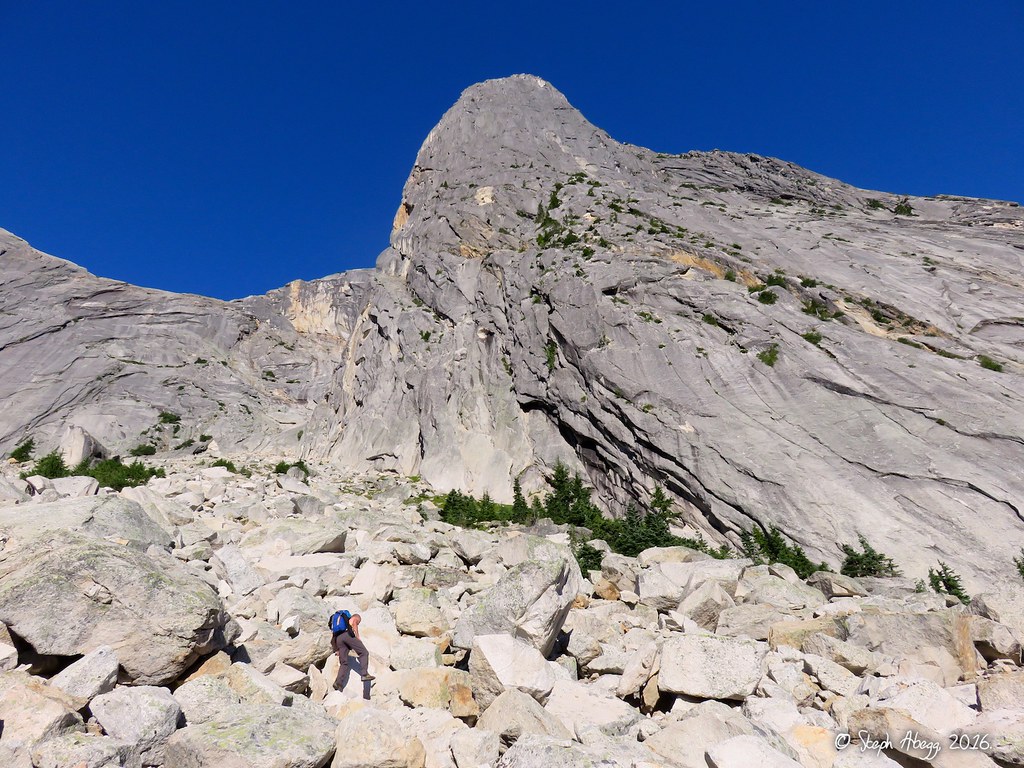
1. Coming from the south on Highway 1, the turnoff for the logging road is shortly after crossing the Alexandra Bridge, just before an old maintenance yard (green roof in photo). The logging road is very well graded for the first 12 miles or so and after that is quite drivable except for 4-5 short rough sections where a high clearance vehicle is nice to have (high clearance more important than 4wd). 2. No, it's not a yellow tooth. This is the blown fuse which happened when pulling a machete out of the back compartment of Wes's explorer. This caused us to have to delay the climb by a day. 3. At 15.1 miles (24.4 km), turn right onto a spur road and drive 0.7 miles (1.1km) to the trailhead. This spur road is easy to miss since it is blocked by tall grass. It is on the right in the photo. Going left will begin to take you too far (you will know because you will see you are passing the valley leading to the Anderson River Peaks). Just past the tall grass, the road clears out again and is easily drivable. 4. A pretty daisy on the road. Not much traffic to compete with. We saw no tire treads on the road besides ours. 5. This section of road, somewhere about 12-14 miles in, is rough but passable. The main concern is the eroding hillside; a big spring storm could very well washout this section and make the road impassible. 6. The roughest section of road we encountered is shown in the photo. This was about one sixth of a mile from the trailhead so it is probably worth just parking here and walking the rest of the way unless you are confident of your clearance. 7. The hike begins on the old road bed of Road 610, which starts off the clearing shown in the photo. This clearing makes for a good camp the night before the climb, if you can get past the last rough section of road. In order: Steinbok Peak, Ibex Peak, Les Cornes, and Chamois Peak seen in distance. 8. The approach starts out in a cool and relatively friendly brush tunnel over the old bed of Road 610. 9. But within half a mile the brush tunnel becomes more schwacky and gets worse as you go. 10. Lots of blueberries in the valley on the approach. 11. Springbok, Ibex, Les Cornes, and Chamois in morning sun. 12. Entering the old growth timber on the slope below Les Cornes. The going is fairly easy in the old growth, so the trick is to get to it and stay in it as long as possible. Once it gets brushy again, get to an open boulder field tongue which leads up to the base of the climb. 13. On the boulder field leading up to the base of the climb. Almost there! 3 hours from the car.
Pitch
1
5.10b, 30m (direct start)
14.
15.
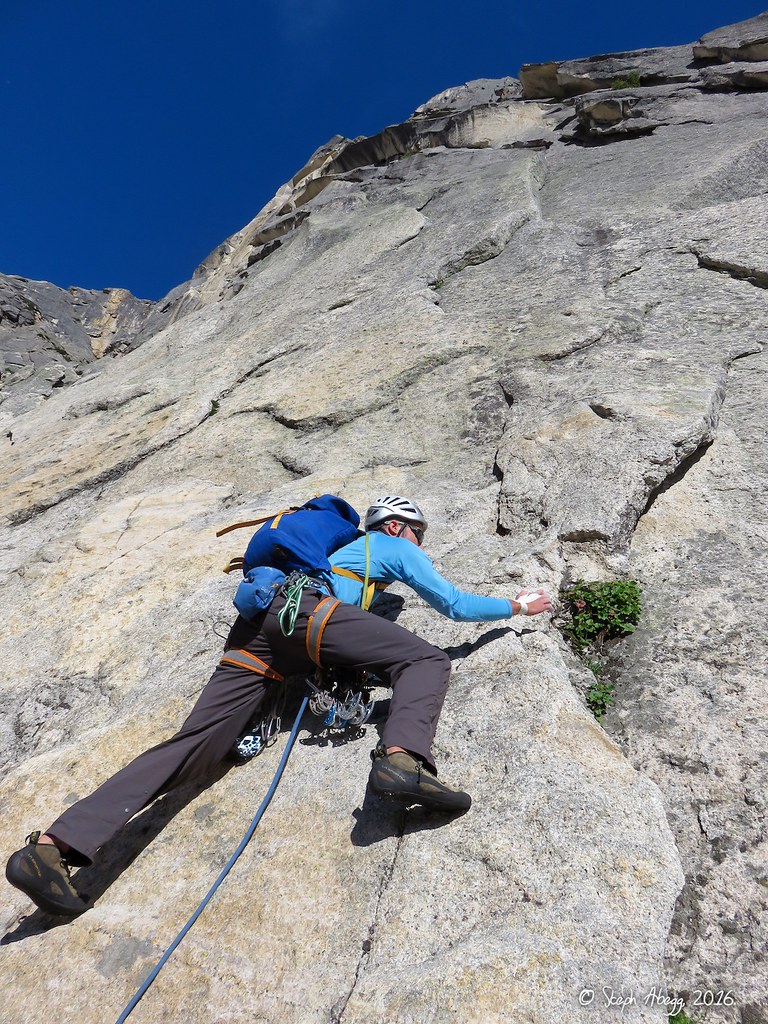
14. DR leading off Pitch 1 of the direct start. The 10b crux is a tricky face move (protected by a bolt), then the pitch went up a nice finger crack in a corner. 15. The finger crack in a the corner that makes up the second half of the pitch. Awesome climbing.
Pitch
2
5.10b, 30m (direct start)
16.
16. Looking down from the belay atop the jutting flake at the top of Pitch 2 of the direct start. Like Pitch 1, the 10b crux came at a face move (protected by a bolt), and the rest of the pitch was a bit more like 5.9-10a climbing up cool flakes and jugs and cracks.
Pitch
3
5.10c, 30m (direct start)
17.
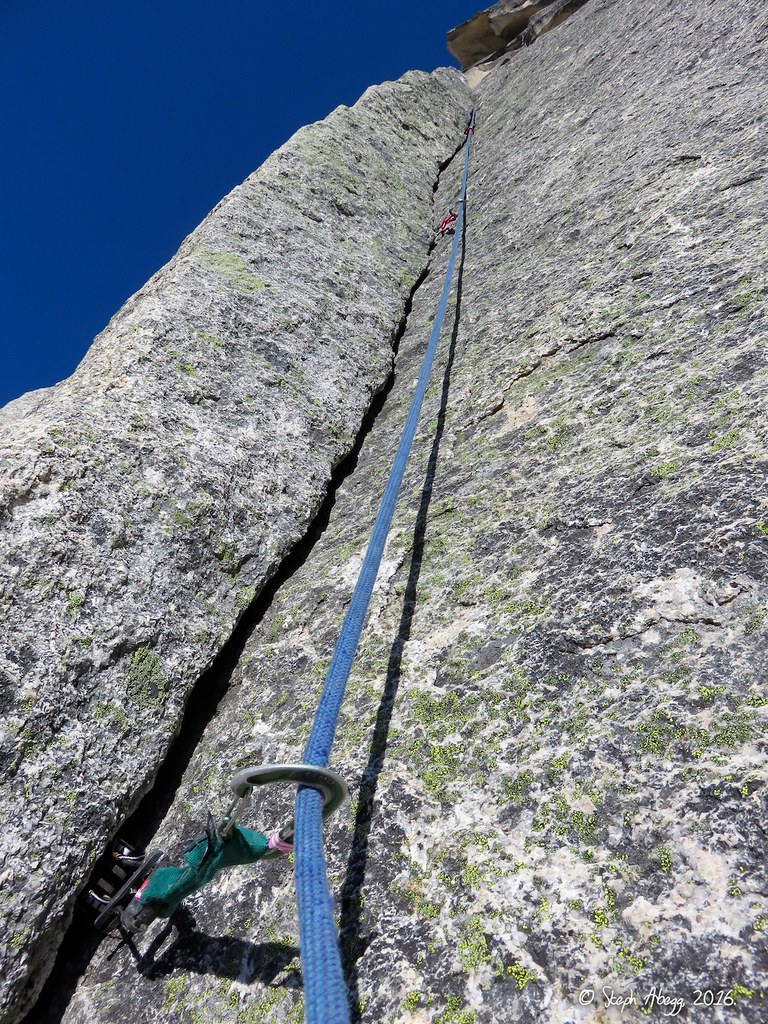
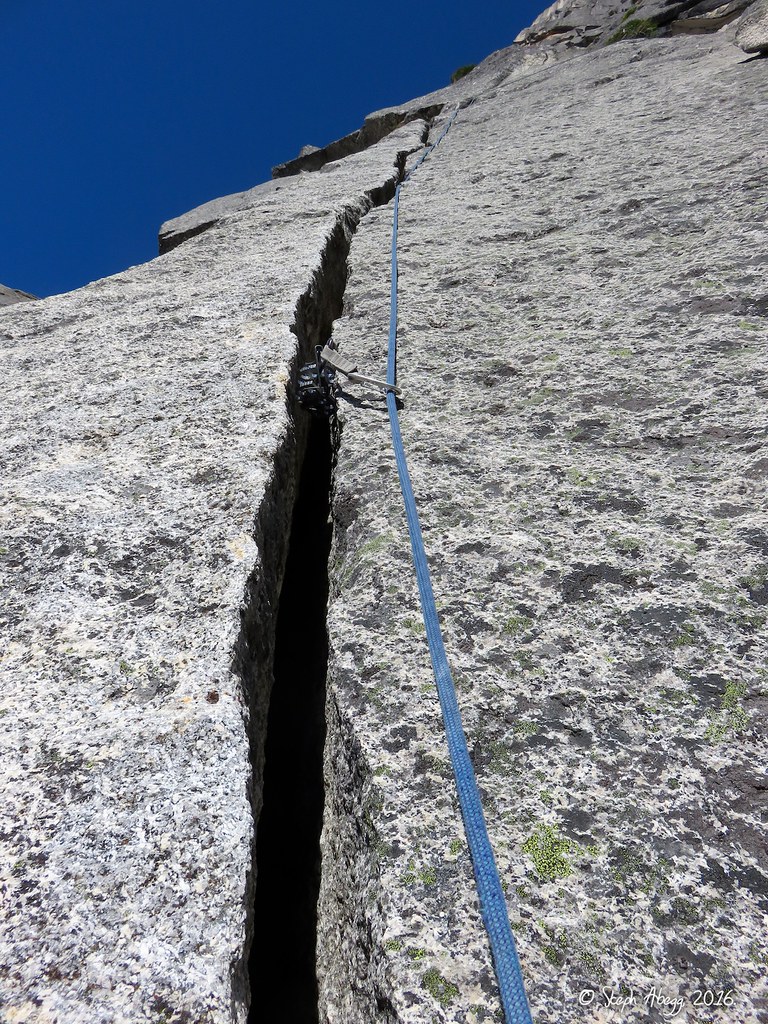
18.
17. DR leading off Pitch 3 of the direct start. We found the hardest parts of the pitch to be getting into the wide crack (just above DR's head) and the face moves at the end getting from the wide crack to a ledge off right. But both crux sections are well-protected, the first by a #3 or #4 cam and the second by 2 bolts. We were happy to find that all the cruxes on the route could be protected. 18. Looking up the splitter fist crack. It is nice to have 2 #3's and 2 #4's for this crack and to spread them out wisely. DR was able to get good fist jams, but for me it was a bit wide for fists; but the rough rock along the sides and the non-vertical angle enables you to put a lot of your weight on your feet, easing the difficulty. We felt the crack was the easiest part of the pitch and that (as mentioned above) the actual 10c cruxes are getting into and exiting the crack.
Pitch
4
5.6, 60m
19.
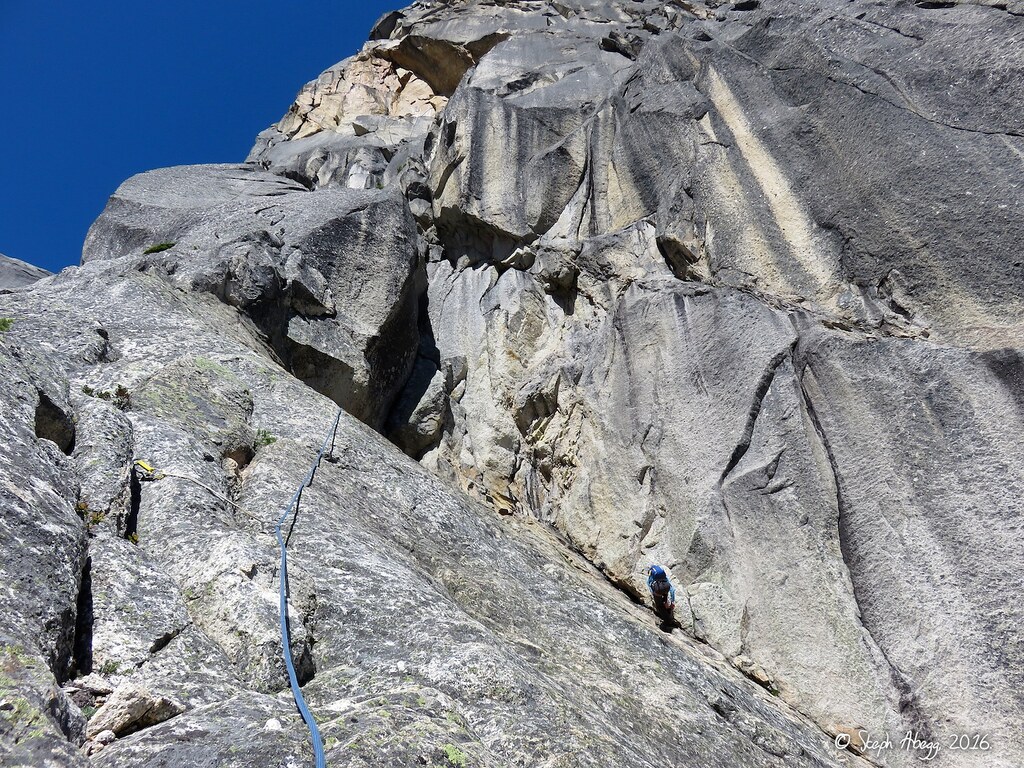
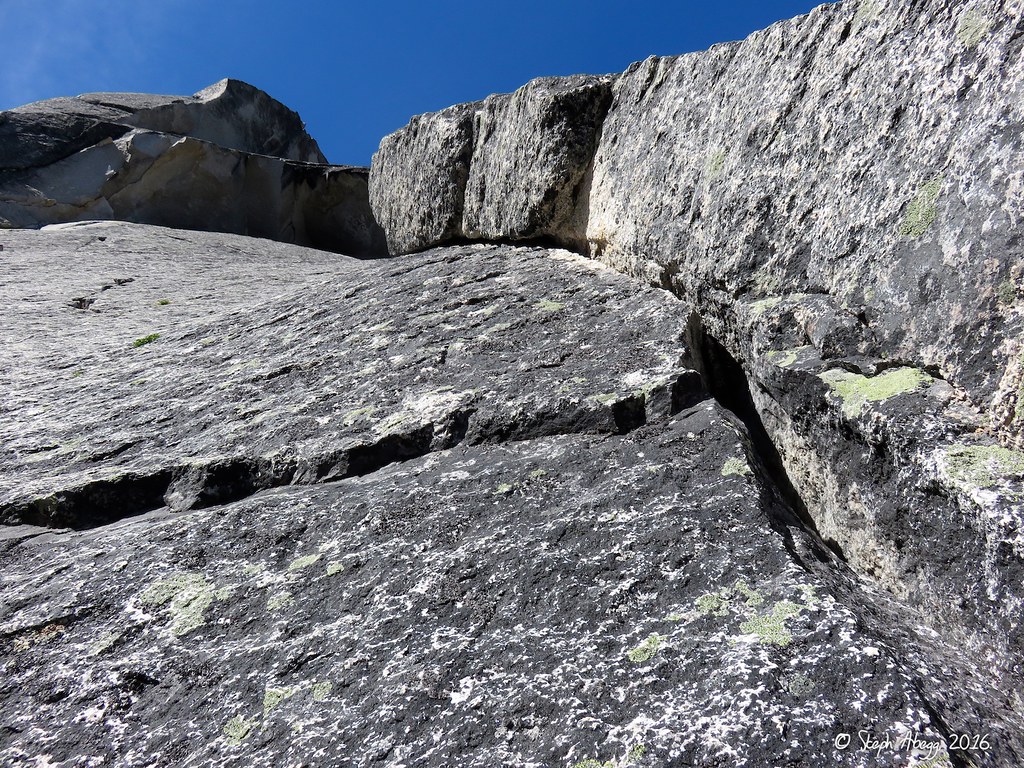
19. Looking up the ramp that comprises Pitches 4-5. (This is also the ramp system that Pitches 1-3 of the original route take and meet up here). This is easy climbing and the rock is not as great of quality as the other pitches on the route. We climbed the somewhat vegetated crack system on the left, since that provided the most opportunities for protection.
Pitch
5
5.6, 50m
20.
20. DR at the belay at the top of Pitch 5. The belay is in the corner with the slung pillar. There are probably several ways to get to the corner, but we went high across the slab and then downclimbed a bit.
Pitch
6
5.10a, 30m
21.
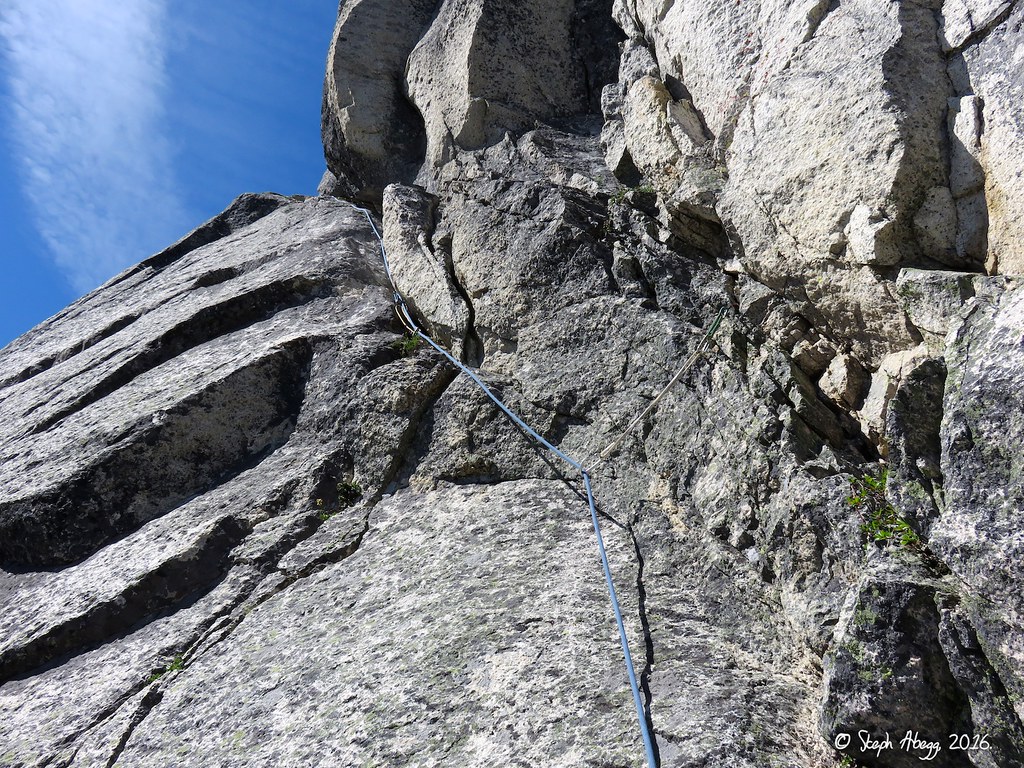
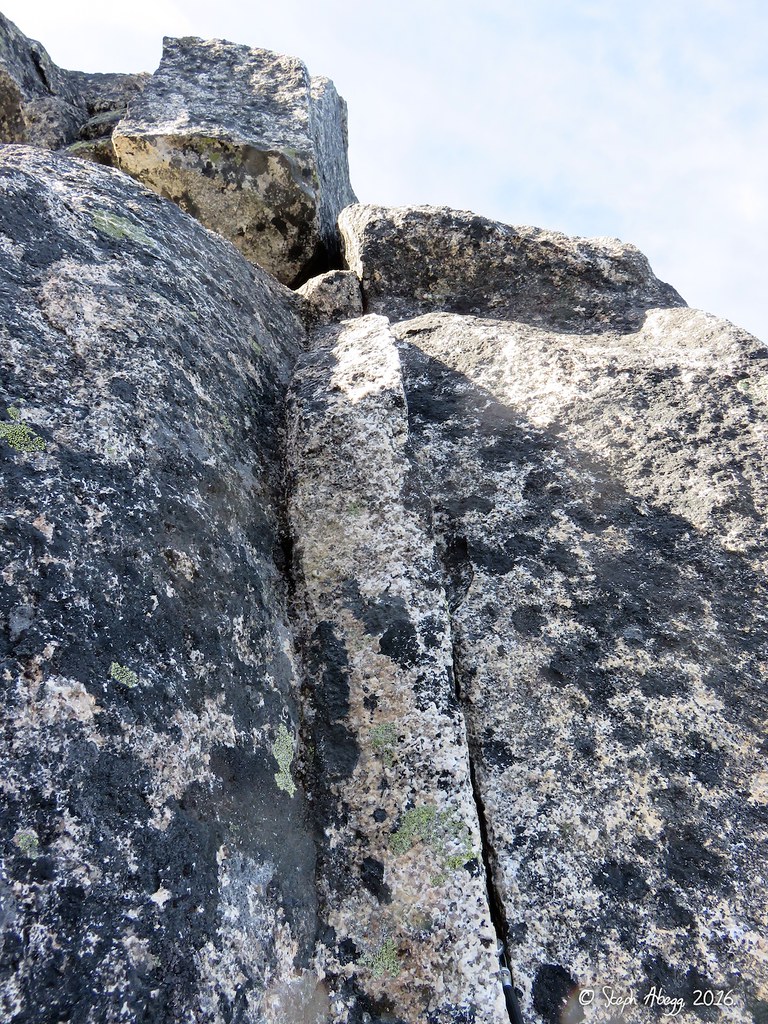
21. Looking up from the belay at the slung pillar at Pitch 6, which goes up the corner above. The climbing is good, but unfortunately the corner is a bit dirty which makes the climbing a little less good.
Pitch
7
5.9, 20m
22.
22. Pitch 7 continues up the corner through a short flaring offwidth. It is a short pitch and the crux is short as well.
Pitch
8
5.10+, 40m
23.
24.
25.
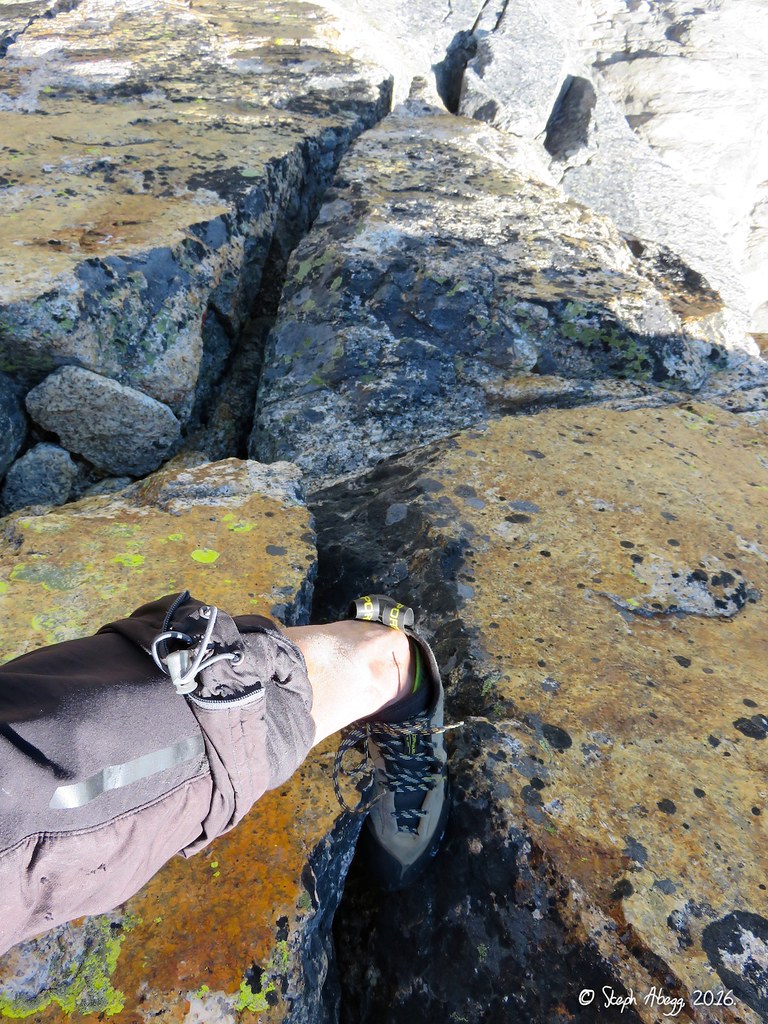
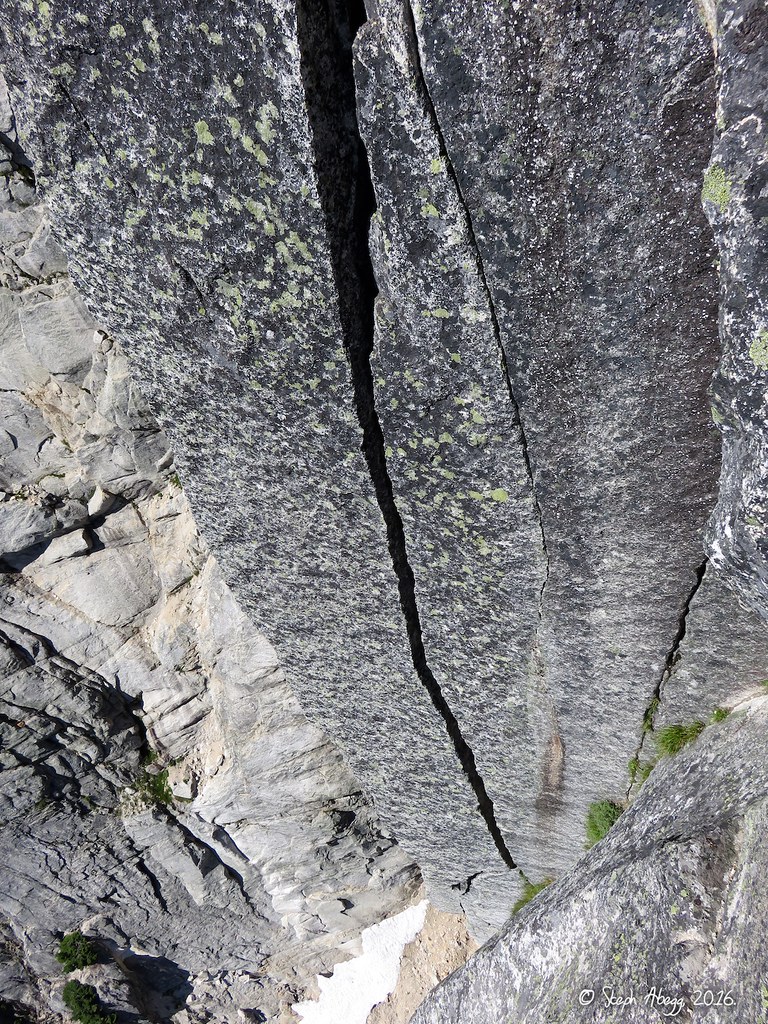
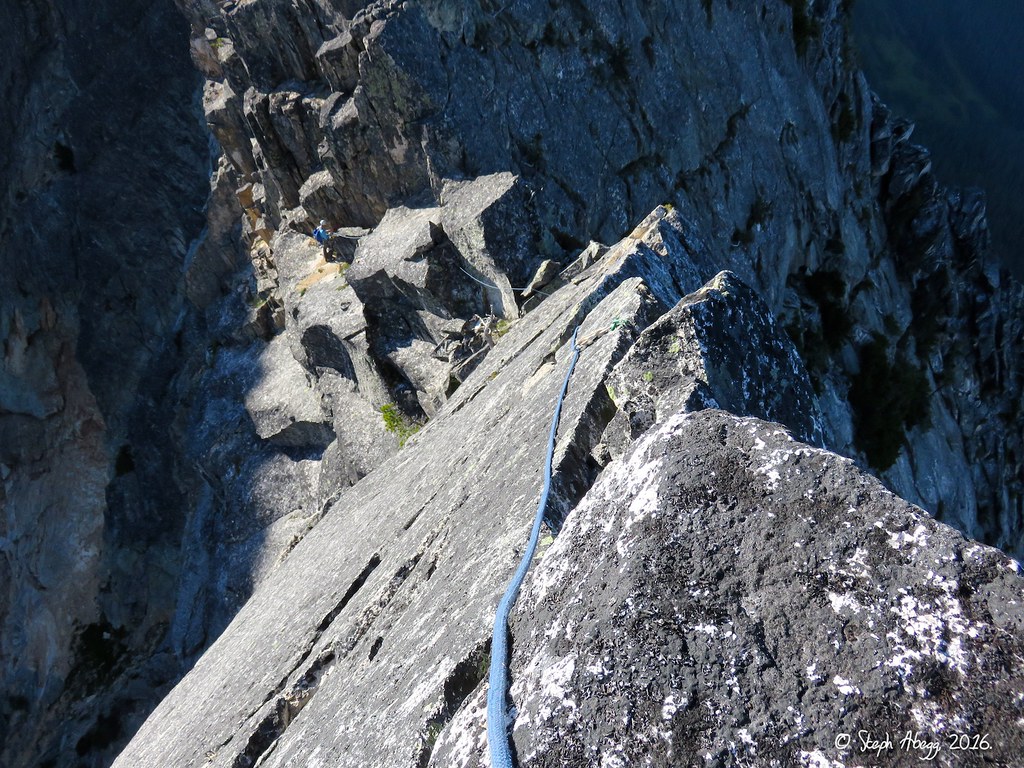
23. Looking up Pitch 8, which ascends the steep cracks in the foreground and then goes up the steep orange wall above. This is probably the most strenuous pitch on the route. DR led this pitch while I took the 11a pitch, and in my opinion this pitch is a harder lead than the 11a pitch (nice work DR!). Use your large cams wisely as they are nice to have for both the lower crack and the orange headwall. 24. Looking down while climbing the upper orange headwall. The rock is very juggy and steep, making for some wild exposed climbing. 25. Looking down a crack on the left below the belay at the base of Pitch 8. This crack is the finish of Pitch 3 of a route called Voodoo Child, which meets up with Springbok Arête here, shares Pitch 8, and then splits off again onto harder terrain.
Pitch
9
5.8, 10m
26.
26. DR following the traverse on Pitch 9. Steinbok Peak in distance. This is a really cool pitch, which looks improbable, but turns out to be 5.8 on juggy flakes.
Pitch
10
5.11a, 40m
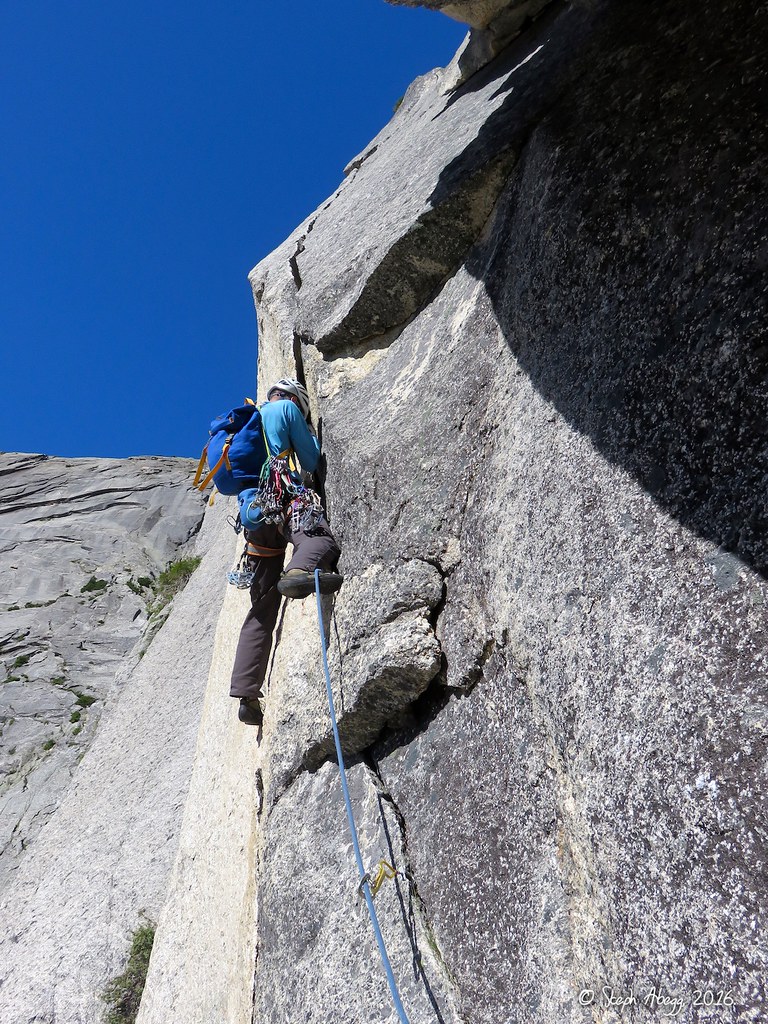
27.
28.
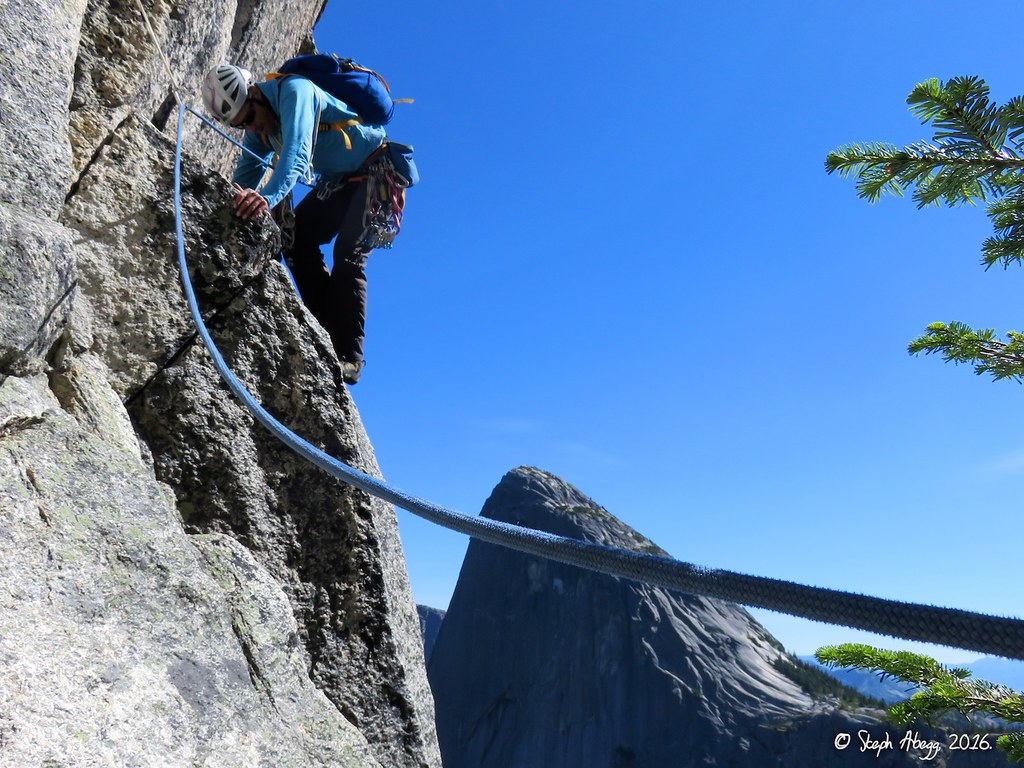
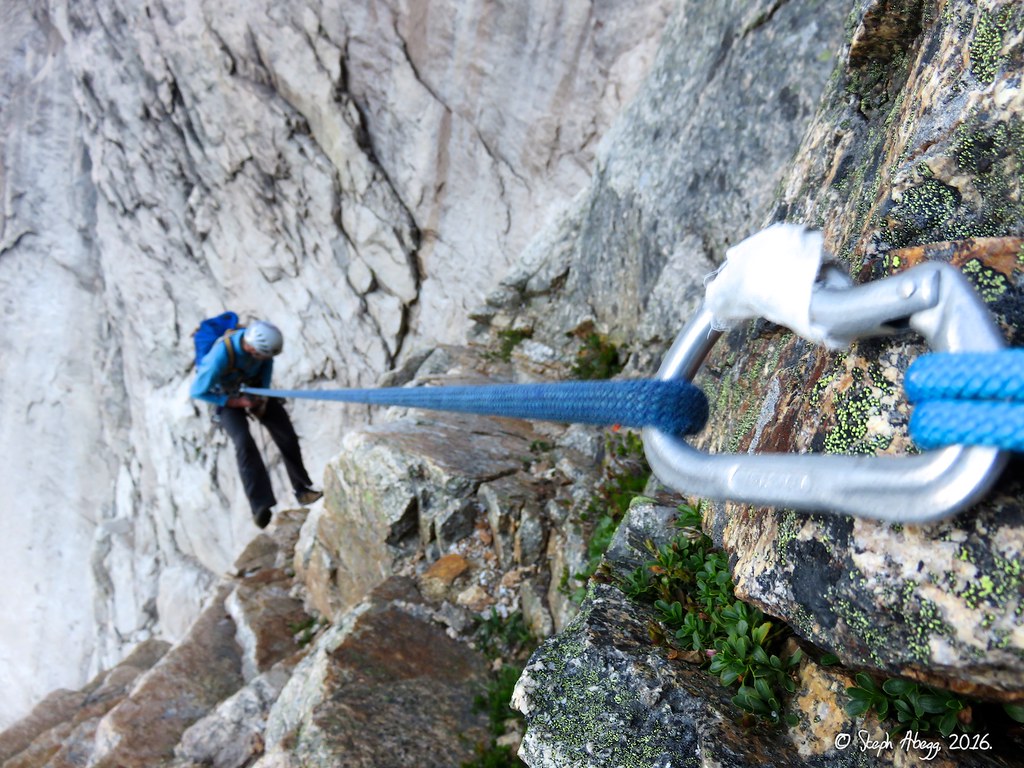
27. Looking up the corner. The 11a crux comes pretty early on but can be protected with small cams (black, blue, green, yellow aliens all fit near the crux). 28. DR following the upper part of Pitch 10, up a sweeping layback corner. This pitch was mostly 5.10- climbing on good rock. One of my favorite pitches on the route.
Pitch
11
5.9, 40m
29.
30.
29. The 5.9 layback corner. More excellent climbing. 30. The 5.9 finger crack up a slab. And more.
Pitch
12
5.9, 60m
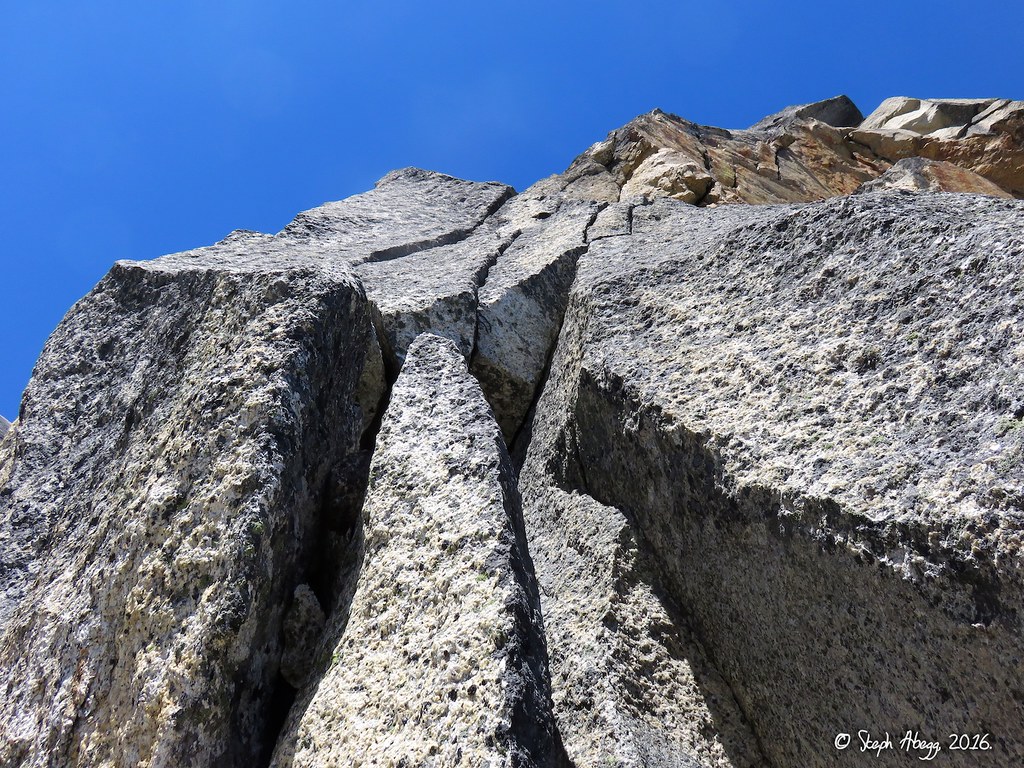
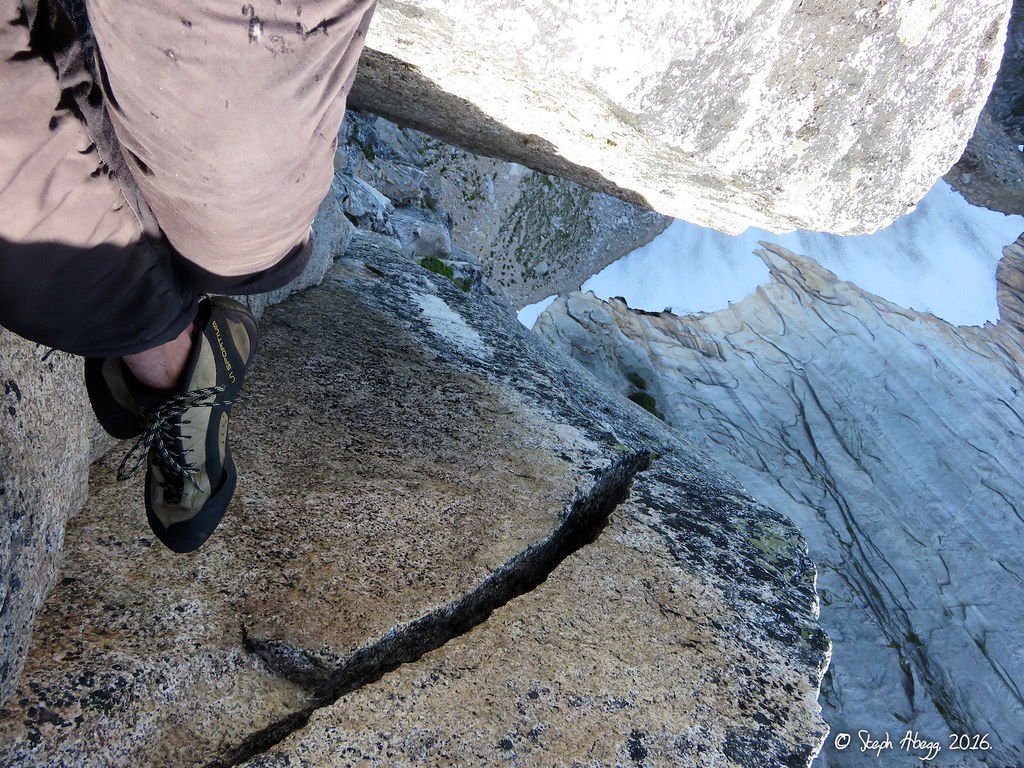
31.
32.
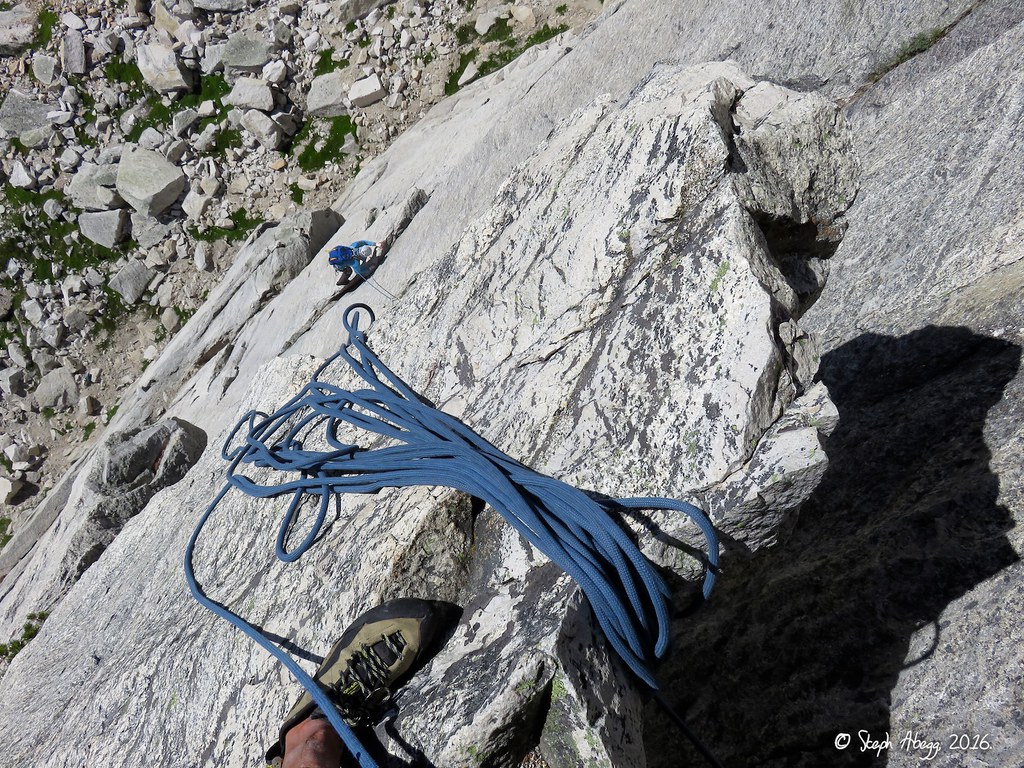
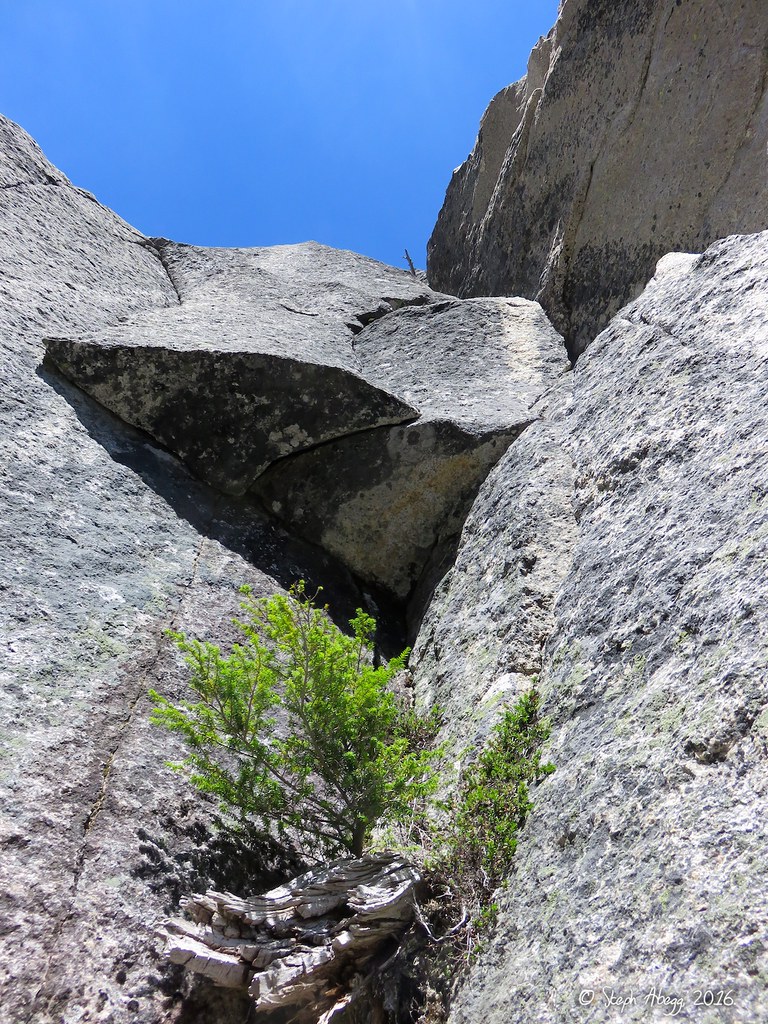
31. Looking up at the start of Pitch 12 from the belay perch below. This pitch consists of a several athletic moves over steps. It is neither a throw away or a gimmie pitch (i.e. good and challenging climbing). 32. The view down from the awesome belay perch below Pitch 12. You are literally perched 1000 feet above the base here.
To Summit
2nd-4th
33.
34.
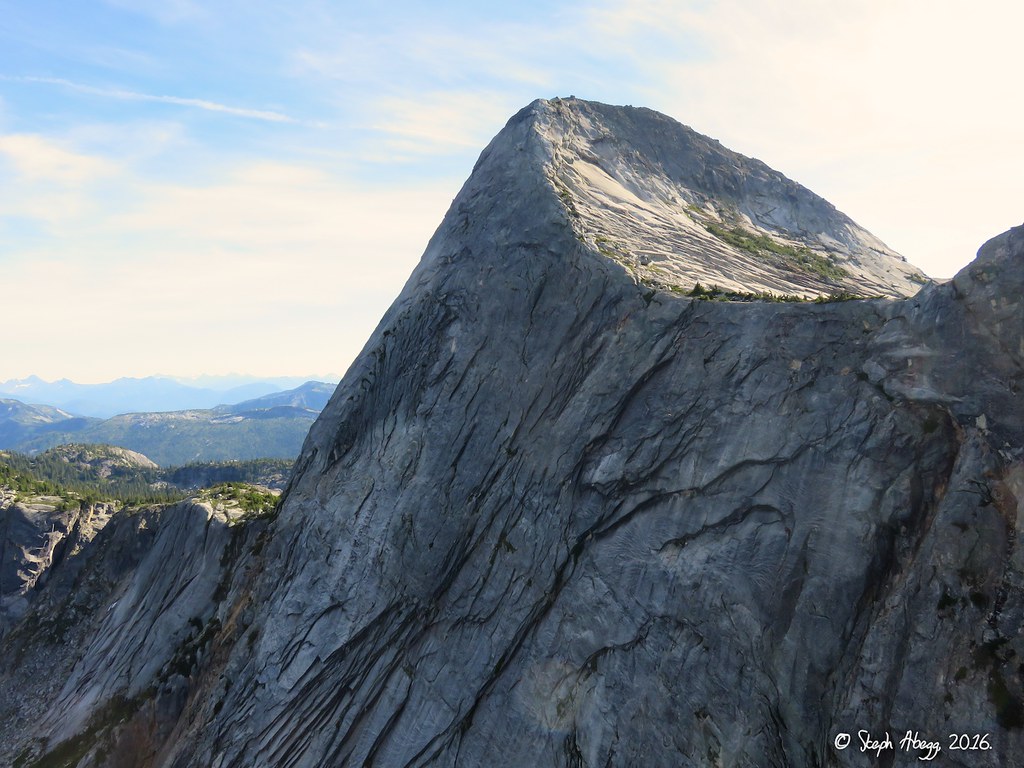
33. From the top of Pitch 12, we unroped and scrambled the Class 2-4 terrain to the summit. The summit is actually behind the tallest point seen in the photo. 34. Ibex Peak to the south, as seen from the top of Les Cornes. There are routes on this large rock face as well. Probably climbed even less frequently than Springbock Arête.
Pitch
13
5.7, 40m
35.
36.
35. We roped up again for the au-cheval along the down-sloping ridge crest. I belayed DR as he downclimbed and placed protection, and then he belayed me as I climbed down it. In this photo I am at the belay on the summit and DR is at the first rappel anchor. 36. The knife-edge ridge. We both did a backwards au-cheval.
Descent
A combination of rappels and downclimbing curves back counterclockwise to the base via a hidden gully.
Here is the beta for a single 70m rope (a single 60m rope would leave you a bit short on a few raps):
Rap 1: Slung block+piton+nut below summit. 35m rappel to Rap Station 2.
Rap 2: Anchor slightly skier's left. Slung block+nut. 20m rappel to Rap Station 3.
Rap 3: (photos) Anchor skier's right. Three nuts. 33m rappel to large ledge.
Rap 4: Scramble shortly to small tree (might not be tat). 30m rappel to large ledge.
Rap 5: Walk skier's left to large tree initially obscured by white block. 25m rappel to Rap Station 6.
Rap 6: (photo) Anchor skier's right on slab. Two pitons+nut. 25m rappel to Rap Station 7.
Rap 7: (photo) Huge slung block/horn. 35m rappel to Rap Station 8.
Rap 8: Anchor on ledge hidden from view until just upon it. Sling on horn. 25m rappel to talus below.
Rap 9: (photo) Scramble down talus for awhile. Make 10m rappel from a slung chockstone to get over a large boulder and polished slab to talus below.
37.
38.
39.
40.
41.
42.
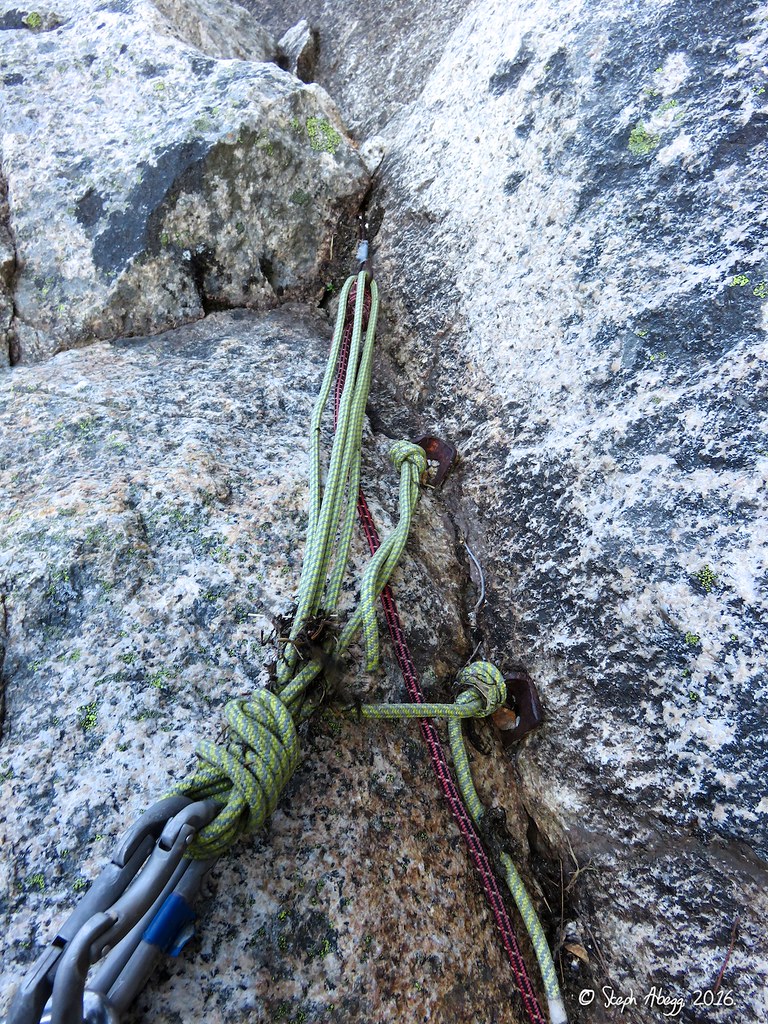
37. Rappelling in the gully. This was our 3rd of 9 single-rope rappels (70m rope). 38. One of the rap stations (Rap 3 of 9). The stations were set up for a single 70m rope. The route is not done often enough to guarantee the tat will be in good shape, but someone had added new tat in 2011 (thanks someone!) which was still in good enough shape that we did not have to add any of the tat we had brought along.
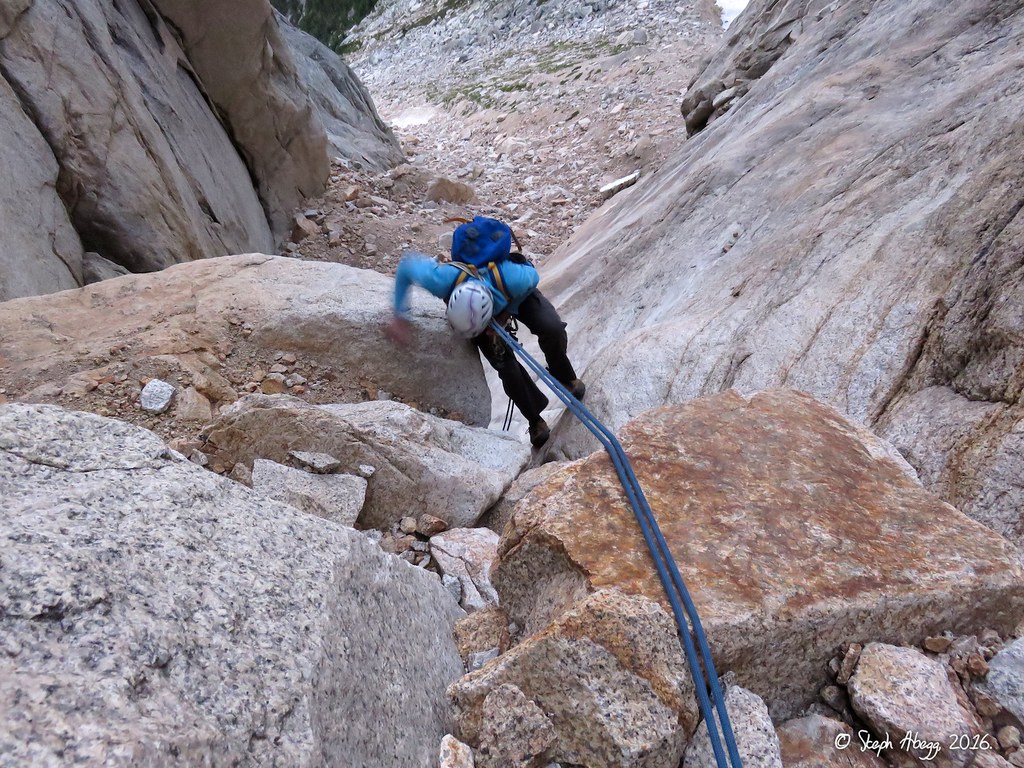
39. Another rap station (Rap 6 of 9). Don't expect bolted chain anchors. 40. Rap 7 of 9. 41. Our last (9th) rappel was a short rappel over a giant boulder in the lower gully, off a sling around a pinched chockstone. As you can see in the photo, below this is just 2nd-3rd class scrambling out of the gully and a short jaunt along the base of Les Cornes back to the packs at the base of the route.
42. As we descended, we enjoyed watching the sun-shadow line creep up Steinbok Peak to the south. A nice evening to cap off a great day of climbing. We were glad that we would be finished with the the rappels before it got dark. I'll get an early start to avoid rappelling in the dark any day.
Useful beta. Updated route information. Corrections. Historical notes. Interesting facts. No fluff please. Please do not put links in your comment, as my spam filter will filter those comments out.