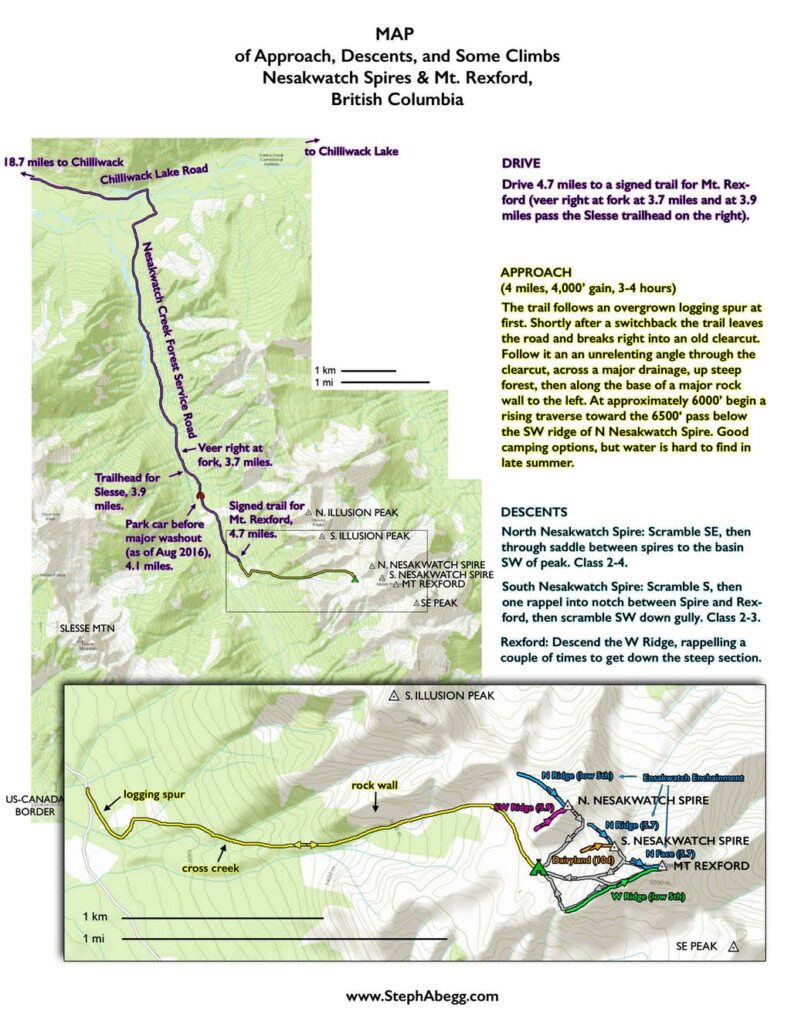
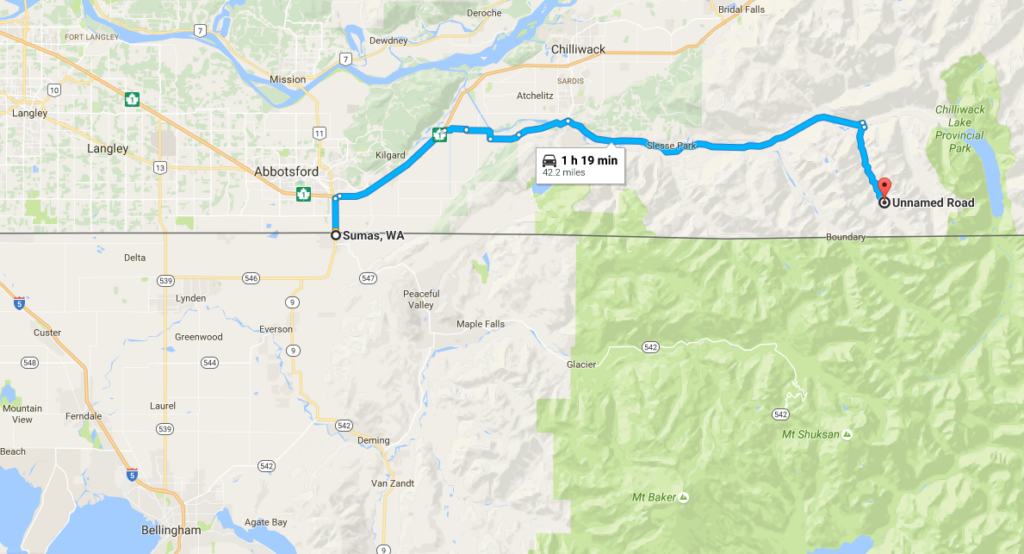
Photos: | Photo Descriptions: 1a. Map I made showing the approach detail, location of high camp, descent detail, popular climbs, etc. Click to enlarge. 1b. Google maps image showing location of trailhead and drive from the US-Canada border. 2. The Nesakwatch Creek Road had been graded in Spring 2016 so we had not problems driving my Subaru up it, until we reached the washout at 4.3 miles. This road can be rough if it has not been recently graded. 3. The washout at about 4.3 miles up the Nesakwatch Creek Road. We parked at about 4.1 miles. 4. The start of the trail up to Rexford at 4.7 miles. 5. The first couple of miles of trail gains elevation through forest. The trail is well-marked, obvious, and steep the whole way up. 6. Hiking along the rock wall, with Mt. Slesse behind. 7. This photo was taken from near the top of the rock wall. From here, we aimed up and right, heading across the boulders and heather slopes to the saddle on the right. Our camp was just on the other side of the saddle. The peak in the photo is North Nesakwatch. The North Ridge is on the left skyline. The SW Ridge is on the right skyline. 8. We camped on top of a large flat-topped boulder in the basin below the spires. From left to right: North Nesakwatch Spire, South Nesakwatch Spire, Mt. Rexford. This was an awesome camp with an awesome view and less than 15 minute approach to all of the climbs we did. (Scroll to the bottom of the page to see more photos of camp! This is a camp you will enjoy and remember.) |
Photos: | Photo Descriptions: |
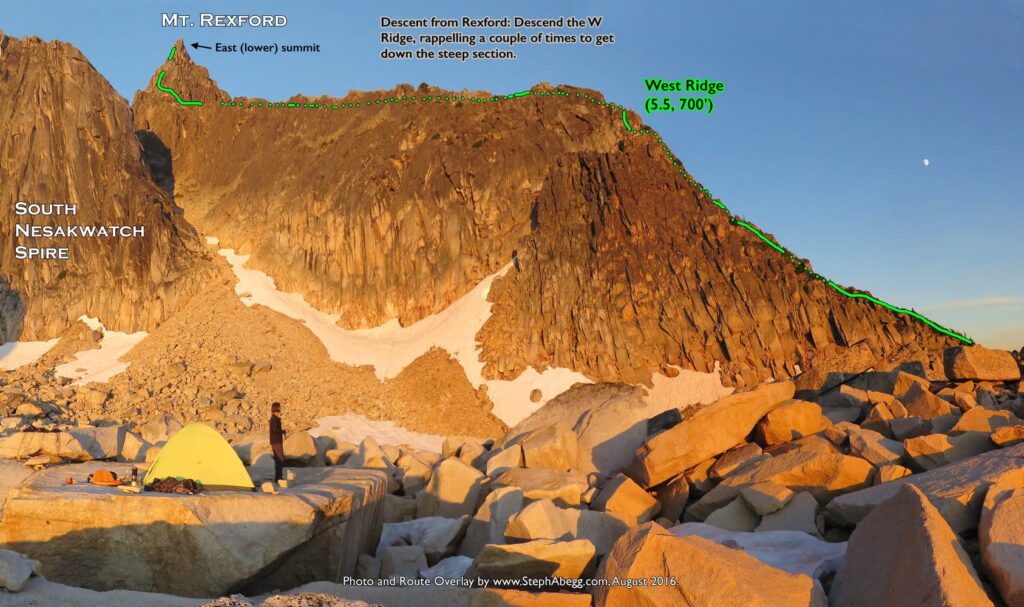
1. On the lower West Ridge, mostly blocky 4th. 2. Looking up towards the summit tower of Rexford from midway up the long West Ridge. The summit of South Nesakwatch is to the left. 3. North Nesakwatch Spire and South Nesakawatch Spire to the north. 4. Looking up from the base of the summit tower. From here, the standard (easiest) route goes left up blocky terrain and to a chimney system. 5. The standard route goes up this blocky chimney system, 5.5. 6. Will on the summit ridge as we head towards the true summit (behind out of view). 7. Will leading the final pitch to the true summit, a short 5.6 section. 8. On the summit of Mt. Rexford. A wooden cross in memory (?) of Doug Rexford. 9. The standard descent from Rexford is to reverse the West Ridge route. We made a couple of rappels through the steeper summit area. 10. This photo was taken from the top of South Nesakwatch Spire the next day, looking over at climbers on Rexford. They are climbing a more direct line to the summit than the standard route which goes to up blockier terrain to the left. This direct route looks like it has some great exposure and cracks. Wish we had known about this route! |
Photos: | Photo Descriptions: | ||
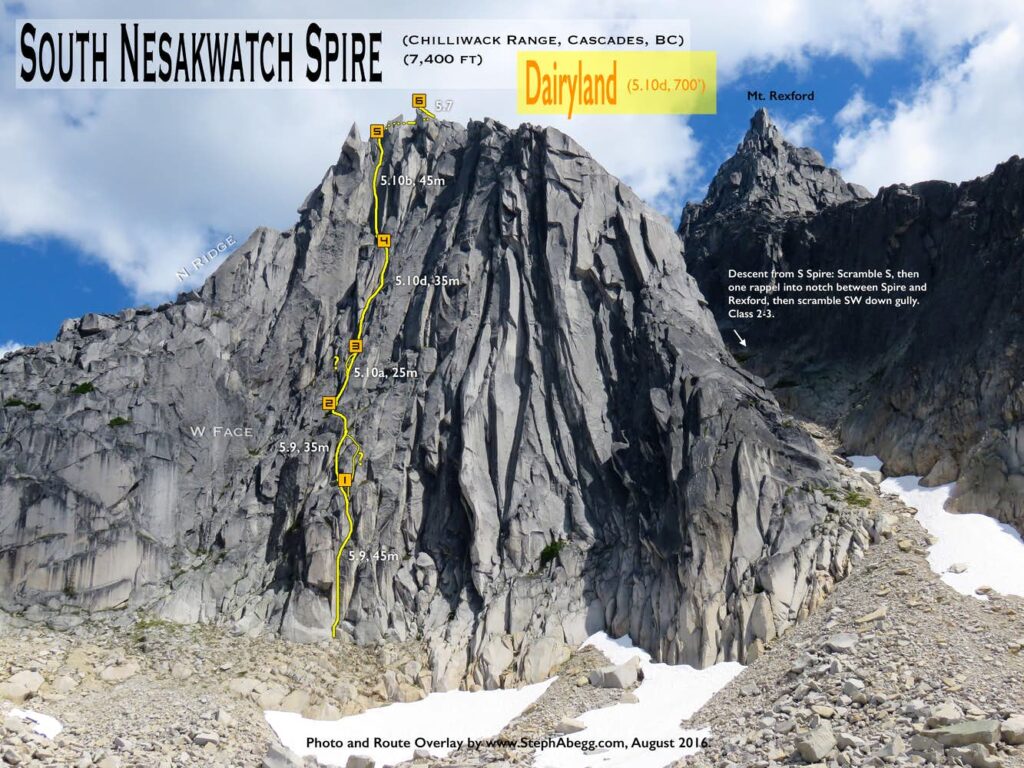
Approach | pretty darn easy once you are in the upper basin | 1. Approaching the steep west face of South Nesakwatch, about 13 minutes from camp to base up an easy boulder field. | |
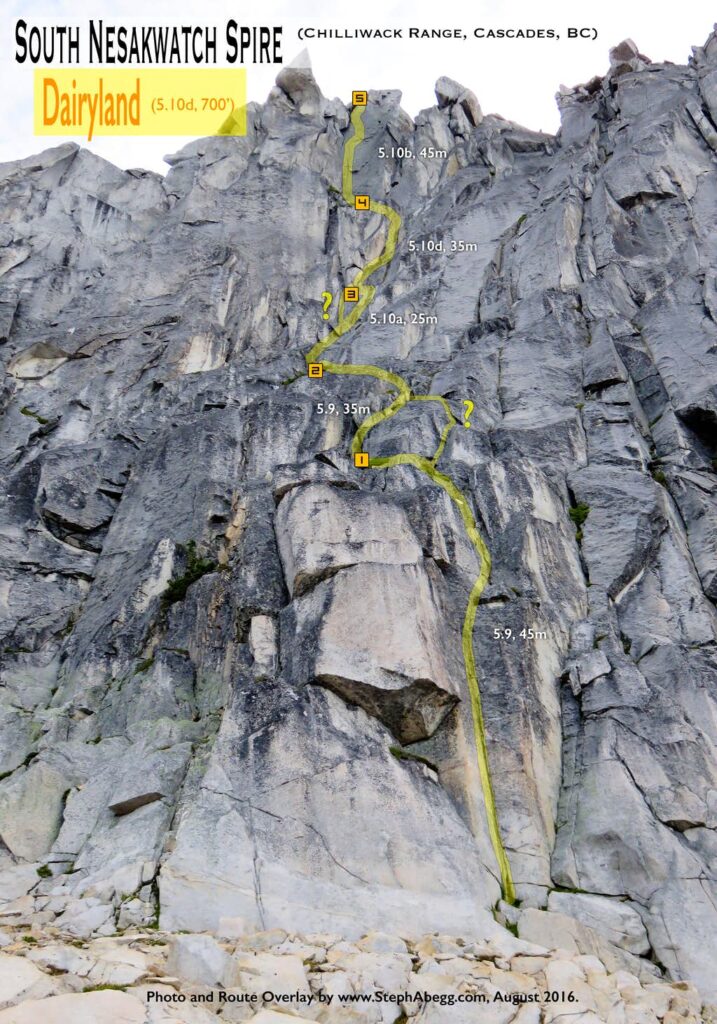
Pitch 1 | 5.9 | 2. The awesome 5.9 hand-crack that starts the route. Pitch 1 was my favorite pitch on the route—just pure fun 5.9 crack climbing. | |
Pitch 2 | 5.9 | 3. Pitch 2 is kind of mediocre climbing up a heather gully and broken ground. But one throw-away pitch amongst 1 good pitch (Pitch 3) and 3 excellent pitches (Pitches 1, 4, and 5) is pretty good for an alpine route. | |
Pitch 3 | 5.10a | 4. Pitch 3 heads up to the bottom of a prow. The description we had said to "pull out right to a belay ledge at the bottom of the prow" but when I tried to go this way it seemed very dirty and unprotectable, so I ended up climbing the cracks in the photo and pulled out left (instead of right) to a ledge at the bottom of the prow. This seemed to be a direct way to go and the climbing was quite good. | |
Pitch 4 | 5.10d | 5. Will led the crux pitch. This pitch consists of a few harder (5.10) moves amongst easier (5.9) moves. Gear is a bit thin at times, but it seemed you could always find a place for a small cam or nut if you looked for it so the climbing never felt runnout as some descriptions suggested. The 5.10d section was a technical move on smaller holds which Will and I both felt looked harder than it actually turned out to be. Will did an awesome job leading this pitch. | |
Pitch 5 | 5.10b | 6. Looking up the 40m splitter on the last pitch up the west face. This crack eats #1's and #2's so with a double rack I did a fair amount of walking of my cams. The hand jams are great and a bold leader could certainly run it out, but the crack is steep and there are few good rests. I found this pitch to be the hardest pitch of the route just due to the lack of rests. 7. Will climbing the upper splitter. 8. A zoomed-in view of Pitch 5 from below during the descent. When I was leading the pitch it was a bit unclear of whether to go left or right where the crack forks, but I went right and I think this is the way to go. The section immediately after the fork certainly felt every bit of 10b to me. 9. The pitch tops out in a cool alcove right on the upper north ridge. | |
Pitch 6 | 5.7 | 10. Dairyland tops out on the north ridge just a short scramble to the base of the summit block, shown in photo. 11. The standard way to surmount the summit is to climb an offwidth (5.7 to 5.9, depending on source). There is no bolt on the top of the summit block, so the safest way down from the top of the block is to sling the horn at the top of the offwidth, lower, and then flip the sling off of the horn as Will is doing in the photo. | |
Descent | Scramble S, then one rappel into notch between Spire and Rexford, then scramble SW down gully. Class 2-3. | 13. If not continuing onto Rexford, the standard descent from the South Spire is down a gully between South Nesakwatch and Rexford. This is a bit loose but was pretty quick and mellow as far as North Cascades gullies go. This gully is undoubtedly filled with snow in early summer, which is probably steep and hard enough to want an ice axe. 14. Our camp gave us plenty of time to gaze at the steep west face of South Nesakwatch. Definitely some potential for some new routes on this wall. Probably hard. We were intrigued by the right-leaning corner in the photo (this is just right of a route called Fairytales and Fantasies, which goes up the crack in the center of the photo). There appears to be lots of grass in this crack in the moment, and it is unclear how wide the chimney is above it, but it is intriguing.... |
Photos: | Photo Descriptions: |
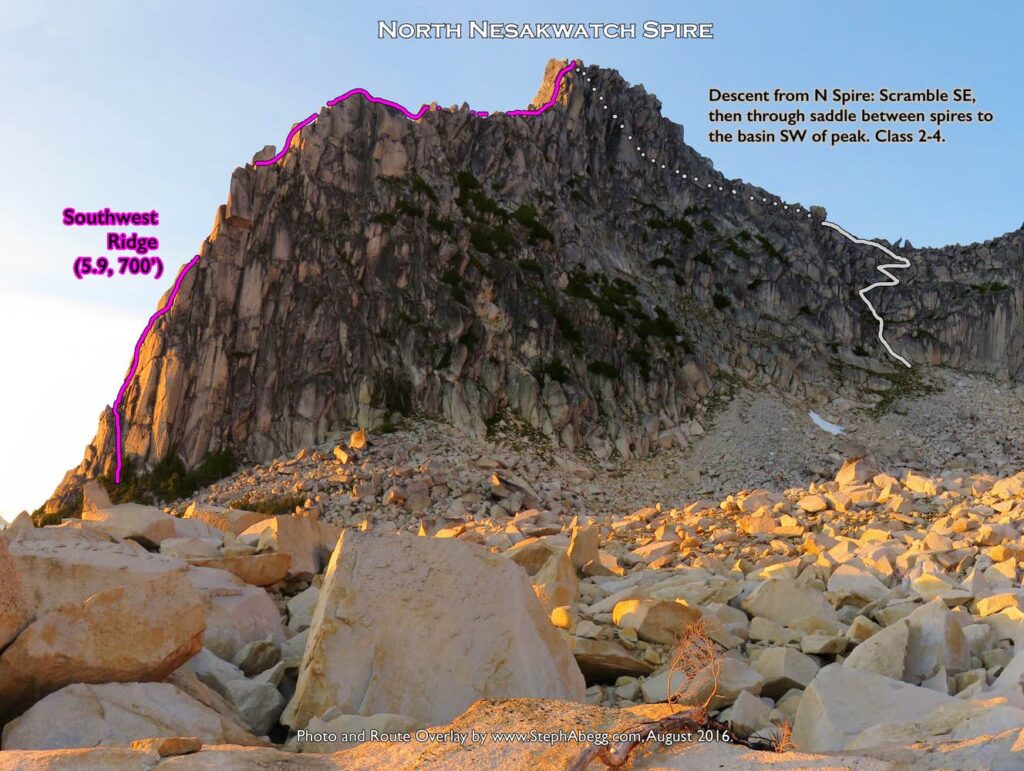
1. A bit of 4th class scrambling (right side) to get to the base of the climb. Left side might work too. 2. Looking up Pitch 1. We had no topo, but it seemed pretty obvious to head up the cracks just left of center. The climbing was steep and exposed on solid rock, and sustained at 5.8 or so for most of the pitch. I led this pitch. 3. Will starting up Pitch 2. More engaging 5.8 crack climbing. 4. The upper half of Pitch 2. 5. Will at the belay at the top of Pitch 2. After the first couple of pitches, this route is in the sun even in the early morning. South Nesakwatch Spire behind. 6. Cracks on Pitch 3. 7. This photo is taken looking towards the summit after the first three pitches. From here, we back-packed the rope and soloed about 100m of 3rd-4th class terrain to the base of the splitter cracks about halfway up the summit tower in the photo. 8. Will leading up the splitter cracks which comprise the last real pitch of the route. These cracks felt 5.7-5.8, even though the guidebook put them at 5.8-5.9. Really fun climbing though. We had smiles on our faces the entire time. 9. Looking down the splitter cracks on the last real pitch before the summit. 10. Me on the summit of North Nesakwatch. South Nesakwatch behind. 11. Me perched on a block on the ridge between North and South Nesakwatch. You can see these blocks quite clearly from camp. 12. To descend back to the basin, we zig-zagged down the ledges below the saddle between the Spires. There is an optional rappel, but we found the terrain mostly 2nd-3rd class with an occasional 4th class move. 13. A view of the Southwest Ridge of North Nesakwatch Spire from the hike out that afternoon. The North Ridge (mostly 3rd, up to low 5th apparently) is the ridge on the left skyline. |
Photos: | Photo Descriptions: 1. A view of camp looking east. From left to right: North Nesakwatch Spire, South Nesakwatch Spire, Mt. Rexford. 2. A view of camp looking south. Shuksan and Baker in distance. 3. Now this is the life (minus the nonogram for some of you). Slesse in the distance to the west. 4. Running water is difficult to find in the basin, especially in later summer. There were still some significant patches of snow in the basin though. With this in mind, we had brought some big black garbage bags, which we filled with snow. This was very effective. During the heat of the day, we could melt over 10 L of water an hour, and we had a regular drip off the end of the boulder. On our trip in August 2016, I would guess that snow will linger in the basin through August, but the basin might be devoid of even snowmelt water in September. This is definitely something to keep in mind if planning a trip here. 5. Looking down on our camp from high on South Nesakwatch Spire. We really did choose the best camp spot. 6. Evening light. From left to right: North Nesakwatch Spire, South Nesakwatch Spire, Mt. Rexford. 6. Enjoying an evening at camp. South Nesakwatch Spire and Rexford above. My mom had hiked in and joined Will and I for the night. 8. Enjoying sunset from camp. Slesse in distance left. My mom had hiked in and joined Will and I for the night. 9. Morning sun on the peaks to the east. Left to right: Baker, Winchester, Larabee, American Border Peak, Slesse. 10. Morning alpenglow on Mount Baker. 11. Morning sun on Mt. Slesse. 12-13. We found this interesting rock formation near camp. The contacts are very geometrically defined, which seems to rule out weathering. The outcrop was very isolated (we didn't see anything else like it in the area) which is also interesting. See Photo 14 for scale. After the trip, I shared the photos with my friend and geologist Doug McKeever, who proceeded to pass them on to geologists David Tucker and Ralph Haugerud and Rowland Tabor. As geology typically goes, none of them had a "for sure" answer but they had some good speculations: Doug: "A couple of the pictures show a sheared off plane, maybe a result of glacial abrasion or just a prominent joint surface. The triangular-shaped blocks are most likely the result of two, three, or more very prominent joint sets formed by applied forces as mountain-building occurred. But that alone doesn't explain the striking relative relief. It looks to me that there are two different intrusive rocks present. Most likely the white rock is alaskite, a very light colored granite rock, which IS found in the Chilliwack batholith.. Very intriguing! Still thinking...!" David: "The short answer is “I don’t know”. I am perfectly willing to arm wave (geologese for hypothesize). The fact they are in one isolated boulder amidst a myriad of others is as interesting as anything else, and suggests that this is a localized feature, related to the white rock alone. The contact between the white bold relief domain and the rest of the rock is very sharp. I like Doug’s idea that the white rock might be alaskite. When the magma in a large intrusion is mostly solidified, a small fraction of the remaining melt is rich in water and dissolved ions (water lowers the melting point so this rock is still fluid when the rest of the magma is solidified). This eventually solidifies in fractures that form when the main magma body has cooled and contracted. The resultant ‘alaskite’ is white because it is mostly plagioclase feldspar. You may hear such late stage watery melts called ‘restite’ because the rest of the magma has cooled and this is the leftovers. So with that hypothesis, the white rock is a narrow alaskite dike. If that is true then the flat upper surface is where the other side of the dike has been eroded away along the opposite contact from the one that remains. Hard to account for the whacky (that is another technical geo term) fracture pattern. The fractures don’t penetrate the underlying granodiorite, so if it is related to a regional joint pattern, only the alaskite was fractured. That would be an odd thing. So I think the dike rock alone was fractured, although why in such a pattern of intersecting joints is another mystery...." Ralph: "Looks to me like the alaskite was a sheet (dike) that once extended across the face of the boulder. Such dikes are common--the only unusual thing here is how it has broken. I suspect one could spin a story about differences in grain size and mineralogy that make the fine-grained, biotite-free alaskite more brittle than the host tonalite(?), thus facilitating fractures of the alaskite that don't propagate into the tonalite." Rowland: "Ralph's explanation for the rock formation sounds as good as any. I still answer questions for the Survey's "Ask-a-Geologist" program, and am constantly making pronouncements from photos of weird rocks." 14. Where's Will? (Too bad Will's not wearing a red and white pin-striped shirt, for all those Where's Waldo fans out there.) 15. Pocket glacier on Mt. Slesse (Aug 12, 2016). It was looking unusually large for this late in the summer. But the following week, on a particularly warm day, the entire glacier slid off all at once! |