Sir Donald Range Traverse: Macdonald, Avalanche, Eagle, Uto, Sir Donald, Terminal

Sir Donald Range Traverse

Routes:

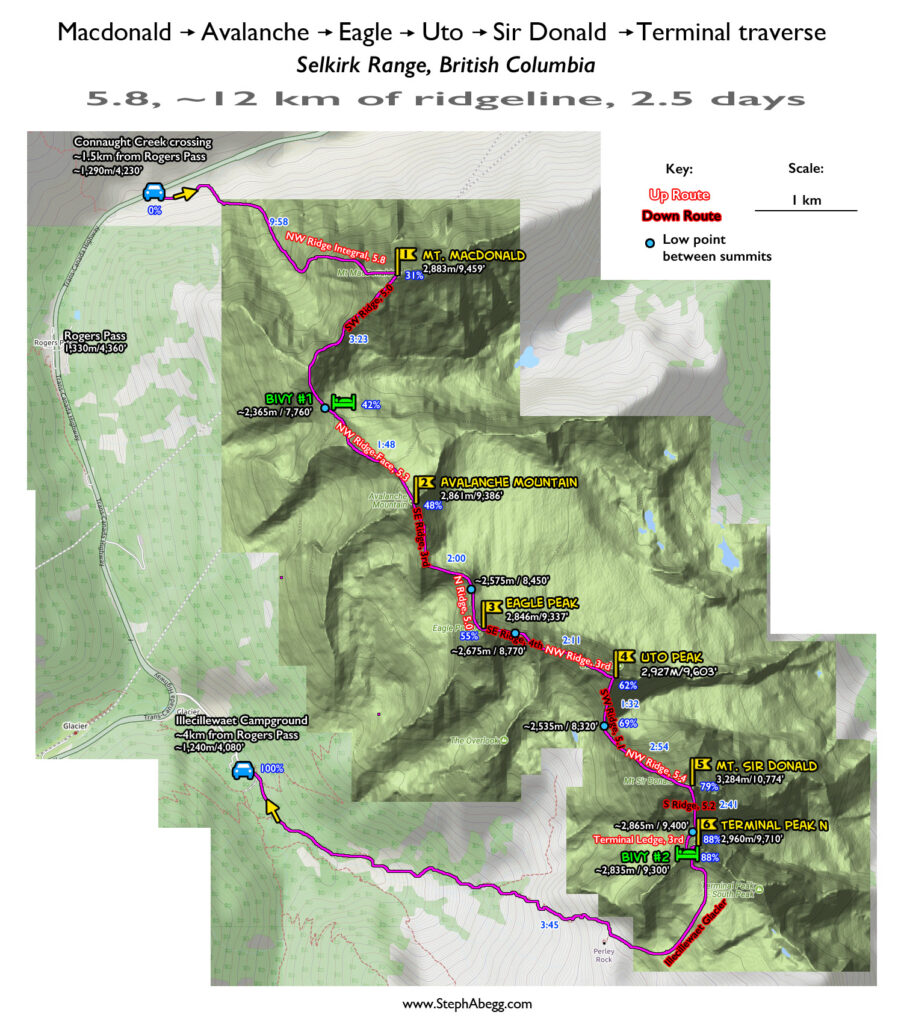
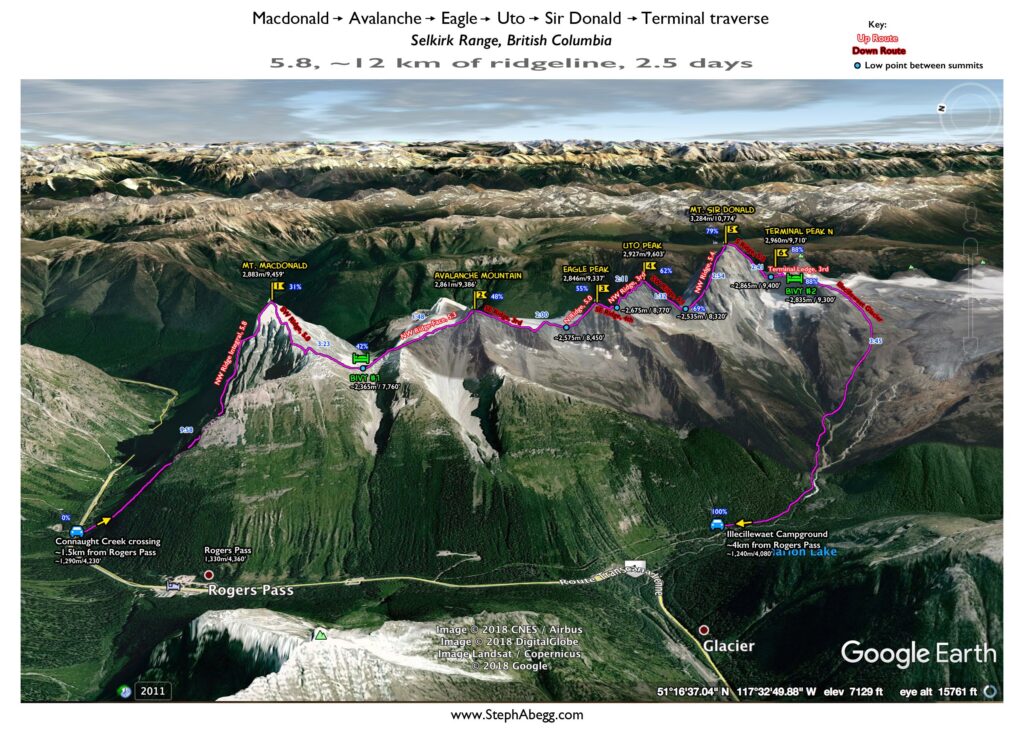
5.8, ~12 km on ridge, 2.5 days

- Mt. MacDonald (2,883m/9,459')
- Avalanche Mountain (2,861m/9,386')
- Eagle Peak (2,846m/9,337')
- Uto Peak (2,927m/9,603')
- Mt. Sir Donald (3,284m/10,774')
- Terminal Peak (2,997m/9,833')

A traverse of the entire Sir Donald Range (6 summits).

Region: British Columbia
Elev: ~3,000 m / 10,000 ft
Rock type: Quartzite & Shale
Type: 
Date(s): August 8-10, 2018 (Wed-Fri)
Partner(s): DR

Map, Google Earth, Route Overlays

CLICK TO ENLARGE

Intro

The Plan
Sometime during another cold and soggy Pacific Northwest winter, my friend DR and I began planning a couple of summer trips together. DR was keen on checking out the Roger's Pass area. The rock in this area is a solid and beautiful white quartzite. I had climbed the NW Ridge/Arête of Mt. Sir Donald in 2006 (a Fifty Classic climb of North America), so I knew how fun the quartzite is for climbing and I was easily psyched to return. DR's idea: What about we traverse the entire Sir Donald Range? We'll start with Mount Macdonald, then continue over Avalanche Mountain, Eagle Peak, Uto Peak, climb the classic NW Ridge of Mount Sir Donald, and finish on Terminal. This would be over 12km of high ridgeline, with terrain involving a lot of 3rd and 4th and easy 5th; the technical crux would be the start of the traverse: the NW Ridge Integral (5.8) of Macdonald. It sounded pretty awesome.

[Interestingly enough, it wasn't until after DR and I successfully executed the traverse from MacDonald to Terminal and I was home writing this trip report that I came across an online article: "Revelstoke team completes one day traverse of Sir Donald range"—just the summer before, in July 2017, the traverse had been done in a single 23-hour push by Greg Hill, Andrew McNab, Chris Rubens, and Dave Sproule. The referenced article suggests that this July 2017 trip might have been the first time the traverse was done in one shot. If that is true, DR and I might be the second party to have done the traverse in its entirety. I believe that DR and I took the same route as the Revelstoke team on all parts of the traverse except the route up MacDonald at the beginning of the adventure. DR and I climbed the NW Ridge Integral (5.8), while the Revelstoke team probably climbed the Herdman Couloir Route (4th) (the article does not make it clear which route they did, but this is what I am guessing since this is the quickest way to the summit and can be done more safely than the NW Ridge in the dark without a rope). The NW Ridge Integral was the most technical climbing DR and I did on the traverse—it was sustained 5th class up to 5.8 and we stayed roped up for most of the route, simulclimbing. But we were planning to bivy and had the luxury to choose a more time-intensive route.]

Note about our Bivy(s)
Rather than do it in a single push, DR and I planned to bivy at some point along the traverse. This meant, however, that our packs would be a bit heavier (bivy sac, sleeping bag and pad, stove and fuel, more food). We ended up bivying twice: the first night at the flat col between MacDonald shoulder and Avalanche (climbing and descending Macdonald was definitely the most time-consuming part of the entire traverse) and the second night just after we had summited Terminal (we decided we preferred to do the final hike out in the daylight). Overall, the traverse took us 32 hours of travel time on the ridge. We stopped for 15-25 min on each summit, but other than that we moved continually. So the 23-hour time for the Revelstoke party is definitely a respectable time, even without overnight loads. The traverse is definitely an athletic push.

Note about our Rack and Rope
We brought a rack to #3 with doubles in some of the medium cams, a set of stoppers (never used), a dozen slings, and a light 60m rope. We roped up for the following sections of climbing:
  1. NW Ridge Integral (5.8) of Mt. Macdonald, which is sustained 5.6-5.8 climbing. The route is a couple of thousand feet of climbing, so we simulclimbed to save time; we had a couple of micro traxions which made simulclimbing safer.
  2. A short exposed step between Macdonald and Macdonald shoulder. Perhaps 5.7ish.
We rappelled about 10 times, most raps being around 25m. We rappelled at the following locations:
  1. SW Ridge of Macdonald (3 raps)
  2. SW Ridge of Uto (2 raps)
  3. S Ridge of Sir Donald (4-5 raps)
Note about Weather and Smoke
A common warning in this area is that the rock gets unusually slick when it rains. Fortunately, there was no chance of precip in our forecast. The weather was warm and calm. Unfortunately, though, BC seems to have been plagued by forest fires in the recent summers, and this was no exception, so the views were a little bit less spectacular than they could have been. But the smoke kept the nights from getting too cold.

Note about Water on the Route
Even though we did the traverse in mid-August, there were plenty of snow patches along the way, from which we could have melted water if we needed to. Occasionally, if the geometry was right, there was running water we could access near the snow patches. We were fortunate to find such running water near both of our bivies, so we never had to resort to the tedious process of melting snow for water.

Photos, Overlays, and More!
The following page gives a trip report for our traverse, including maps, stats, and lots of photos. What a fun trip involving 6 summits!

Stats

*Total travel time includes all short breaks during ridge travel. The clock stops only during the time spent at the bivies.

The Sir Donald Range Traverse, Peak by Peak

THIS TRIP REPORT IS STILL MOSTLY IN THE EMBEDDED HTML FORMAT OF MY OLD WEBSITE.

The rest of this page contains photos from the traverse, broken down by peak-to-peak section. Enjoy!

CLICK ON PEAK SECTION TO DROP DOWN CONTENT

Trans Canada HWY to Summit of Mt. Macdonald (#1)
6:32 am - 4:30 pm (travel time: 9:58); 31% complete
Photos:
1.    
2.    
3.    
4.    
5.    
6.    
7.    
8.    
9.    
10.    
11.    
12.    
13.    
14.    
15.    
16.    
17.    
18.    


Photo descriptions:
1. Parking along HWY 1 just across from Mt. Macdonald. This is at a small picnic area just after Roger's Pass and before a large snowshed. This is the parking area recommended in the guidebook for the NW Ridge Integral. From here you can cross Connaught Creek on a fallen log. 
2. Crossing Connaught Creek on a fallen log. This long is actually directly down from the place we parked, although the guidebook describes a long about 300m upstream of this log (that one was there too).
3. Mt. Macdonald. Herdman Couloir is just off to left in this photo. (We should have been further left, in Herdman Couloir probably. We got into a mess of bushwhacking because we were too far right.)
4. What happens if you head up the slopes too soon. I think the best approach stays along the creek until you get to below Herdman Coulor, and then start heading upwards. There is probably some unavoidable bushwhacking, but we certainly did more bushwhacking than needed.
5. My best guess of the approach to the NW Ridge Integral. Photo taken looking down on the approach while climbing on the ridge.
6. The route starts at the obvious notch.
7. The start of the route.
8. The NW Ridge Integral. Pretty much choose a line of least resistance close to the crest.
9. 
Fun blocky quartzite climbing on the ridge.
10. We had two micro traxions which allowed us to simulcimb in blocks of three pitches at once. This saved us a lot of time, since pitching out the entire route would be over 16 pitches and take forever. But the climbing is fairly sustained at the 5.6-5.8 level, so the micro traxions were nice to make this feel safer.
11.
 Up up up.

12. Giving the feet a break.
13. On Promenade Ledge. Mt. Tupper behind.
14. The NW Ridge above Promenade Ledge.
15. If you look closely you can find DR.
16. The 3rd class summit slopes.
17. The wet pages or the lack of a pencil might explain why no one had signed the summit register recently. Also, I am guessing it is not climbed all that often.
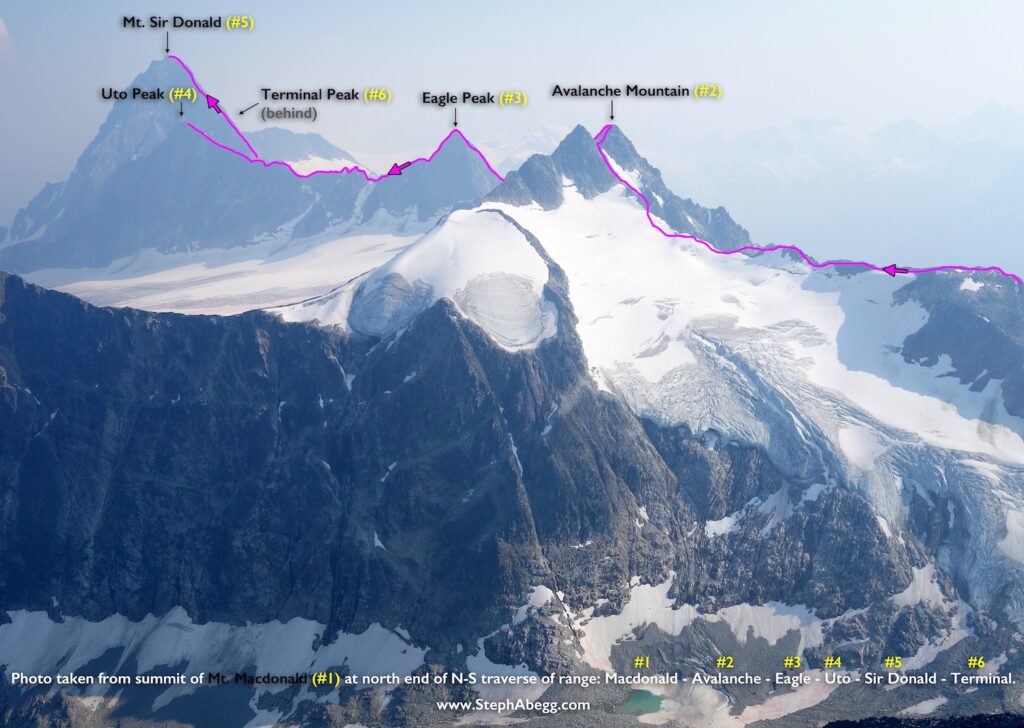
18. Looking towards the continuation of the traverse. Near to far: Avalanche, Eagle, Uto, Sir Donald. The summit of Terminal is behind Sir Donald, although you can see the West Ridge.

Summit of Mt. Macdonald (#1) to Bivy #1 to Summit of Avalanche Mountain (#2)
4:52-8:15 pm / 5:28-7:16 am (travel time: 5:11); 48% complete
Photos:
1.    
2.    
3.    
4.    
5.    
6.    
7.    
8.    
9.    
10.    
11.    
12.    
13.    
14.    
15.    
16.    
17.  
Photo descriptions:
1. Starting the descent of the SW Ridge of Macdonald. Avalanche Mountain in the distance.
2. We made a few rappels as we descended the SW Ridge. We found pre-existing tat for all of them.
3. Rap Anchor 1.
4. Rap Anchor 2.
5. Rap Anchor 3 (here the tat was bad enough that we just rapped directly off the horn - in retrospect it might have been better to just burn a piece of our tat rather than put a lot of wear on a skinny rope).
6. We roped up for a short but steep and exposed step between Macdonald and Macdonald shoulder. This was the last place we roped up on the trip although we used the rope for a few rappels later on.
7. Looking back at the SW Ridge of Macdonald. The NW Ridge Integral is on the left skyline.
8. On top of Macdonald shoulder in the evening light.
9. Looking down at the col between Macdonald shoulder and Avalanche Mountain. This is where we bivied.
10. Our bivy. It was a very pleasant spot to bivy, with snow nearby to melt and a plethora of comfortable, flat ground. DR even spotted running water at the base of the snowfield to the east, and ran down the slope to collect some to save having to melt several liters of snow.
11.
 Avalanche Mountain in the morning light.

12. Glacier to the east.
13. We were able to expedite travel at times buy getting onto the snow.
14. Back on the rock ridge again. Our route up the NW Ridge went just left of the snow finger, and then cut right to go up the NW Face to the summit of Avalanche (summit is on the right).
15. The NW Face of Avalanche. We went just left of the steep headwall.
16. Easy blocky climbing on the NW Face. Supposedly there is some 5.3 but it seemed to be mostly 4th.
17. DR on the summit of Avalanche Mountain. About 50% of the way through the traverse (although we didn't have a sense for this at the time). 

Summit of Avalanche Mountain (#2) to Summit of Eagle Peak (#3)
7:30-9:30 am (travel time: 2:00); 55% complete
Photos:
1.    
2.    
3.  
Photo descriptions:
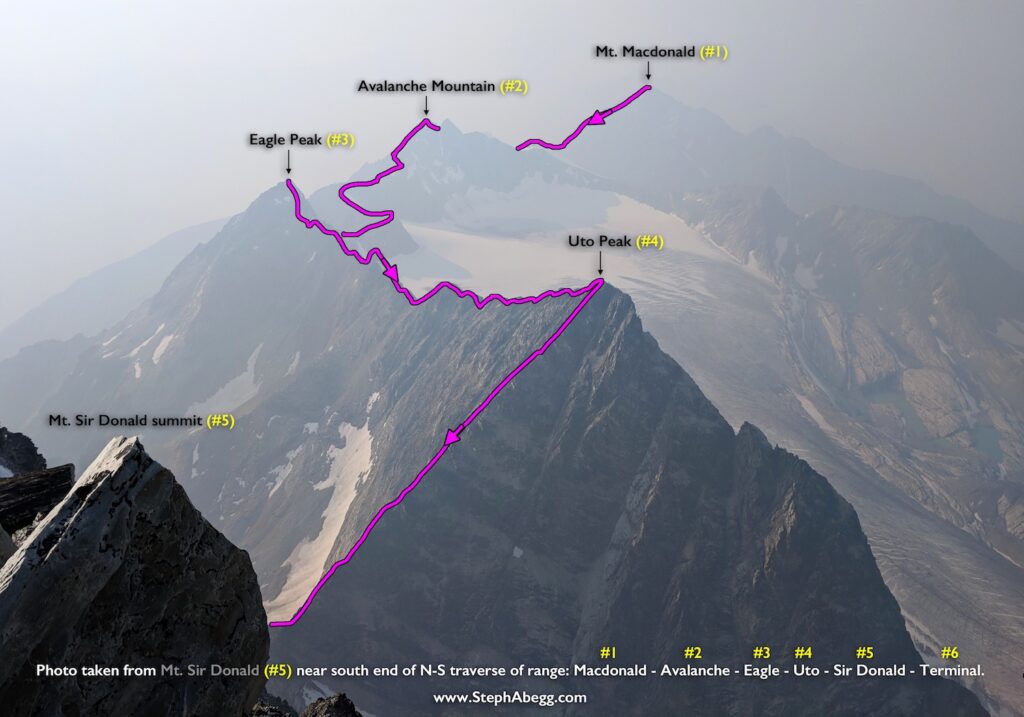
1. Midway through the traverse, on the summit of Avalanche Mountain. The next four objectives stretch out in front of us: Eagle, Uto, Sir Donald, Terminal.
2. Approaching the North Ridge (5.0) of Eagle. We soloed this.
3. On top of Eagle.

Summit of Eagle Peak (#3) to Summit of Uto Peak (#4)
9:45-11:56 am (travel time: 2:11); 62% complete
Photos:
1.    
2.    
3.    
4.    
5.  

Photo descriptions:
1. Headed towards Uto. This section of ridge went up and down more than it had initially appeared.
2. Collecting water between Eagle and Uto. We found running water on occasion during the traverse.
3. The final summit area of Uto via the NW Ridge (3rd).
4. Looking back towards the terrain we had covered. Near to far: Eagle, Avalanche, Macdonald.
5. Summit cairn on Uto. Sir Donald in background.

Summit of Uto Peak (#4) to Uto-Sir Donald Col to Summit of Mt. Sir Donald (#5)
12:25-1:57 pm / 2:23-5:17 pm (travel time: 4:26); 79% complete
Photos:
1.    
2.    
3.    
4.    
5.    
6.    
7.    
8.    
9.    
10.    
11.    
12.    
13.    
14.   
15.   
Photo descriptions:
1. Starting down the SW Ridge (5.1) of Uto towards the Uto-Sir Donald col.
2. We made a couple of rappels to get through some steeper sections on the SW Ridge of Uto.
3. Downclimbing SW Ridge of Uto. Summit of Sir Donald behind.
4. Looking back up SW Ridge of Uto.
5. Potty with a view at the Uto-Sir Donald col.
6. Starting up NW Ridge (5.4) of Sir Donald. We put on rock shoes and soloed the entire thing.
7-12. Just some photos along the way. The NW Ridge of Sir Donald is a Fifty Classic for good reason. 2400 feet of mostly 4th class (and a few sections up to 5.4) on solid quartzite.

13. The rap route is clearly marked.
14. Beautiful white quartzite near the summit.
15. Taking a break on the summit, looking towards our appropriately-named last peak: Terminal. (Photo by DR.)

Summit of Mt. Sir Donald (#5) to Summit of Terminal Peak North (#6) to Bivy #2
5:33-8:14 pm / 8:15-8:20 pm (travel time: 2:46); 88% complete
Photos:
1.    
2.    
3.    
4.    
5.    
6.    
7.    
8.    
9.  
Photo descriptions:
1. There are 4-5 rappels on the South Ridge (5.2) desent.
2. On the first rappel we noticed some sheath damage on my rope. By the last rappel, the core was clearly showing. Time for retirement....skinny ropes don't last long on sharp endges.
3. Evening sun through forest fire smoke.
4. North Terminal and Terminal Ledge.
5. On Terminal Ledge.
6. On top of Terminal Peak North, which we scrambled up to after accessing the West Ridge from Terminal Ledge.
7. Our bivy site on the West Ridge of Terminal a few hundred feet below the summit of Terminal North. (Photo by DR.)
8. Our bivy site.
9. DR's dinner: Nuun tablet, half a ramen flavor packet, and a handful of smashed chips.

Bivy #2 to Trans-Canada HWY
6:45-10:30 am (travel time: 3:45); 100% complete
Photos:
1.    
2.    
3.    
4.    
5.    
6.    
7.    8   
9.  
Photo descriptions:
1. From our bivy, we had a couple of descent options: The West Ridge (on the right) or the Illecillewaet Glacier (left). We chose the Glacier,  since it would be quicker, and we had brought crampons for this descent.
2. Starting down the Illecillewaet Glacier.
3. Descending the
 Illecillewaet Glacier.
4. Crack on the
 Illecillewaet Glacier.
5. Nearing the end of the glacier. Youngs Peak in distance.
6. Quartzite slabs at the base of the glacier.
7. We intersected the trail coming down from Perley Rock (Perley Rock on the left in the photo).
8. The final stretch of trail to the
 Illecillewaet Campground. So much more pleasant then the way we started the traverse with a 'shwack up Herdman Couloir!
9. Oops...guess you need a wilderness permit if you plan to stay up there overnight. Fortunately, it was only a warning.

Comments Pertaining to this Page / Trip Report

Useful beta. Updated route information. Corrections. Historical notes. Interesting facts. No fluff please.
Leave a Reply

Your email address will not be published. Required fields are marked *