The first time I climbed the Incredible Hulk (as of this trip report, I've climbed Red Dihedral in 2013 and 2015 and Positive Vibrations in 2013), I noticed a group of spires across the valley to the west, about 600-800' high with steep walls and crack systems. These are called the Little Slide Spires. There are a few routes on these spires and certainly potential for more routes. One of the routes that intrigued me was the East Face Direct of Outguard Spire, the furthest north of the named spires. A Peter Croft route, this route climbs crack systems up the steep 800' east face of the spire. An account of this route is in Croft's book "The Good, The Great, and The Awesome."
So, at the end of Summer 2016, on the drive between the Wind Rivers and Yosemite eeking out a few days more climbing before heading back to Washington, I managed to squeeze in a day for the East Face Direct with my friend Jeff. Jeff and I really enjoyed this route. We found the climbing to be interesting and challenging, with multiple cruxes, and good climbing on every pitch. Plus, the position was superb, with awesome views looking across the canyon at the Hulk, and a tiny sharp summit to cap off the route. Although the rock was not the splitter white granite of the Hulk (the Hulk is hard to beat), overall we felt that the rock quality was good, just a bit gritty at times due to lack of traffic. Jeff and I both felt that the 10c traverse on the third pitch was the crux of the route, while the 10d corner on the fourth pitch seemed straightforward. With its mellow approach and descent and 6 pitches of climbing, the route makes for a pretty chill car-to-car (or camp-to-camp or camp-to-car or car-to-camp...) day of great climbing without the crowds on the nearby Hulk. I'd recommend it.
The following page gives some overlays and photos from the climb.
Pitch-by-Pitch Photos
THIS TRIP REPORT IS STILL MOSTLY IN THE EMBEDDED HTML FORMAT OF MY OLD WEBSITE. MOBILE Tip: Try Landscape mode. It is generally more mobile friendly.
Photos:
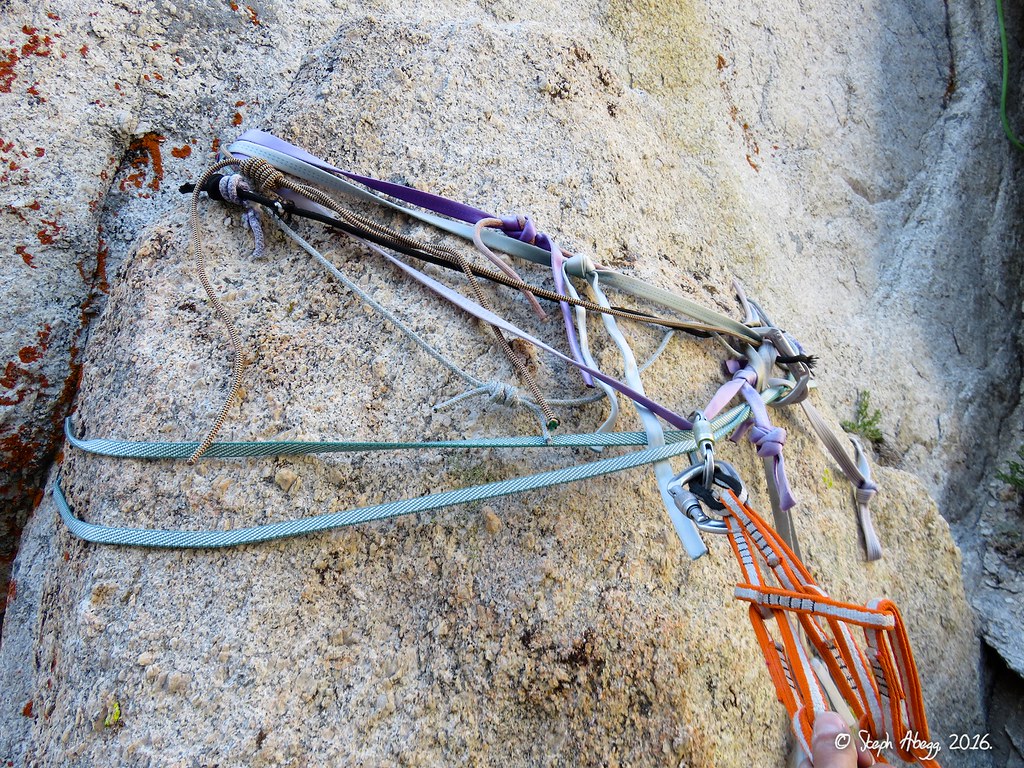
Photo descriptions:
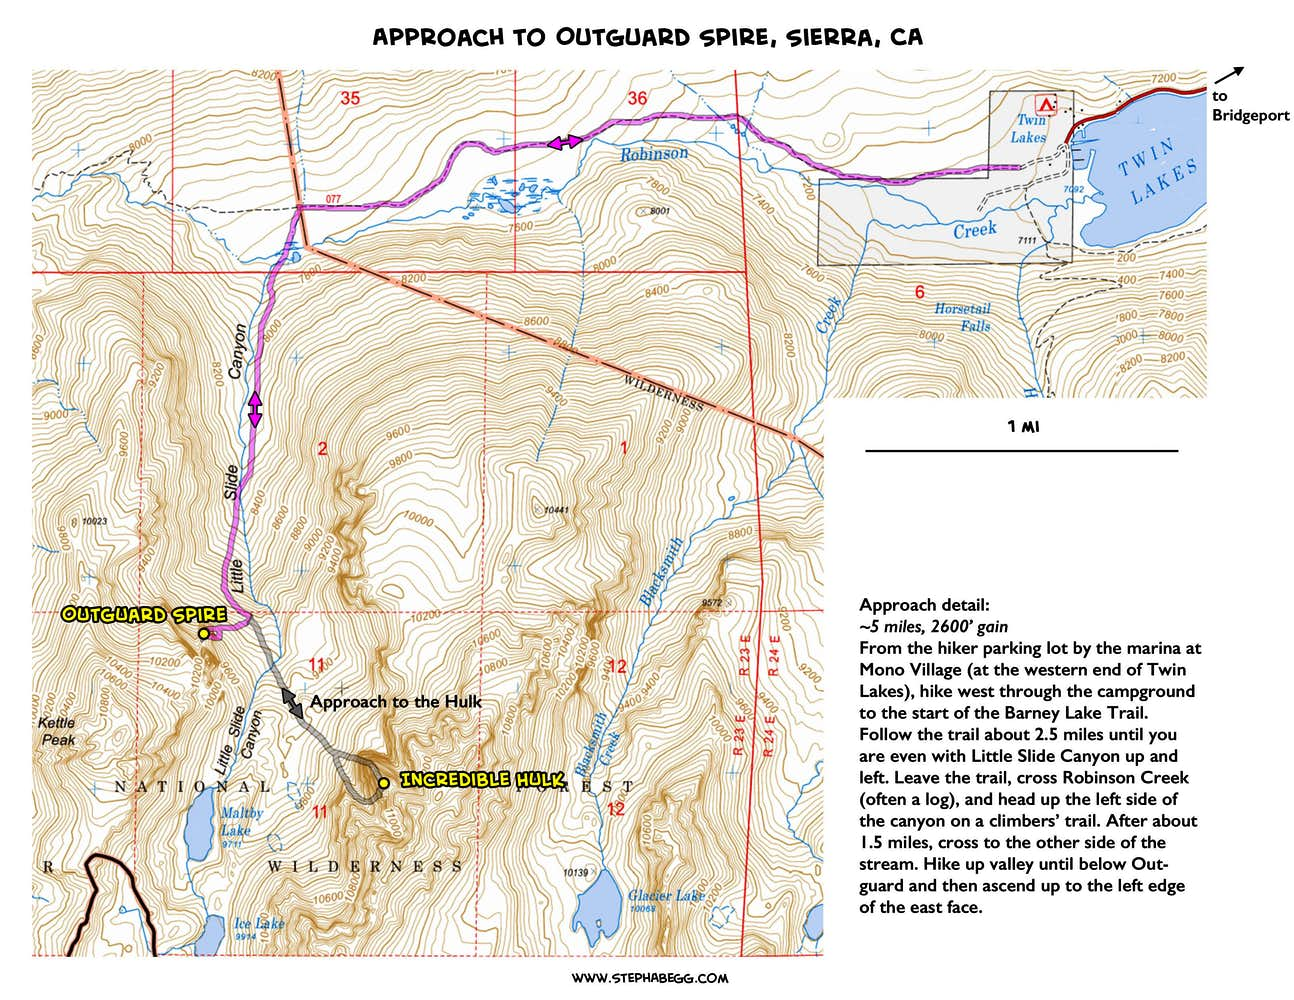
Approach
~5 miles, ~2600' gain.
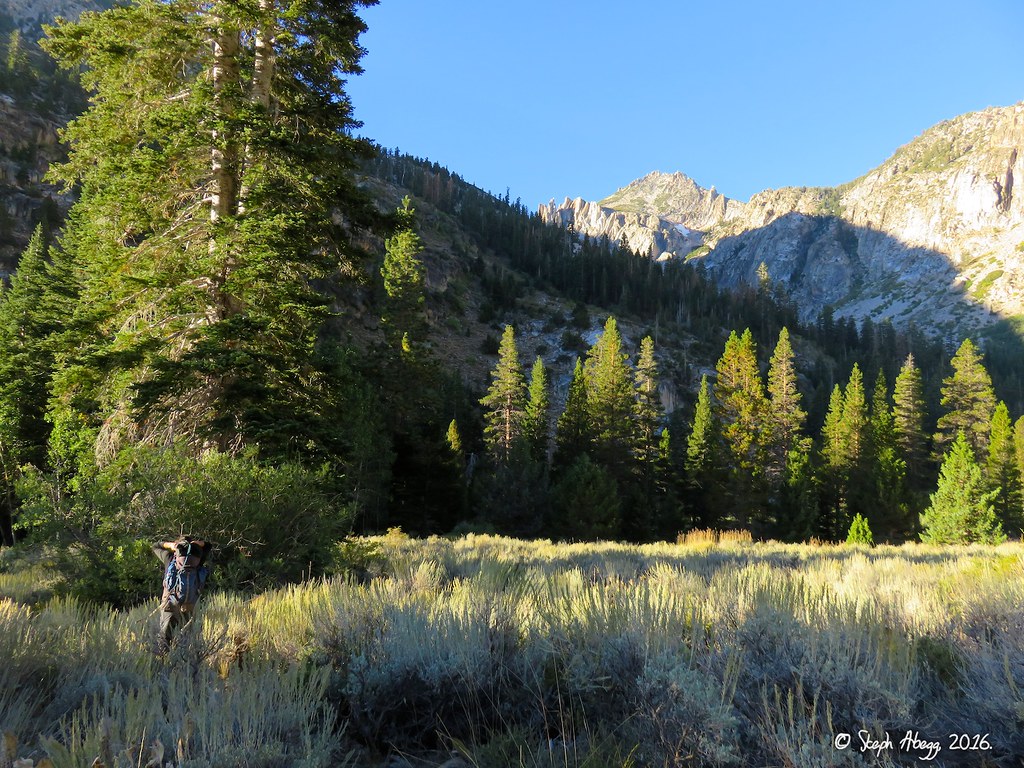
(Same as approach for Hulk, except turnoff from path to Hulk when below Outguard.) From the hiker parking lot by the marina at Mono Village (at the western end of Twin Lakes), hike west through the campground to the start of the Barney Lake Trail. Follow the trail about 2.5 miles until you are even with Little Slide Canyon up and left. Leave the trail, cross Robinson Creek (often a log), and head up the left side of the canyon on a climbers’ trail. After about 1.5 miles, cross to the other side of the stream. Hike up valley until below Outguard (the first spire you will come to on the right side of the canyon). The route starts at an obvious ledge on the left side of the east face.
1.
2.
3.
4.
5.
6.
1. The start of the Barney Lakes trail. Walk through the campground to get to this point. This can be difficult for first-timers to find in the dark.
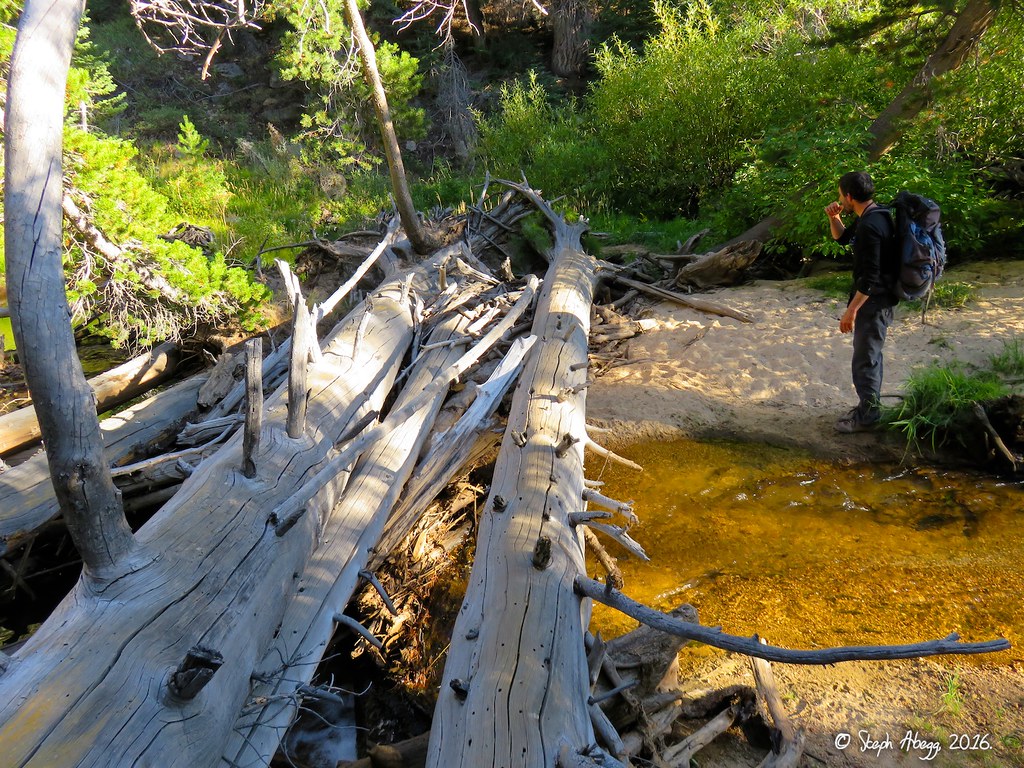
2. Taken just after turning off the Barney Lakes Trail on a path heading towards Little Slide Canyon (above and right in photo). 3. The convenient logs across Robinson Creek (these logs have been there since at least 2013, when I first climbed the Hulk).
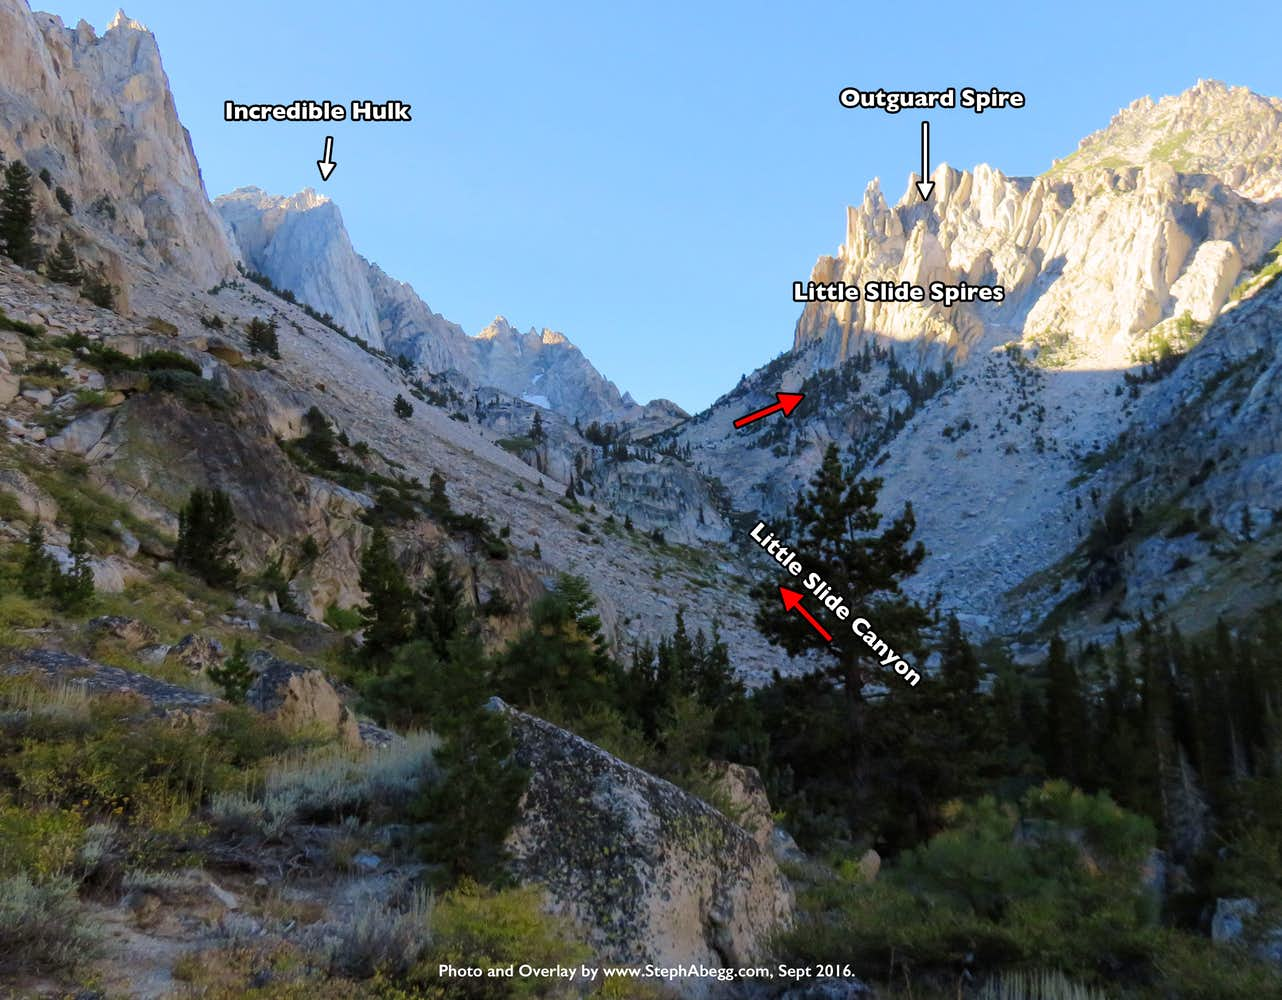
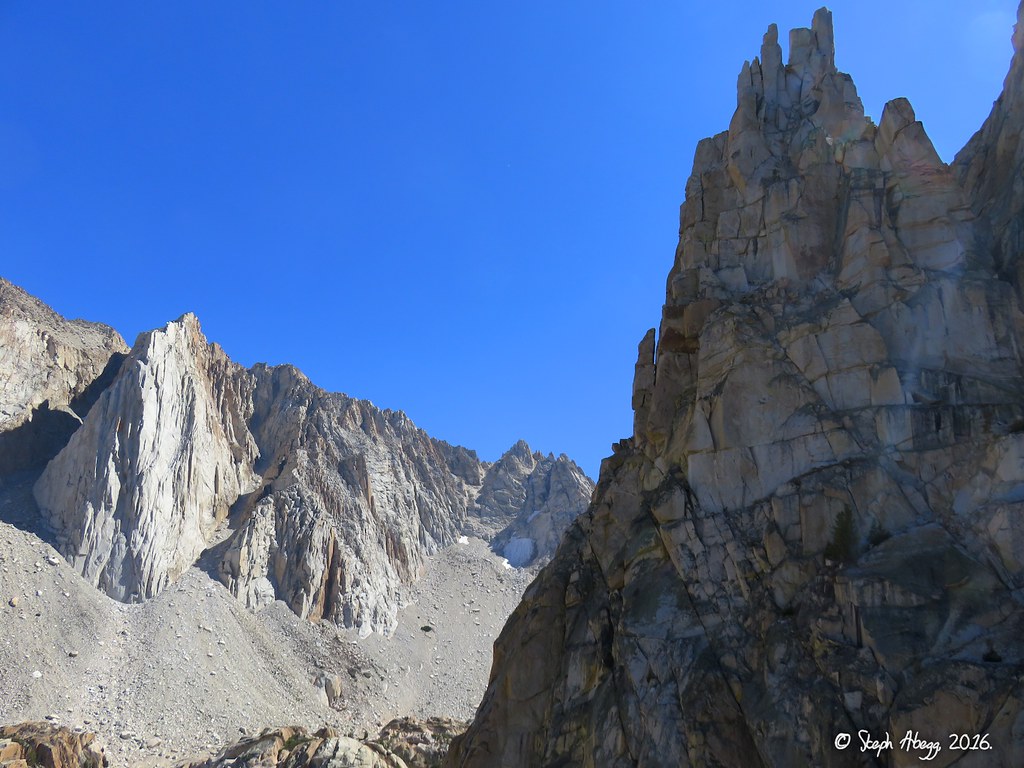
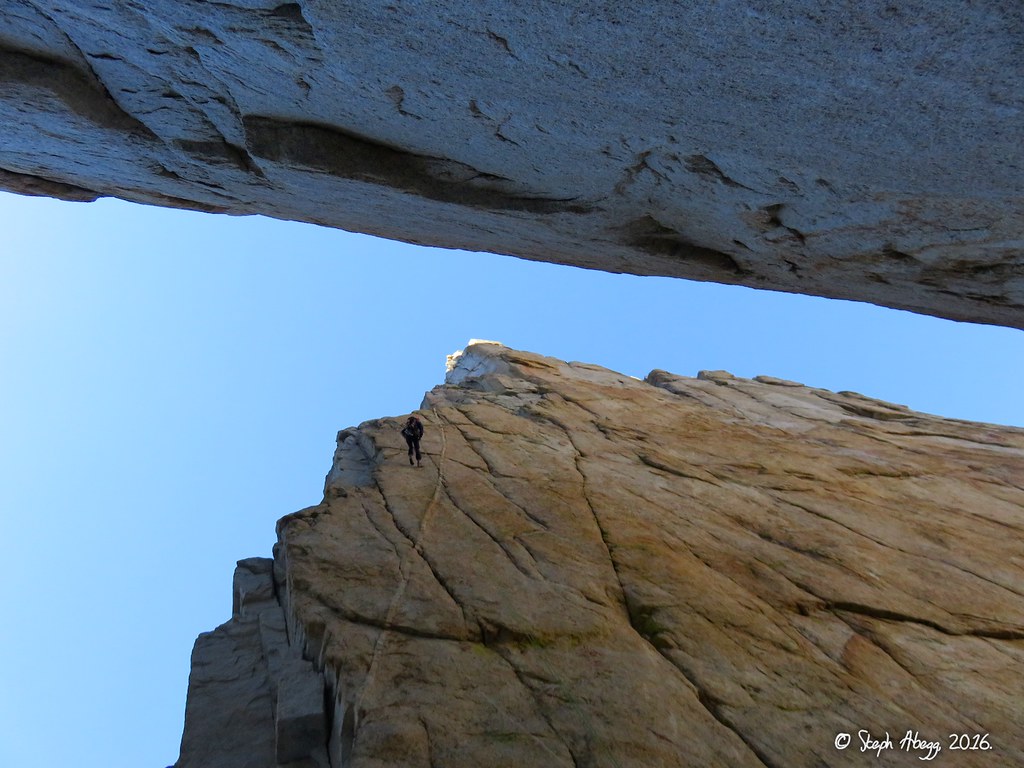
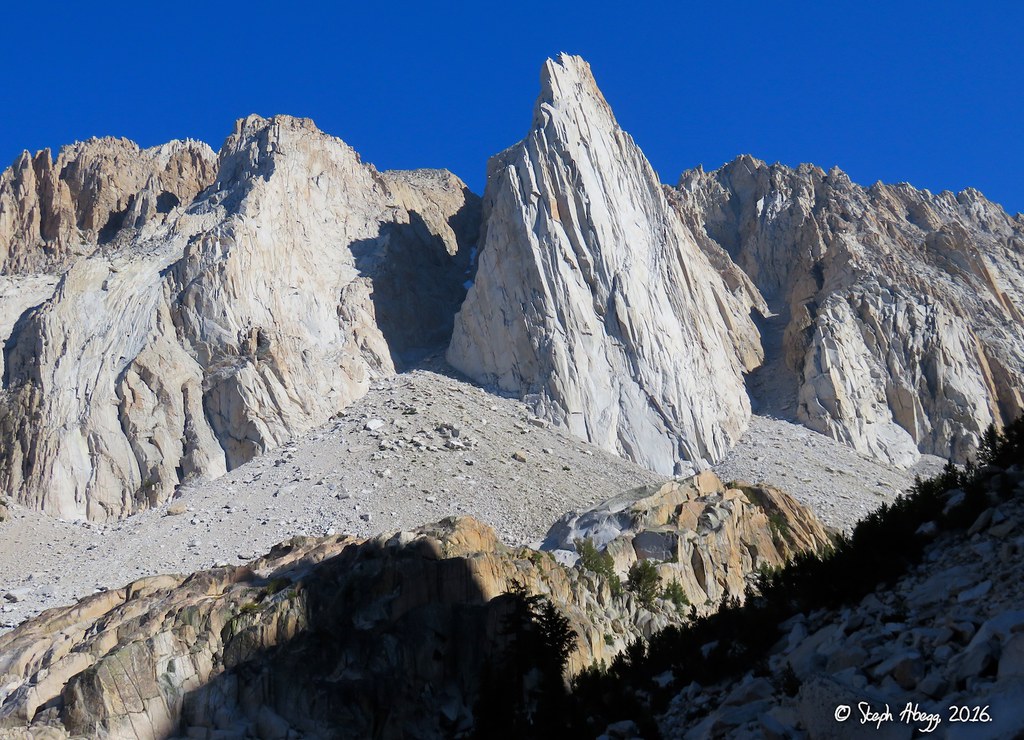
4. Outguard Spire as seen from hiking up Little Slide Canyon.
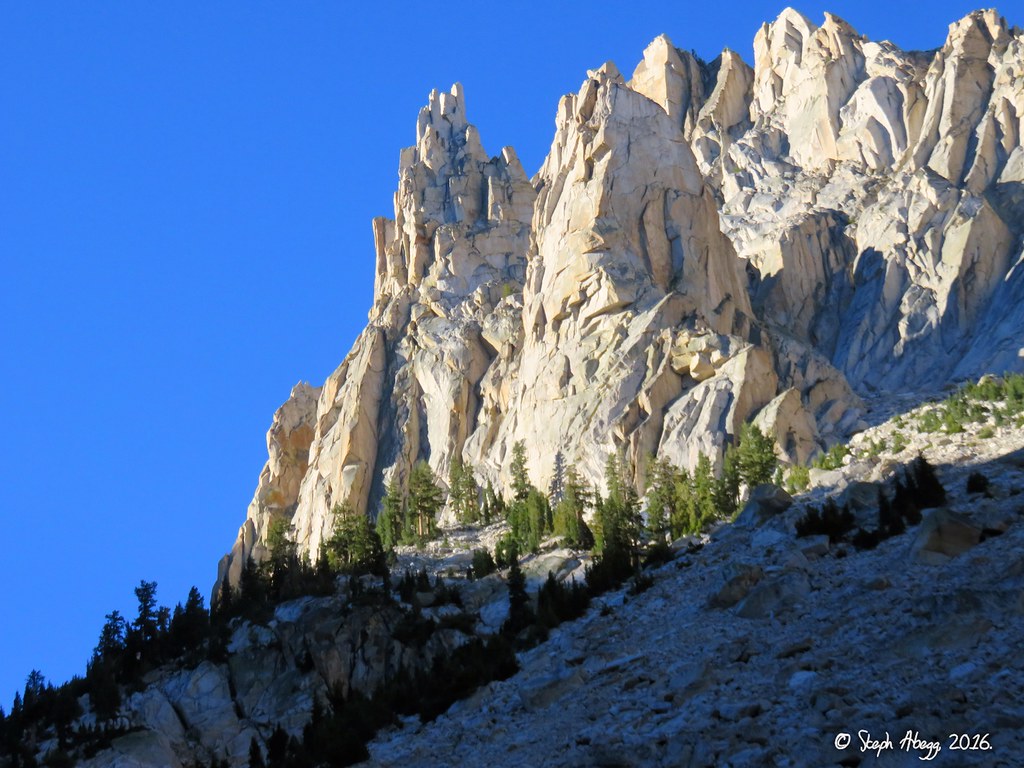
5. Outguard Spire is on the right. The Turret is just left. 6. Outguard Spire on the approach. The east face is on the right, south face on the left, and the descent gully left of this.
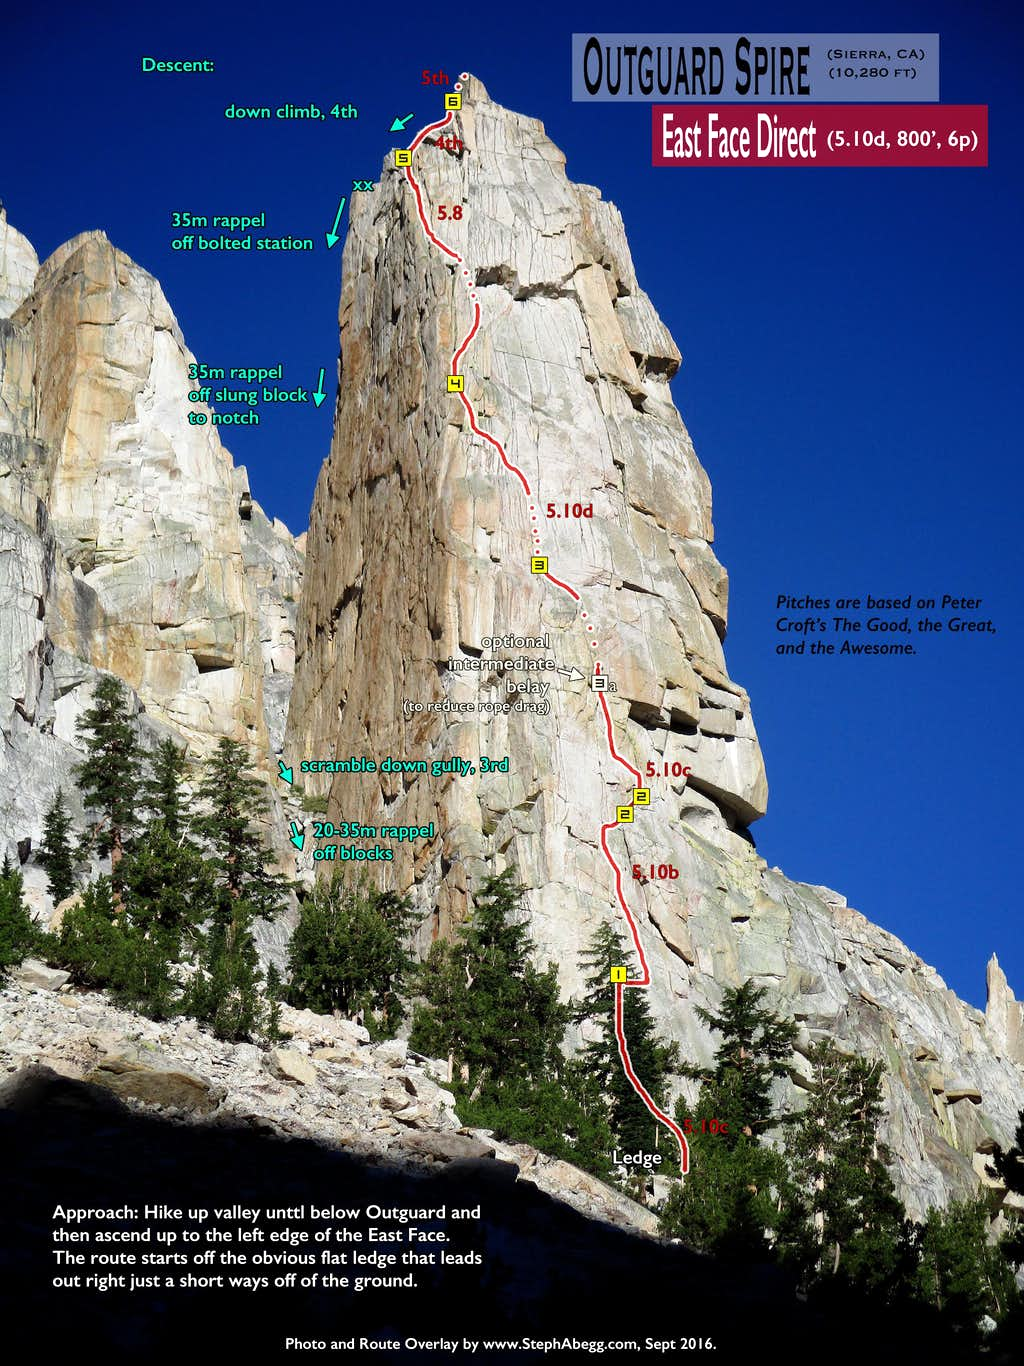
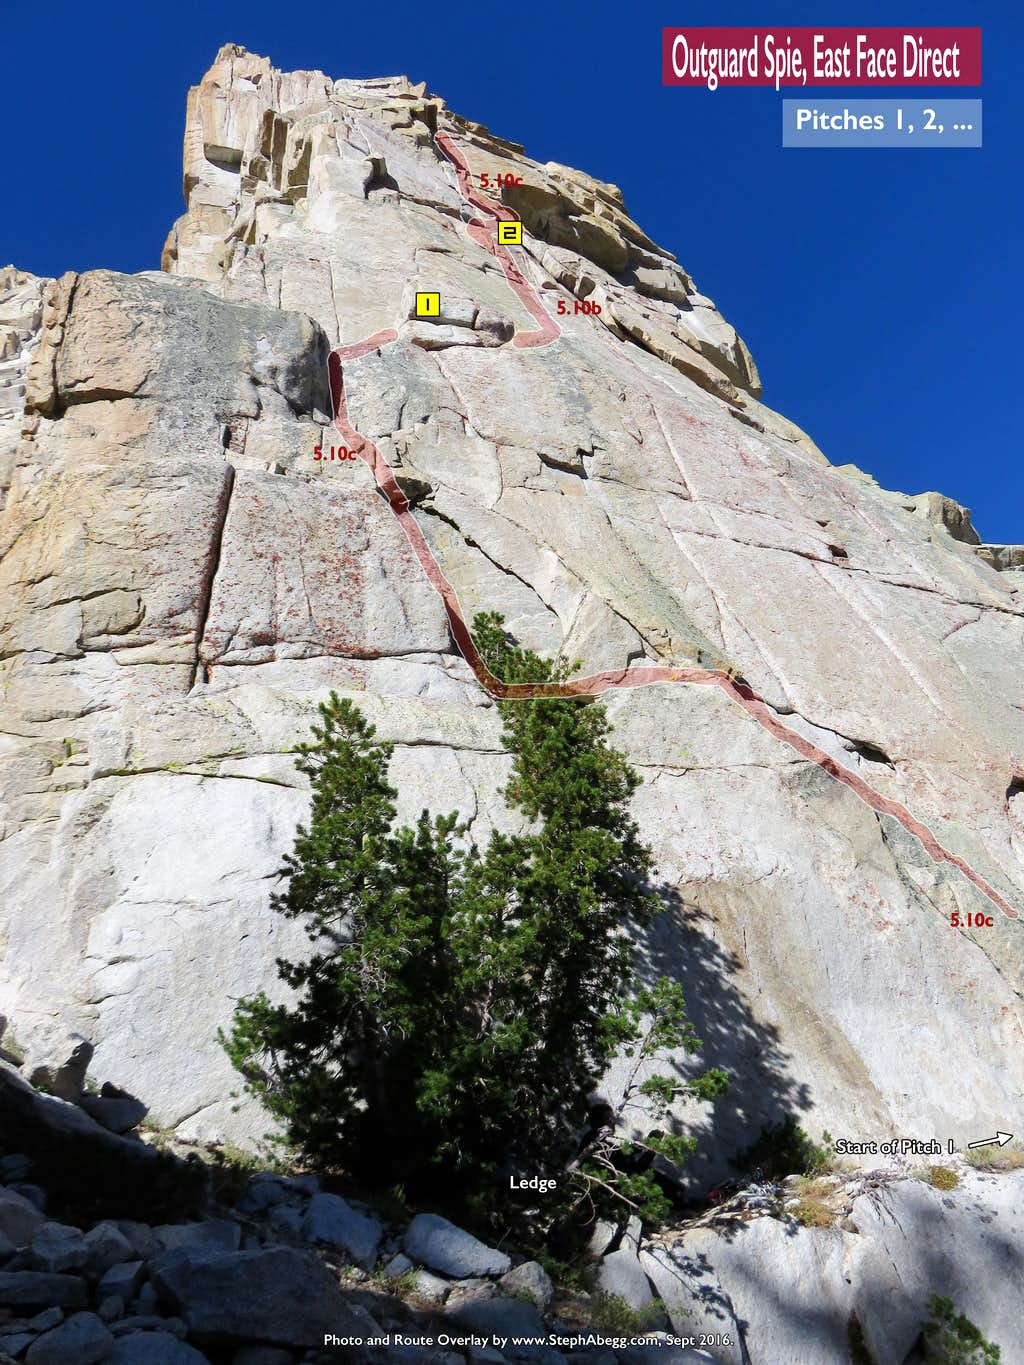
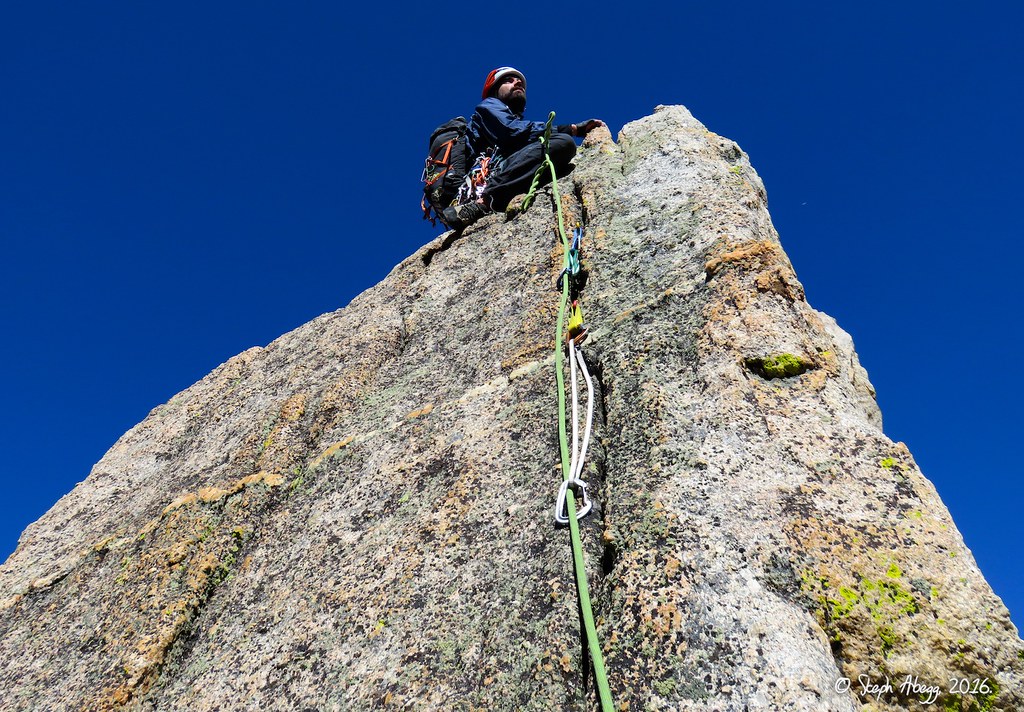
Pitch
1
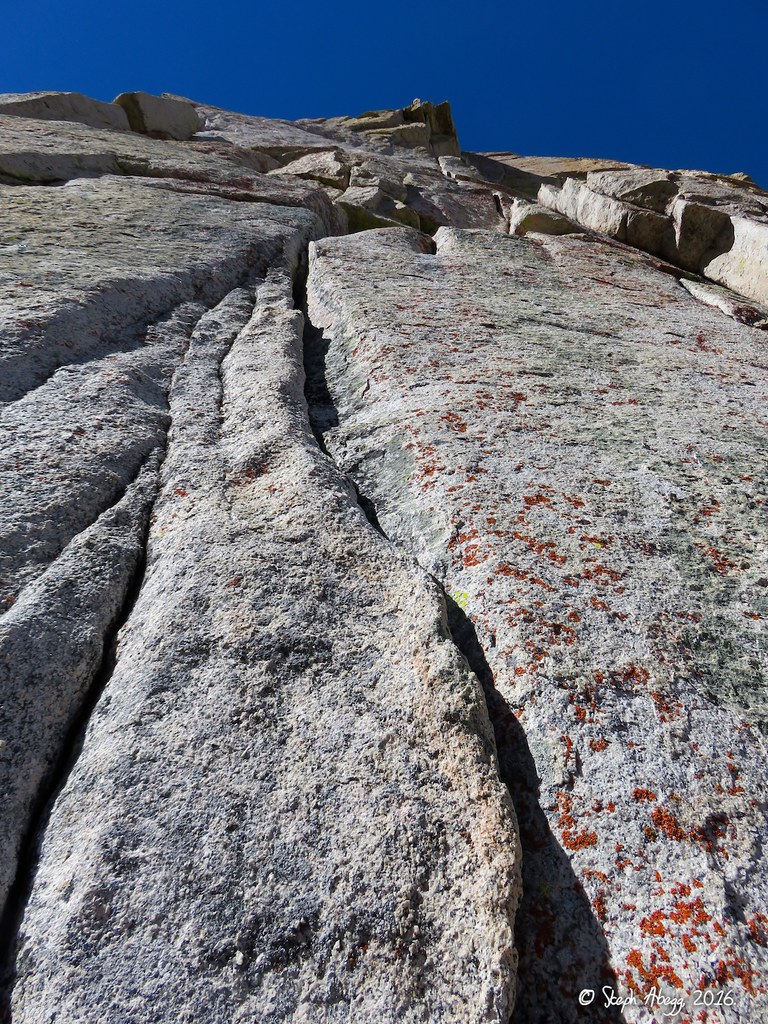
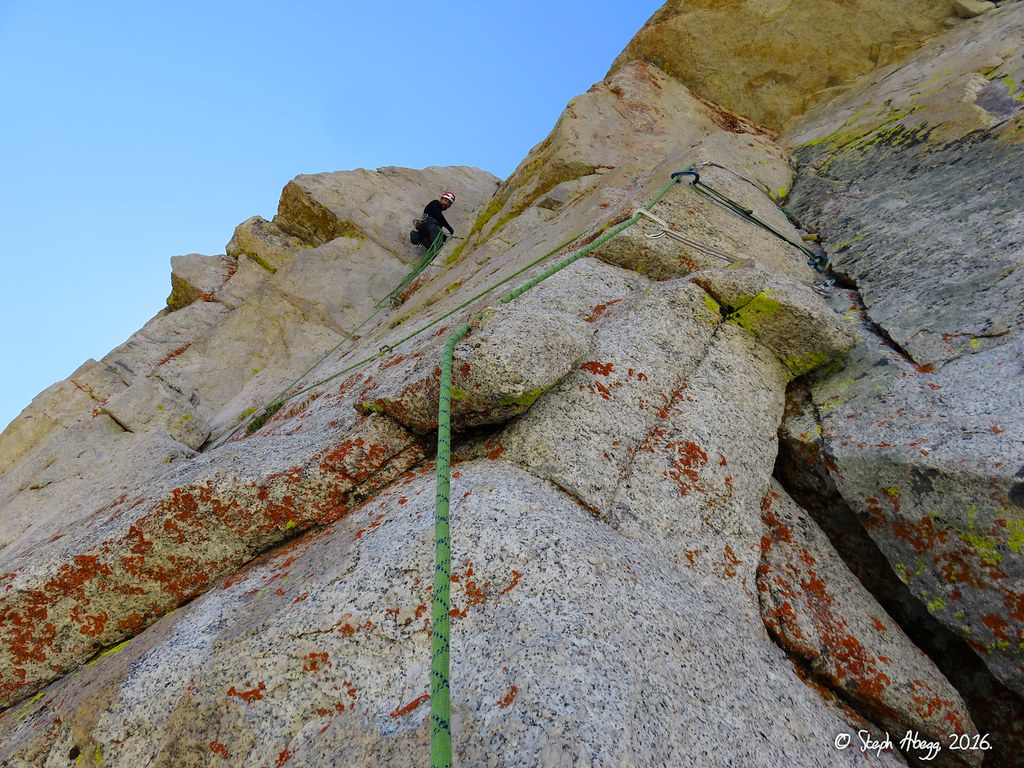
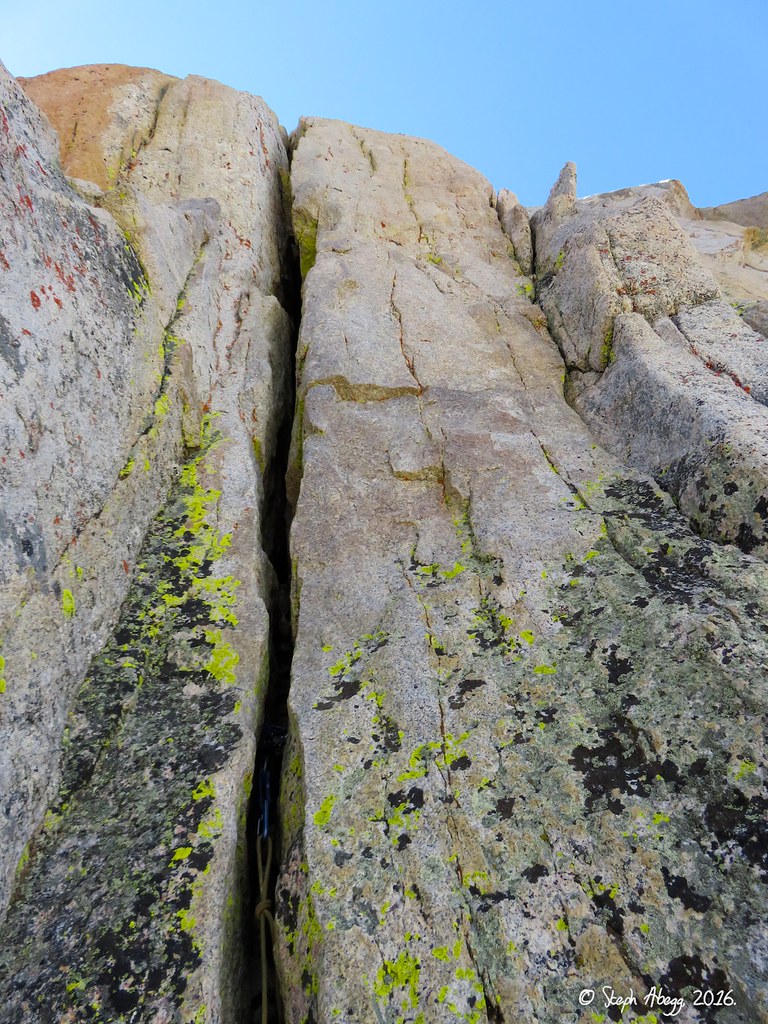
5.10c, 35m From the right side of the ledge, make a few tricky moves (apparently not the 10c crux, but seemed like the crux of the pitch to me), then traverse left along an arching left ramp/crack system, then up a dihedral, past a bulge, and past a couple of thin layback moves (Croft says this is the 10c crux of the pitch, but seemed easier). Easy moves up and right to a belay by an old bolt.
7.
8.
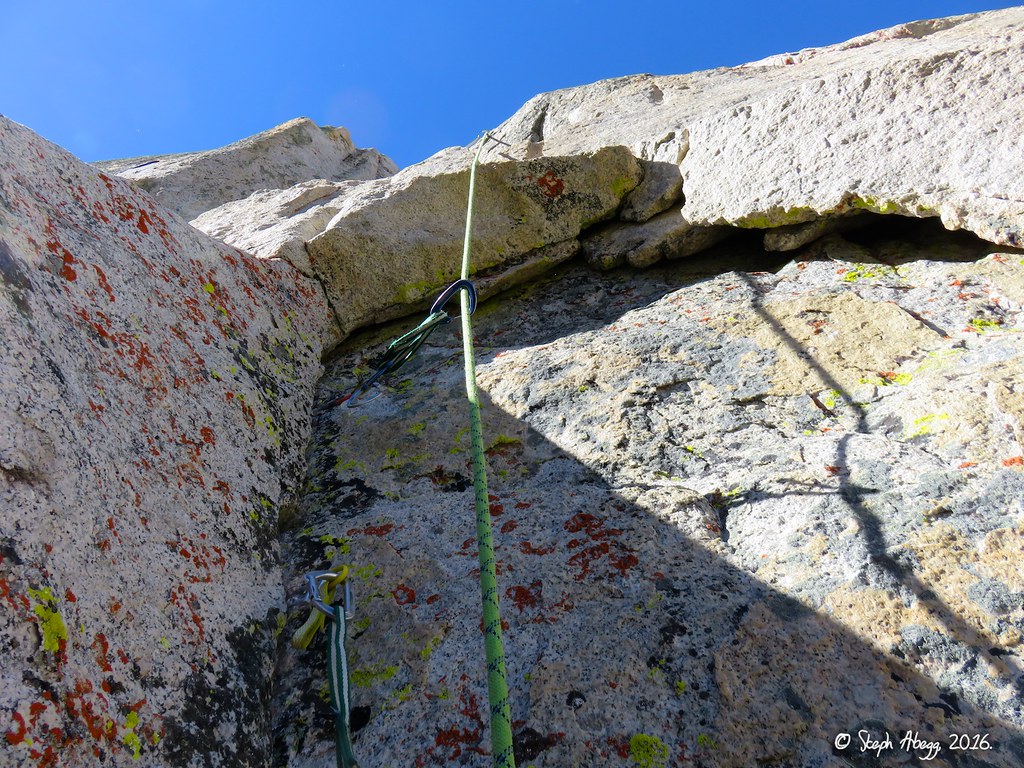
7. Jeff on Pitch 1. Here he is just above the cruxy start moves and is beginning the easier leftward traverse on the ramp/crack system. 8. Looking up at the second half of Pitch 1, which goes through the bulge and up a short corner above.
Pitch
2
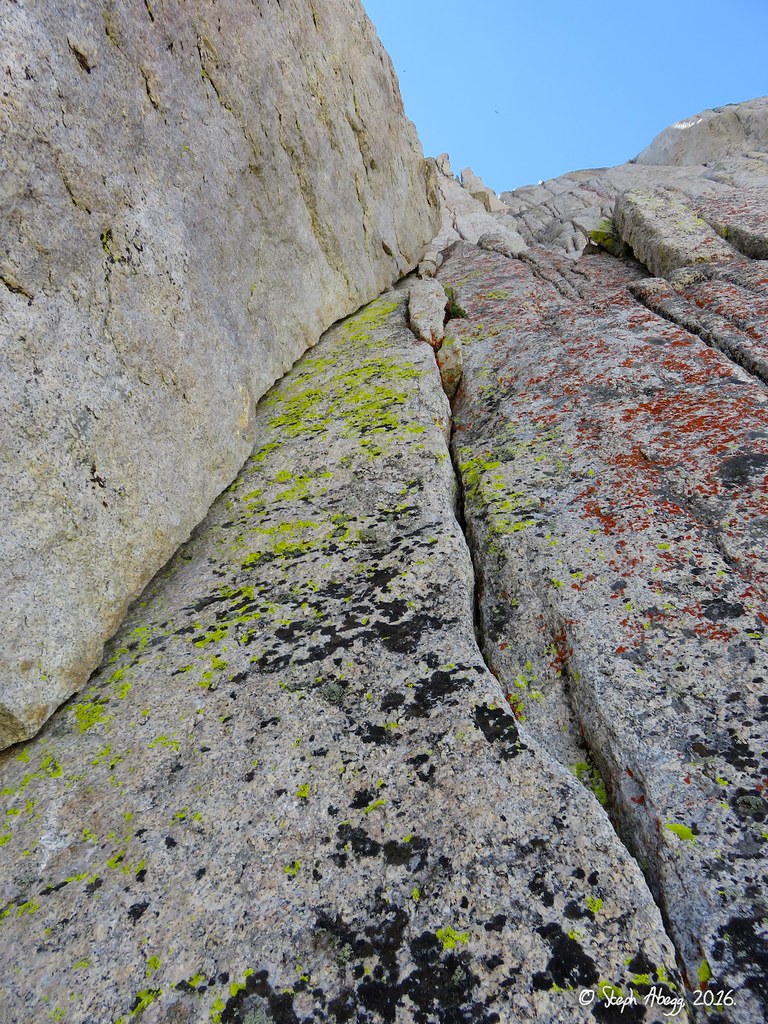
5.10b, 30m Traverse right to a finger crack. Up this past a bolt (10b), past a big detached block (more solid than it looks), and up to the base of a roof where you traverse right to a belay stance below a right facing corner.
9.
10.
9. Looking up the finger crack on Pitch 2. There is a protection bolt about 20 feet up, but the bolt seems a bit unnecessary as the crack takes pretty decent gear throughout. 10. Looking down from the belay at the top of Pitch 2. The final part of this pitch traverses right under a roof.
Pitch
3
(we climbed as 2 pitches due to rope drag)
First half:
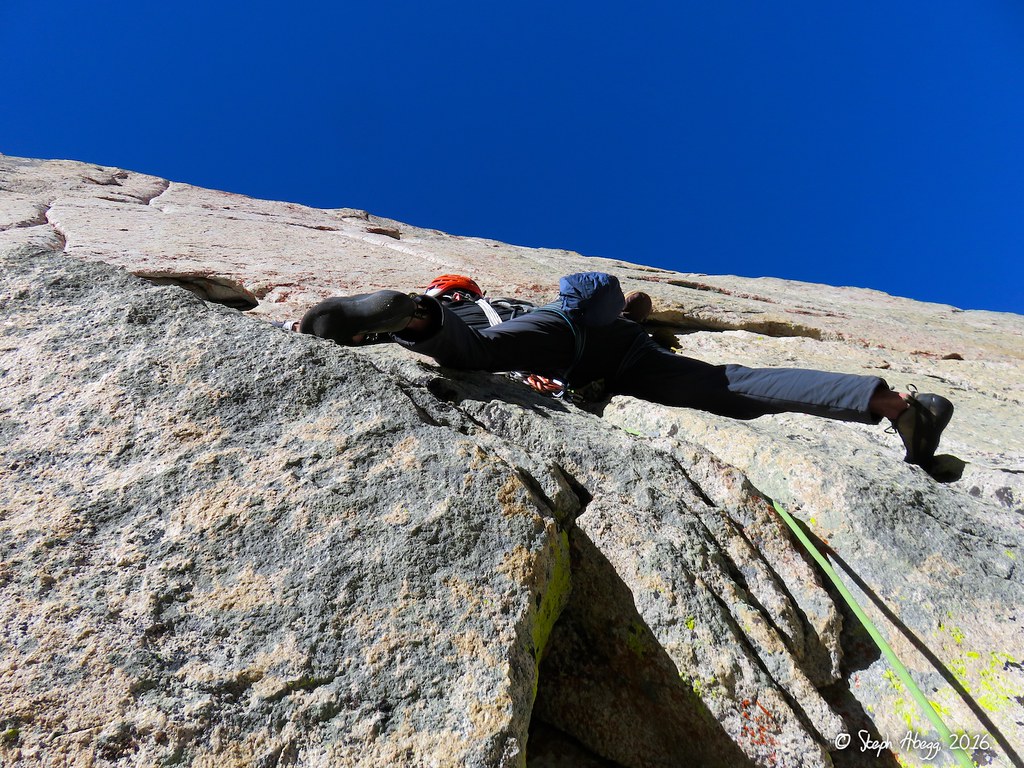
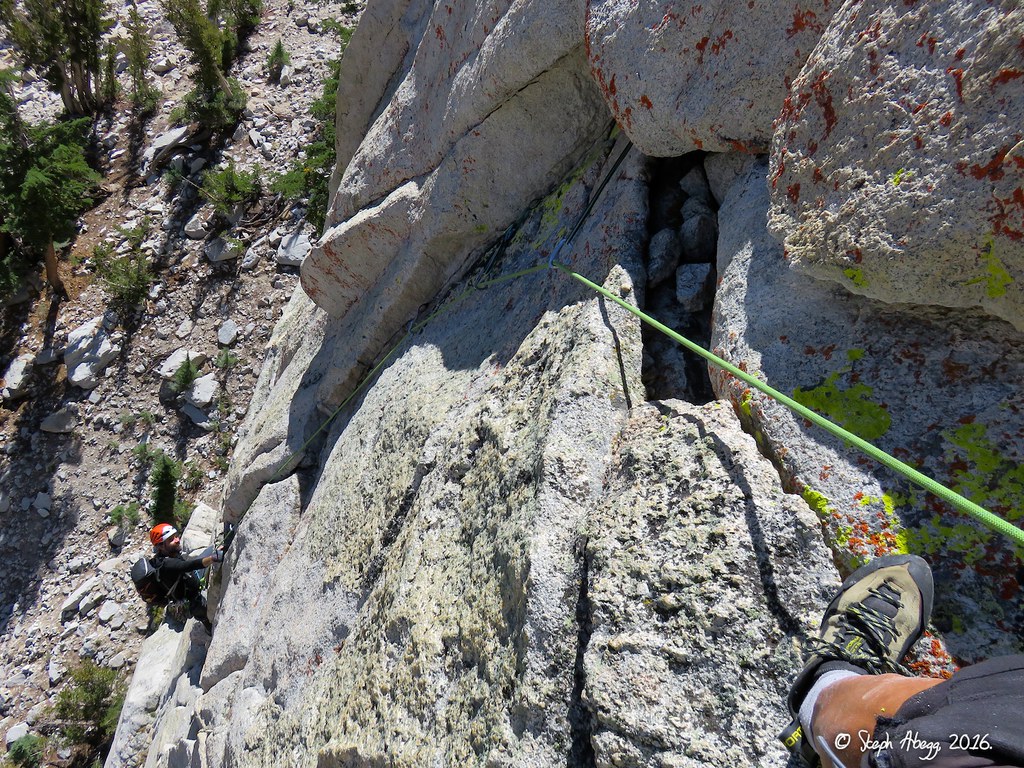
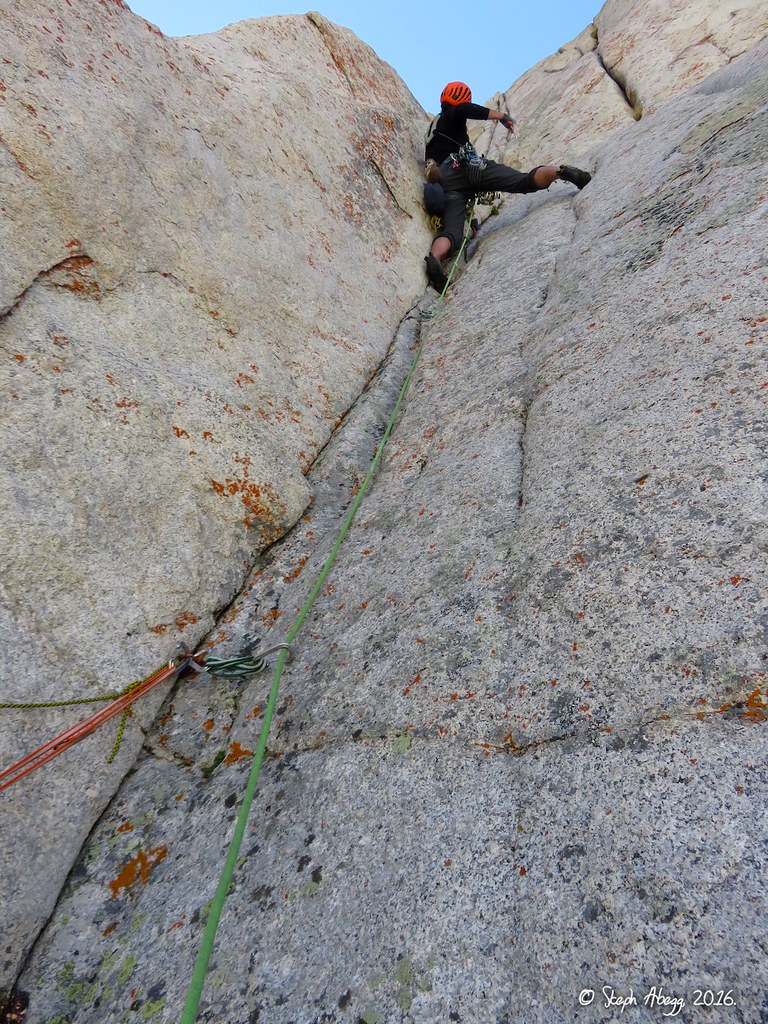
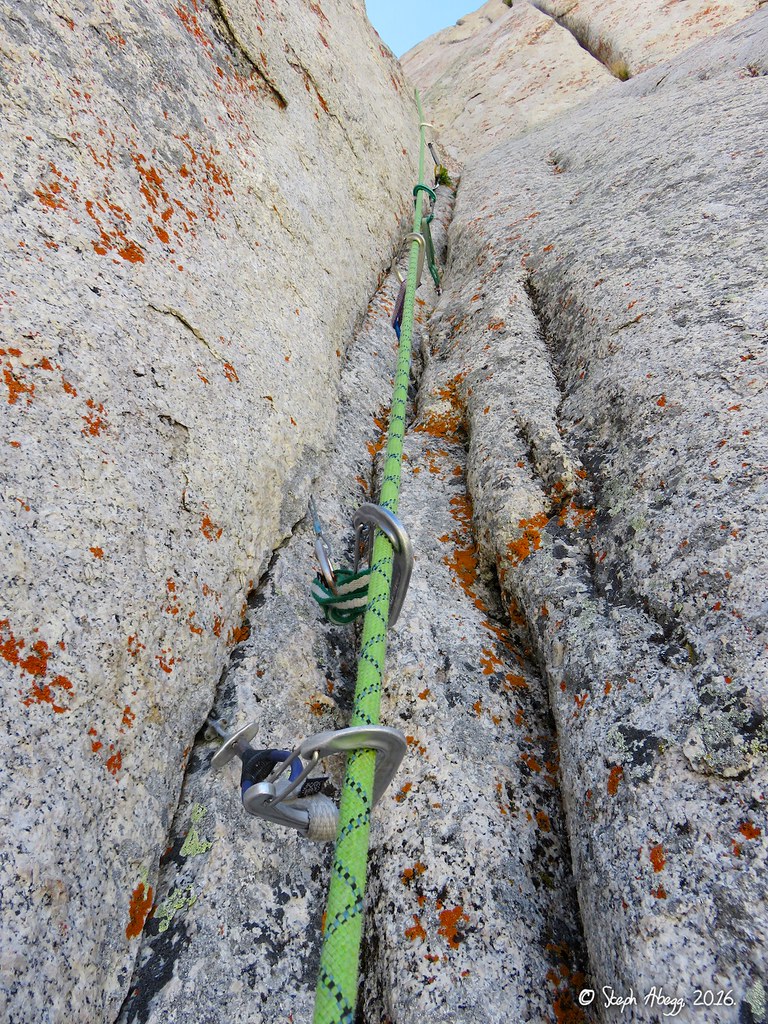
5.10c, 30m Up into the corner, to where a tricky hand traverse goes straight left (10c) on flaring seam to a corner. (This traverse the crux of the route for us, and seemed harder than 10c; the leader can set a piece up high in the initial corner to protect the first couple of moves, but do not place too high or the follower will have to downclimb with a dangerous pendulum possible.) Move into a right-facing corner, then up a finger crack (10c) to a ledge below a thin-hands crack in a corner. Set a belay here if rope drag is bad. Second half: 5.8, 20m Climb the thin-hands crack, then move up and left to a belay below the thin dihedral with a piton at its base.
11.
12.
13.
11. Jeff on the crux traverse across the flaring seam. He got a good cam (0.5-0.75 size, offset is great) in about where he is in the photo. Awesome lead Jeff. 12. Looking up at the first half of Pitch 3 from below the crux traverse. Due to rope drag, we set an intermediate belay above the fingercrack. 13. The 5.8 crack above our intermediate belay. I led this half of the pitch. This was fun climbing, and feels 5.8 if you have thin hands.
Pitch
4
5.10d, 40-50m Climb the right-facing corner, which takes small gear (Croft puts this as the 10d crux of the route, but to us it seemed pretty straightforward and easier than the 10c sections on Pitch 3). Move left, and climb up an easier corner, and belay beneath a wide crack.
14.
15.
16.
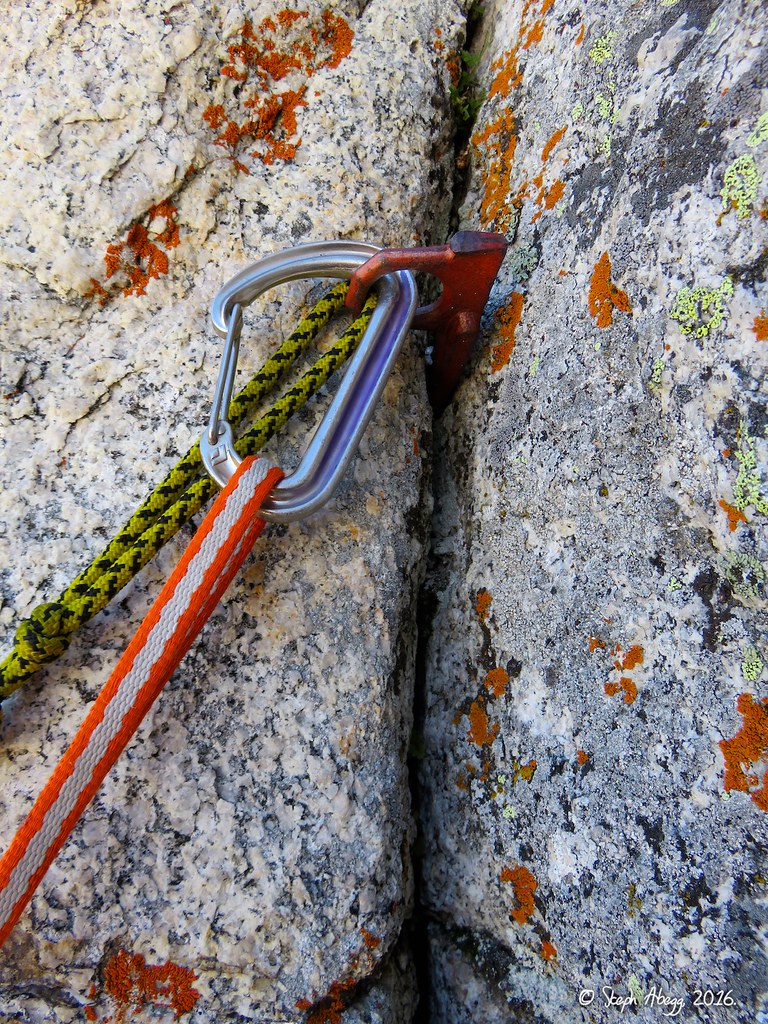
14. Jeff nearing the top of the crux corner that starts off the pitch. 15. From below, the corner appears like it won't take good gear, but it actually protects pretty well with small cams and nuts. 16. A piton at the base of the corner. Apparently there used to be a couple of fixed pins on this pitch, but the only one we found was at the base of the corner.
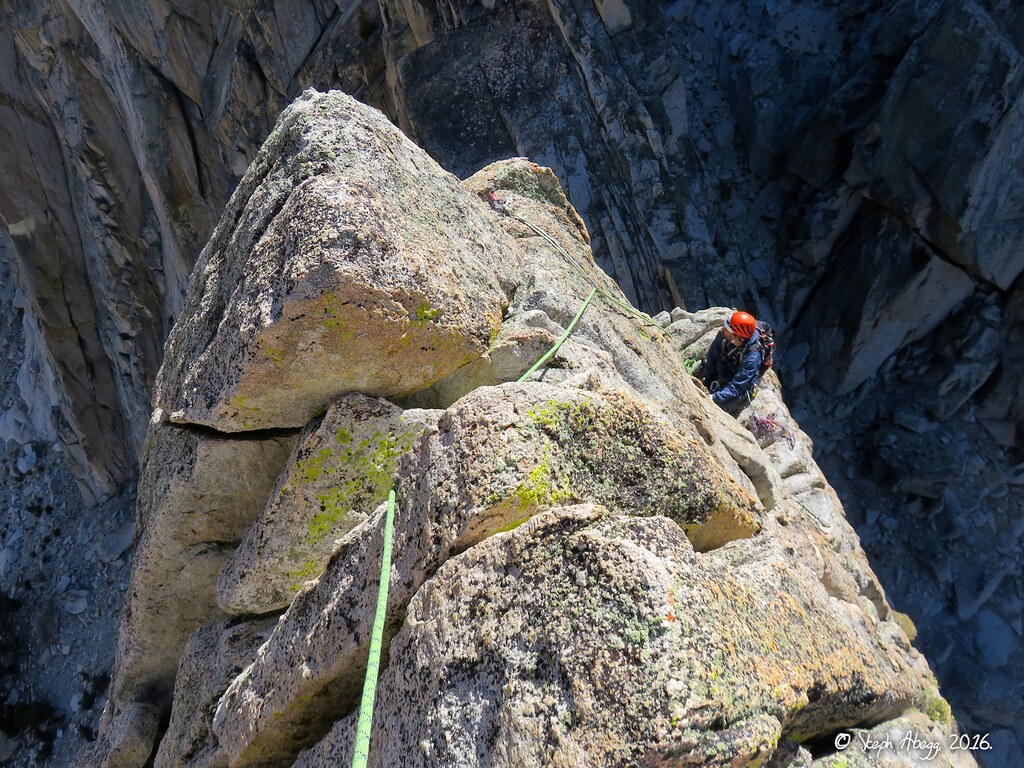
Pitch
5
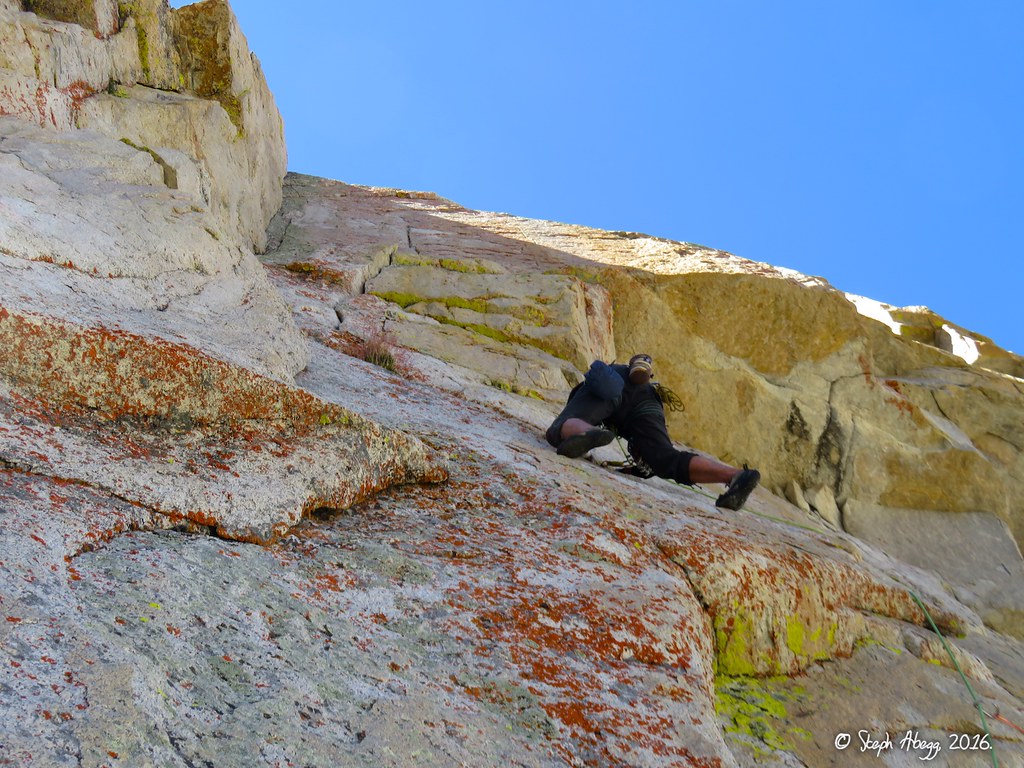
5.8, 40-50m Climb up cracks and corners and past blocky terrain (some looseness), trending left towards the crest. Belay at the top shoulder of Outguard.
17.
18.
19.
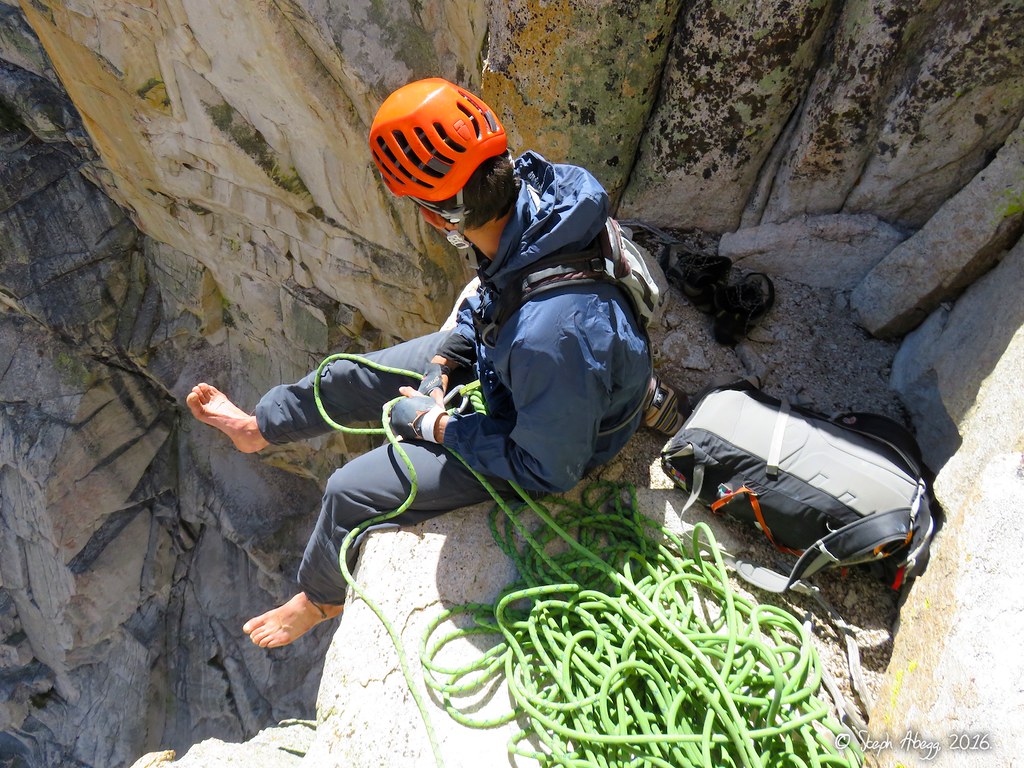
17. We belayed beneath this wide crack. We climbed a few moves up the wide crack, then moved right, around some loose blocks to a corner.... 18. ...up the corner, then left and up towards the shoulder of Outguard. 19. An awesome exposed belay seat on the shoulder of Outguard.
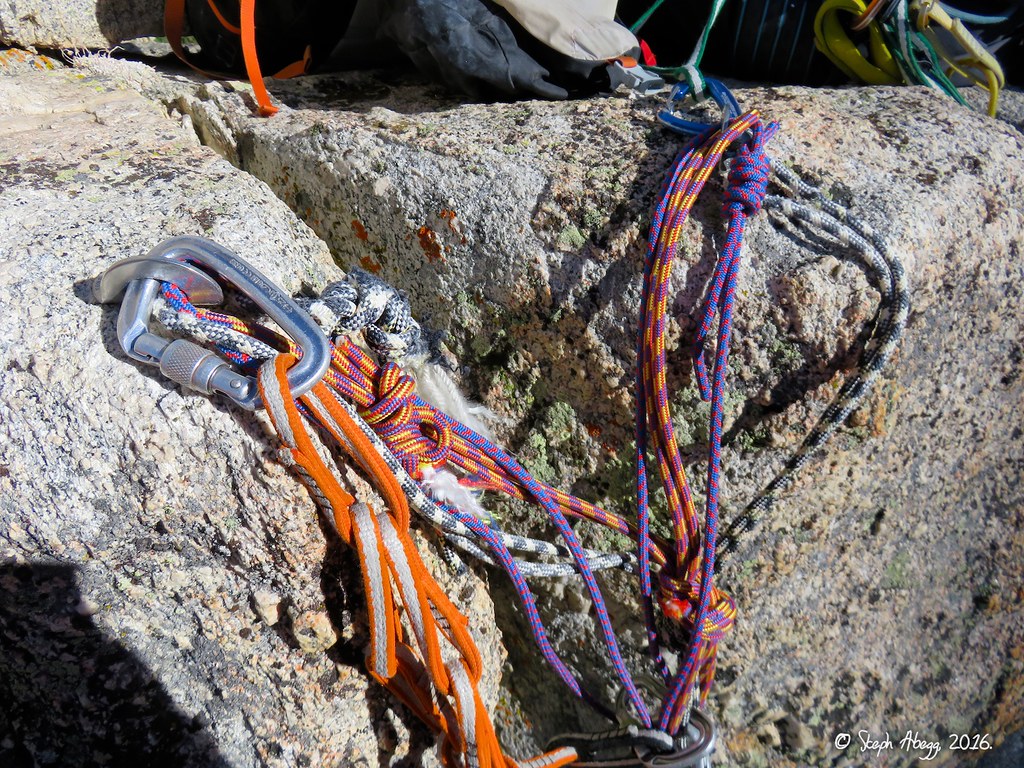
Pitch
6
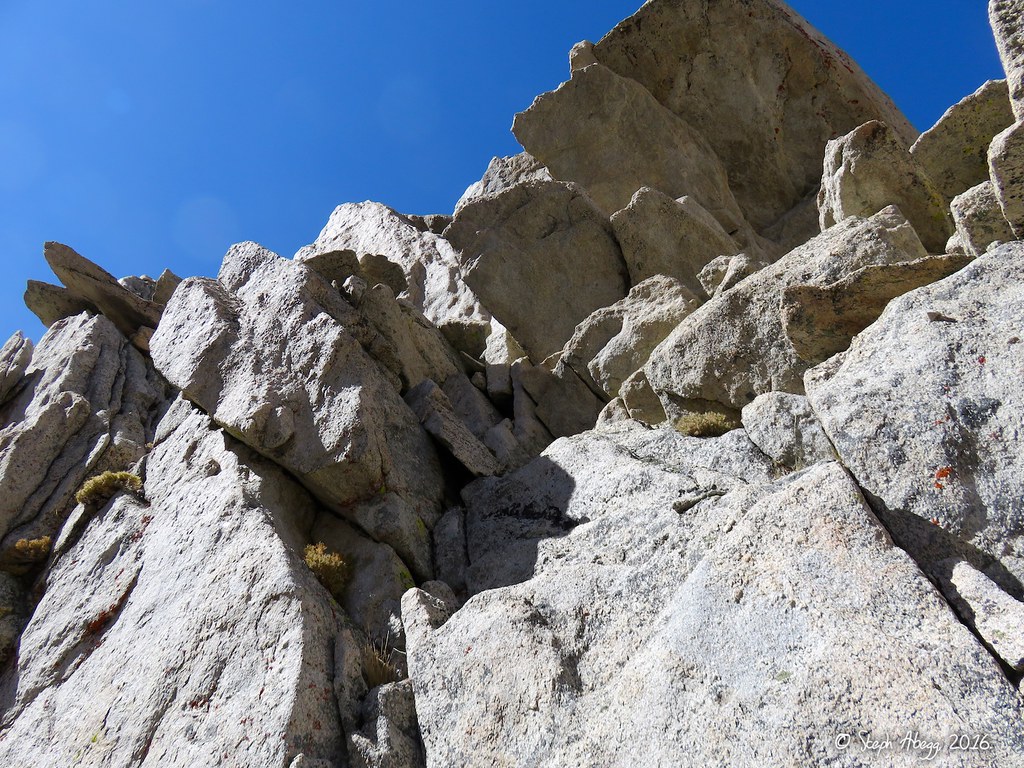
4th-5th, 30-40m Scramble up mostly 4th class terrain to a belay stance below the summit block. On lead, I climbed to the top of the summit block, then downclimbed and set a belay below the block (there is just a fixed pin on top, not adequate for a belay).
20.
20. 4th class to the summit block.
Top
We climbed cracks (~5.7) on the west side of the summit block to the top (there might be another way to the top but this worked fine). Due to lack of adequate belay anchor on top, we downclimbed this section with a belay just below it.
21.
22.
21. Jeff on the summit, from the belay just below the summit block. We climbed these cracks on the west side of the block (seemed ~5.7), but there might be alternatives ways to the top. 22. View of the Hulk and The Turret.
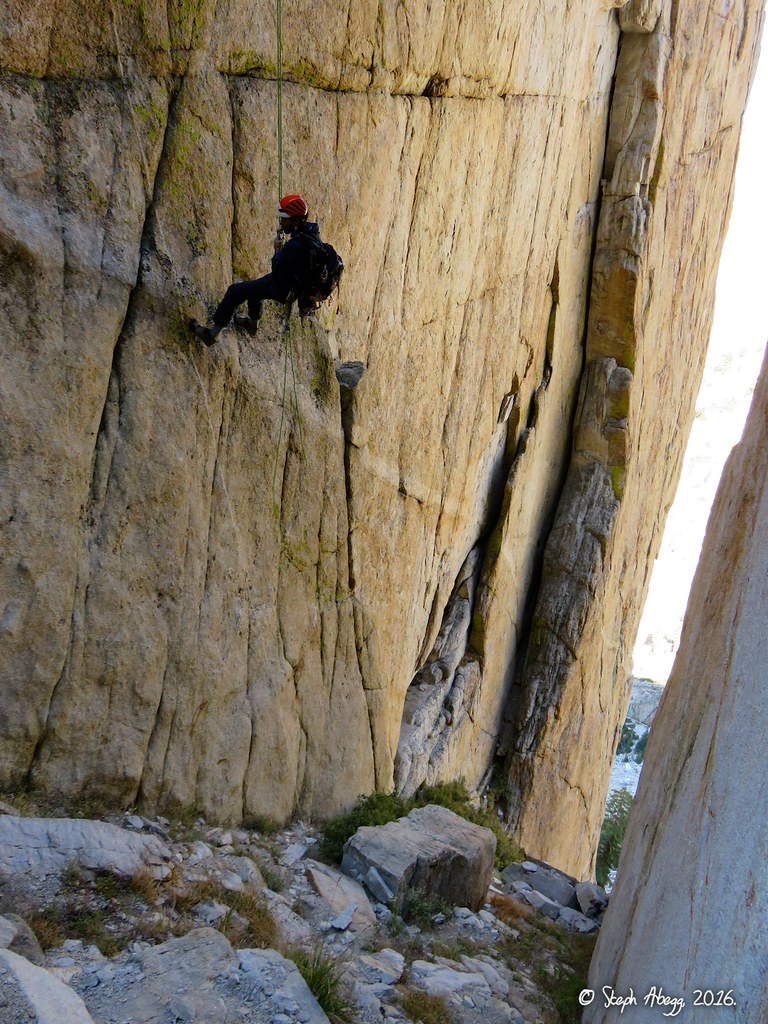
Descent
Downclimb SW (4th) from the summit to a bolted rap station, then make two 35m rappels into the obvious gully, then scramble down gully, make another rappel over a steeper section, then scramble back to packs at base of route.
23.
24.
25.
26.
27.
28.
29.
30.
31.
32.
33.
34.
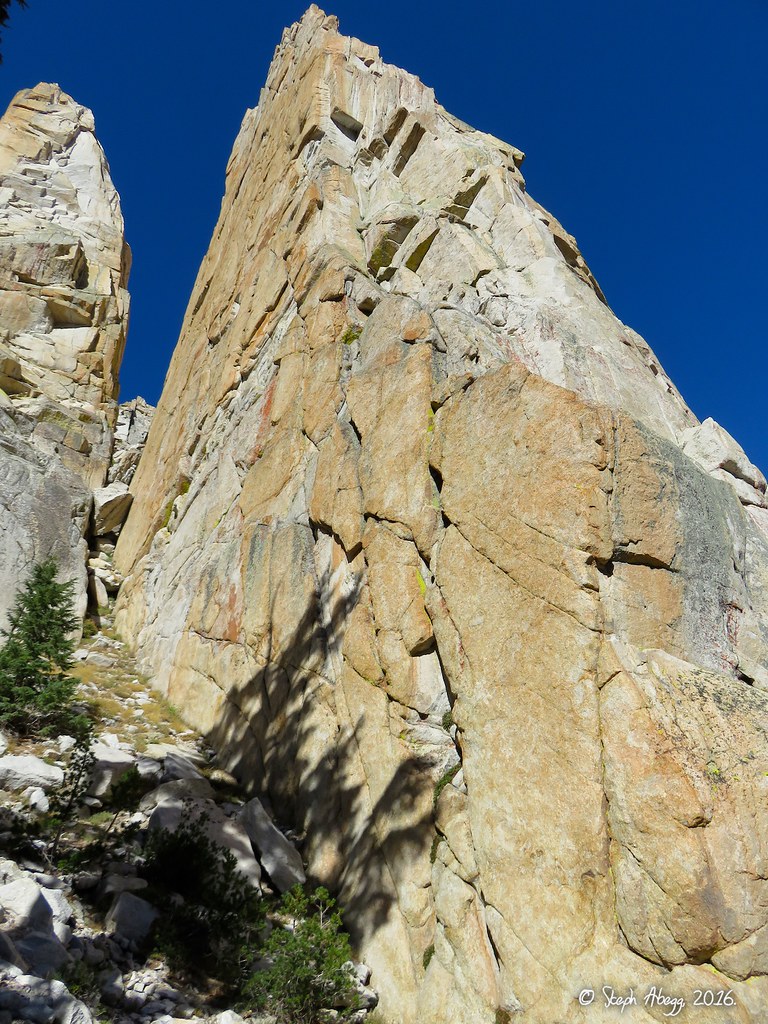
23. Jeff downclimbing to the first rappel station. There is an easier way (3rd-4th) around left but we downclimbed (low 5th) directly down the ridge. 24. The first rappel station, bolted. 25. The second rappel station, on a slung block. 26. Looking down into the gully below the south face of Outguard. 27. Jeff rappeling into the gully below the south face of Outguard. 28. If you look closely at the photo, the tails of our rope (we had a 70m rope) are a good 10 feet off the ground. But if you swing left you can reach the ground further up the gully. So a 70m rope works fine for the rappels. But a 60m rope would be too short for both rappels. 29. The third rappel, over a steeper section lower down in the gully. 30. The descent gully is on the left. The south face towers above. 31-32. Incredible Hulk as seen from the hike out. 33. Looking back up towards the Little Slide Spires. Left to right: The Duck, Regge Pole, The Turret, Outguard Spire.
34. A closer view of Regge Pole, the tallest and narrowest of the Little Slide Spires. Secor's High Sierra book lists 3 routes on the formation - the South Face (III, 5.10), the South Face, Right Side (IV, 5.7 A3), and the East Face (III, 5.11). Maybe I'll be back to climb one of these routes...
Useful beta. Updated route information. Corrections. Historical notes. Interesting facts. No fluff please. Please do not put links in your comment, as my spam filter will filter those comments out.