Palisade Traverse 3/5: Thunderbolt, Starlight, North Palisade (up to 5.9, late spring conditions)
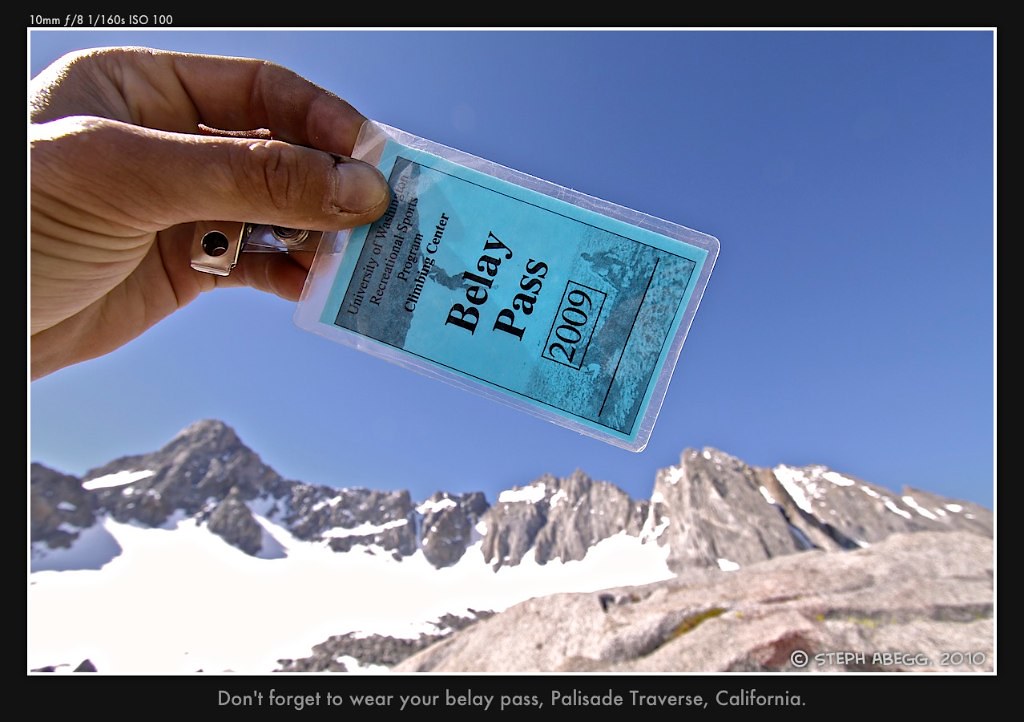
Palisade Traverse 3/5
Routes:
up to 5.9, late spring conditions
- Thunderbolt (14,003')
- Starlight (14,220')
- North Palisade (14,242')
- Polemonium (14,100') - not reached
- Sill (14,153') - not reached
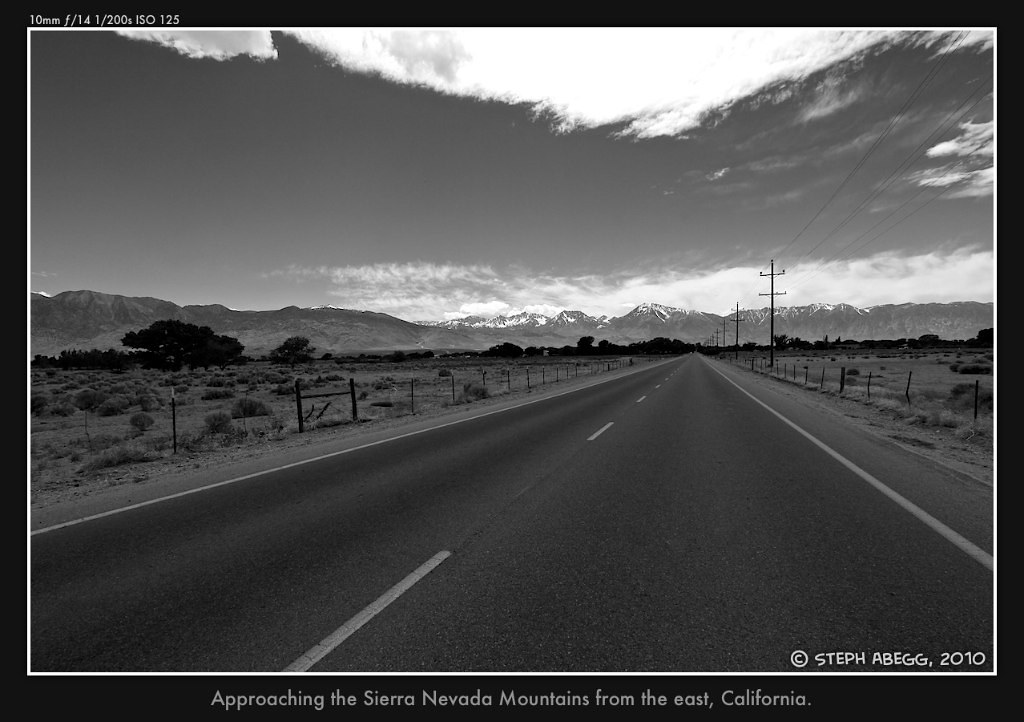
After my Utah Road Trip, the grand finale was the Palisade Traverse in the sunny Sierra Nevada Mountains of California. I had wanted to do this popular traverse for a long time, and although we didn't climb to as many of the summits as we had planned, it was nevertheless worth the detour.
THIS TRIP REPORT IS STILL MOSTLY IN THE EMBEDDED HTML FORMAT OF MY OLD WEBSITE. MOBILE Tip: Try Landscape mode. It is generally more mobile friendly.
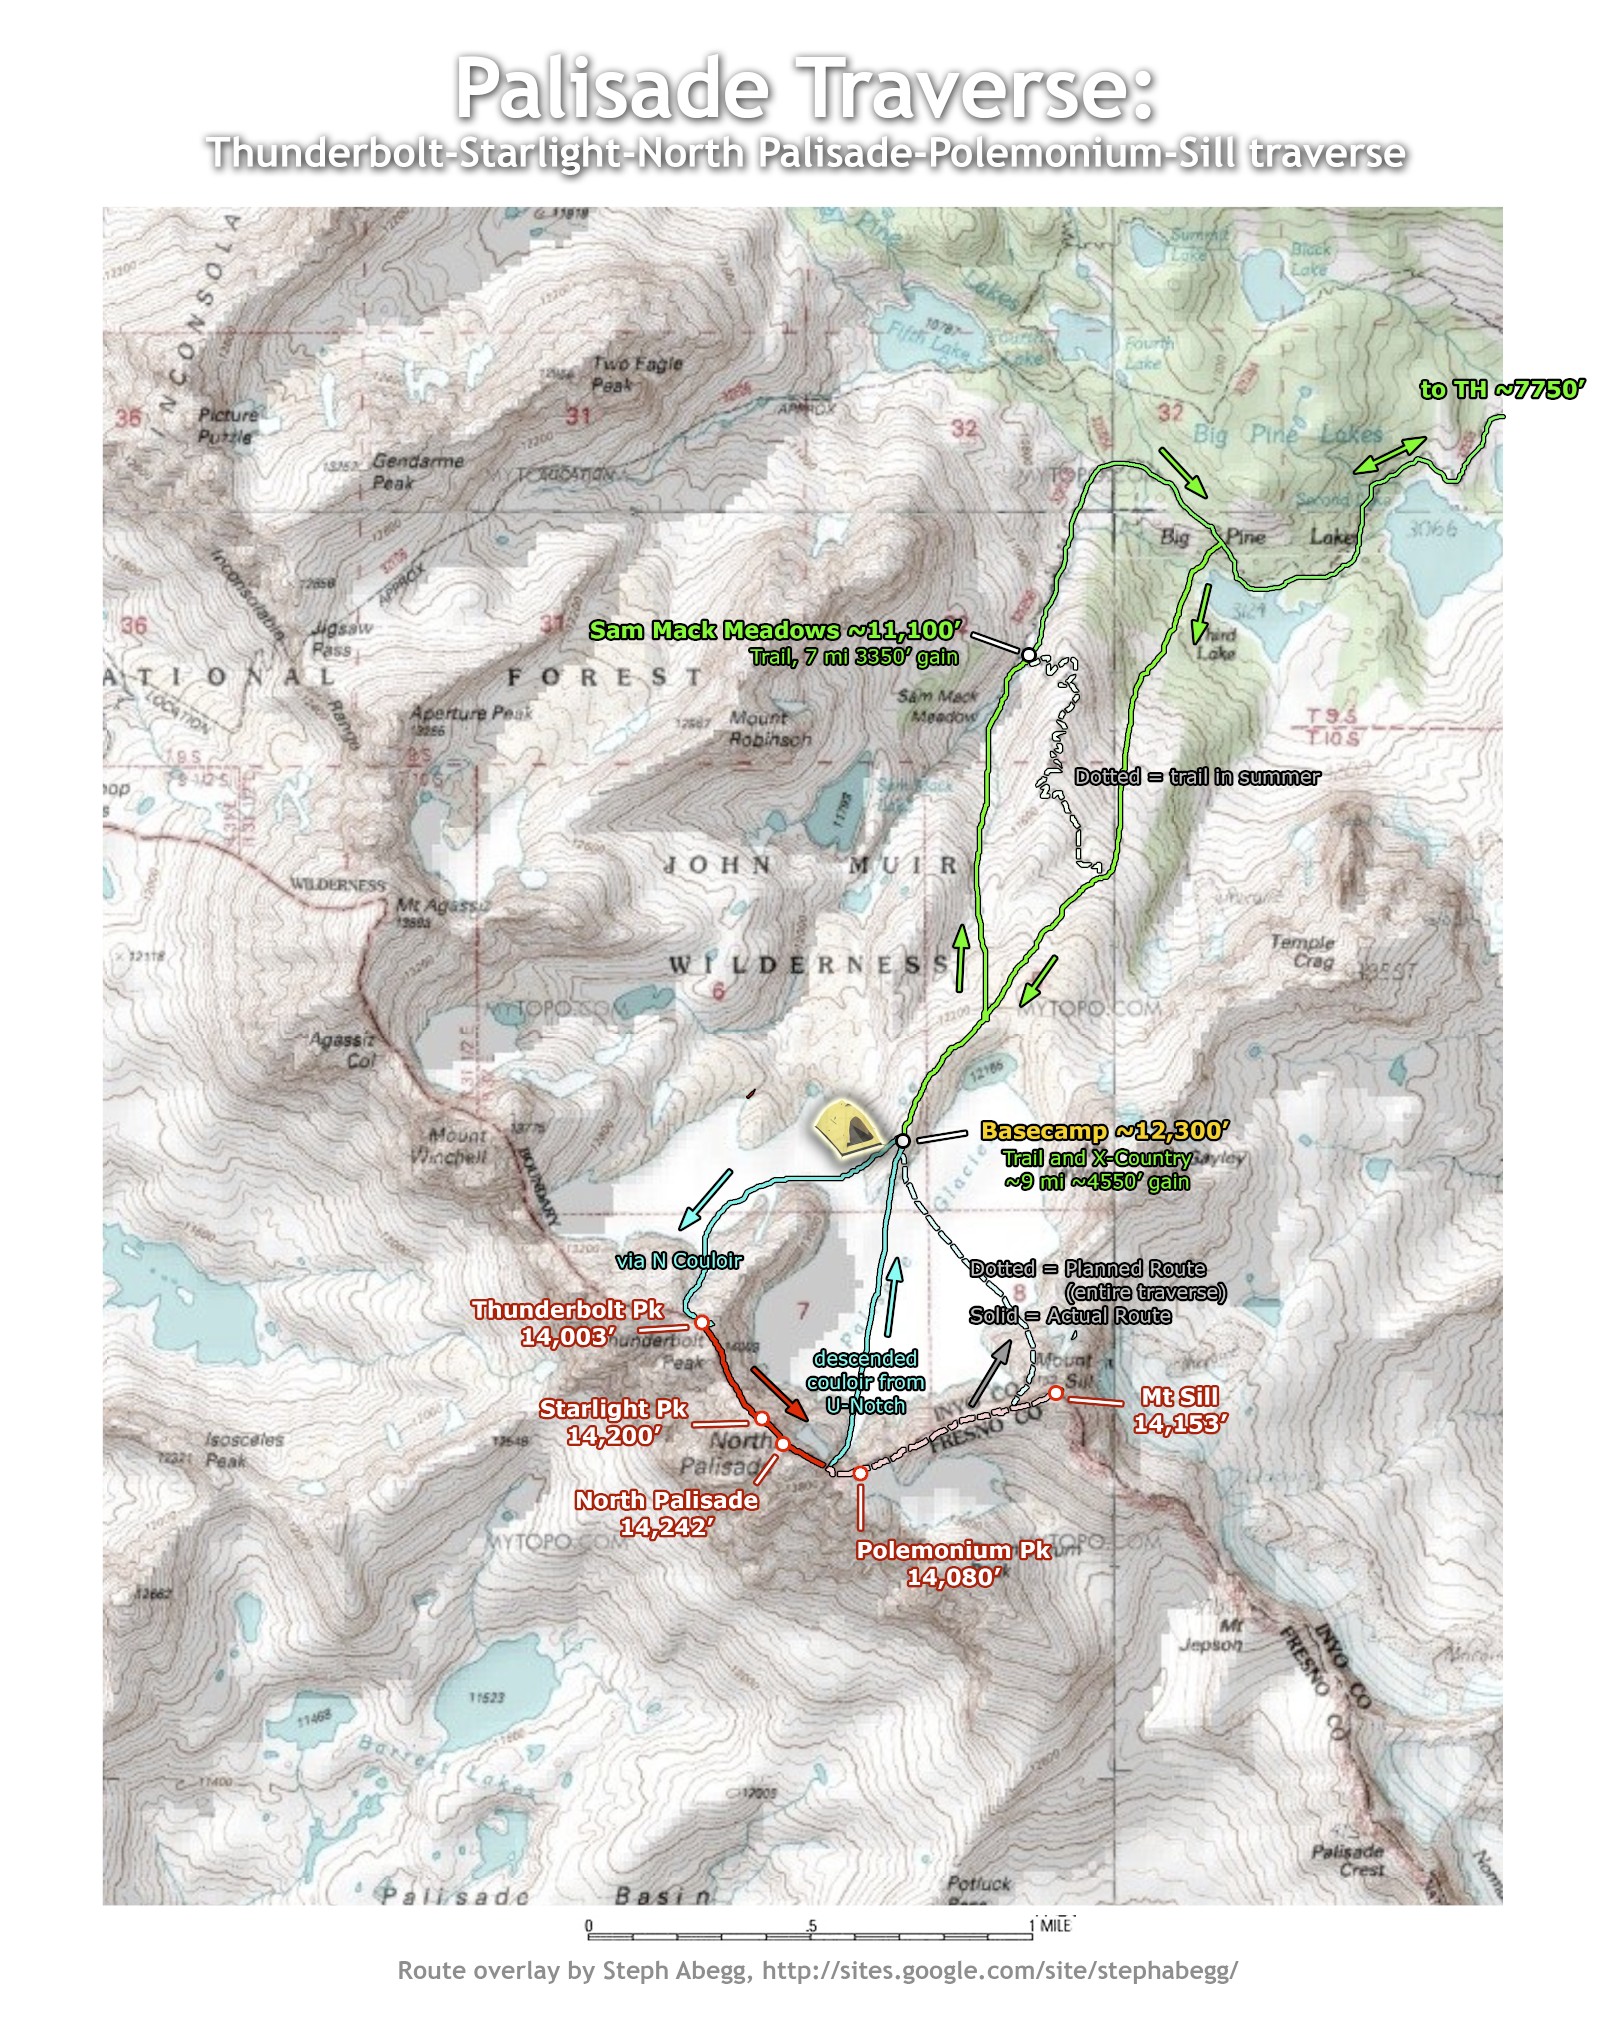
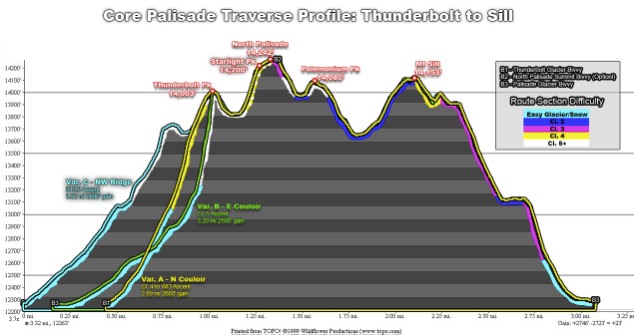
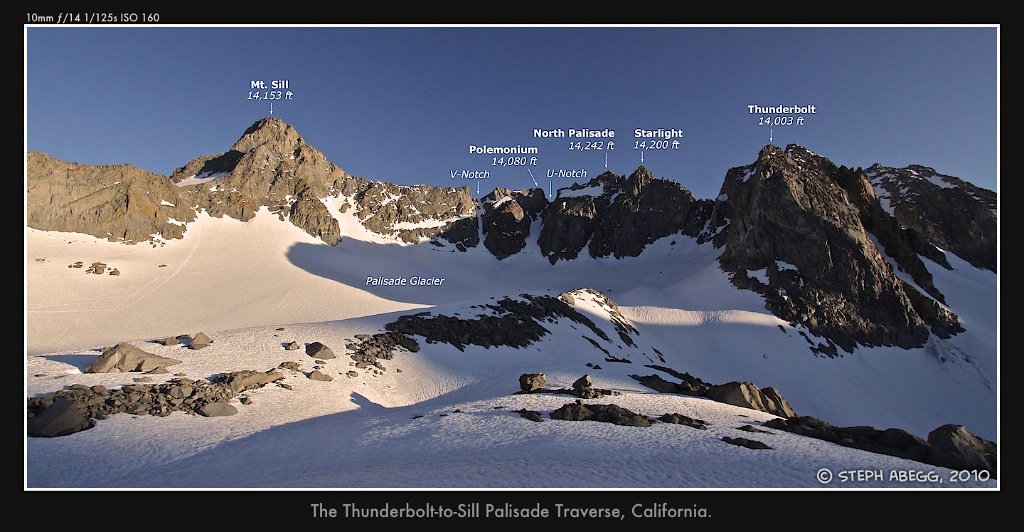
The Palisades are the most alpine subrange in the Sierra and contains some of the Sierra's highest peaks, its largest glacier, and most stunning scenery. This is a trip report for the Thunderbolt-Starlight-North Palisade-Polemonium-Sill traverse, a classic route that traverses five of the major Palisade peaks, all above 14,000 ft. This five-summit route is often referred to as the Palisade Traverse, although there also exists a "full" Palisade Traverse which much longer (it includes the Thunderbolt to Sill traverse in addition to several other Palisade summits) and has seen far fewer successful completions (the FA in 1979 was done with pre-placed caches and took 7 days to climb).
It is possible to do the traverse from Thunderbolt to Sill (or Sill to Thunderbolt) in a single 22-mile car-to-car push, but Mark and I wanted to enjoy the beauty of the area (and do some night photography!), so we established a wonderful camp on the lower Palisade Glacier. We planned to do the Palisade Traverse in a day from basecamp. However, we ended up only climbing Thunderbolt, Starlight, and North Palisade before darkness forced us to forgo Polemonium and Sill and descend down the couloir from the U-Notch. Fortunately, though, we successfully climbed what are thought to be the three most aesthetic summits of the traverse.
Our inability to complete the traverse before nightfall was due to a few factors, such as having to scope out the unfamiliar route, some early-summer snow on the route that forced us into convoluted detours, and too much roped simulclimbing and belaying. However, that said, more often than not climbers end up bivying or descending early on this Grade IV route; most of the successful traverse-in-a-day attempts are done by unroped soloists.
Below is a labeled panorama of the peaks of the Palisade Traverse, a map of the route (the complete route as well as our truncated route), and a profile.
The Palisade Traverse, Peak by Peak
CLICK ON PEAK TO DROP DOWN CONTENT
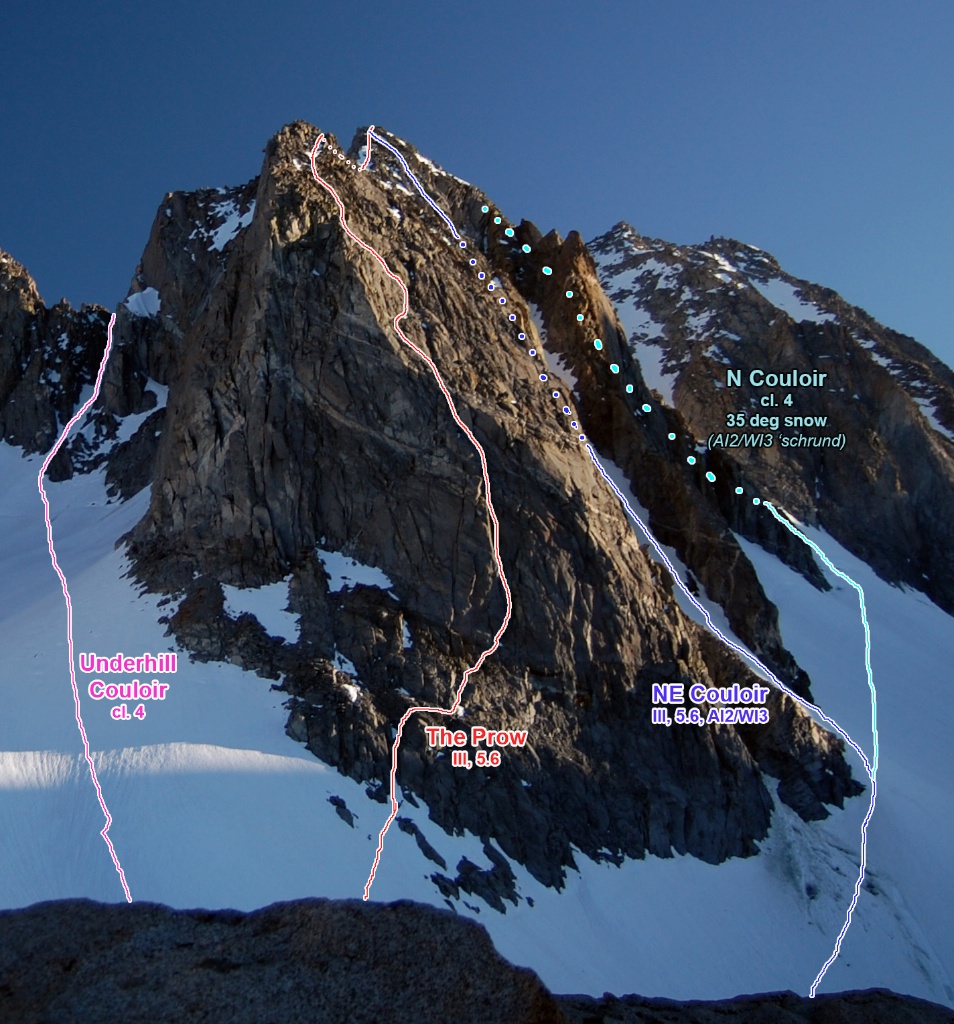
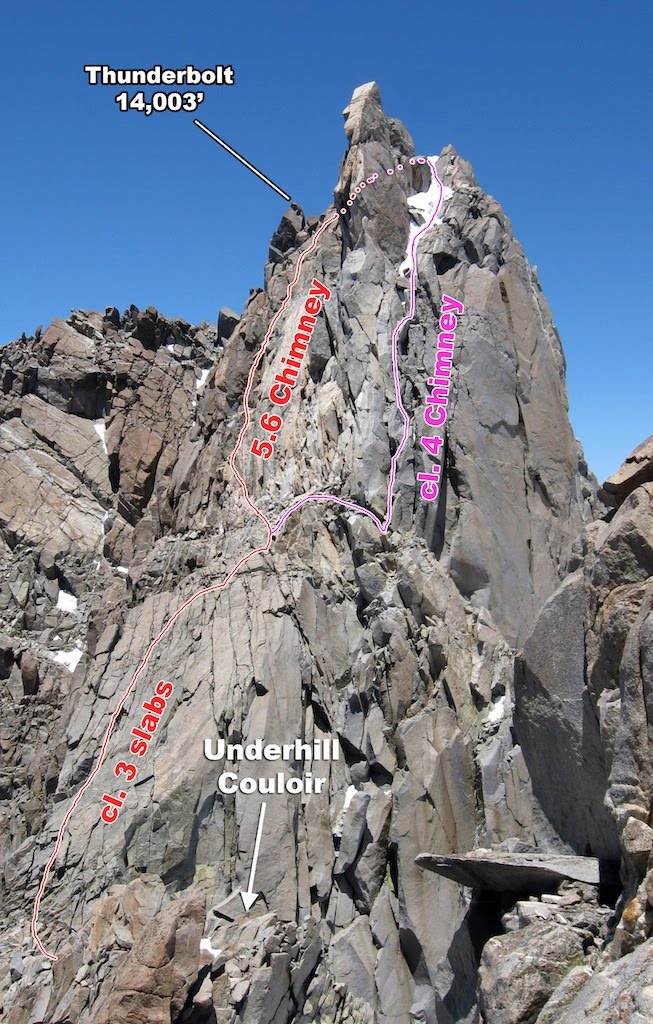
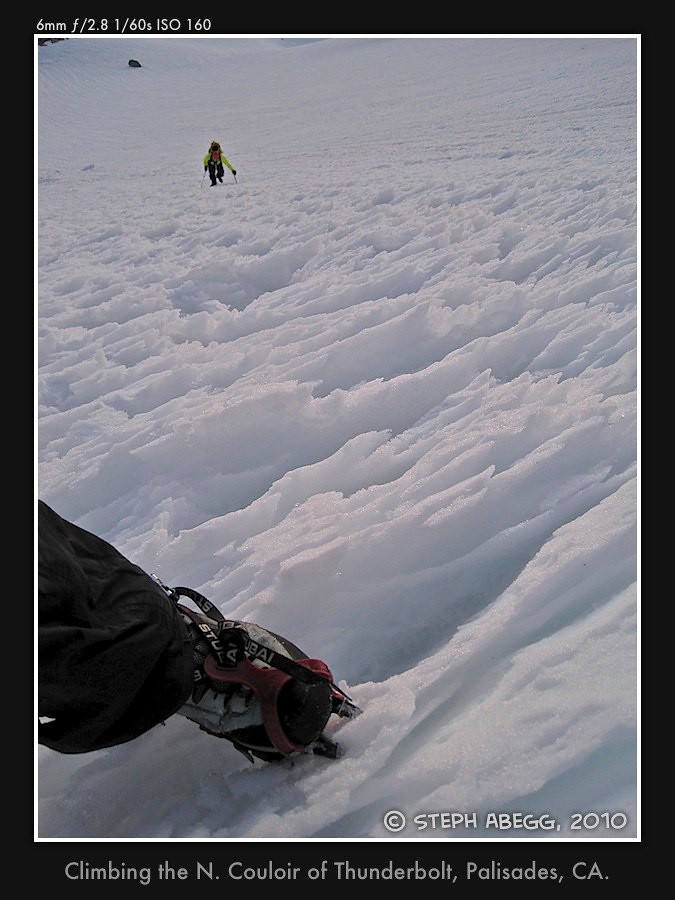
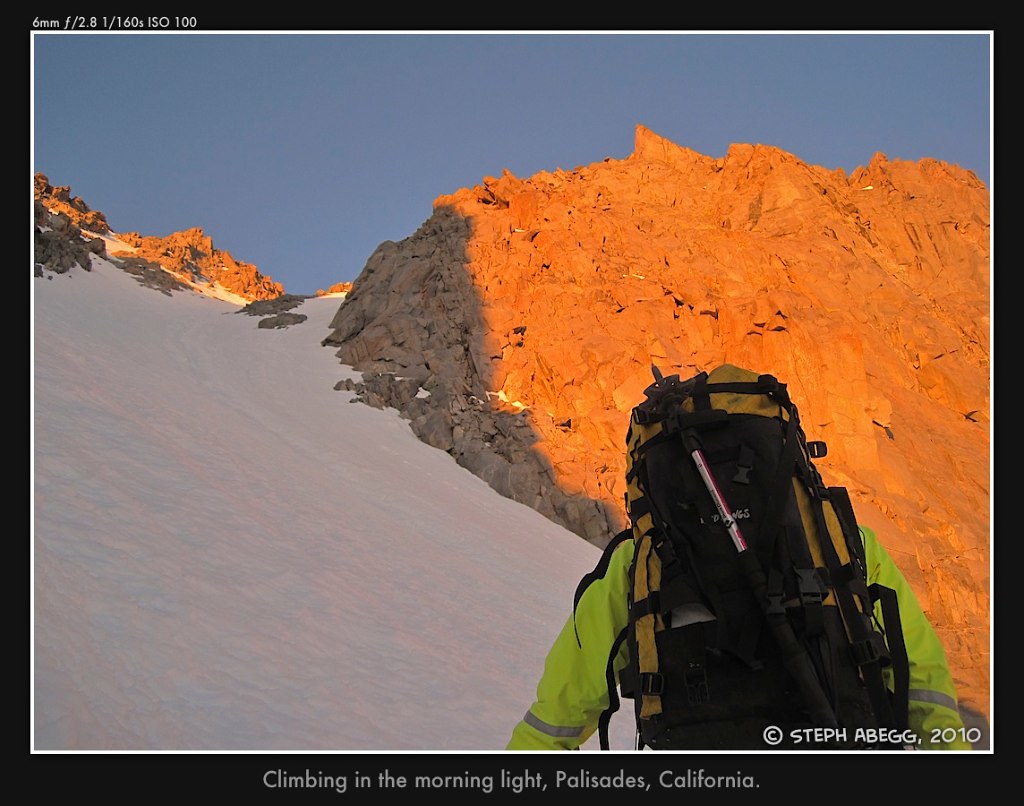
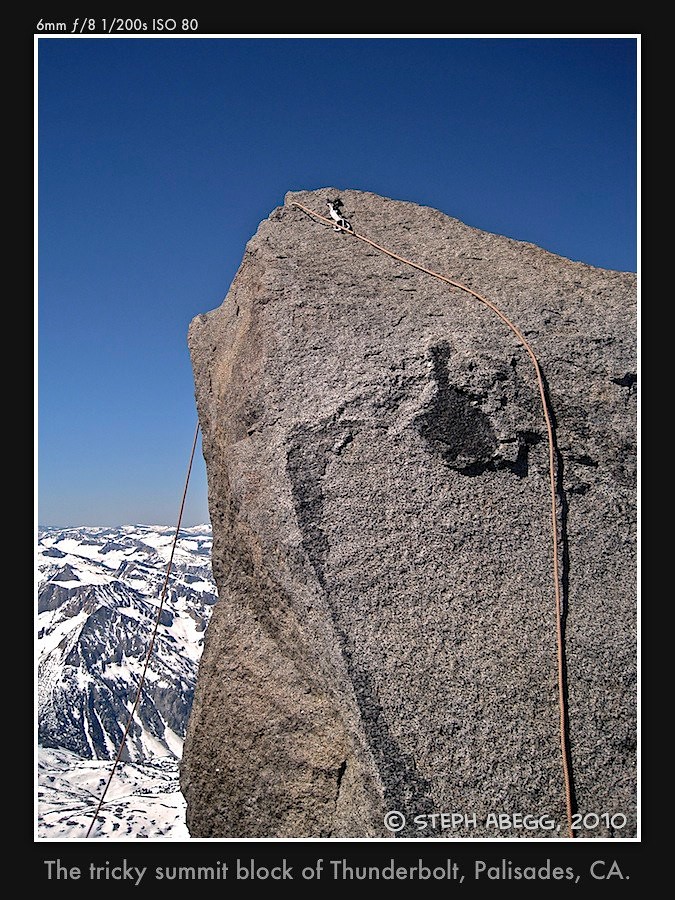
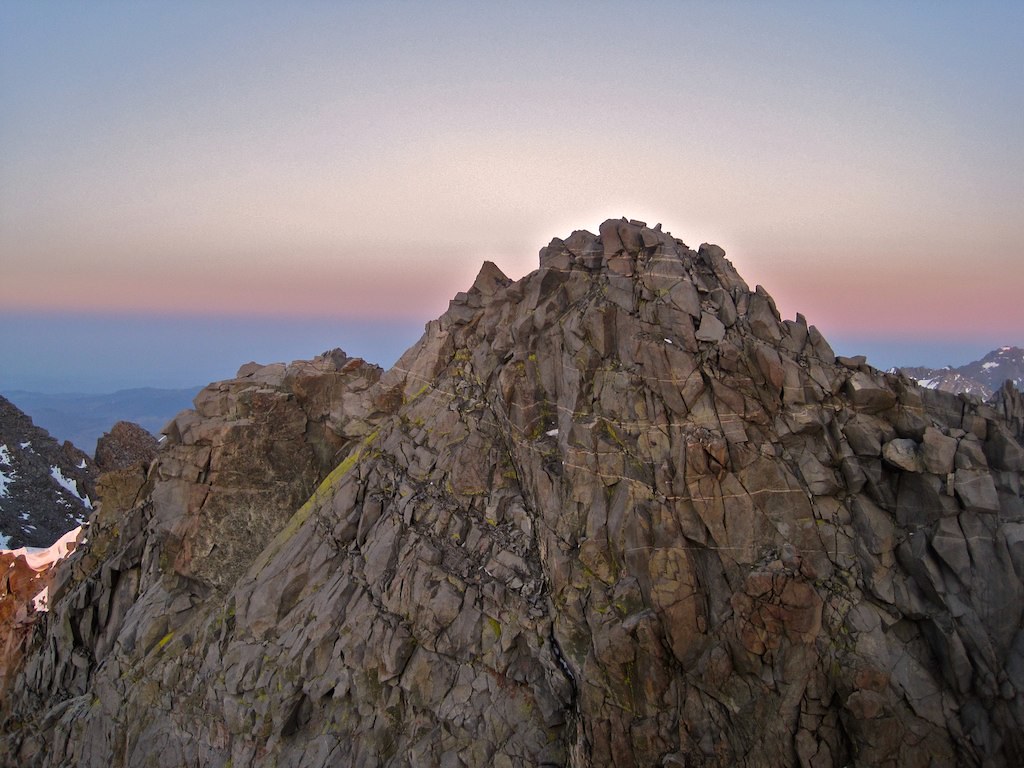
Summit 1 - Thunderbolt Peak elev.:14,003 ft route: North couloir (~40° snow) on summit:10:08 am
With the early-season snowcover, the traverse to the base of the North couloir of Thunderbolt was easy. The bergschrund was also covered, which can present a problem in later season. The route took a straightforward 35-40° snow couloir to the ridge (take a left spur near the top unless you feel like adding some time to the traverse). From there, we roped up and simulclimbed along the ridge to the summit. The best route probably takes the left (NE) side of the ridge.
The summit of Thunderbolt has a wildly exposed summit block. The east face looks like it would go at 5.9, but it is slabby and unprotectable, a fun boulder problem if not for the sheer drop on all sides. Previous reports indicate that you can set up an aid system on the summit block. Skeptical, I gave Mark "10 minutes," feeling that given the traverse ahead of us, each minute was just as valuable as a foot closer to the true summit. After about an hour of schenanigans that produced a sketchy looking anchor where the rope was only held in place by a protruding old bolt pin, we decided to forgo the final 10 feet and head onwards. This was a source of contention between the two of us, and kind of put a damper on the rest of the climb. Sorry Mark.....(Update: On a later trip just to climb Thunderbolt, Mark did successfully lasso the summit block and get on top; without the time crunch of needing to continue on to traverse 4 more summit, he and his partner had a lot of fun doing it.)
Photos from Thunderbolt section:
Mark's annotated overlays for the Thunderbolt section:
Ascent routes
Descent
Thunderbolt and Lightening Rod
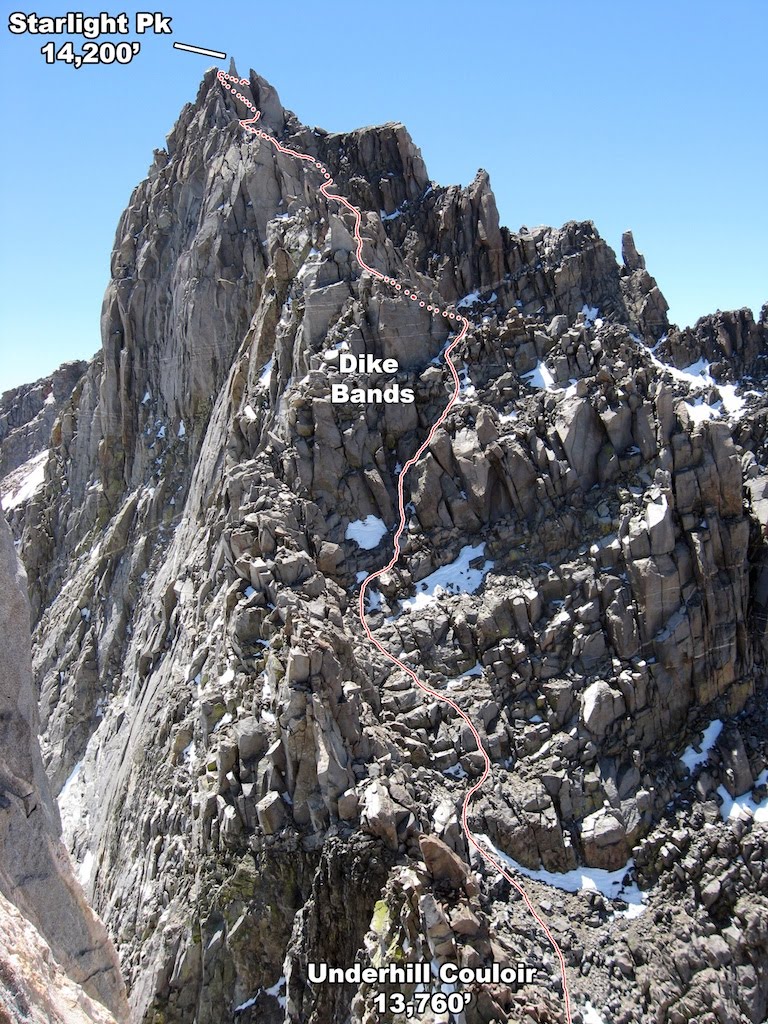
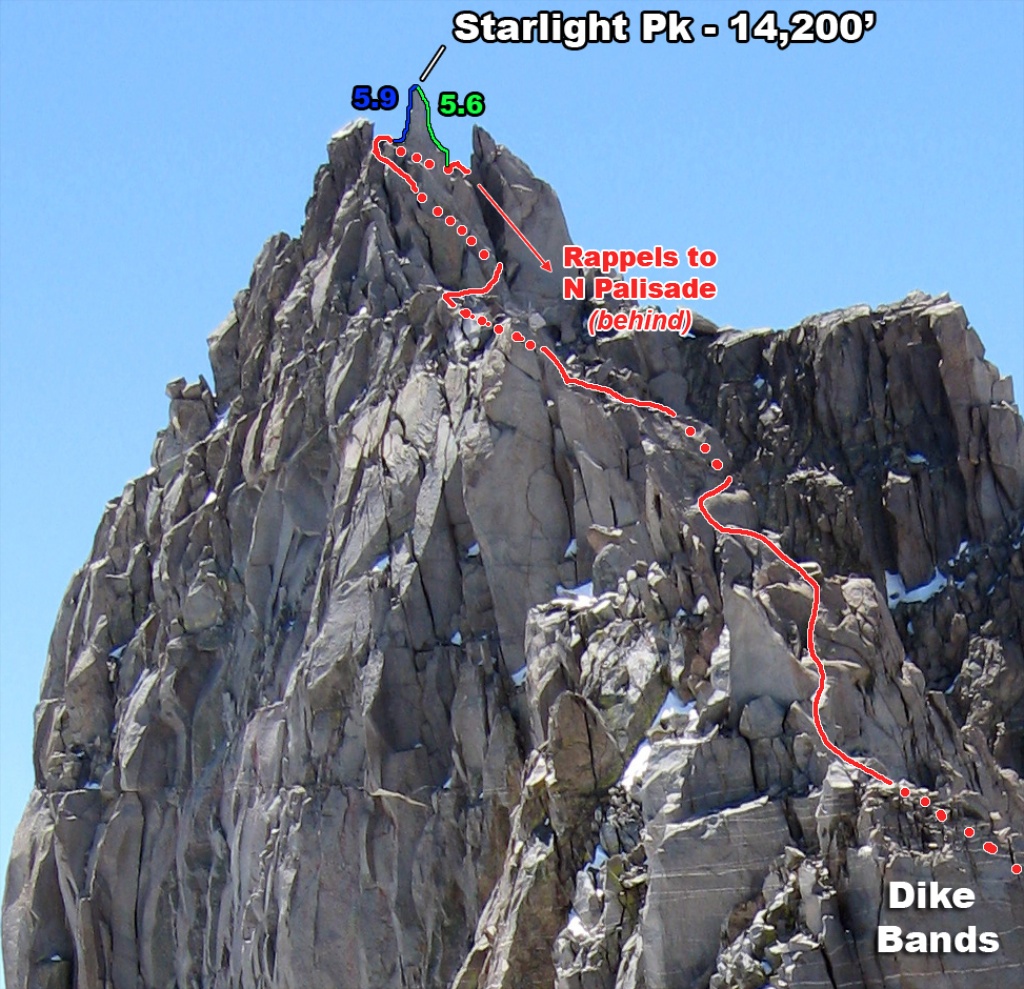
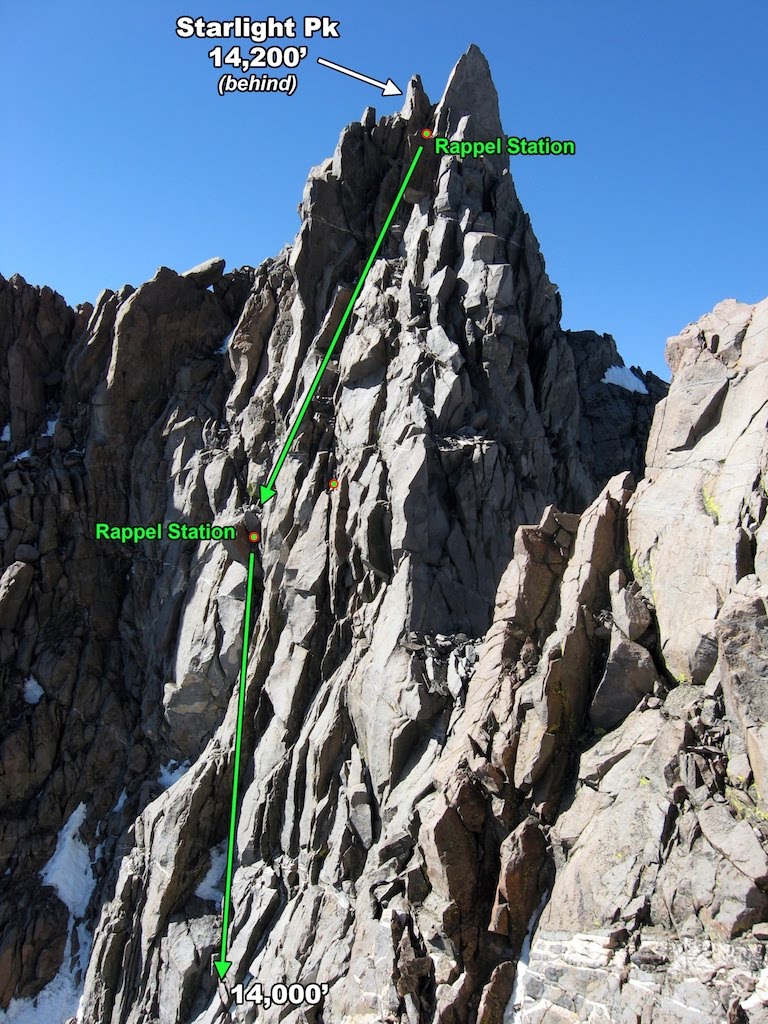
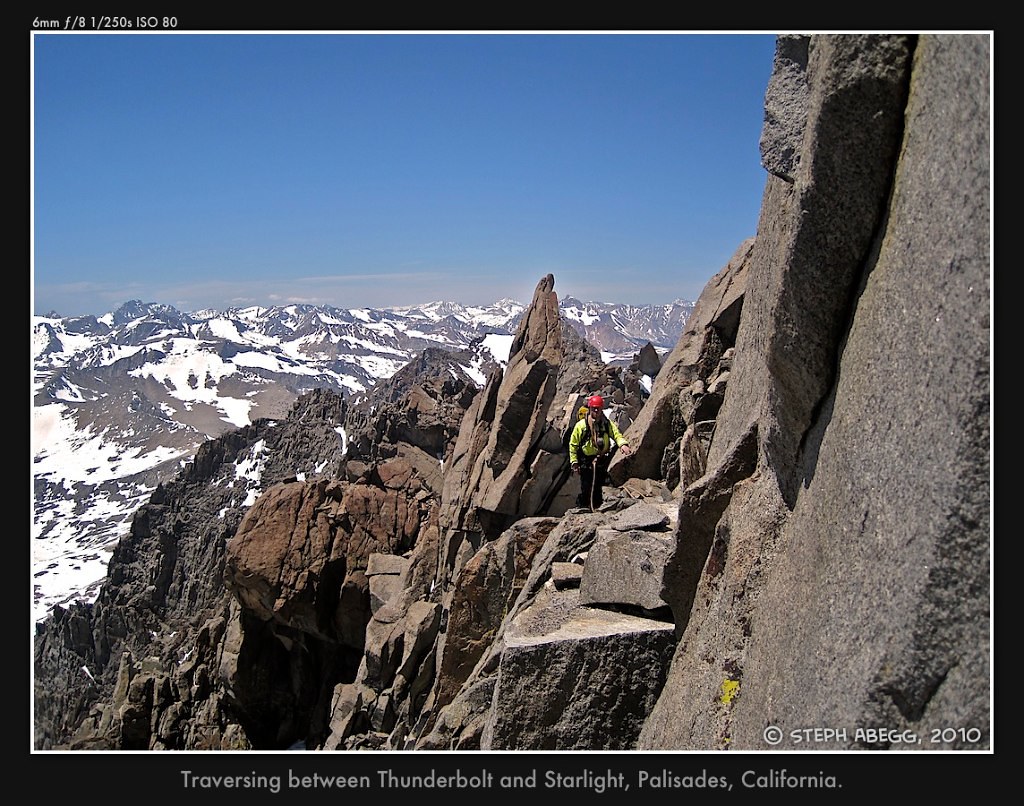
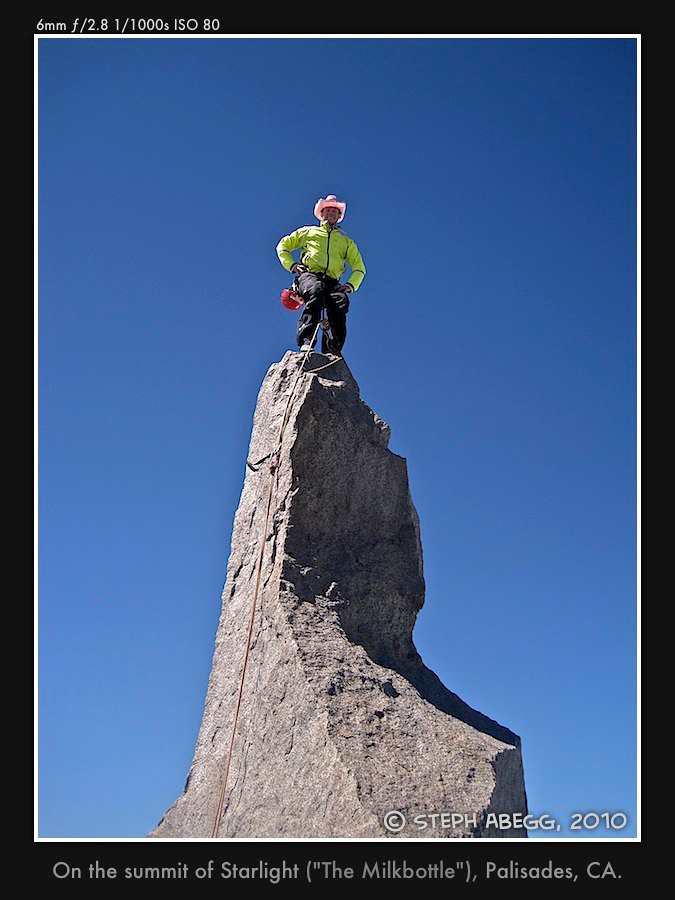
Summit 2 - Starlight Peak elev.: 14,200 ft route: NW ridge, traverse from Thunderbolt on summit:2:44 pm
Traversing from Thunderbolt to Starlight was mostly 4th class over loose blocks, generally on the right (west) side of the ridge. There are a few low 5th moves on the downclimb from Thunderbolt, but they are pretty easy. Many trip reports indicate it takes about 30 minutes to 2 hours to traverse between the two summits, but it took us far longer due to some poor route-finding decisions and rope drag (I'd suggest staying unroped rather than simulclimbing; in fact, in the interest of time, the traverse in general requires mostly exposed unroped climbing).
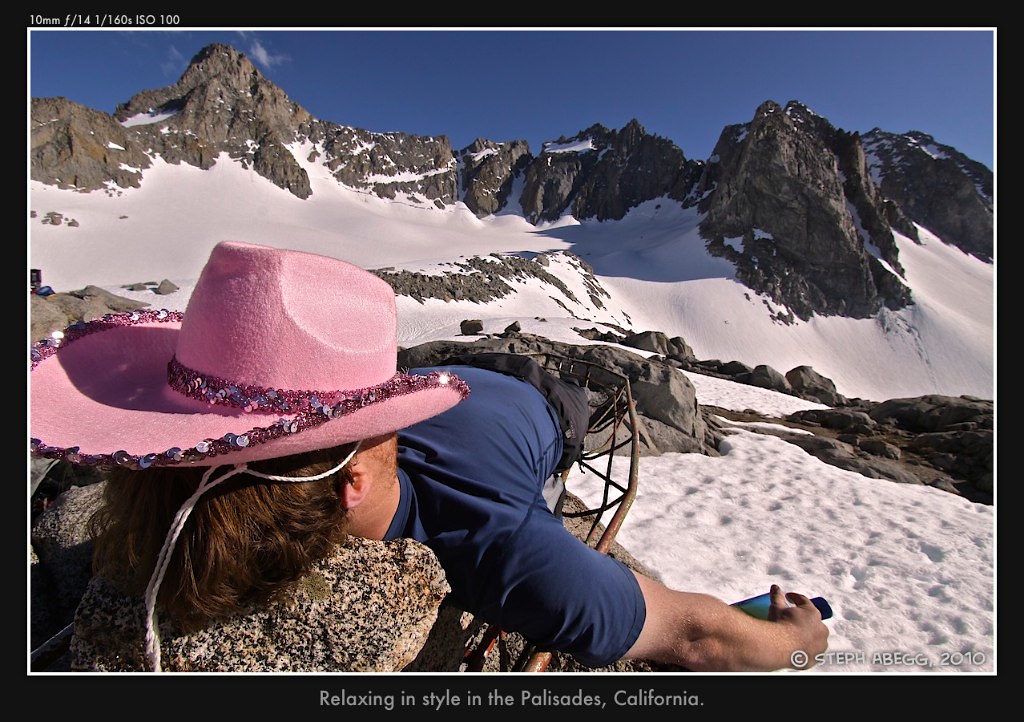
The summit block of Starlight, called the "Milk Bottle" because of its distinct shape, is perhaps the coolest summit I've climbed. This was one summit block we were not going to bypass - we didn't bring along the pink cowboy hat for nothing! Although slabby and exposed, the moves were actually pretty easy (5.7ish?) on great holds, and Mark led easily up to the top. I had no problem following in my boots. To get down, we rappeled off the bolt that is on the top.
Photos from Starlight section:
Mark's annotated overlays for the Starlight section:
Ascent
Ascent
Descent
Starlight and N Palisade
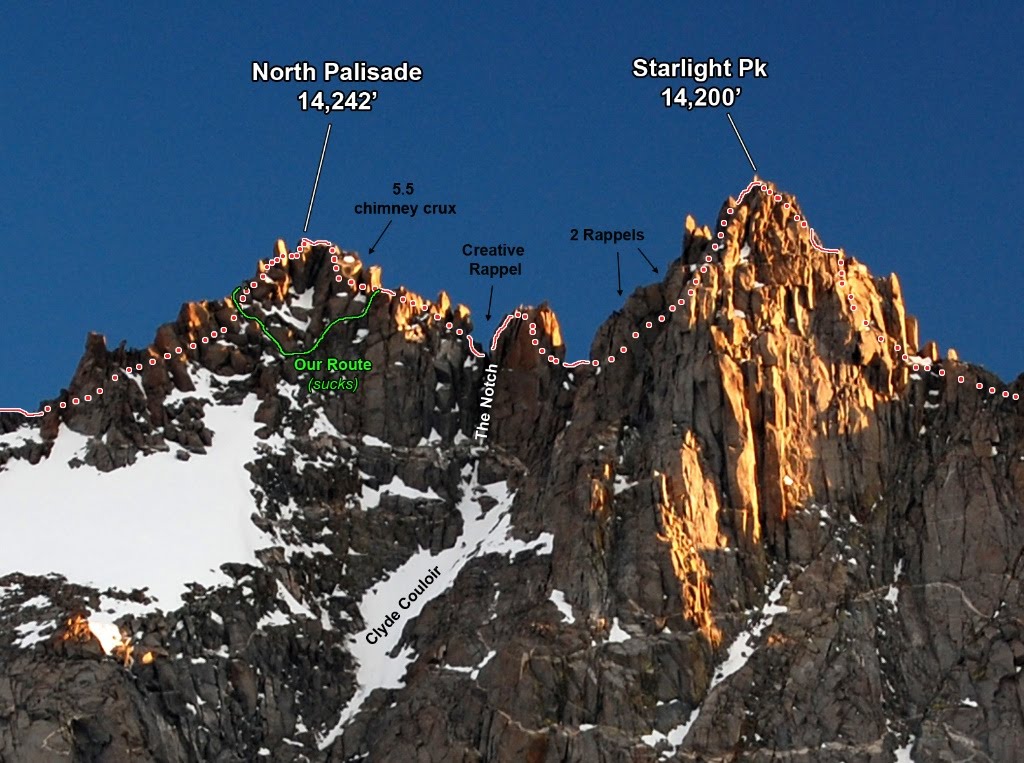
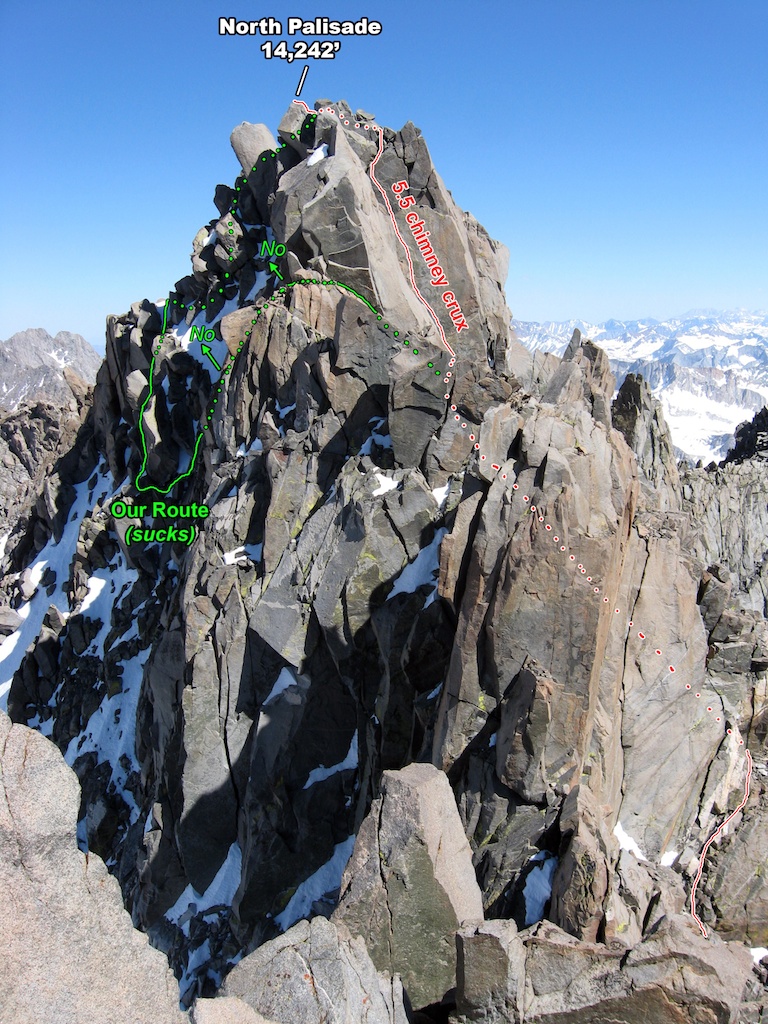
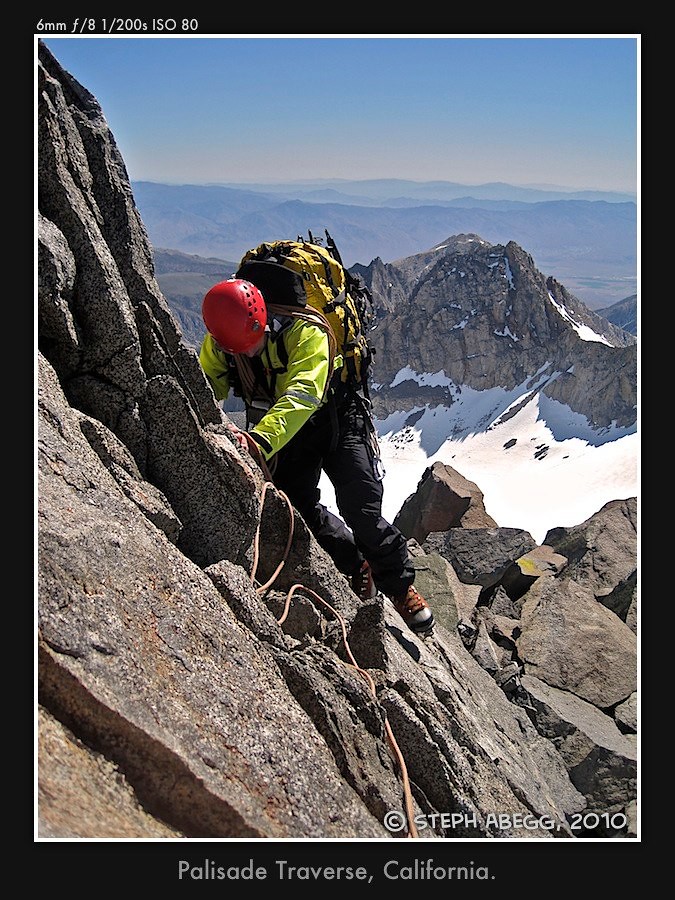
Summit 3 - North Palisade elev.:14,242 ft route: NW ridge, traverse from Starlight on summit:7:28 pm (uh oh....)
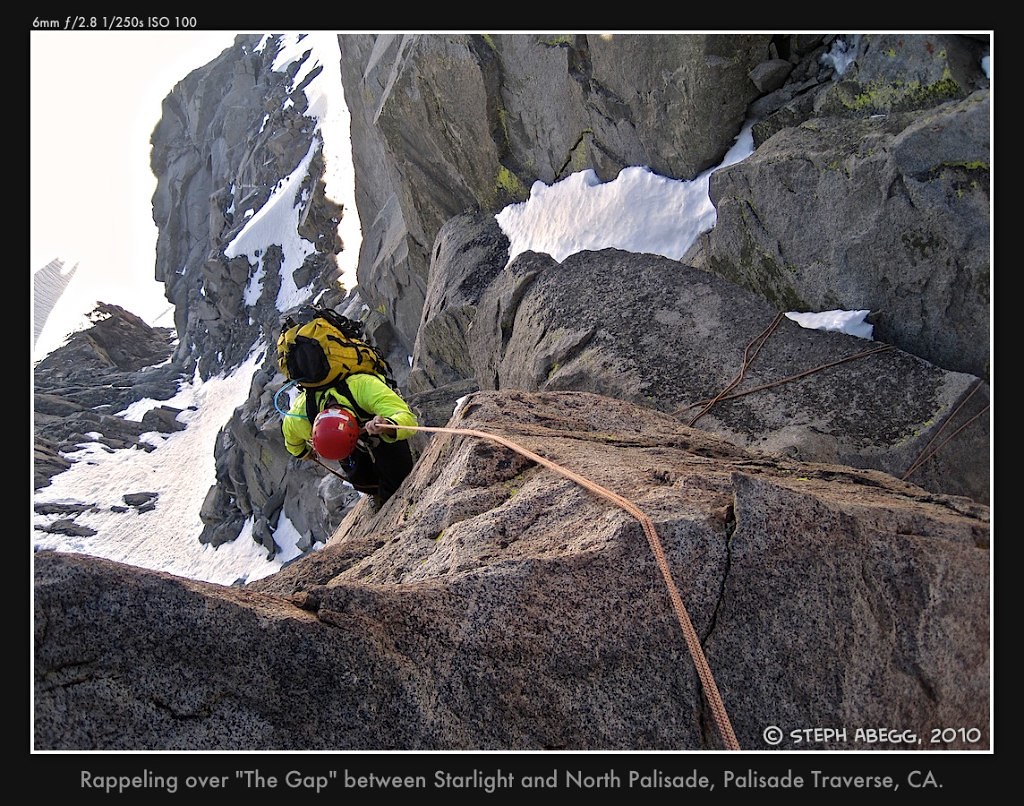
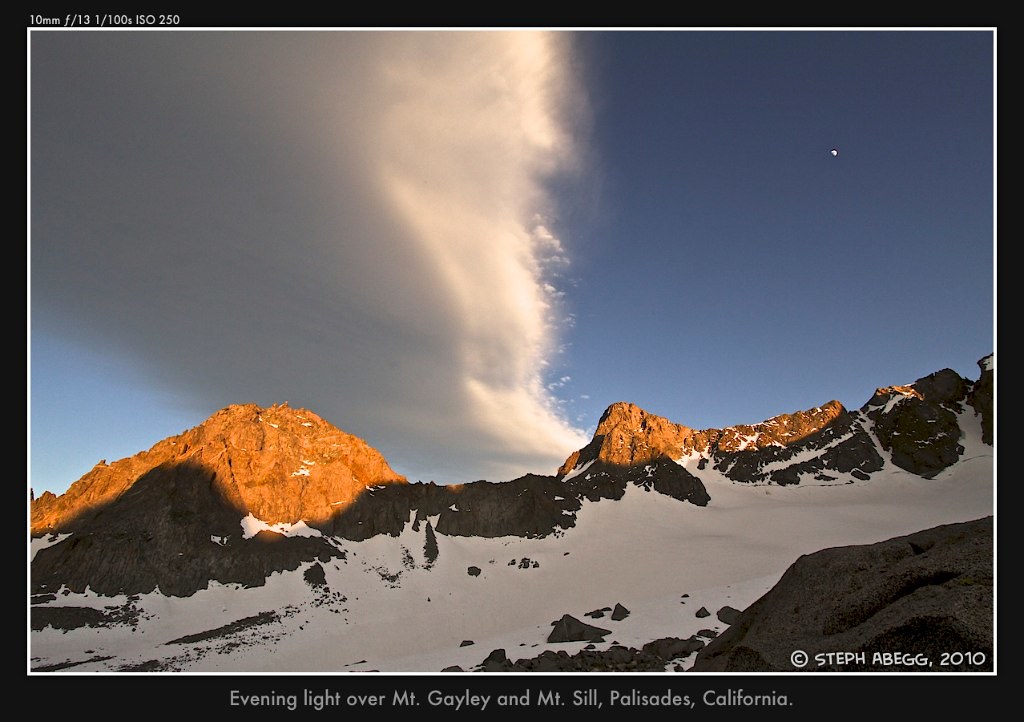
Starlight and North Palisade are quite close, but there is a difficult gap (aka "Notch" or "stem of faith") to cross which requires a tricky swing from one side of the chasm to the other off a set of slings (some reports mention downclimbing a chimney and then being able to step across the gap lower, but this looked a bit tricky too). From the gap, various reports suggest taking the right (SW) side, even though this side appears to be less featureless than the left (NE) side. We opted for the blocky left (NE) side, but ended up encountering a lot of early-season snow that forced us into convoluted and difficult detours; perhaps the right (SW) side is indeed a better choice. At least the evening lighting was nice when we reached the summit of North Palisade!
After the summit of North Palisade, the traverse requires descending to the U-Notch, which is an easy scramble and a couple of rappels from some slings. (Note: it is also possible to avoid the rappels by downclimbing the Class 4 Clyde variation, which descends the drainage to the right (west) side of the peak. Cairns mark where you leave this drainage about 400 ft down, turning left and traversing on some exposed but solid ledges that deposit you in the W Chute about 50-100 ft below the U-Notch. You could also downclimb the area where the rappels are, which is low 5th.) By the time we reached the U-Notch, it was getting dark. Rather than spend a cold night in the notch, we decided to try to descend the U-Notch couloir, hoping that since it was early season the condition of couloir would be more snow than ice (the couloir is a popular alpine ice climb in later summer). Fortunately, we both had crampons and 2 tools, and we encountered no ice, so we were able to back down the 2000' of steep snow in the darkness without a problem. There is a bergschrund at the base of the couloir, but we found some rappel slings on the side wall (climber's right) and our rope just reached over the schrund. While we were setting up our rappel, some giant rocks careened down the couloir right where we had been about 10 minutes previous. Yikes. From the base of the couloir was an easy traverse across the Palisade Glacier to our camp, which we reached around midnight. I made some hot chocolate, snapped a few shots of the Milky Way above the moonlit Palisades, and joined Mark who was already snoring away in the tent. It was disappointing not to have completed the five-summit traverse, but at least we climbed the three more difficult summits, enjoyed that part of the route, and made it safely back to camp. I will definitely have to return for the full traverse, someday....
Photos from North Palisade section:
Mark's annotated overlays for the North Palisade section:
Starlight and N Palisade
Ascent (**what is shown here might not be best line of ascent**)
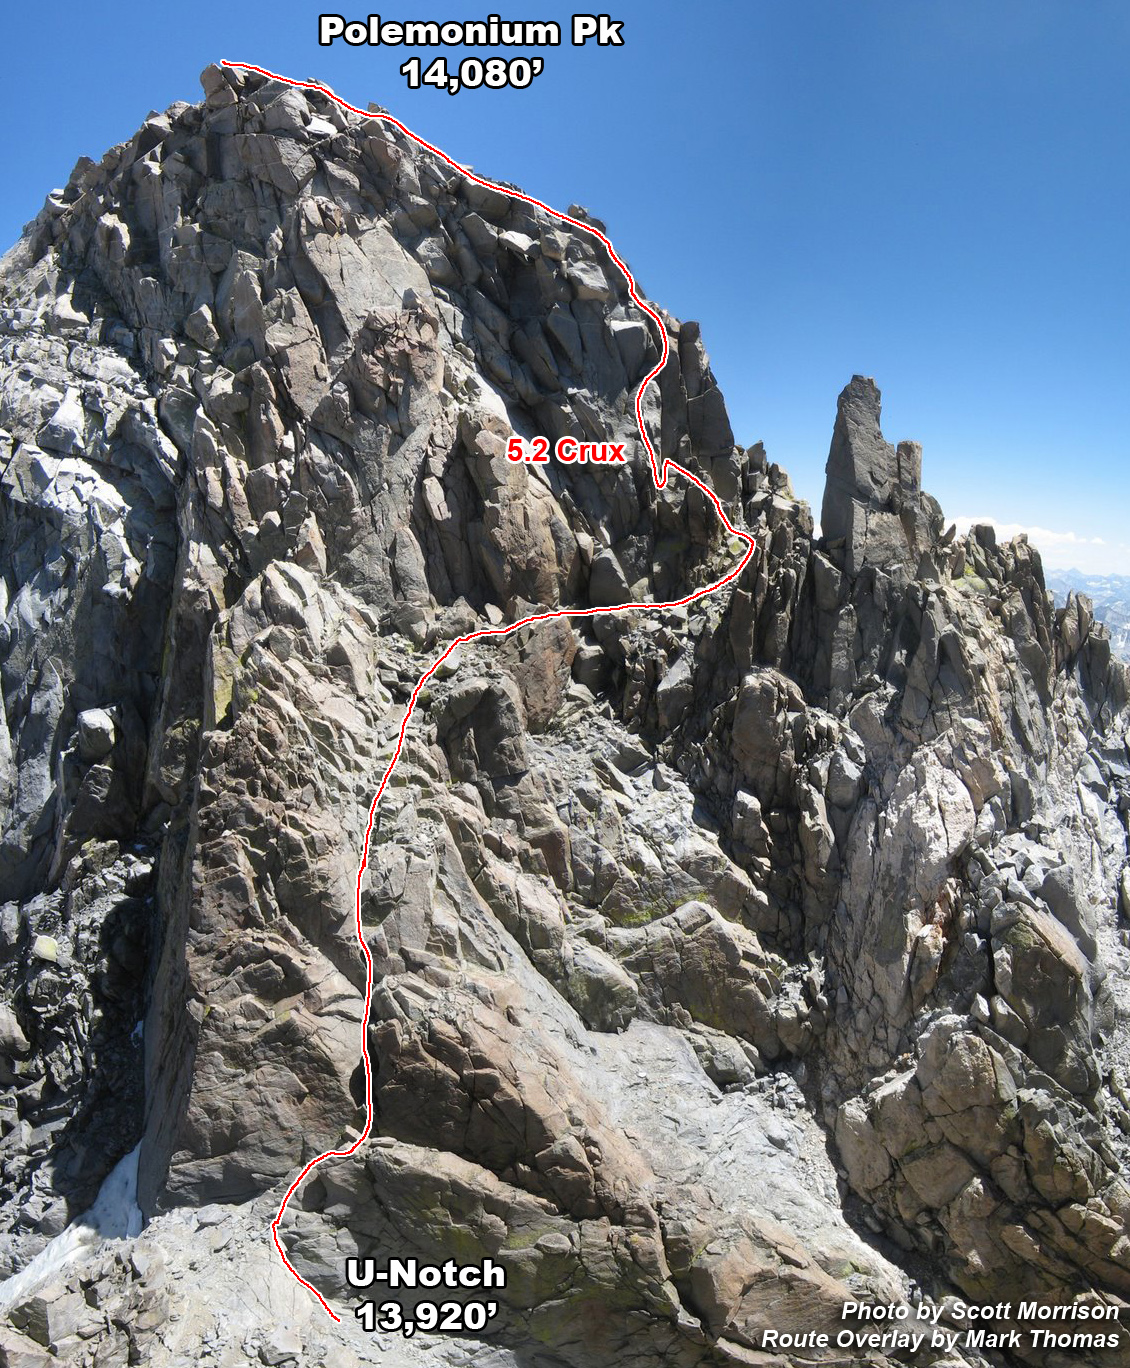
Summit 4 - Polemonium Peak elev.: 14,200 ft route: W ridge, traverse from North Palisade via U-Notch on summit:N/A
(Since Mark and I did not climb Polemonium or Sill, my descriptions here are just general descriptions gleaned from other trip reports. There are no good photos of the route.)
The traverse between North Palisade and Polemonium first involves an easy scramble and two rappels to the U-Notch (see previous section for description). From the U-Notch, it is not far to the summit of Polemonium. Ascend a series of Class 4 ledges up and right to a notch in the ridge (1 pitch). The toughest part of this section is the beginning, and the pitch ends short to reduce rope drag. From the notch, ascend the ridge, deviating slightly to the left (north) side of the ridge for a short 5.2 finger crack crux move. Above this is easy 4th class scrambling to the summit on an exposed and airy crest!
Photo of Polemonium from North Palisade at sunset:
Mark's annotated overlays for the Polemonium section:
Ascent
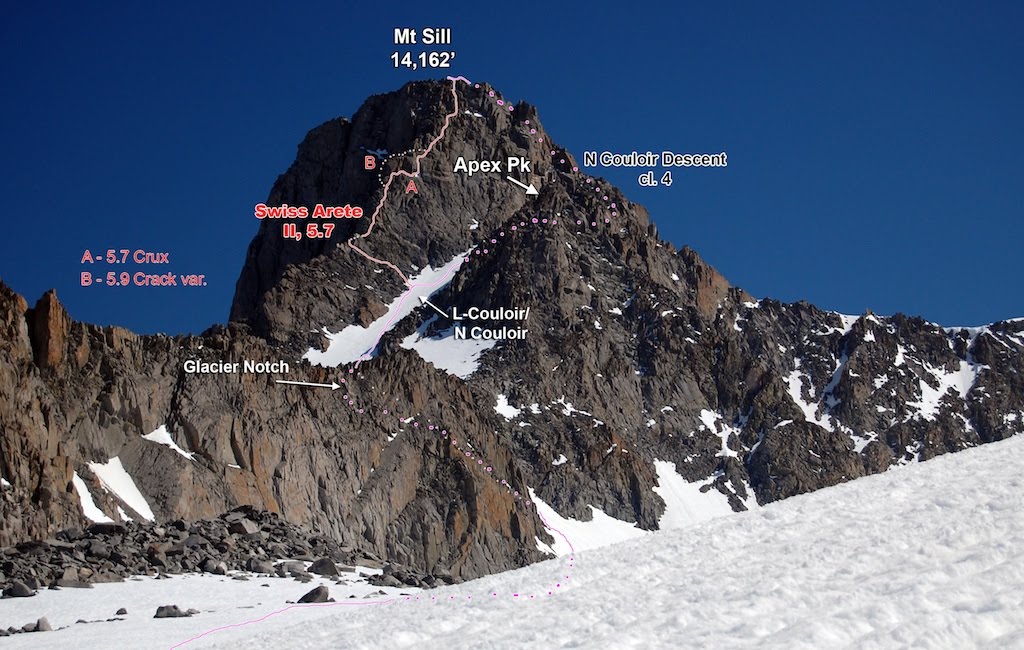
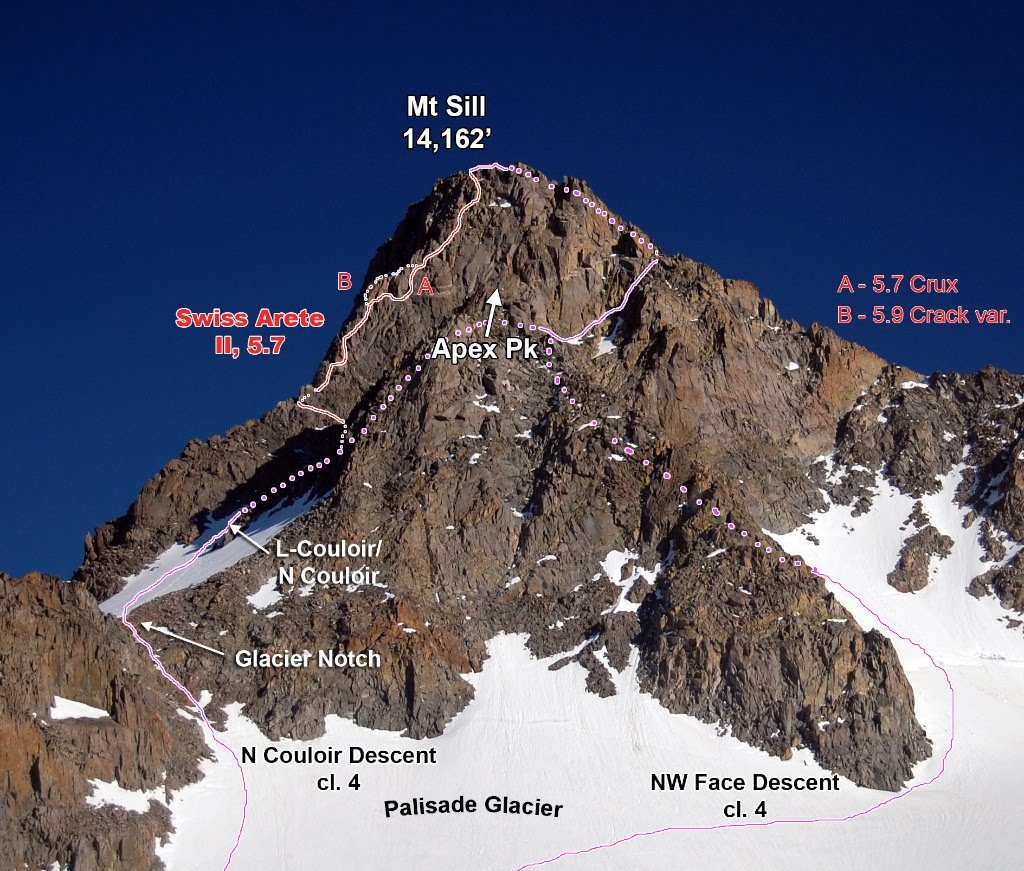
Summit 5 - Mt. Sill elev.:14,162 ft route: W ridge, traverse from Polemonium via V-Notch on summit:N/A
Mt. Sill lies quite a distance from Polemonium, but the route is straightforward and can be done quickly. After the short Class 4 section of downclimbing from the summit of Polemonium, it is just 2nd-3rd class scrambling near the ridge all the way to Sill. Whenever the ridge gets more difficult, drop off to the right (south) side of the ridge.
From reading other trip reports, the descent from Sill to the Palisade Glacier is apparently not that fun. The descent starts a bit below the summit of Sill (on the route between Polemonium and Sill). The descent route is marked with cairns. At a step/slight notch in the ridge, turn right and downclimb a series of 4th class chimneys, traversing slightly right (east). From here there are some exposed and sandy ledges that traverse to a notch between Mt. Sill and Apex Peak. This whole section may have verglas form on it in various spots at night and the rocks are loose.
From the notch, either descend the L-Shaped (north) Couloir to Glacier Notch, or if you don't have crampons, descend to the left (north) side of the snowfield on class 2-3 blocks, with loose blocks and scree. At the leg of the "L" there is a rappel station for clearing the final section of snow. This puts you at the Glacier Notch at 13,200 ft. Descend one of the earlier couloirs closer to Apex Peak and NOT at the lowpoint of the ridge closer to Gayley. This descent to the glacier is class 2-3 and has extremely loose rock and scree. From there there is a 30-35 degree downclimb and traverse along the edge of the Palisade Glacier to the moraine and climbers trail, which leads back to Sam Mack Meadows.
Photo of Mt. Sill from North Palisade at sunset:
Mark's annotated overlays for the Mt. Sill section:
Ascent routes, descent
Ascent routes, descent
The Approach route: North Fork of Big Pine TH to camp on Palisade glacier miles:~9 miles to glacier camp (~7 on trail, ~2 cross-country) elevation gain: ~4550 ft from TH (elev. 7750 ft) to glacier camp (elev. ~12,300 ft)
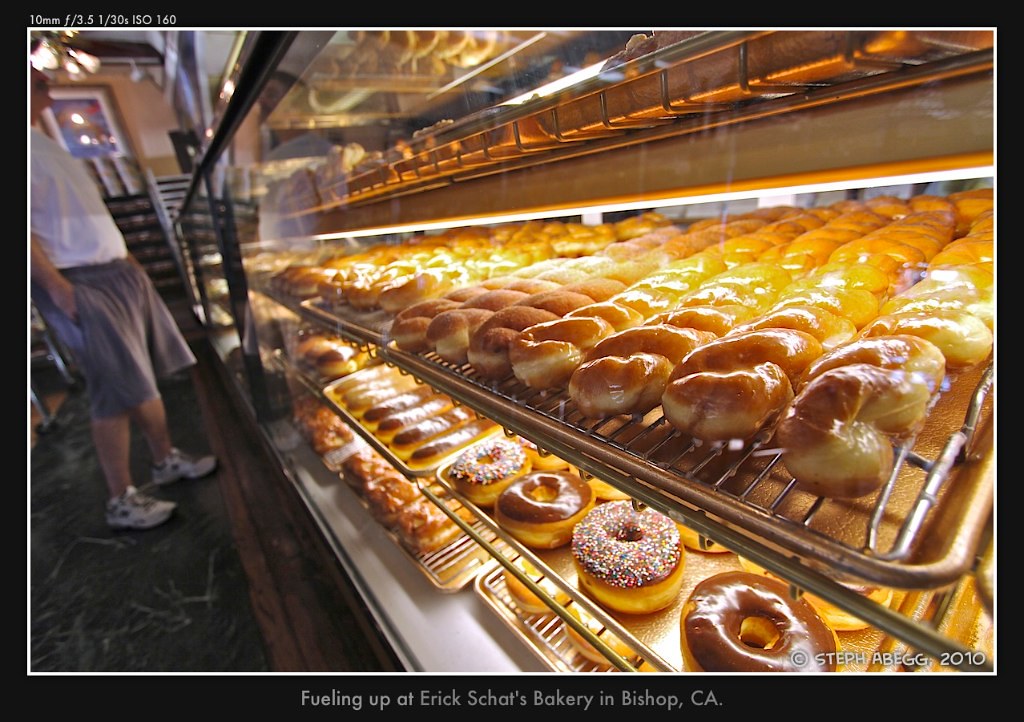
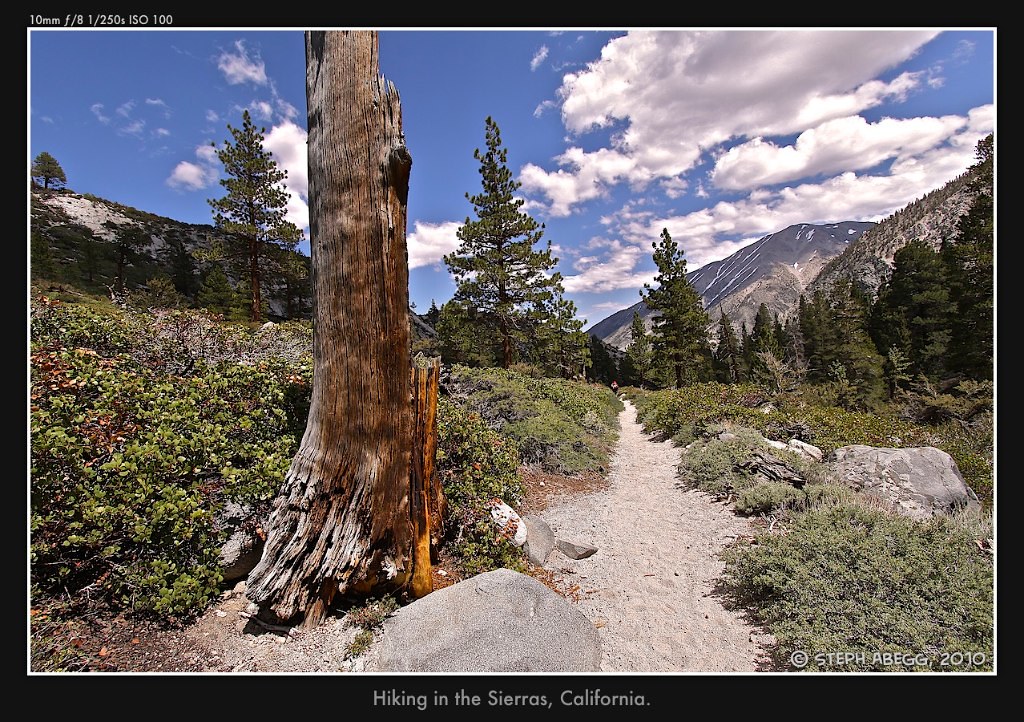
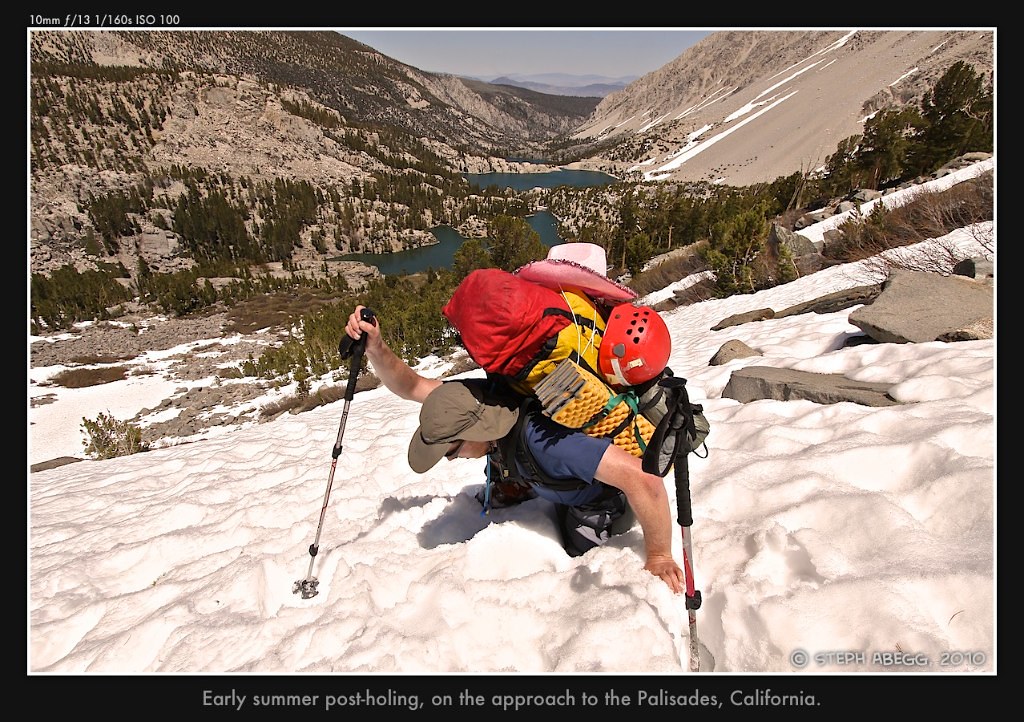
We chose to approach the Palisades via the North Fork of Big Pine trail, which gains about 9 miles (the last 2 are cross-country) and 4550 ft as it winds through a series of lakes to Sam Mack Meadows and then up to the Palisade Glacier. The trailhead is just west of Big Pine. Due to the early-summer snow cover, we turned off the trail before reaching Sam Mack Meadows and ascended the snow above Third Lake directly to the glacier. It was a pretty easy approach, but gains a lot of elevation so would definitely make a car-to-car push on the Palisade Traverse a good workout!
Photos from the approach:
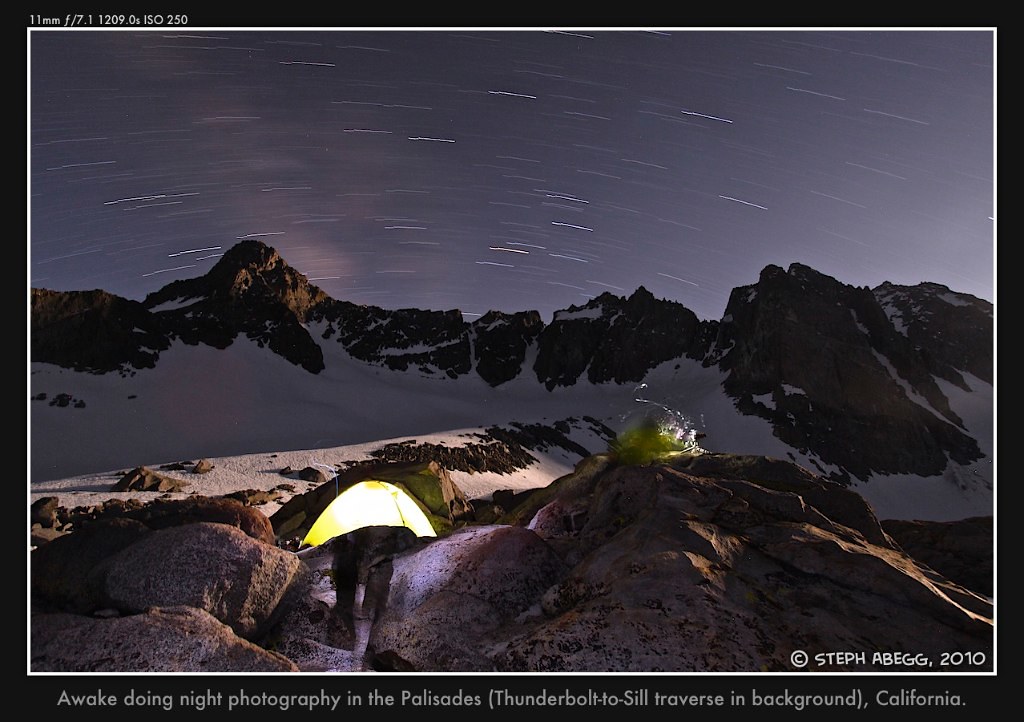
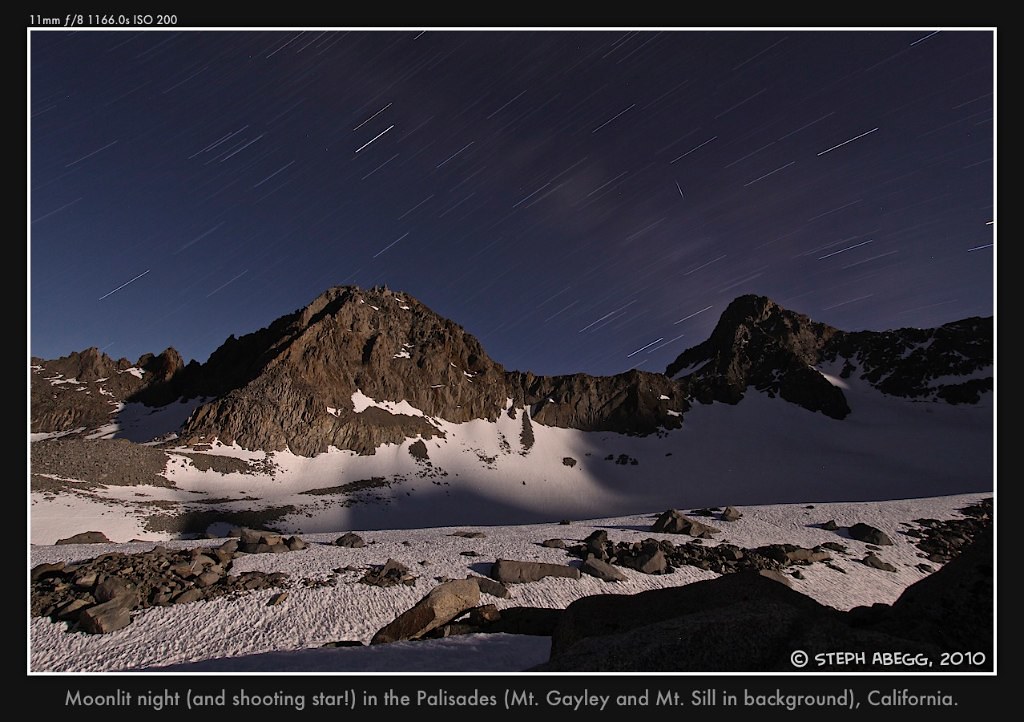
At Camp
We had a beautiful camp on the lower Palisade Glacier, well-placed for both the approach and descent from the traverse. The Palisades were beautiful in the light of the waxing moon, so Mark and I both spent some time doing some night photography. It was fun to have a climbing partner interested in being awake to enjoy the stars as well!
Photos from camp:
Hiking out
Although we had hiked in via the snow slopes above Third Lake, we chose to hike out via a quick glissade to Sam Mack Meadows. The trail was snow free after the Meadows, and visions of a post-climb meal propelled us onward. I will definitely have to return for the full traverse, too bad it's so far from Seattle, maybe I can link it with a Yosemite climbing trip...
Useful beta. Updated route information. Corrections. Historical notes. Interesting facts. No fluff please. Please do not put links in your comment, as my spam filter will filter those comments out.