Crestone Needle, Ellingwood Arête/Ledges (5.7, 2000′)

Crestone Needle

Route:

Ellingwood Arête/Ledges

5.7, 2000'

Ticking off my remaining Fifty Classic in Colorado.

Region: Colorado
Elev: 14,197 ft
Rock type: Crestone conglomerate
Type: 
Date(s): July 11&12, 2019 (Thu&Fri)
Partner(s): Doug Hutchinson

Route Overlays

CLICK TO ENLARGE

Map & GPX File

The descent is probably the place where the greatest number of route-finding errors occur (especially if visibility is poor). Here is a GPS track I took of the descent.

CLICK TO ENLARGE

Intro

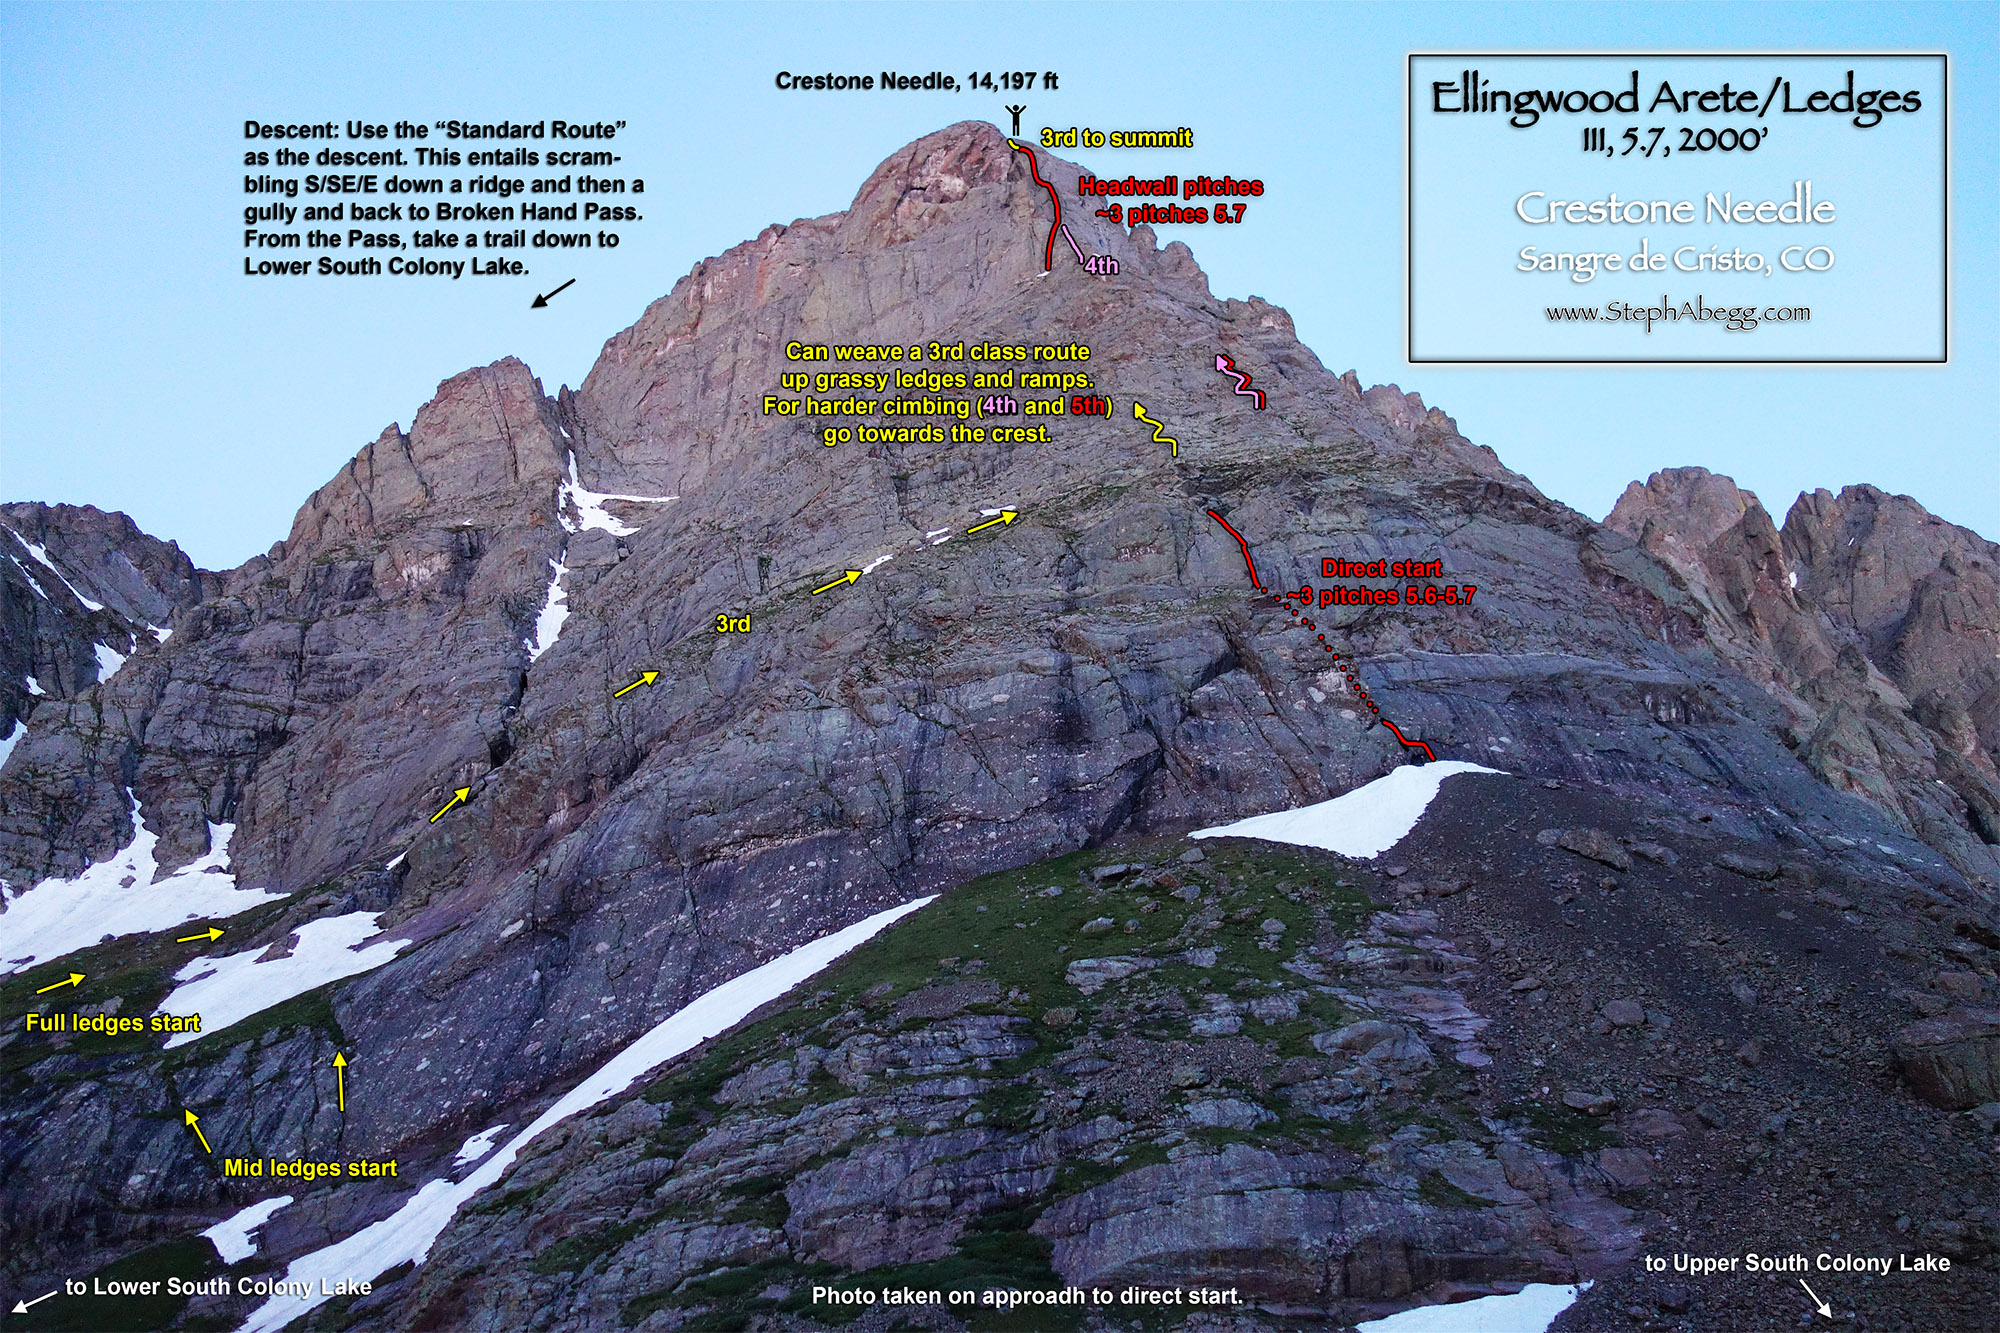
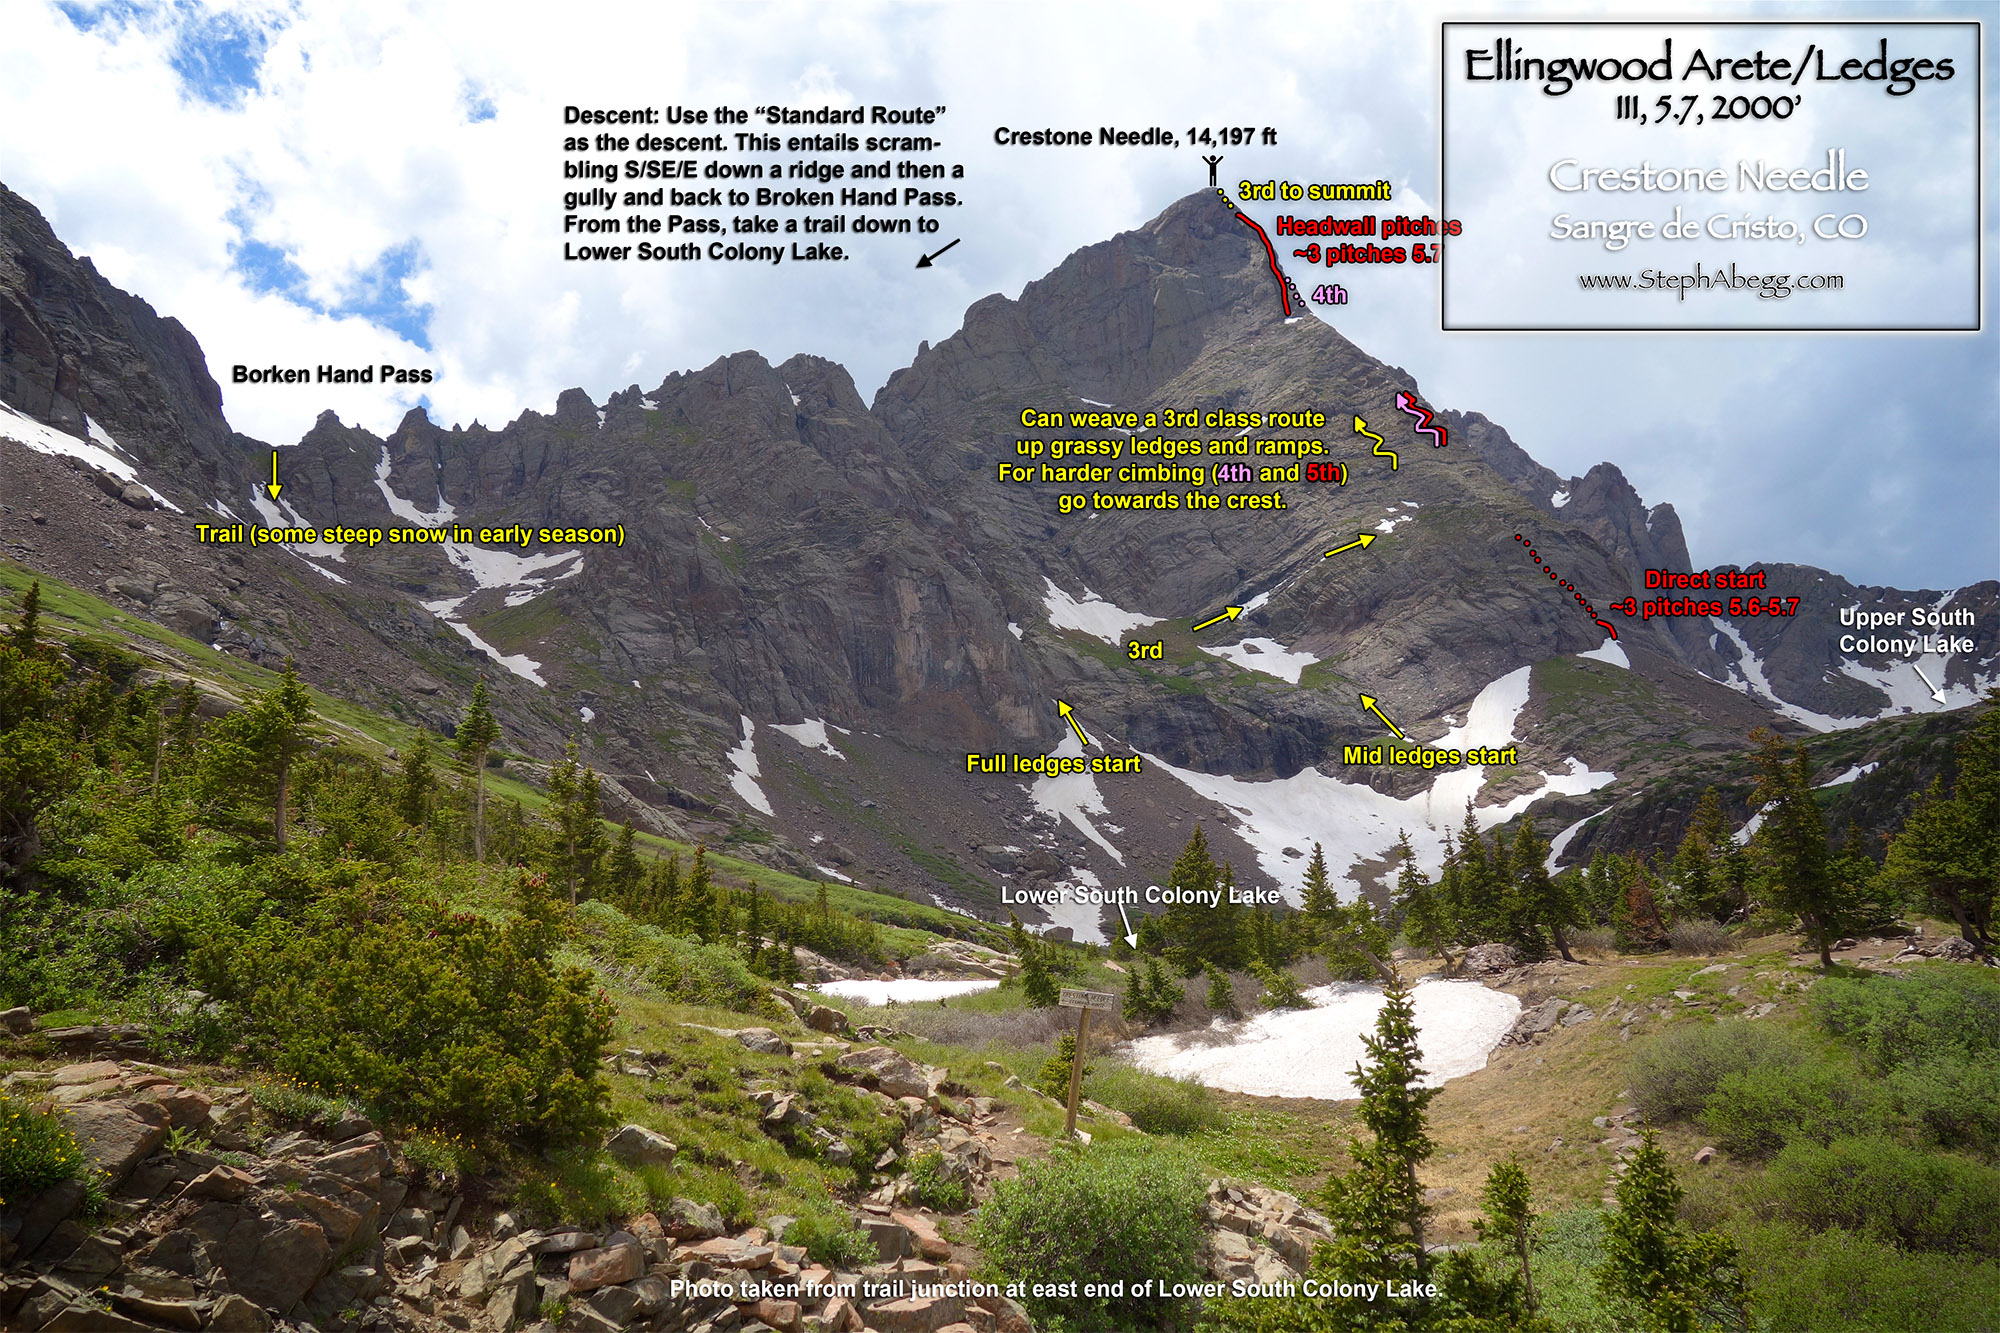
Ellingwood Arête (aka Ellingwood Ledges) ascends the elegant 2000-foot arête of Crestone Needle directly to the summit. Most of the climbing is pleasant 3rd class, but the upper headwall yields three sustained and airy pitches of 5.6-5.7 climbing leading to the summit. There is also the option to do a direct start and add on 3 more pitches of 5.6-5.7 climbing. Ellingwood Arête is a climb that is less about hard climbing and more about being in the mountains and enjoying a full athletic day to the top of a 14,000+ summits. The route is part of Colorado's climbing history as well, as its first ascent in 1925 made it one of Colorado's first technical rock climbs. The line did not see many ascents over the following years, but after its inclusion in Fifty Classic Climbs of North America, the route became quite popular.

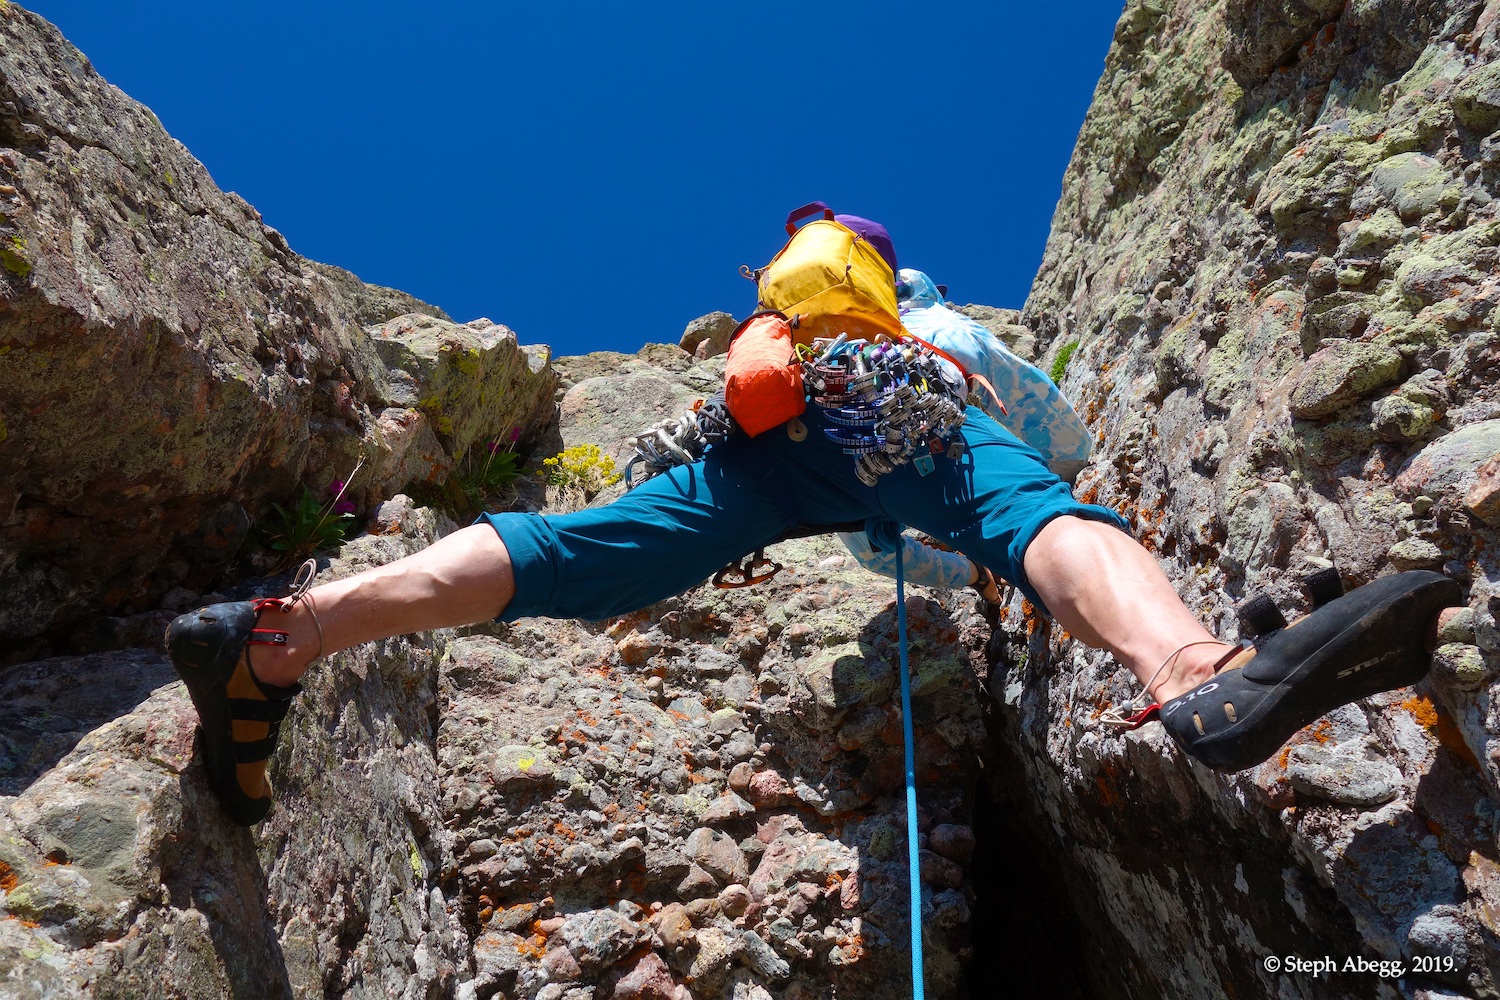
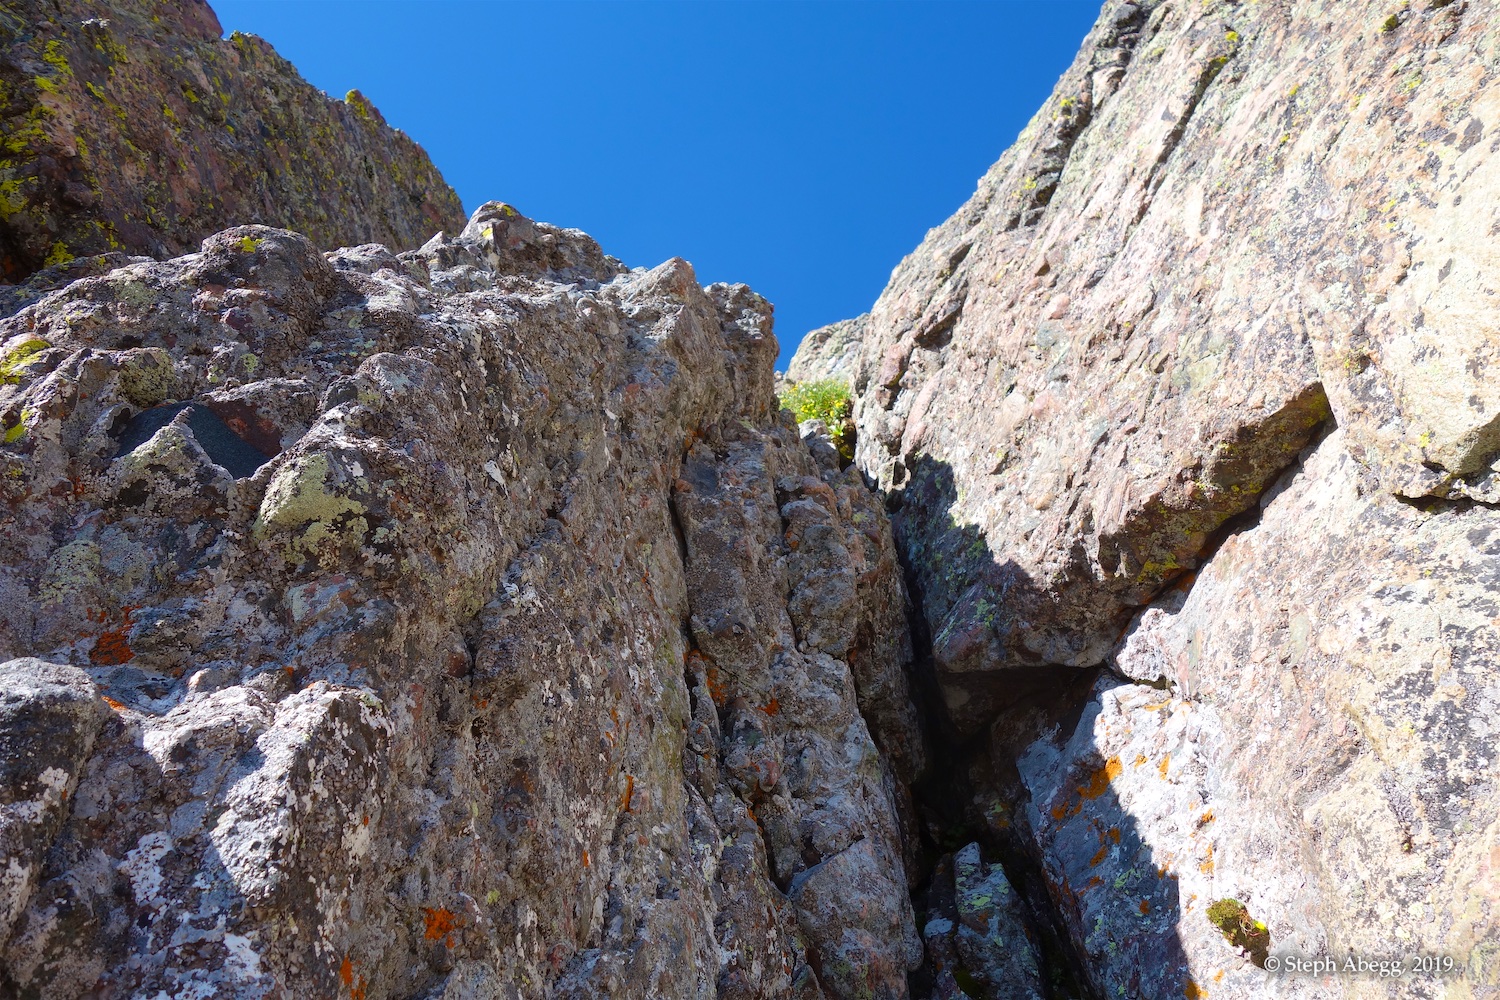
The rock on Crestone is a unique and beautiful ancient Paleozoic conglomerate. This "Crestone conglomerate" is composed of numerous knobs, cobbles, and boulders of quartzite, pink granite, sandstone, schists, and gneisses firmly cemented into the bedrock matrix of fine-grained silica. From a climbing perspective, it takes some getting used to, but once you realize the cobbles are (for the most part) firmly cemented in, it is quite entertaining to climb.

When I am in the vicinity of a Fifty Classic route, I make a point to climb it. I had just moved to Colorado a couple of weeks before this trip. There are four Fifty Classic routes in Colorado (South Face of Petit Grepon, D1 on The Diamond, Northcutt-Carter Route on Hallett Peak, and Ellingwood Arête on Crestone Needle). I had already climbed the Petit Grepon, the Diamond, and Hallett, so Ellingwood Arête moved to the top of my list. My friend Doug was visiting from Seattle and we were doing a grand tour of some of the major climbing areas in Colorado, so we decided to add Ellingwood Arête to the trip.

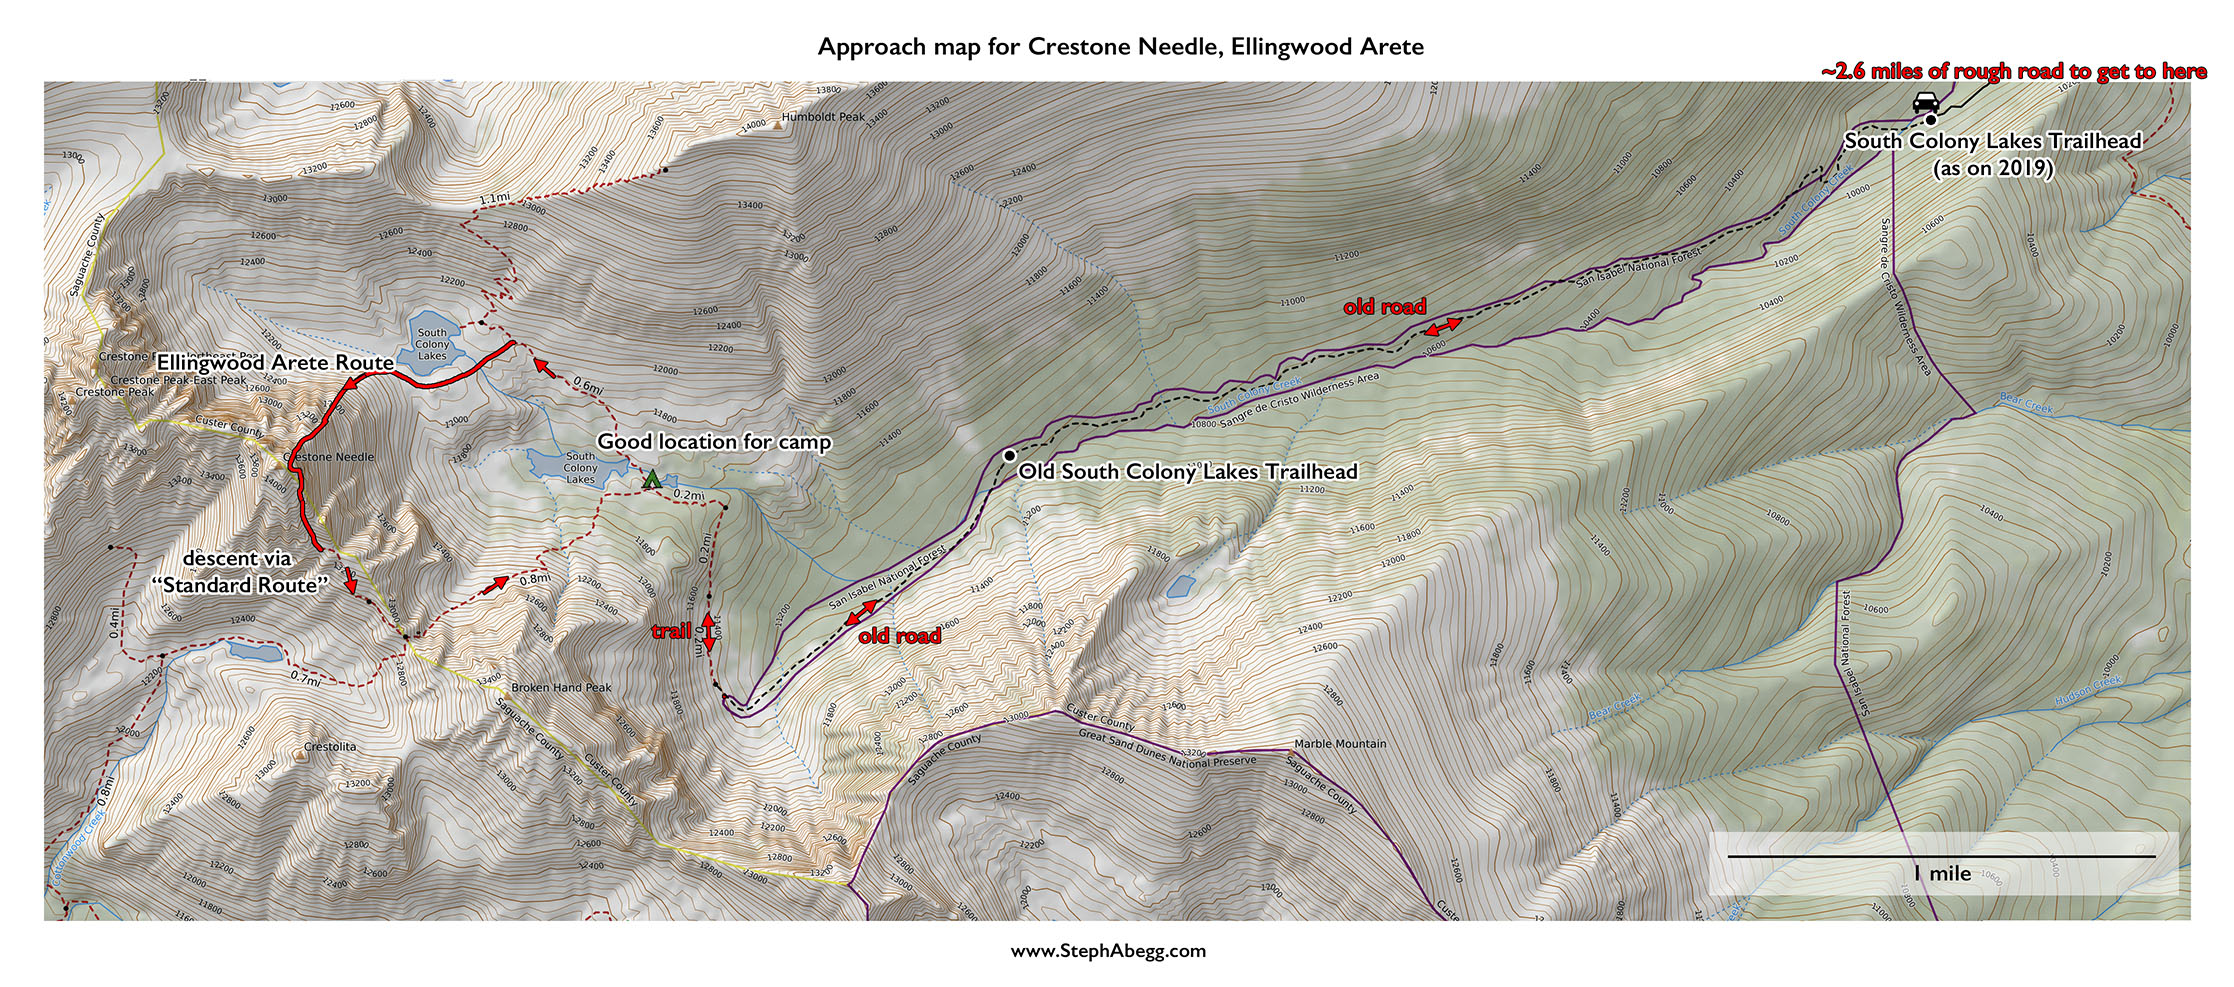
Doug and I enjoyed the athletic adventure. The following page gives a trip report, including overlays, approach map, and lots of photos. Enjoy!

Time Stats

(times do not include short breaks between)
South Colony Lakes trailhead to camp: 2:25
Camp to base of route: 1:05
Base of route to summit: 4:30
Summit to camp: 2:10
Camp to South Colony Lakes trailhead: 1:46

Photos

THIS TRIP REPORT IS STILL MOSTLY IN THE EMBEDDED HTML FORMAT OF MY OLD WEBSITE.


Photos:
Photo descriptions:
Approach 
Drive as far up rough road to South Colony trailhead as you are comfortable. Hike remaining road plus  ~5 miles to Lower South Colony Lake. Establish camp.
1.    
2.    
3.    
4.    
5.    
6.    
7.    
8.    
9.    
10.    
11.    
12.    
13.    
14.    


1. The start of the rough road. It is 2.6 miles from here to the trailhead. Just FYI, in case you decide to drive only partway and walk the rest, the first 1.5 miles is private land you are not allowed to leave your car on.
2-3. Photos taken on the 2.6 miles of road to the trailhead. It's pretty rough in sections but not in others. A high-clearance 4wd truck would have no problem, and if you are good at these sorts of things and didn't care about a few bumps and scrapes you could probably get just about any car up there.
4. An idea of what kind of cars were able to make it up the road. Disclaimer: We had a Toyota HIghlander and stopped 1 mile before the trailhead and walked. We were slightly ashamed when we saw the Honda and Mazda hatchbacks that had made it all the way.
5-6. From the South Colony Lakes Trailhead, walk about 4 miles of old road to the previous site of the South Colony Lakes trailhead.
7. Some pretty columbine along the road walk.
8. Crossing South Colony Creek just after the old South Colony Lakes trailhead.
9. Signage.
10. Hiking the last bit of old road before the trail starts. The trail section is only about 0.5 miles to Lower South Colony Lake. The approach sure was short when the road was driveable!
11. Our camp on the east end of Lower South Colony Lake. We determined this was the best place to camp since the descent route comes right back down to here. Camping at Upper South Colony Lake would have meant having to hike back up to Upper South Colony Lake after the climb (by the way, there is a trail that directly goes from the old trailhead to Upper South Colony Lake, but even so you would have to ascend from Lower to Upper after the climb if you camped at Upper).

12. Solar-powered light cube. This is a new acquirey of mine, and it is quite handy to have around camp for alpine starts.
13. Crossing the outlet stream of Lower South Colony Lake. I didn't like my odds at keeping my feet dry if I tried to rock hop.
14. Approaching Ellingwood Arête from the rocky rib between the lakes.
Direct start
~3 pitches, 5.6-5.7
15.    
16.    
17.    
18.   
15. At the base of the direct start.
16. We soloed up the first 20 feet in order to have a dry place to rack up and put shoes on. This photo gives a good display of the Crestone conglomerate.
17. Looking up the direct start corner. This photo was taken just after sunrise and the sun was already sweeping over the route. The route is NE facing so it gets morning sun.
18. The direct start is equipped with shiny bolt anchors. Notice also our microtraxion device. We linked all three pitches into one pitch with some simulclimbing. The microtraxion is great for safety during simulclimbing (if the follower falls, the device catches the fall rather than pulling the leader off).
Middle section
~1500 feet, mostly  3rd
19.    
20.    
21.    
22.    
23.   
19. Looking up at the ledgy low-angle terrain above the direct start.
20. Doug 3rd-classing up the middle section of the route.
21. Doug succumbing to to the altitude and the alpine start. =)

22. The key to keeping the middle section 3rd class is to weave your way through the ledges. Broken Hand Peak in background.
23. This photo was taken near the end of the middle section. You can see the headwall above.

Upper headwall pitches
~3 pitches, 5.6-5.7
24.    
25.    
26.    
27.    
28.    
29.    
30.    
31.    
32.    
33a.    
33b.    
34.    
35.    
36.    
37.    

   
24-25. The start of the headwall. We climbed up the crack/corner on the right above the snow. It was 5.6-5.7 climbing. I don't think this is the official Pitch 1 of the headwall though. I think you could climb easier (4th?) terrain just right of the arête. So we got in a bonus pitch. Yay!
26. Some pretty flowers.
27. Humboldt Peak to the northeast.
28-29. I think this is the official Pitch 1 of the headwall. This is where there are three chimney options. We went up the center option. Second photo taken by Doug, of me starting off the pitch.
30. Somewhere in the vicinity of Pitch 2 of the headwall. I linked this with Pitch 1.
31. An old piton. There were a few old pitons and fixed nuts on the headwall pitches.
32. Doug enjoying a comfortable belay spot.

331/b (BETA PHOTO). Looking up at the final headwall pitch (Pitch 3). We just went straight up the corner (option F in my overlay) and thought it was the best pitch of the route. It was only after the fact when making my trip report that I couldn't connect the route description in the guidebook to the pitch I led! Not really sure where this mysterious "Head Crack" pitch is. Either way, I recommend F. (I've read accounts of D, E, and G, which don't sound as good as F; I have not read accounts of A, B, C, H, or I).
34. We climbed the right-facing corner in the center of the photo. I don't think this is the official Head Crack, but it seems to be the obvious choice from the belay and it offers very good 5.7ish climbing. I'd recommend it.
35-36. A couple of photos I took as I lead the Pitch 3 corner.
37. The final 3rd class scramble to the summit. With the melting snow, this section was a bit of a bowling alley of snowballs and small rocks. I had set my belay at the top of Pitch 3 about 10 feet to the right under a roof to get clear of it.
Top!
Congrats, you've tagged a 14-er! Enjoy the view.
38.    
39.    
40.       
38. On top! It was about 10:30am. Looks like we beat the "50% thundershowers after noon" to the summit! (By the way, the thundershowers did arrive a few hours later, but we were already hiking out. I wouldn't want to be up here or doing the descent in the rain, so an early start and moving quickly is worth it.)
39. Crestone Peak to the west.
40. We thought this "technical only" sign was interesting. Perhaps this is the gully you take to traverse over to Crestone Peak from Crestone Needle?
Descent
Use the "Standard route" as the descent. Follow cairns SE, descend a gully to S, and then a ledge to E to Broken Hand Pass, and then down trail to Lower S Colony Lake. The Crestone conglomerate is particularly cool along this descent, so stop to enjoy it.
41.    
42.    
43.    
44.    
45.    
46.    
47.    
48.    
49.    
50.    
51.    
52.    
53.    
54.    
55.    
56.    
57.    
58.    
59.    
60.    
61.    
62.    
63.      
41. Beginning the descent.
42-44. Photos taken in the descent gully. Pretty much follow the cairns.
45. Much of the descent is really fun 3rd/4th class scrambling and downclimbing on Crestone conglomerate. The rock on this side is even prettier and more solid on this side than on the Ellingwood Arête side.
46-48. More photos of the Crestone conglomerate. Crestone conglomerate is composed of numerous knobs, cobbles, and boulders of quartzite, pink granite, sandstone, schists, and gneisses firmly cemented into the bedrock matrix of fine-grained silica.
49-50. Looking back up at the descent gully. Second photo by Doug.
51-52. Some cool rock features and towers on the descent. These two photos were taken as we traversed leftward at the base of the descent gully. You can see Broken Hand Peak in the distance. The goal is Broken Hand Pass on the near side of the peak.
53. The descent eventually intersects a hiking trail leading to Broken Hand Pass.
54. Starting down the trail on the north side of Broken Hand Pass.
55-58. We had to negotiate a steep snowfield on the north side of Broken Hand Pass between the Pass and Lower South Colony Lake. We were glad that we had decided to bring our crampons for this section. We used rocks to act as makeshift ice axes and to keep our hands off the cold snow.
59. It's hard to get lost now. The cairns are like small towers.
60. Hiking down to Lower South Colony Lake.
61-62. Some photos of Crestone Needle from near Lower South Colony Lake. Ellingwood Arête climbs the elegant arête on the skyline.
63. Doug enjoying a Carl's Jr Beyond burger on the drive home. I skipped the burger due to my keto diet and my unavoidable car sickness as I used the 3 hour drive back to Boulder to upload photos, answer emails, and start my trip report. Doug told me the burger was excellent and that I was missing out. But in my mind the faster I can get the trip report done the quicker I can get to my next climbing adventure and hence the less climbing I miss out on! 

Comments Pertaining to this Page / Trip Report

Useful beta. Updated route information. Corrections. Historical notes. Interesting facts. No fluff please.
Leave a Reply

Your email address will not be published. Required fields are marked *