Photos: | Photo descriptions: |
• Approach (Lawn Lake Trailhead --> Camp) (split: 2:53) | |
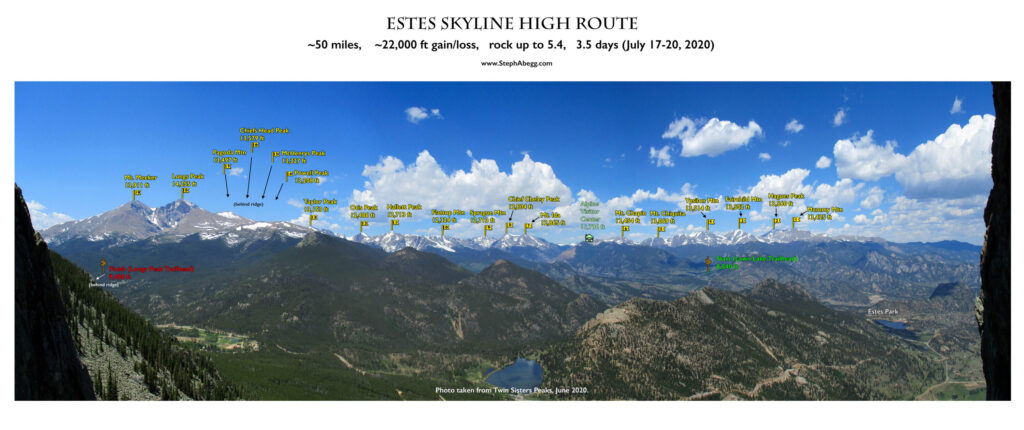
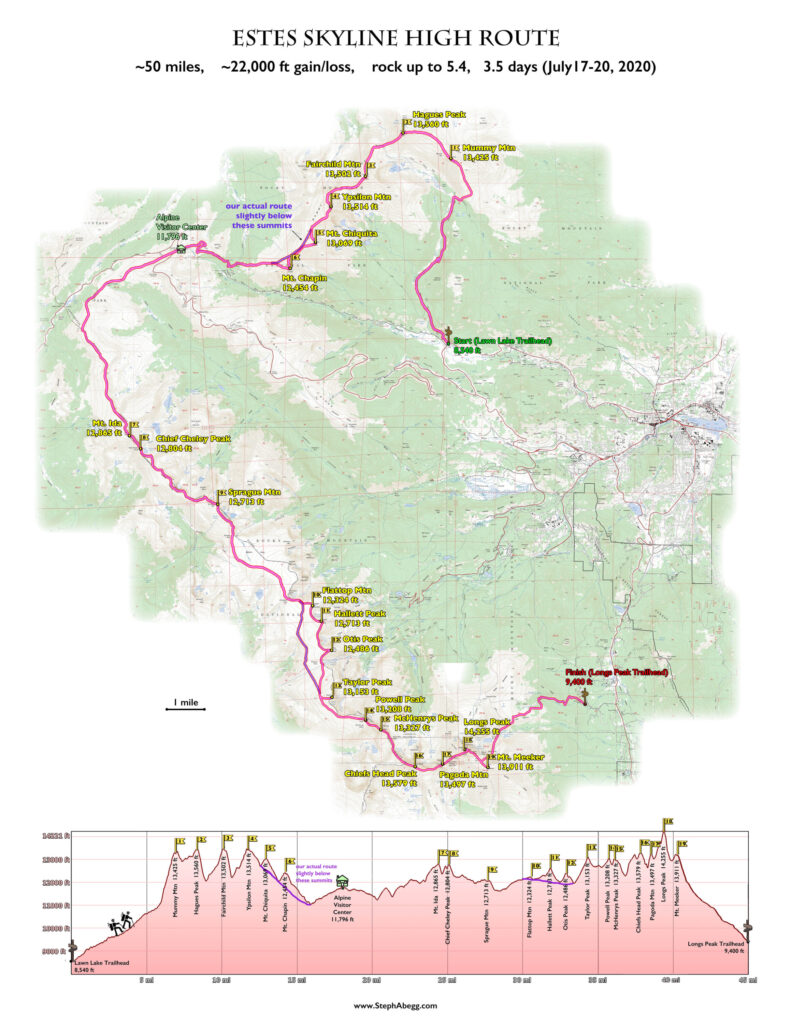
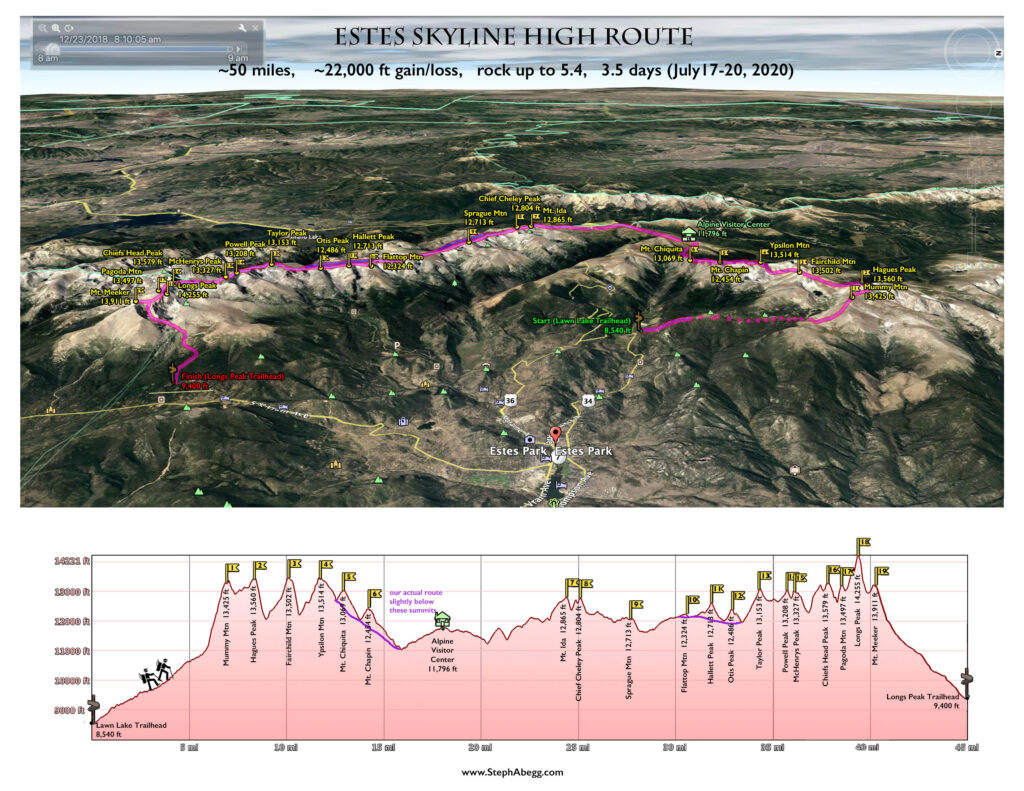
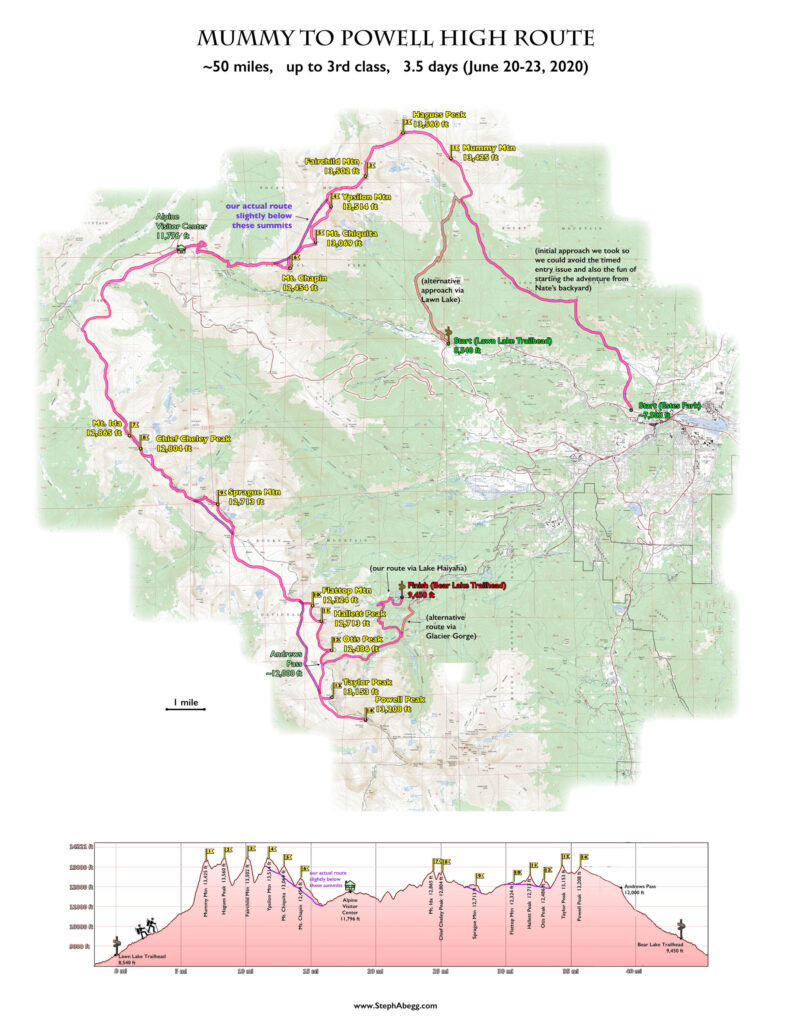
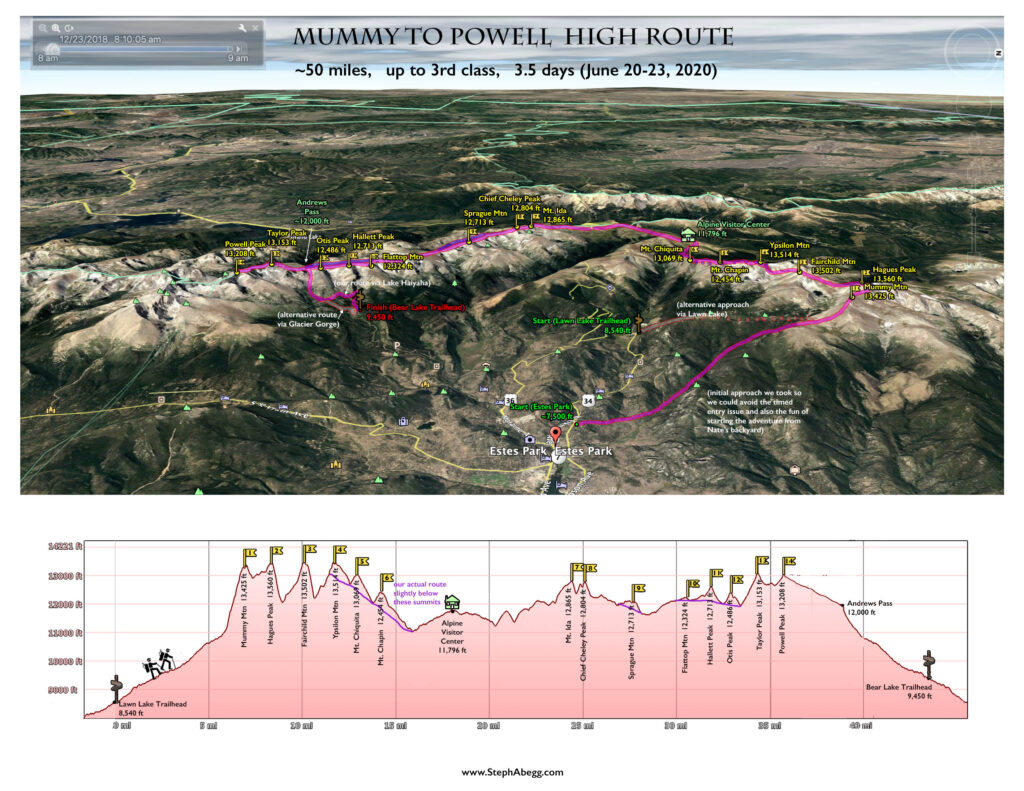
1. Starting pack weight down to just under 20 lbs (about 5 lbs less than the previous trip). And this time it includes everything, including water, phone, book, and jacket. 2. Lawn Lake trailhead, our starting point. While it was cool to start the adventure from Nate's doorstep the previous trip, the more reasonable starting point would be Lawn Lake trailhead. 3. Open terrain on the south shoulder of Mummy Mountain. 4. Water. Finding and filling up with water was a bit more strategic than it had been in June, now that much of the snow had melted. We would often fill up a few liters at a source if we suspected we would not have water for a good portion of the day. 5. Cool boulders on the ridge. 6. Nate doing some bouldering. 7. A nice sunset. 8. Evening light on the south shoulder of Mummy Mountain. 9. Evening light. 10. Mashed potatoes is my go-to backcountry dinner. 11. Nate had rice in tortillas. Topped with Fritos for extra crunch and flavor. |
Photos: | Photo descriptions: |
• Mummy Mountain (Camp --> Mummy summit) (split: 0:43) | |
12. Making breakfast in the sun. 13. Heading up towards the summit of Mummy. 14. Pleasant terrain. 15. On the summit of Mummy. I took a photo like this on every summit, to easily create a timestamp and be able to more easily identify the locations along the traverse of my 700+ photos after the trip. 16. On the summit of Mummy. | |
• Hagues Peak (Mummy summit --> Hagues summit) (split: 1:02) | |
17. Headed for Hagues. 18. Nate found his Hyperlight pack to be great for this adventure. And, no, we're not sponsored by Hyperlight... 19. Cirrostratus clouds. 20. Sky pilot. 21. Lake below Rowe Peak. 22. Radio repeater on the top of Hagues Peak. | |
• Mt. Fairchild (Hagues summit --> Fairchild summit) (split: 1:27) | |
23. Headed down from Hagues towards Fairchild. 24. The grassy saddle between Hagues and Fairchild. We met some hikers here doing the Mummy Kill traverse. This "all-day suffer-fest" hike from Mt. Chapin to Mummy Mtn seems short in comparison to our traverse plans! 25. Another summit timestamp photo on the summit of Fairchild. | |
• Ypsilon Mountain (Hagues summit --> Ypsilon summit) (split: 1:24) | |
26. Headed from Fairchild to Ypsilon. 27. Some water between Fairchild and Ypsilon. Drink up when you can! 28. Nate on the summit ridge of Ypsilon. 29. On the summit of Ypsilon, headed towards the trail along the northwest slopes of Chiquita and Chapin. | |
• Mt. Chiquita - Mt. Chapin (Ypsilon summit --> slopes below Chiquita and Chapin --> trail --> Old Fall River Road) (split: 1:37) | |
\ | 30. Hiking along the slopes under the summit of Chiquita. As before, we decided not to hit the summits of Chiquita and Chapin. Of the nineteen summits on the traverse, we skipped only five. 31. And hiking. 32. In this photo you can see the trail we intersected at Chapin Pass. This brought us to the Old Fall River Road which led up to the Alpine Visitor Center. 33. Kings crown. |
• Alpine Visitor Center (Old Fall River Road --> Alpine Visitor Center) (split: 0:36) | |
34. We intersected the Old Fall River Road and hiked it 2 miles up to the Alpine Visitor Center. 35. Indian paintbrush along the road. 36. Hiking up Old Fall River Road towards the Alpine Visitor Center. 37. Taking a break at the Alpine Visitor Center. 38. We bought some snacks and drinks. The cafe options were quite limited due to the COVID-19 pandemic. | |
• Camp (Alpine Visitor Center --> Camp) (split: 1:28) | |
39. Getting back on the trail again. 40. Hiking. 41. A view across the headwaters of the Big Thompson River towards Mt. Ida (our next summit objective). 42. On the alpine tundra on the north slopes of Mt. Ida. 43. This cairn looks pretty old. 44. We stopped to admire this cool chunk of quartz. 45. A late afternoon storm brewing over Mt. Ida. 46. I had some instant pudding for dessert. Reminds me of my childhood when we used to shake the powder in a Nalgene and my mom would dole out four small servings for each of us to enjoy for desert. 47. Nate's dinner of ramen, dehydrated vegetables, and tuna. 48. Enjoying a book and the evening sun. |
Photos: | Photo descriptions: |
• Mt. Ida (Camp --> Ida summit) (split: 1:24) | |
49. A glorious morning. 50. The grassy golden ridge leading towards Mt. Ida. 51. Nate enjoying the hike. 52. We intersected the trail leading to the summit of Ida. This was the portion of our trip where we encountered the most hikers. 53. Summit of Mt. Ida. | |
• Chief Cheley Peak (Ida summit --> Chief Cheley summit) (split: 0:41) | |
54. At the saddle between Ida and Chief Cheley. 55. Azure Lake, Inkwell Lake, and Arrowhead Lake to the east of Ida and Chief Cheley. 56. This chickenhead actually looks like a chicken head! 57. Another chickenhead. I took a photo of this one the previous trip as well. | |
• Sprague Mountain (Chief Cheley summit --> Sprague summit) (split: 1:30) | |
58. Water shortly after Chief Cheley. Drink up! 59. Between Chief Cheley and Sprague Mtn. 60. Between Chief Cheley and Sprague Mtn. 61. On the summit of Spague. The summit register Nate is examining was too wet to sign. | |
• Flattop Mountain - Hallet Peak - Otis Peak (Sprague summit --> Bighorn Flats --> North Inlet Trail --> Thundershower --> Camp) (split: 4:53) | |
62. The rolling high terrain of Sprague-Flattop-Hallet ("BIghorn Flats" on the map). 63. The rolling high terrain of Sprague-Flattop-Hallet ("BIghorn Flats" on the map). 64. The "Eureka Ditch". The ditch diverts water that would naturally flow to the west of the watershed to the east. 65. We intersected a trail for awhile. I think this is called the North Inlet Trail. 66. More pleasant trail hiking. 67. Daisies. 68. Alpine sandwort. 69. Sky pilot. 70. Dwarf sunflower. 71. Sulphur paintbrush. 72. Alpine lousewort. 73. Elephant's head. 74. Queen's crown. 75. Queen's crown 76. Parry's primrose. 77. Parry's primrose. 78. Enjoying a midday break along the trail. Why not, we have plenty of time! 79. May as well make a midday coffee to go along with the break. 80. A marmot enjoying a midday break too. 81. Back on the trail. 82. Weather brewing. 83. It started to rain so we threw up a shelter to stay dry. 84. Flower shadow. 85. The storm passed and we resumed hiking. Here we are on the slopes of Taylor. | |
• Taylor Peak (Camp --> Taylor summit --> Camp) (split: 0:15) | |
86. Filling up with water on the slopes of Taylor. 87. Looking up towards the summit of Taylor. 88. On the summit of Taylor. From here is a nice view of the remainder of the traverse from Powell to McHenrys to Chiefs Head to Pagoda to Longs Peak. This would be the next day's objective. 89. Evening light on Longs, Pagoda, Chiefs Head, McHenrys and Powell. 90. Evening light on the summit of Taylor. 91. A view down to the Petit Grepon and Sky Pond from the summit of Taylor. 92. Evening light show. 93. Evening light show. 94. Evening light show. 95. And another glorious day comes to a close. Red sky at night.... |
Photos: | Photo descriptions: |
• Powell Peak (Camp --> Powell summit) (split: 0:52) | |
| 96. Morning light on the slopes leading towards Powell. 97. A view of the Petit Grepon. 98. The rugged McHenrys Notch. |
• McHenrys Peak (Powell summit --> McHenrys Notch --> McHenrys summit) (split: 0:39) | |
99. The 3rd class ramp around the south side of a tower in McHenrys Notch. 100. The 3rd class ramp around the south side of a tower in McHenrys Notch. 101. To get out of McHenrys Notch on the east side and onto the summit of McHenrys, we climbed the steep rock on the other side of the notch. This was about 5.4. 102. Nate scrambling up the east side of McHenrys Notch. 103. The 5.4 section. We soloed this easily in approach shoes. 104. Nate on the summit ridge of McHenrys. 105. A view down onto Arrowhead. 106. On the summit ridge of McHenrys. | |
• Chiefs Head Peak (McHenrys summit --> Stoneman Pass --> Chiefs Head summit) (split: 1:33) | |
107. Descending from McHenrys to Stoneman Pass. 108. A view of the terrain between McHenrys and Chiefs Head. 109. Stoneman Pass. The Stoneman tower is on the left side of the photo. 110. Next thing I knew Nate was on top of the Stoneman. He said it felt like 5.9. I wonder how many other people have climbed to the top?! Nate can officially call himself a stoneman now. 111. A cool window near Stoneman Pass. 112. A quartz explosion. 113. On the final stretch to the summit of Chiefs Head. 114. A view of the remainder of the traverse: Pagoda, Longs, Meeker. 115. On the summit ridge of CHiefs Head headed towads Pagoda. | |
• Pagoda Mountain (Chiefs Head summit --> Pagoda summit) (split: 1:10) July 2024 Update: I did the West Ridge Bypass (low 5th) on Pagoda. This is the way I would recommend rather than the NW Face that I did for the trip report on this page. Click link to see the trip report for West Ridge Bypass (low 5th). | |
116. Looking up the west ridge of Pagoda. Apparently this is 5.7. I had scoped out a 5.4 route on the north side of Pagoda the previous week, so we went with the 5.4 route instead. I think the 5.7 west ridge would have probably been fine too. 117. The ledgy north side of Pagoda. 118. Grassy ramp with some pretty King's crown flowers. 119. Traversing towards a gully system leading back up to the ridge of Pagoda. 120. We climbed up this (5.4 ish) to intersect the upper west ridge of Pagoda. 121. On the upper west ridge of Pagoda. 122. A summit timestamp photo. | |
• Longs Peak (Pagoda summit --> Longs summit) (split: 1:03) | |
123. Looking towards Longs Peak from Pagoda. We traversed on the right side of the Keyboard of the Winds, and climbed through the cliffband on juggy gneiss (5.5 ish) just left of the obvious weakness (3rd) that one could also take. 124. Nice gneiss. The banding is developed under high pressure and temperature conditions. 125. More nice gneiss. 126. We climbed through the cliffband on juggy gneiss (5.5 ish). One could also take an obvious weakness (3rd) just right of this. But the juggy gneiss was fun. 127. We went up the weakness on the right to intersect the Keyhole Route at the base of the Homestretch. 128. Scrambling up the Homestretch to the summit of Longs. 129. The view from the summit of Longs, looking towards the start of the traverse on Mummy Mountain. Looks a long ways away! | |
• Mt. Meeker (Longs Peak summit --> The Palisades --> The Loft --> Meeker summit) (split: 1:17) | |
130. The Palisades between Longs and Meeker. We traversed below these to get to the Loft. 131. Some cool rock in the Palisades. 132. Traversing below the Palisades. 133. We headed up this to get to the Loft. 134. Hiking across the Loft towards our final summit objective: Meeker. 135. View from the summit of Meeker. The mountains in the distance are the start of the traverse! 136. Longs Peak as seen from the summit of Meeker. 137. Beginning the descent from the summit ridge of Meeker. | |
• Hike out (Mt. Meeker --> The Loft --> Longs Peak trailhead) (split: 2:11) | |
138. Starting down from the Loft towards the trail that leads to Chasm Lake. 139. Descending from the Loft. 140. A field of alpine columbine. 141. End of hike, at Longs Peak trailhead timestamp photo. |