Lower East Face Longs Peak
Route:
Kor's Door
5.9-, 6p
A pretty mellow climb in a spectacular location.
Region: Colorado
Elev: ~13,300 ft
Rock: Granite
Mode:

Date(s): June 25, 2020 (Thu)
Partner(s): Will Starks


| Photos: |
Photo descriptions: | |
|
Approach
|
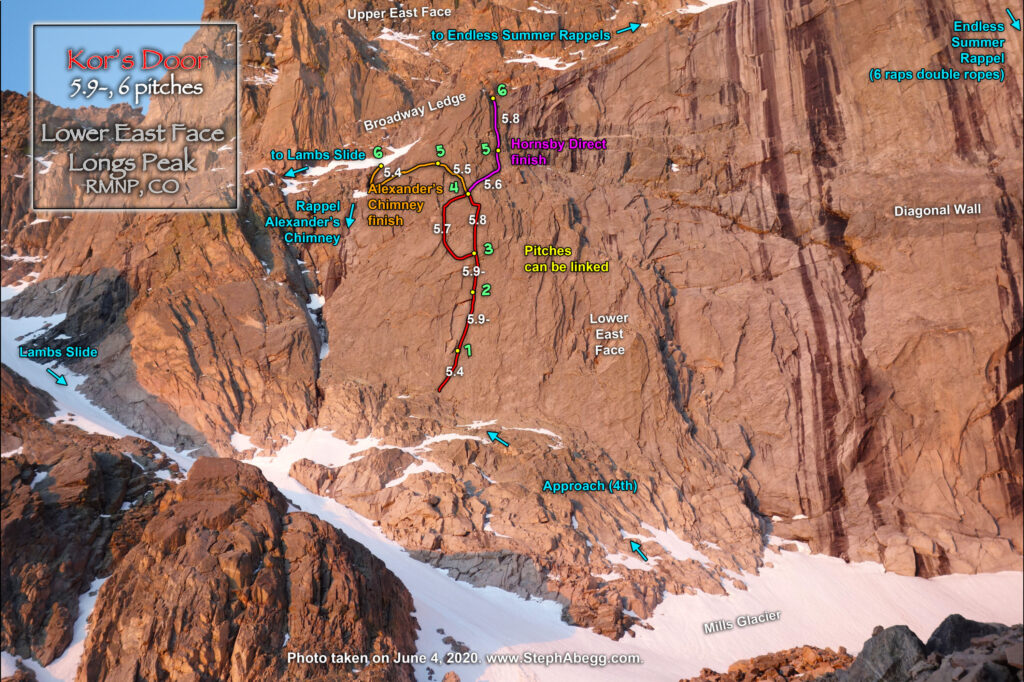
Hike up past Chasm Lake. Cross the Mills Glacier to reach the toe of the buttress. We racked up and left our extra gear here. Scramble up a 4th class rock band right of Lambs Slide to a good ledge below an obvious rectangular inset. | |
|
|
1. Ships Prow and the Diamond glowing in the morning sun. 2. Lower East Face is below and left of the Diamond. 3. To get to the base of the route you have to ascend a bit of the Mills Glacier and then scramble up the 4th class rock band to the right of Lambs Slide. 4. The snow was soft enough that approach shoes were sufficient to boot up it. 5. A view back at Will booting up Mills Glacier. 6. The 4th class rock band. |
|
|
Pitch
1
(we linked Pitches
1-3)
|
5.4. From the right end of the ledge, climb a curving, left-facing corner. There is a nice spot to belay at the bottom of the inset. This is a short pitch (especially if you scramble all the way to the base of the corner) and is easily and logically linked with Pitch 2. | |
| 7. Will on Pitch 1. 8. An old pin. 9. Some blocky flakes at the end of Pitch 1. 10. The obvious large flake on the left side of the inset. |
||
|
Pitch
2
(we linked Pitches
1-3)
|
5.9-. Climb the corner on the right side of the inset. Pull through the roof at its top. Belay at a small stance about 10 feet above the roof. With some simulclimbing, it is possible to continue climbing and get to a better belay ledge at the top of Pitch 3. | |
| 11. Looking up Pitch 2. 12. The roof. |
||
|
Pitch
3
(we linked Pitches
1-3)
|
5.9-. Climb up and through the next roof. Belay at a nice ledge about 20 feet above the roof. | |
| 13. The roof on Pitch 3. | ||
|
Pitch
4
(we linked Pitches
4&5)
5.8 right/
direct
option
|
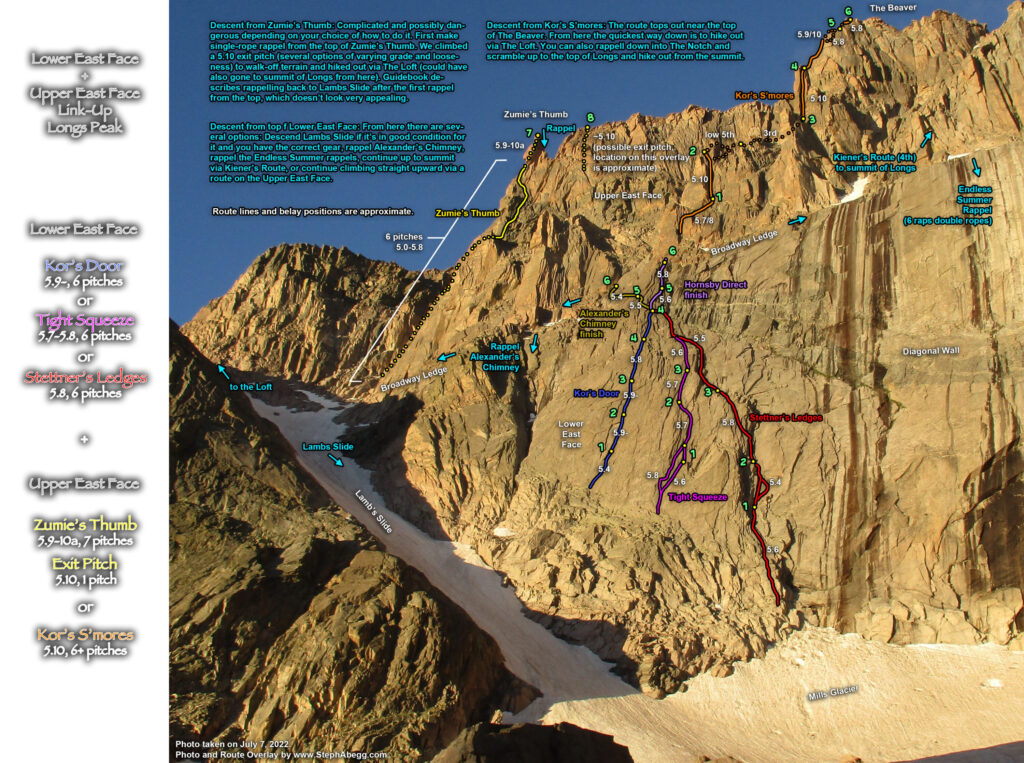
There are two options for this pitch. We went with the 5.8 option, which was directly above the belay. Option 1: 5.7. Traverse to the left end of the ledge and climb right-facing corners. Option 2: 5.8. From the right side of the ledge, climb a right-facing dihedral. At the top of either option, there are again two choices depending on your plan for the remainder of the route. Either angle up and left to the long traverse on Alexander's Chimney or angle up and right if climbing Hornsby Direct. |
|
| 14. Looking up at the 5.8 option. 15. The right-facing dihedral of the 5.8 option. 16. Steph leading off the pitch. (Photo by Will.) |
||
|
Pitch
5
(we linked Pitches
4&5)
Hornsby Direct finish
|
There are two options for this pitch depending on your plan for the remainder of the route. We chose to climb the slightly more challenging Hornsby Direct. 5.5. (Same as Pitch 3 of Alexander's Chimney.) Climb a right-facing dihedral for about 40 feet, work up and left for another 80 feet, and then belay on a higher ledge. 5.6. (Hornsby Direct.) Head right to get into the dihedral system. |
|
| 17. Somewhere on Pitch 5. | ||
|
Pitch
6
Hornsby Direct
finish
|
There are two options for this pitch depending on which way you went on Pitch 5. We chose to climb the slightly more challenging Hornsby Direct. 5.4 (Same as Pitch 4 of Alexander's Chimney.) Traverse left for another 75 feet (3rd) into a recessed area that has become known as the Yellow Bowl. Belay here, or continue up left side of the bowl to Broadway Ledge. 5.8. (Hornsby Direct.) Climb straight up the dihedral to Broadway Ledge. |
|
| 18. The corner of the final pitch to Broadway. | ||
|
Top!
|
The route ends on Broadway Ledge. | |
| 19. There's some good-looking rock on the Upper East Face... 20. Looking left (towards Lambs Slide) on Broadway from the top of the route. 21. Looking right (towards the Diamond) on Broadway from the top of the route. 22. A view back as we traversed Broadway towards the Diamond. 23. This soft snowfield hanging above Field's Chimney looked a bit too sketchy to cross. 24. A view up at The Obelisk on The Diamond. I need to climb this route. | ||
|
Descent
|
There are a few descent options: go right and rappel the Endless Summer Rappel Route down the Diagonal Wall to Mills Glacier; go left and rappel Alexander's Chimney (probably a bit loose); go left and descend Lambs Slide (ice or snow, somewhat steep, probably want crampons and ice axe especially in later summer); go left and get to the base of Zumie's Thumb and climb some more!
It is possible to access the base of the Diamond by traversing rightward along Broadway Ledge, but it is pretty sketchy in one section. We actually tried to traverse to the base of the Diamond to run up the Casual Route, but we were thwarted by a steep and sloughing snow patch hanging above Field's Chimney. So we ended up doing the Diagonal Wall rappels (we could have also descended Lambs Slide, since it was in great shape with all of its early summer snowcover). |
|
| 25. The first rappel of the Endless Summer Rappel Route down Diagonal Wall. 26. The first rappel of the Endless Summer Rappel Route down Diagonal Wall. 27. Will rappelling. 28. The 100 foot traverse to the 4th rap station. These exposed ledges would be a bit sketchy in a storm... 29. One of the rap anchors. 30. The final rap onto Mills Glacier. 31. Thunderheads brewing to the east. 32. Our respectable booty gear haul for the day. |
||