Pitch descriptions: (Pitch numbering as per Blake Herrington's Cascades Rock guidebook) | Photos: | Photo descriptions: | |
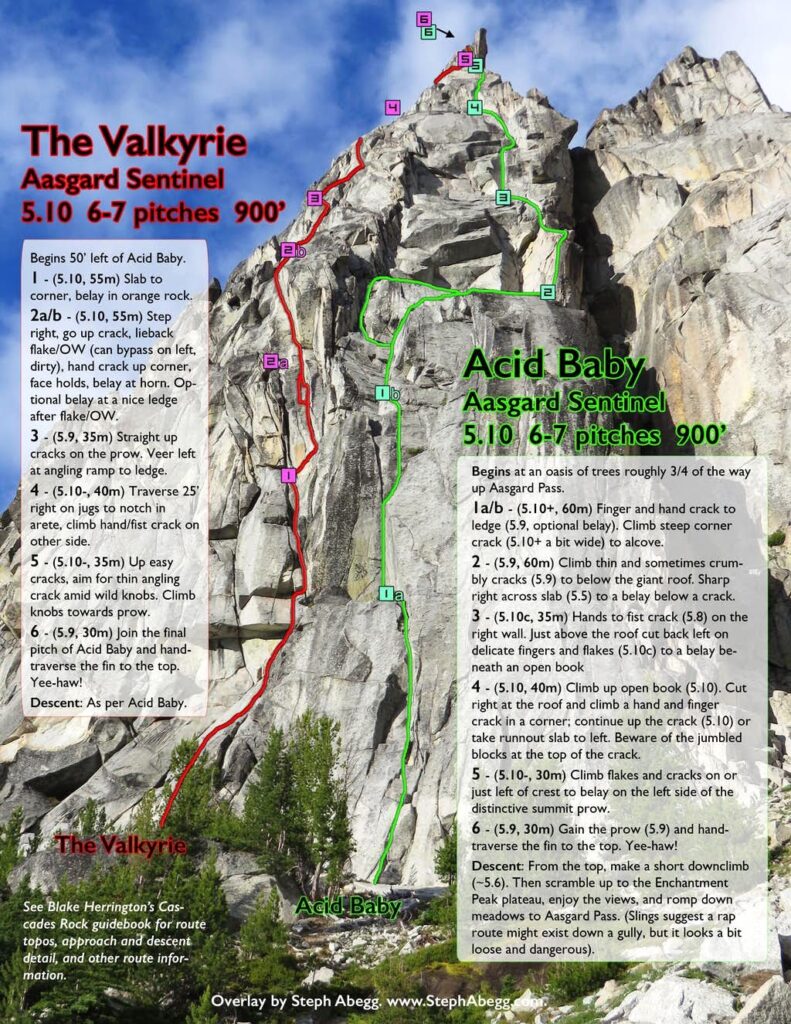
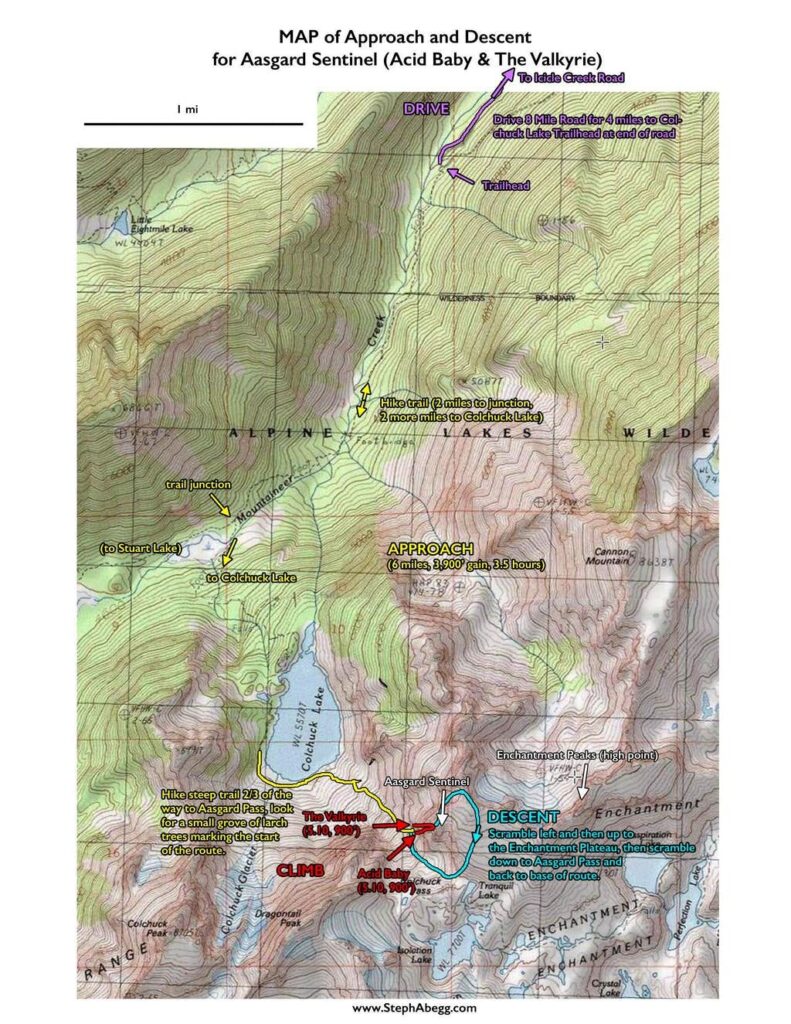
Approach | ~3 hours Begins at an oasis of trees roughly 3/4 of the way up Aasgard Pass. | a. The route is quite feasible as a car-to-car from Stuart Lake Trailhead, which is how Will and I climbed it. It took us about 3.5 hours (at a moderate pace) to hike from the car to the base of the route. (Usually there would be more snow on the slopes below Aasgard Pass, but 2015 has been an unusually low snow year (sorry skiers...).) | |
Pitch 1a | 5.9, 30m Finger and hand crack to ledge. | 1a. The route starts up the cracks just above the snowpatch in the photo and continues up the left facing corner system. The original Pitch 1 was a rope-stretcher but (like most parties I think) we broke up this pitch into two pitches, to make the route have a total of 7 pitches to the top. The crux of the first pitch is the slightly overhanging section of the corner with the black streaks at about the middle of the photo. | |
Pitch 1b | 5.10+, 30m Climb steep corner crack (5.10+ a bit wide) to alcove. | 1b. Looking up the 5.10+ corner that comprises the upper part of Pitch 1 (our second pitch). This slightly overhanging wide crack is the physical crux of the route. We were quite comfortable with our two #3 and two #4's. I really enjoyed this corner, since over the recent years I have grown to enjoy wide crack climbing. | |
Pitch 2 | 5.9, 60m Climb thin and sometimes crumbly cracks (5.9) to below the giant roof. Sharp right across slab (5.5) to a belay below a crack. | 2. Looking down while climbing Pitch 2 (our third pitch...). I climbed all the way up a corner system on the left to below the obvious roofs from where it was obvious (and easy) to traverse horizontally to the right across an easy slab. Inevitable rope drag at the end of this pitch. | |
Pitch 3 | 5.10c, 35m Hands to fist crack (5.8) on the right wall. Just above the roof cut back left on delicate fingers and flakes (5.10c) to a belay beneath an open book | 3a. Will reading the route description at the base of the hand to fist crack of Pitch 3. This was a fun crack. Although not necessary since it is only 5.8, we again felt quite comfortable with our two #4 and two #3 cams. Above the hand/fist crack Will took a more direct variation up some tight fingers which felt 10d (ish) to me. I think there was an easier way just to the left. 3b/c. Shadow climbing on Acid Baby. | |
Pitch 4 | 5.10, 40m Climb up open book (5.10). Cut right at the roof and climb a hand and finger crack in a corner; continue up the crack (5.10) or take runnout slab to left. Beware of the jumbled blocks at the top of the crack. | 4a. Looking up the obvious open book corner that begins Pitch 4. I led this pitch and thought it featured some excellent climbing. For me, the technical crux of the route was a 5.10 move at the top of this corner just before stepping right (easier) around the roof. 4b. Looking down while climbing the open book. 4c. Will enjoying life at the top of Pitch 4. | |
Pitch 5 | 5.10-, 30m Climb flakes and cracks on or just left of crest to belay on the left side of the distinctive summit prow. | 5a. Looking up Pitch 5. I think some route descriptions include the finger crack in the first 30 feet in this photo with Pitch 4, but there is a nice belay spot on both ends of the finger crack so whether it is a part of Pitch 4 or 5 is equally viable. I felt the finger crack felt like 5.10+ on lead. I think some parties avoid this finger crack by going left or right onto easier ground but the finger crack definitely seemed like the most direct and protectable line to me. At the top of the photo you can see the summit prow. Pitch 5 stops just below and left of this prow. 5b. Looking down while climbing the 5.10- hand/fist crack. I really enjoyed this crack, despite the ominous wedged blocks at the top. 5c. Taken while climbing the 5.7 slab near the top of the pitch. 5d. I think the standard belay spot is a nice ledge alcove at the top of the slab. However, I continued on up the arete a bit to a belay ledge on the overhanging prow so I could get some photos of Will coming up the arete. The exposure on this arete is great. | |
Pitch 6 | 5.9, 30m Gain the prow (5.9) and hand-traverse the fin to the summit. Yee-haw! | 6a. We climbed just left around the prow, which featured some fun moves. 6b. The final portion of the route involves a wildly exposed section right on the top of the ridge. I initially tried to surmount the block that Will is standing on in the photo (which turned out to be the correct way to go about it) but woosed out and proceeded to explore some very sketchy traverses around right and then around left of the block. Neither one of these options seemed very safe. By this time Will was calling up if I was off belay, so I decided to set an anchor and belay him up so we could have better communication. Will took a crack at the block and easily surmounted it and continued the pitch to its finish at the notch. (Side note: I'd actually recommend setting a belay here to break Pitch 6 into two half pitches. This way you can communicate with your leader (for both encouragement on a committing move and safety reasons), and take great photos, and belay from a spot that is probably one of the most comfy belay seats en route and comes with a 360° view.) 6c. We spotted an area of recent rock fall on the walls just the east. Looks like a HUGE section of the mountain came off. | |
On top! | a. View of Dragontail from near the top of Acid Baby. b. View of Mt. Stuart from Acid Baby. | ||
Descent | ~30 min to plateau, ~1 hour to base From the top, make a short downclimb (~5.6). Then scramble up to the plateau, enjoy the views, and romp down meadows to Aasgard Pass. (Slings suggest a rap route might exist down a gully, but it looks a bit loose and dangerous). | a. The rap gully (or at least what we suspected was the rap gully since we spotted a red sling about 30 feet below the notch) looked rather loose and of high potential for a stuck rope. So we decided to scramble to the Enchantment Peak plateau and hike down the other side. It was easy Class 2 and 3 scrambling with a short snow field. b. The view of Upper Enchantment Lakes basin (Little Annapurna in distance) from the descent down the meadows on the east slopes of Enchantment Peak. I highly recommend the walk-off since the views are great and the terrain is friendly. c. The side profile of Acid Baby as seen from near Aasgard Pass on the descent. You can see the route does not actually top out on Enchantment Peak, but there is a few hundred feet of scrambling to the plateau above. d. Will back on the Colchuck Lake Trail. The hike out is a grind after a full day on the move and a descent of Aasgard Pass. But with the long days we easily made it out in the daylight. e. The West Face of Colchuck Balanced Rock. I'll be back..... |