Torment-Forbidden Traverse: Torment South Ridge (4th/5th) & Forbidden West Ridge (5.7) (+ ridge bivy)
Torment-Forbidden Traverse
Routes:
- Mt. Torment, South Ridge (4th/5th)
- Forbidden Peak, West Ridge (5.7)
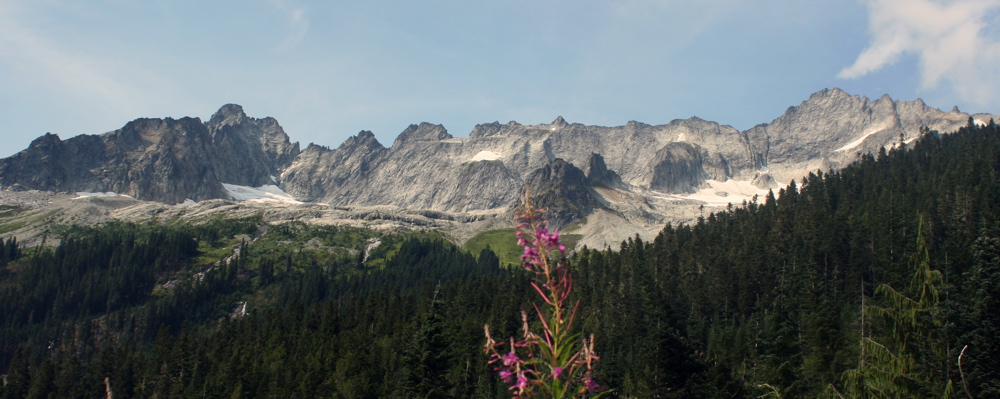
This is a wonderful mile-long traverse on the ridge between two classic summits, with spectacular views of the North Cascades every second along the way. It had been a warm summer, so bergschrunds and moats and ice were a problem on the first half mile of the traverse.
Late-summer conditions + a spectacular ridge bivy on the Torment-Forbidden Traverse = some spicy climbing and great photos!
THIS TRIP REPORT IS STILL MOSTLY IN THE EMBEDDED HTML FORMAT OF MY OLD WEBSITE. MOBILE Tip: Try Landscape mode. It is generally more mobile friendly.
Overview
THE ROUTE
(Click on the images to enlarge.)
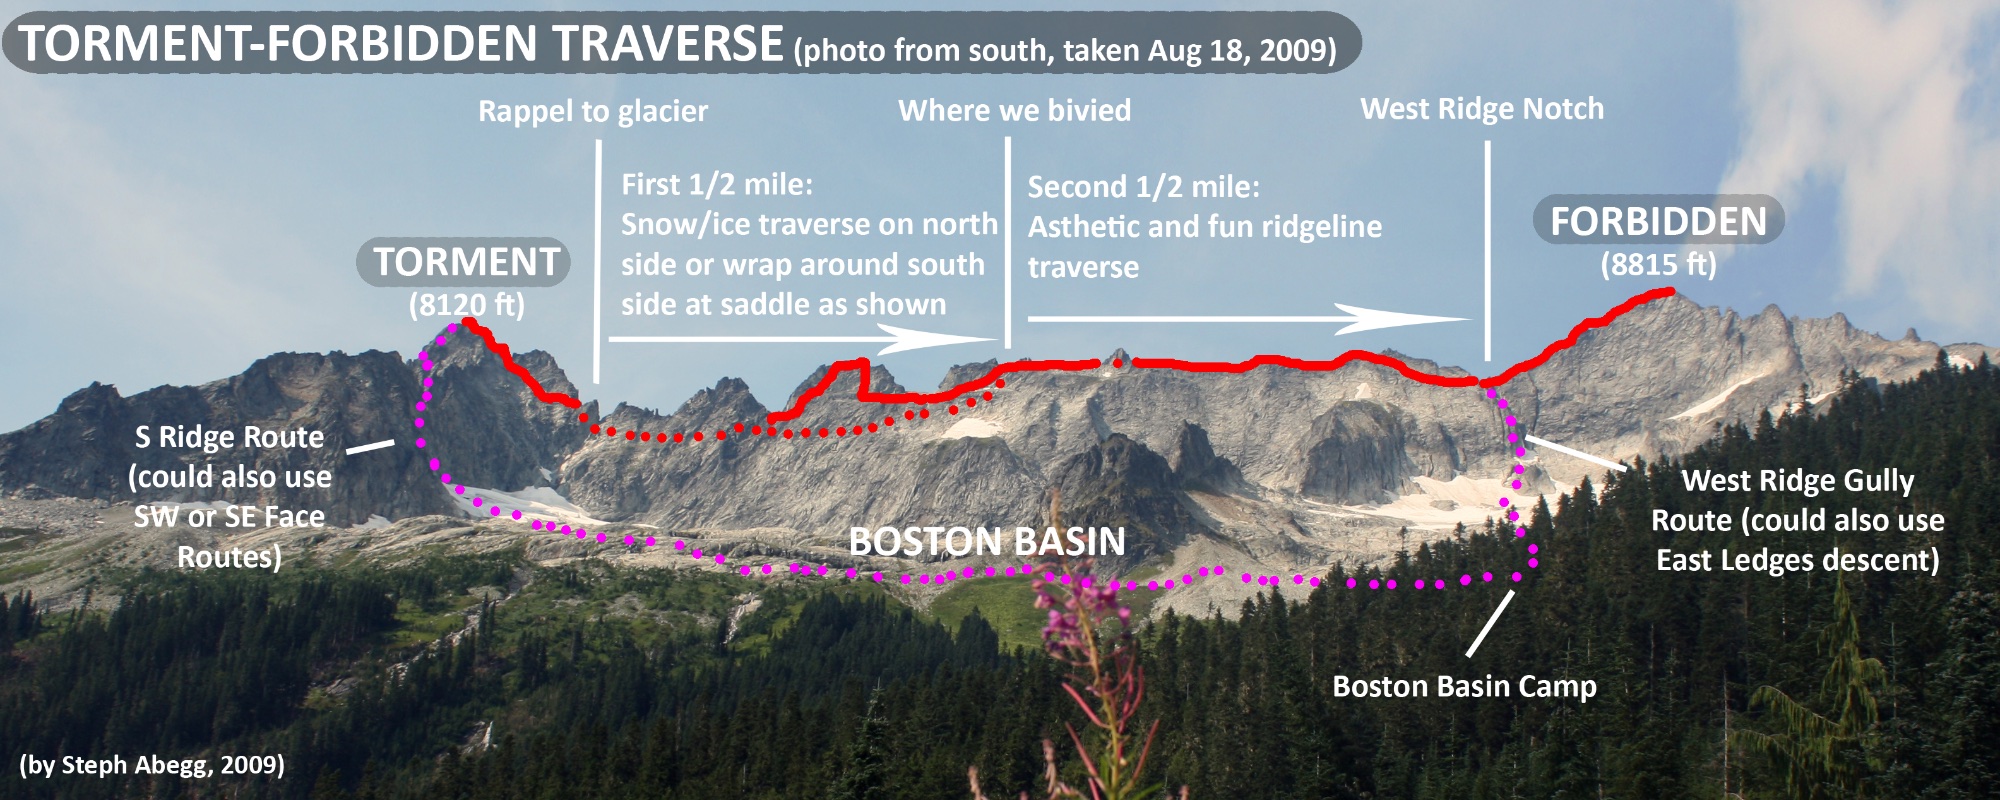
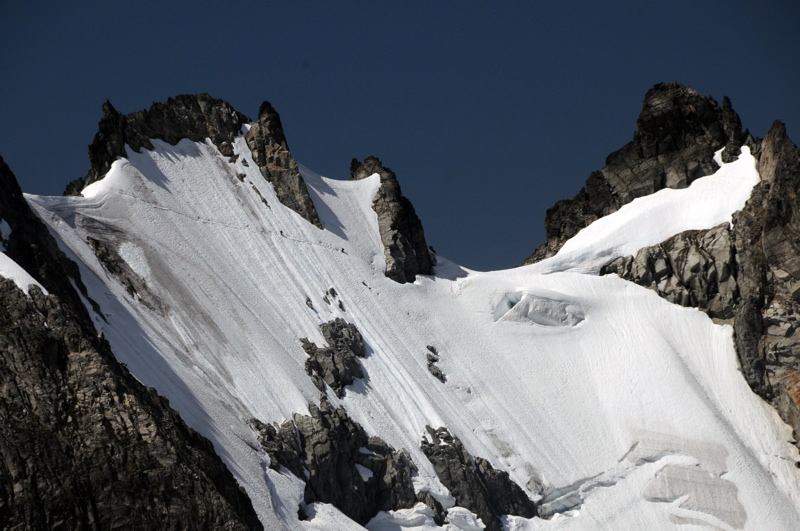
Above: The traverse stretches about 1 mile on the ridge between Torment (on the left) and Forbidden (on the right).
Above: The traverse from the south, annotated.
Above: The traverse from the north, annotated.
The traverse from Mount Torment to Forbidden Peak is a superb route on good rock. The route is a mile long, which means about a mile of spectacular views, wonderful exposure, and (at times) challenging route-finding. First, climb Torment by whatever route pleases you (South Ridge and Southeast Face are two popular choices). The Torment-Forbidden traverse route begins from the summit of Torment and follows the ridge westward to the summit of Forbidden (via the West Ridge). From there, descend Forbidden by whatever route pleases you (downclimbing the West Ridge or the East Ledges are two popular choices).
Under the right snow and weather conditions, the route is quite moderate, and can be done in a long day, although a ridge bivy is a great location to spend a night. However, in the recent years, bergschrunds and moats have added some significant challenges to the route in the latter half of the summer (as they did for us). The route is not to be underestimated, as there have been some accidents on the route, including the fatal fall of Craig Luebben shortly before Jason and I did the route in August 2009. But it is a lot of fun if everything goes well!
The views from virtually every point on this route are stunning. To the west are Baker, Shuksan, and Eldorado. To the east are Boston, Goode, and Sahale. To the south are the peaks of the Ptarmigan Traverse such as Johannesburg, Formidable, and Glacier Peak.
Photo Trip Report
Jason Schilling and I had been eyeing the Torment-Forbidden Traverse for awhile. We definitely wanted to add a ridge bivy to the plans, since this would be a great way to spend a summer evening. So, with a solid mid-August forecast, we headed up Mt. Torment with our full packs, excited for the route ahead.
The traverse was a lot of fun, with a fair share of moat and bergschrund cruxes that kept our full concentration. The steep snow/ice traverse on the north side of the first half mile was very melted out, so we opted to find a bypass route via the rock above and south side ledges, which worked out very well. We found a wonderful bivy site mid-ridge. I had brought my SLR, tripod, and extra batteries for some night photography, and it was a great night and location for it!
The following trip report gives lots of photos and details from our adventure. Enjoy!
Start by climbing Mt. Torment....
We chose to climb Torment via the South Ridge route, as is shown in the photo overlay above. The south ridge can be approached from either Boston or Torment Basin. The SE Face (above the Taboo Glacier in the photo) is another popular route, although the moat can be problematic (a fatality in Aug 2009) in late season.
1. Wake up early for a big day of fun climbing.
This photo shows morning sun on Johannesburg from our camp in Boston Basin. Since the camps in Boston Basin are about 2 hours from the trailhead, it is possible to just approach from the car, but you can get much better sunset and sunrise photos from the beautiful basin!
2. Approach the South Ridge.
The South Ridge route may be approached from either Torment Basin or Boston Basin. Both approaches involve some minor glacier travel and third class scrambling to reach the start of the climb, which is at a notch in the south ridge just before the ridge steepens. From Torment Basin ascend slabs to the small glacier/snowfield beneath the southwest face. Cross the glacier to a prominent gully (class 3) that leads to an obvious notch in the ridge. From Boston Basin contour around a spur ridge from the upper high camp until below the Taboo Glacier nestled beneath the southeast face. Gain the glacier on the left and walk up the left side until a deep gully appears.
The approach from camp in Boston Basin (which we did) was about 1 hour over easy talus and slabs.
The photo shows the easy approach from camp in Boston Basin.
3. Stop to take photos of the pink monkey flowers.
4a. Locate the notch.
This photo shows the notch, which is hidden from view until you are almost right below it. The top of the headwall above the notch has a fair bit of yellowish lichen, which can be seen from quite far away, so this is a good way to know where the notch is. We put on crampons to cross a tricky bergschrund.
4b. Scramble up the class 3/4 gully to the notch.
Looking down from the notch at a party crossing the bergschrund on the upper Taboo Glacier. We had talked to these guys on the way up, who were also planning on climbing the South Ridge and doing the Torment-Forbidden traverse; however, after this we did not see them again, so they must have turned around due to the sketchy moat/bergschrund conditions. Earlier in the week, a climber (Craig Luebben) had died when part of the bergschrund/moat on the upper Taboo Glacier collapsed beneath him, so this might have played a role in their decision to turn around.
5. From the notch, ascend a short, steep crack about twenty feet until it is possible to scramble down and left on fourth class ledges to an alcove below a massive gully/chimney.
This photo shows Jason starting off from the notch. The route goes left rather than up the actual ridge that is quite steep as evident in the photo.
6. Eschew the gully and climb a dihedral on the left to its end (~100 feet). Climb straight up over a steep section (easier than it looks) until the angle backs off, then trend up and left beneath a headwall (do not traverse right back into the chimney/gully).
This photo is taken looking down at the dihedral pitch, with the notch in the south ridge behind.
7. Continue climbing up and left for several hundred feet until reaching a third class gully/scoop that leads to a notch in the south ridge (shown in the photo).
An old piton on the route.
8. From the upper notch, traverse across and up the southeast face on grassy 3rd class ledges until directly below the saddle between the north and south summits.
9. Scramble straight up to the saddle then climb the short ridge to the higher south summit.
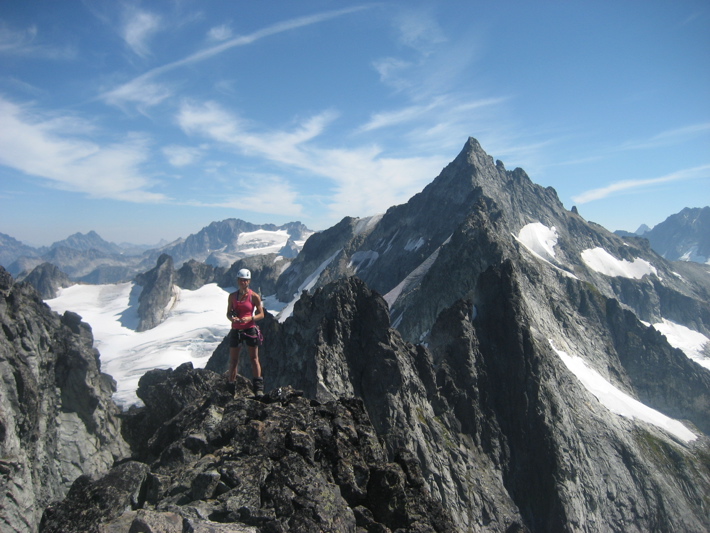
This photo shows me on the summit of Torment, with Forbidden in the distance.
...then traverse the first half mile to a spectacular bivy....
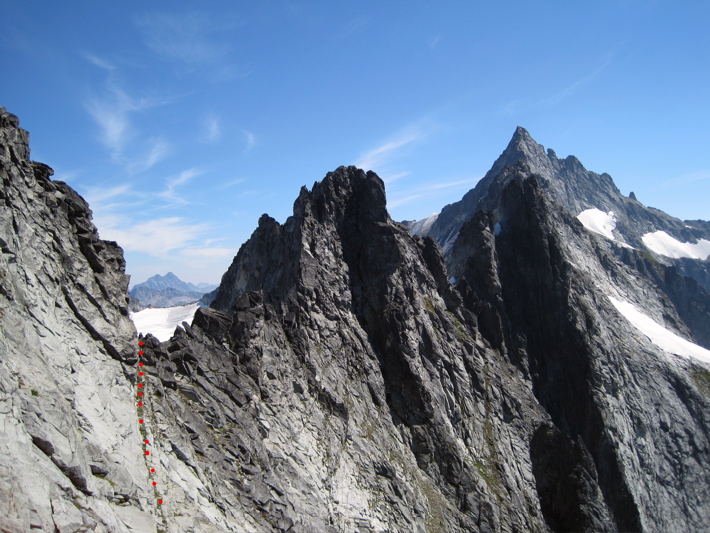
1. From the summit of Torment, scramble down the Southeast Face several hundred feet until it is possible to traverse east (skier's left) towards a notch in Torment's east ridge. This is not the lowest notch, but the one to the west of it.
The red dots in the photo show the grassy ledge we traversed to the notch.
2. From the notch gain the small glacier (first decent bivy option) on the north side of the ridge. Depending on time of year and snowfall, this might be a scramble, or it might be a free-hanging rappel.
For us, it was a rappel, as shown in the photo.
The first rappeller (that was me) had to rappel into the bergschrund below the notch, which required some wild chimney moves to get out (backpack on rock on the right, crampons on the ice on the left). Once I regained the snow above, I was able to hold the ends of the rope to swing Jason clear of the 'schrund.
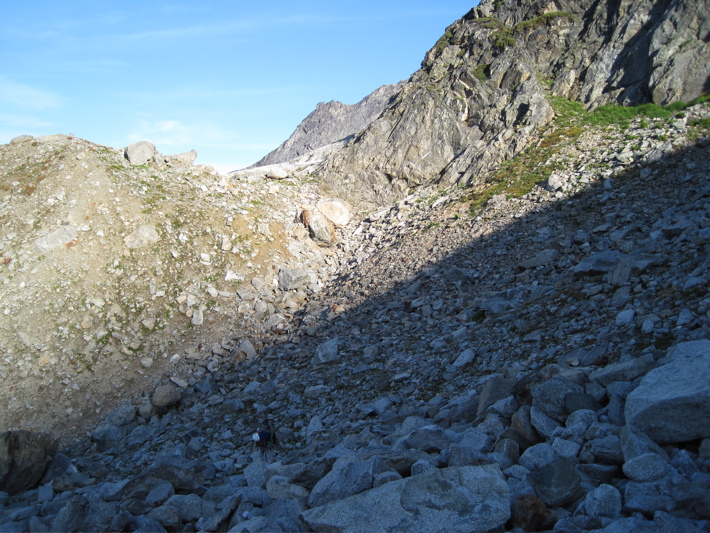
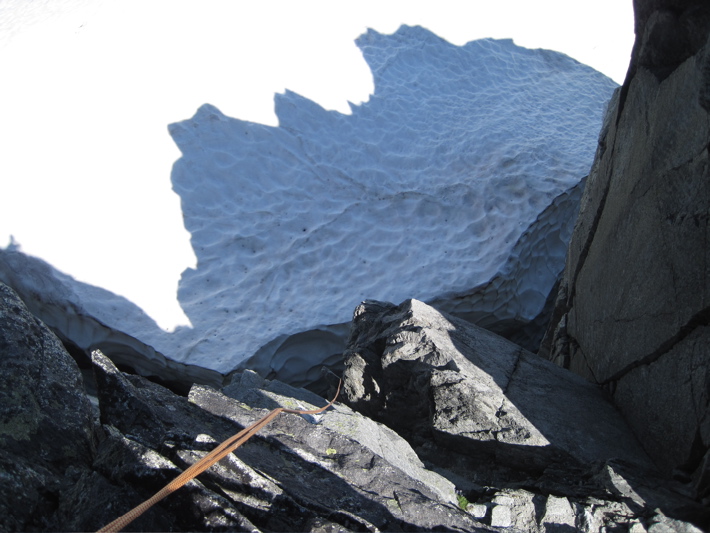
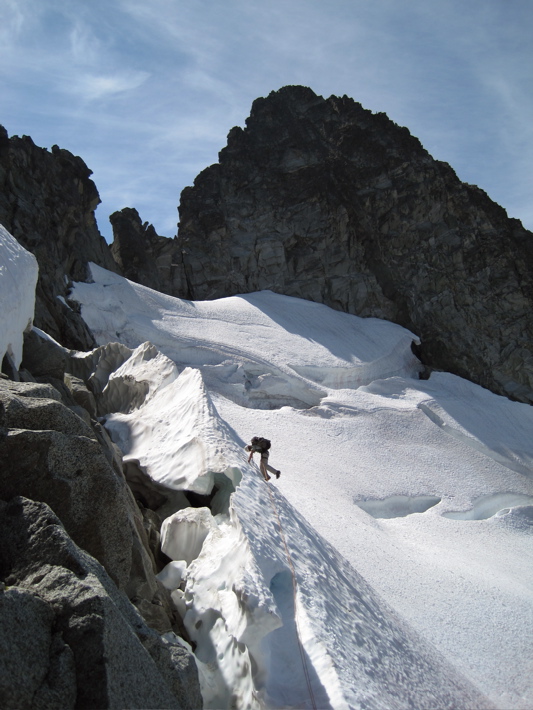
3. Negotiate the glacier down and east towards a ledge system.
In early summer, this is probably a relatively straightforward downwards traverse on snow, but with the conditions we encountered, we had to negotiate several tricky bergschrunds, snow bridges, and moats. This photo makes it look easy, but the bergschrunds and moats are hiding on all sides!
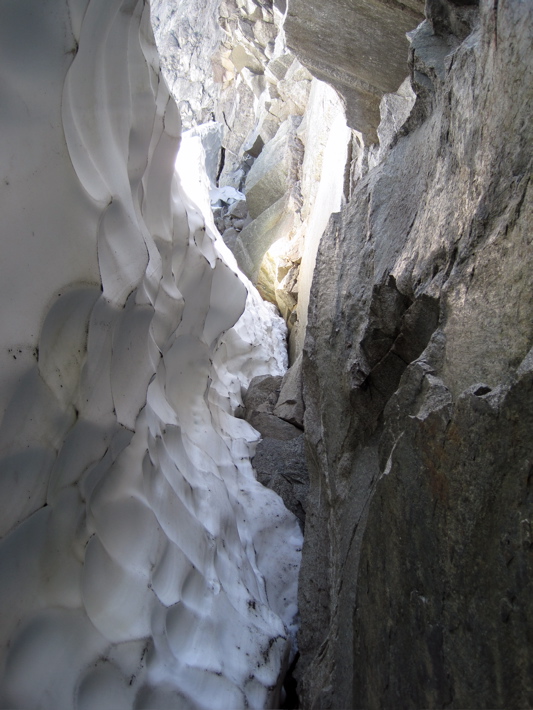
Rappelling to get over some cracks in the glacier. We spotted rappel slings in several locations along the edges of the glacier.
More tricky moats.
Note the rightmost notch in the background (we rappelled from this notch onto the glacier), and the gaping cracks (we rappelled over these cracks).
4. Once back on rock, traverse east and up around the rock, class 3/4. This rock continues until a saddle in the ridge at the beginning of the snow/ice traverse.
This photo shows some nice bivy sites on the rock traverse between the glacier and the snow/ice traverse. We did not bivy here, since it was still quite early in the day and we wanted to bivy on the other side of the snow/ice traverse so we could go to sleep knowing all of the route cruxes were behind us.
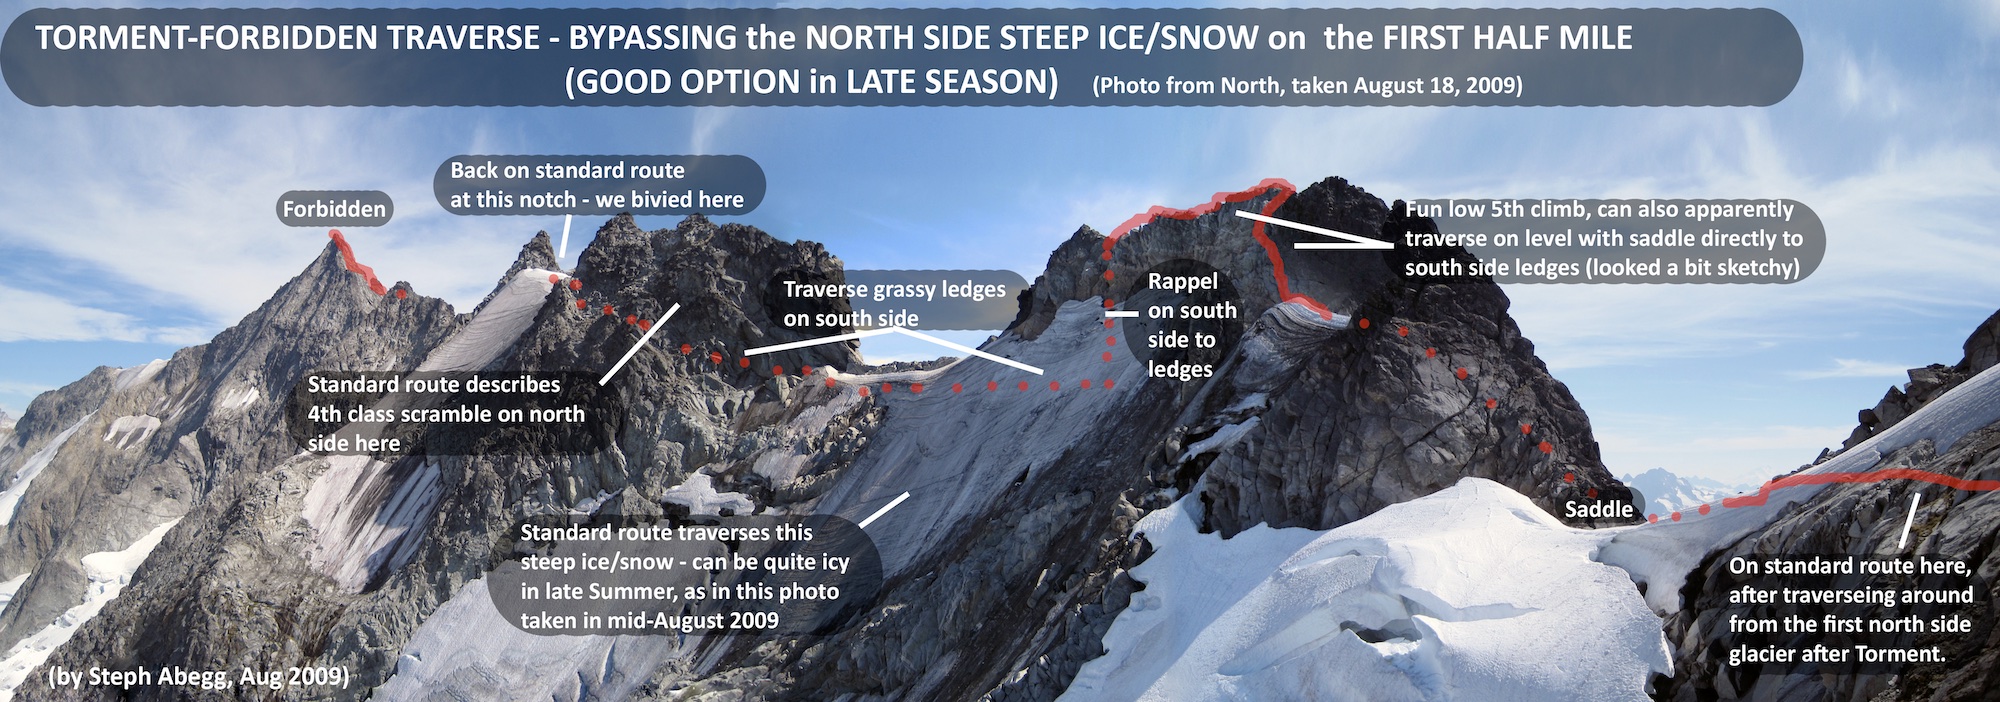
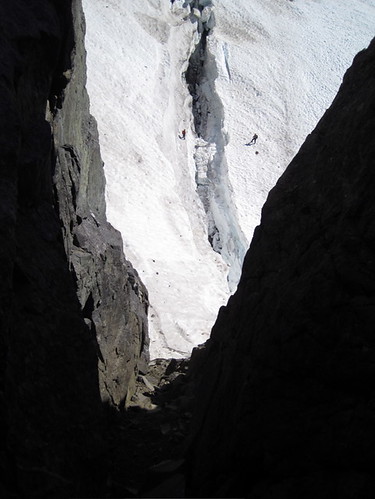
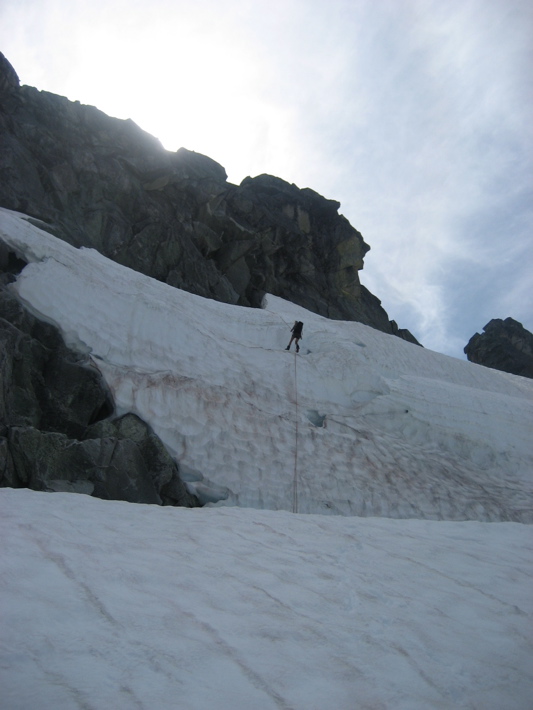
5. From the saddle, the standard route traverses below the ridge on steep ice/snow to the next notch/saddle in the ridge.
6. From there, the route follows a 4th class ledge system on the north side of the rock leading to the next notch/saddle (furthest left notch in the photo, where we bivied).
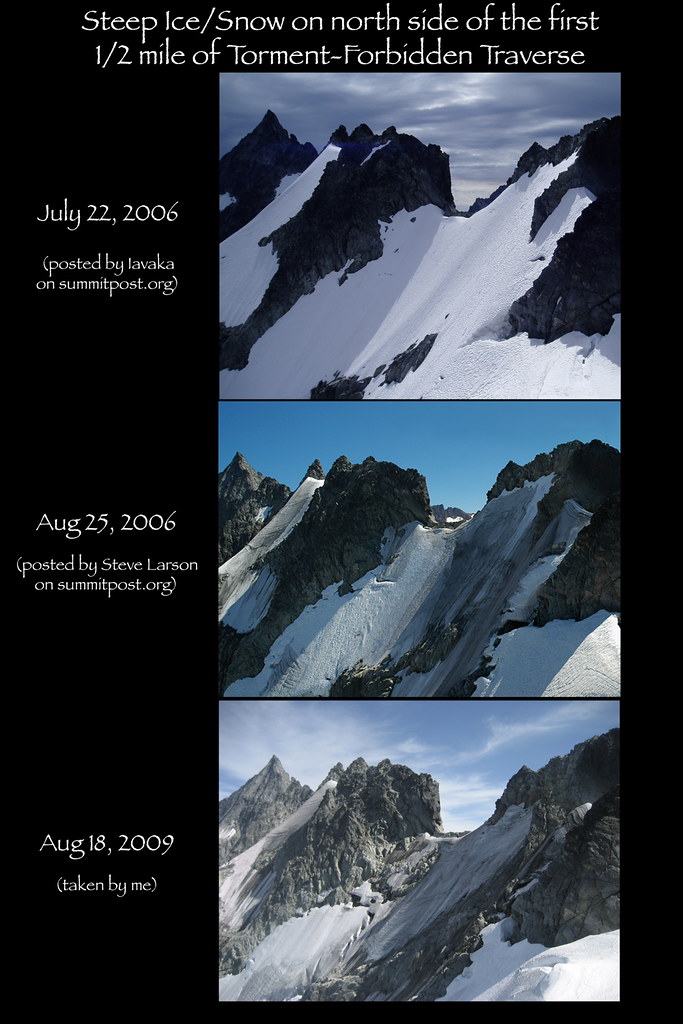
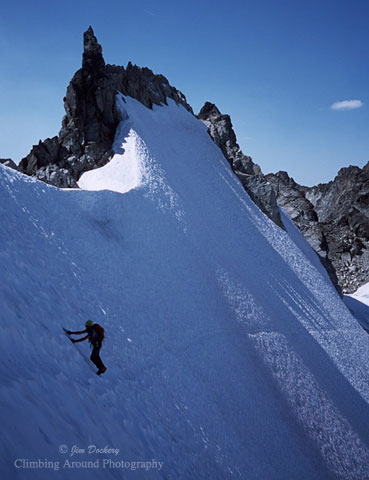
However, it had been a warm summer, and this traverse was in pretty poor condition for us (unless you like several hundred feet of hard ice with a single ice axe and only one ice screw). So we opted to climb over the rock ridge and try to gain the ledges on the south side. These ledges are mentioned in Beckey's description in the CAG.
This photo shows the steep ice on the north side and the route we took.
Conditions can make a huge difference on how challenging the steep ice/snow section is. There is less summertime snow in the North Cascades than when most of the routes were first climbed. Many routes are now best done earlier rather than later in the summer. The Torment-Forbidden traverse is one such route.
The first cluster of three photos shows how the conditions of this section of the route vary in different summers as well as in different times of the summer.
The bottom image was taken on July 18, 2009 by Alastair Turner (from the NW Face of Forbidden), one month before Jason and I did the Torment-Forbidden Traverse in August. (Here's a link to Alastair's blog.)
We decided to climb over the ridge above the steep ice. This was a fun 5.4ish climb up solid rock. We were rather surprised to see no evidence for rappel slings up here, since it seemed like an aesthetic way to bypass the ice.
Our chosen bypass route was better protected than the ice traverse would have been with single axes and one ice screw.
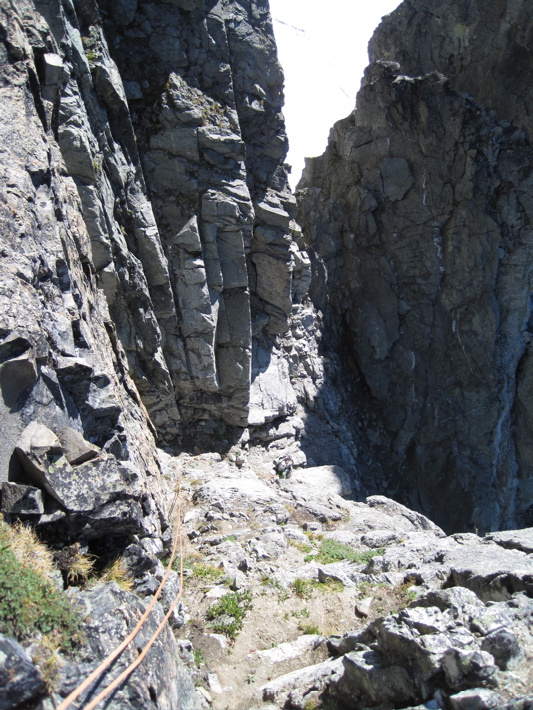
From the top of the rock ridge, we made two rappels from horns (where we left some rap cord) to some friendly grassy class 3 ledges on the south side. These grassy ledges are mentioned in Beckey's CAG description of the traverse.
We traversed these ledges on the south side of the tower in the photo, and regained the standard route at a notch/saddle on the east side of the tower. This is the notch/saddle furthest left in the annotated photo above.
This was a pleasant traverse, a great way to bypass the steep ice/snow section if it is out of condition.
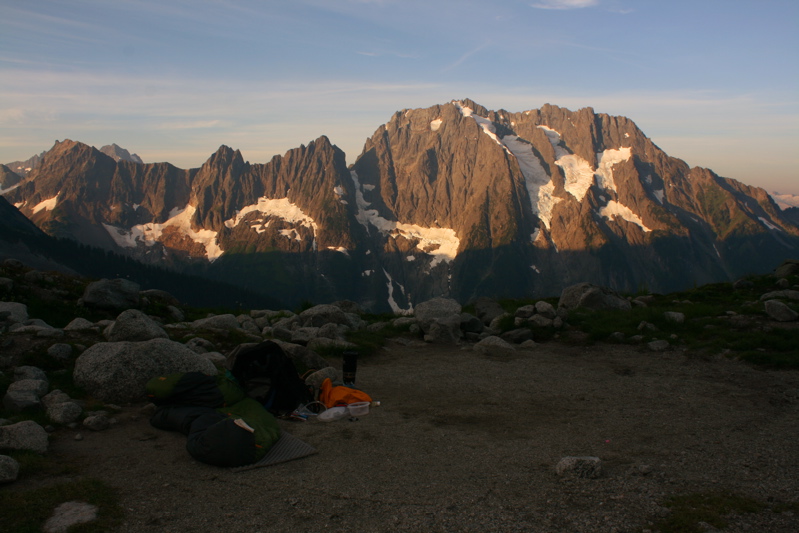
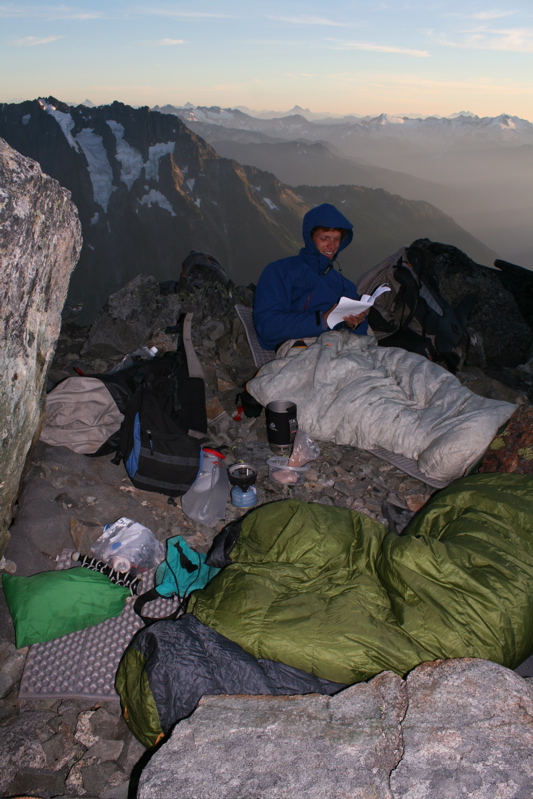
We bivied at the notch/saddle where we regained the route on the east side of the tower.
At the bivy, we could hear water running underneath the boulders, and finally were able to dig ourselves a faucet of water. This was nice, as I get impatient melting snow to make dinner.
7. Enjoy a relaxing evening and beautiful views from the bivy!
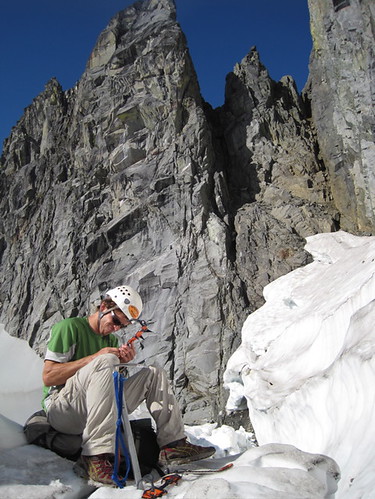
Here, Jason is reading one of the many route descriptions we brought.
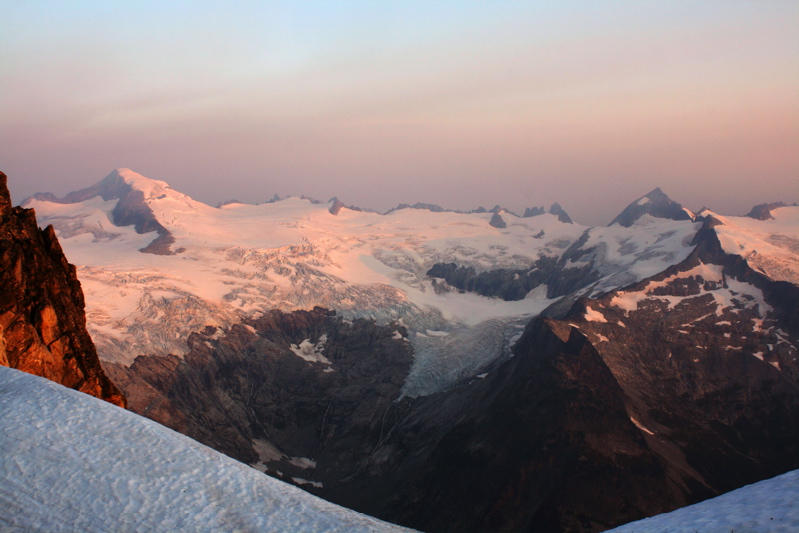
From the bivy we had great views of Eldorado to the north and the peaks of the Ptarmigan Traverse to the south. This photo shows evening light on the Ptarmigan Traverse (Magic Mtn, Mixup Peak, The Triplets, Cascade Peak, Spider Mtn, Mt Formidable, Dome Peak, Glacier Peak).
Sunset over Eldorado from our bivy.
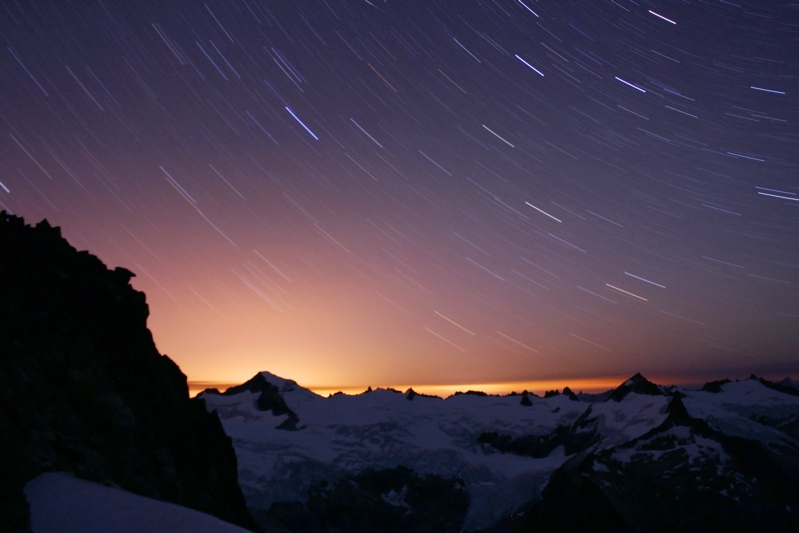
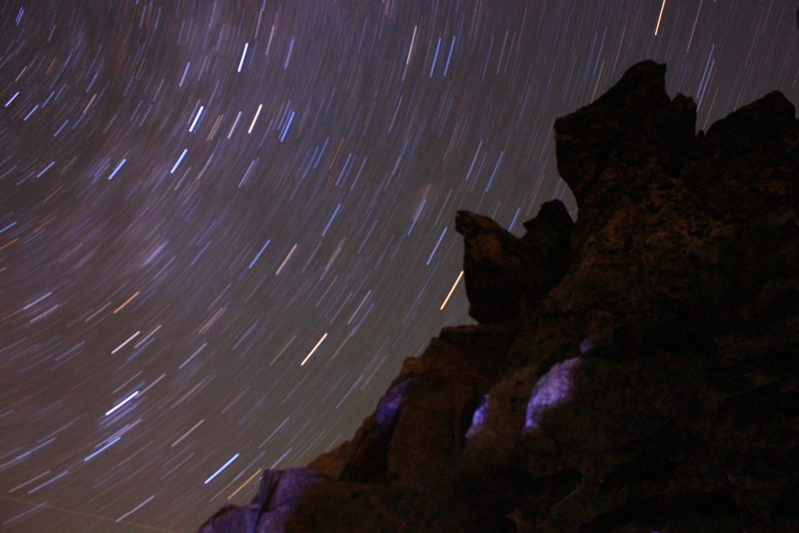
I took a series of "star trails over Eldorado" photos from our bivy site. The exposure for this one is 18 minutes, f/4.5, ISO 400.
Then, I lost motivation to get out of my sleeping bag, so just tipped the camera over and opened the shutter. This photo captured star trails above the rocks above our bivy site.
...then traverse the second half mile....
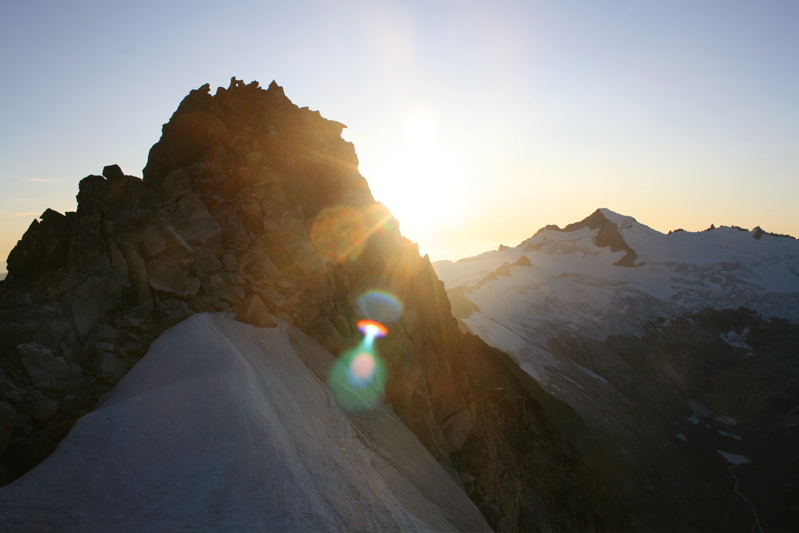
8. Enjoy sunrise from the bivy.
This photo shows the morning sun on Eldorado from our bivy site. It was a rather hazy (and warm) morning, perhaps due to some smoke from forest fires east of the Cascades.
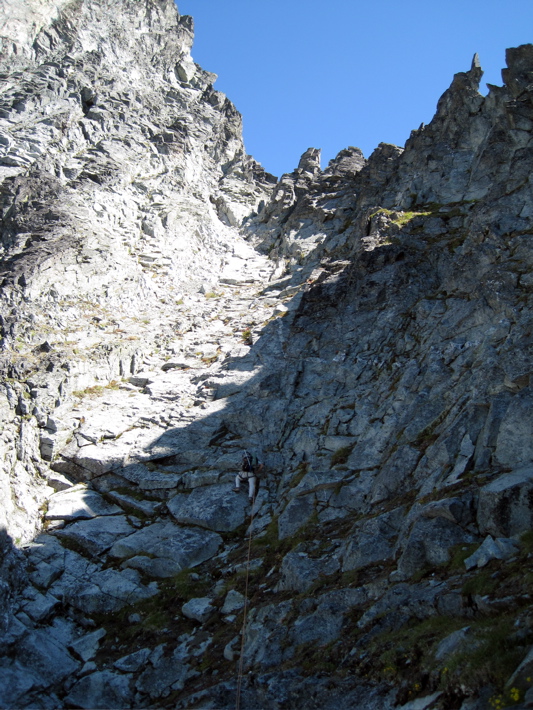
9. From the location of our bivy at the notch/saddle, this is where the standard route crosses over onto the south side of the ridge and traverses the third class ledges until arriving at the start of the knife-edge section of the route.
10. From here the route follows on or near the ridge crest, dipping down to ledge systems on the north as needed to pass gendarmes.
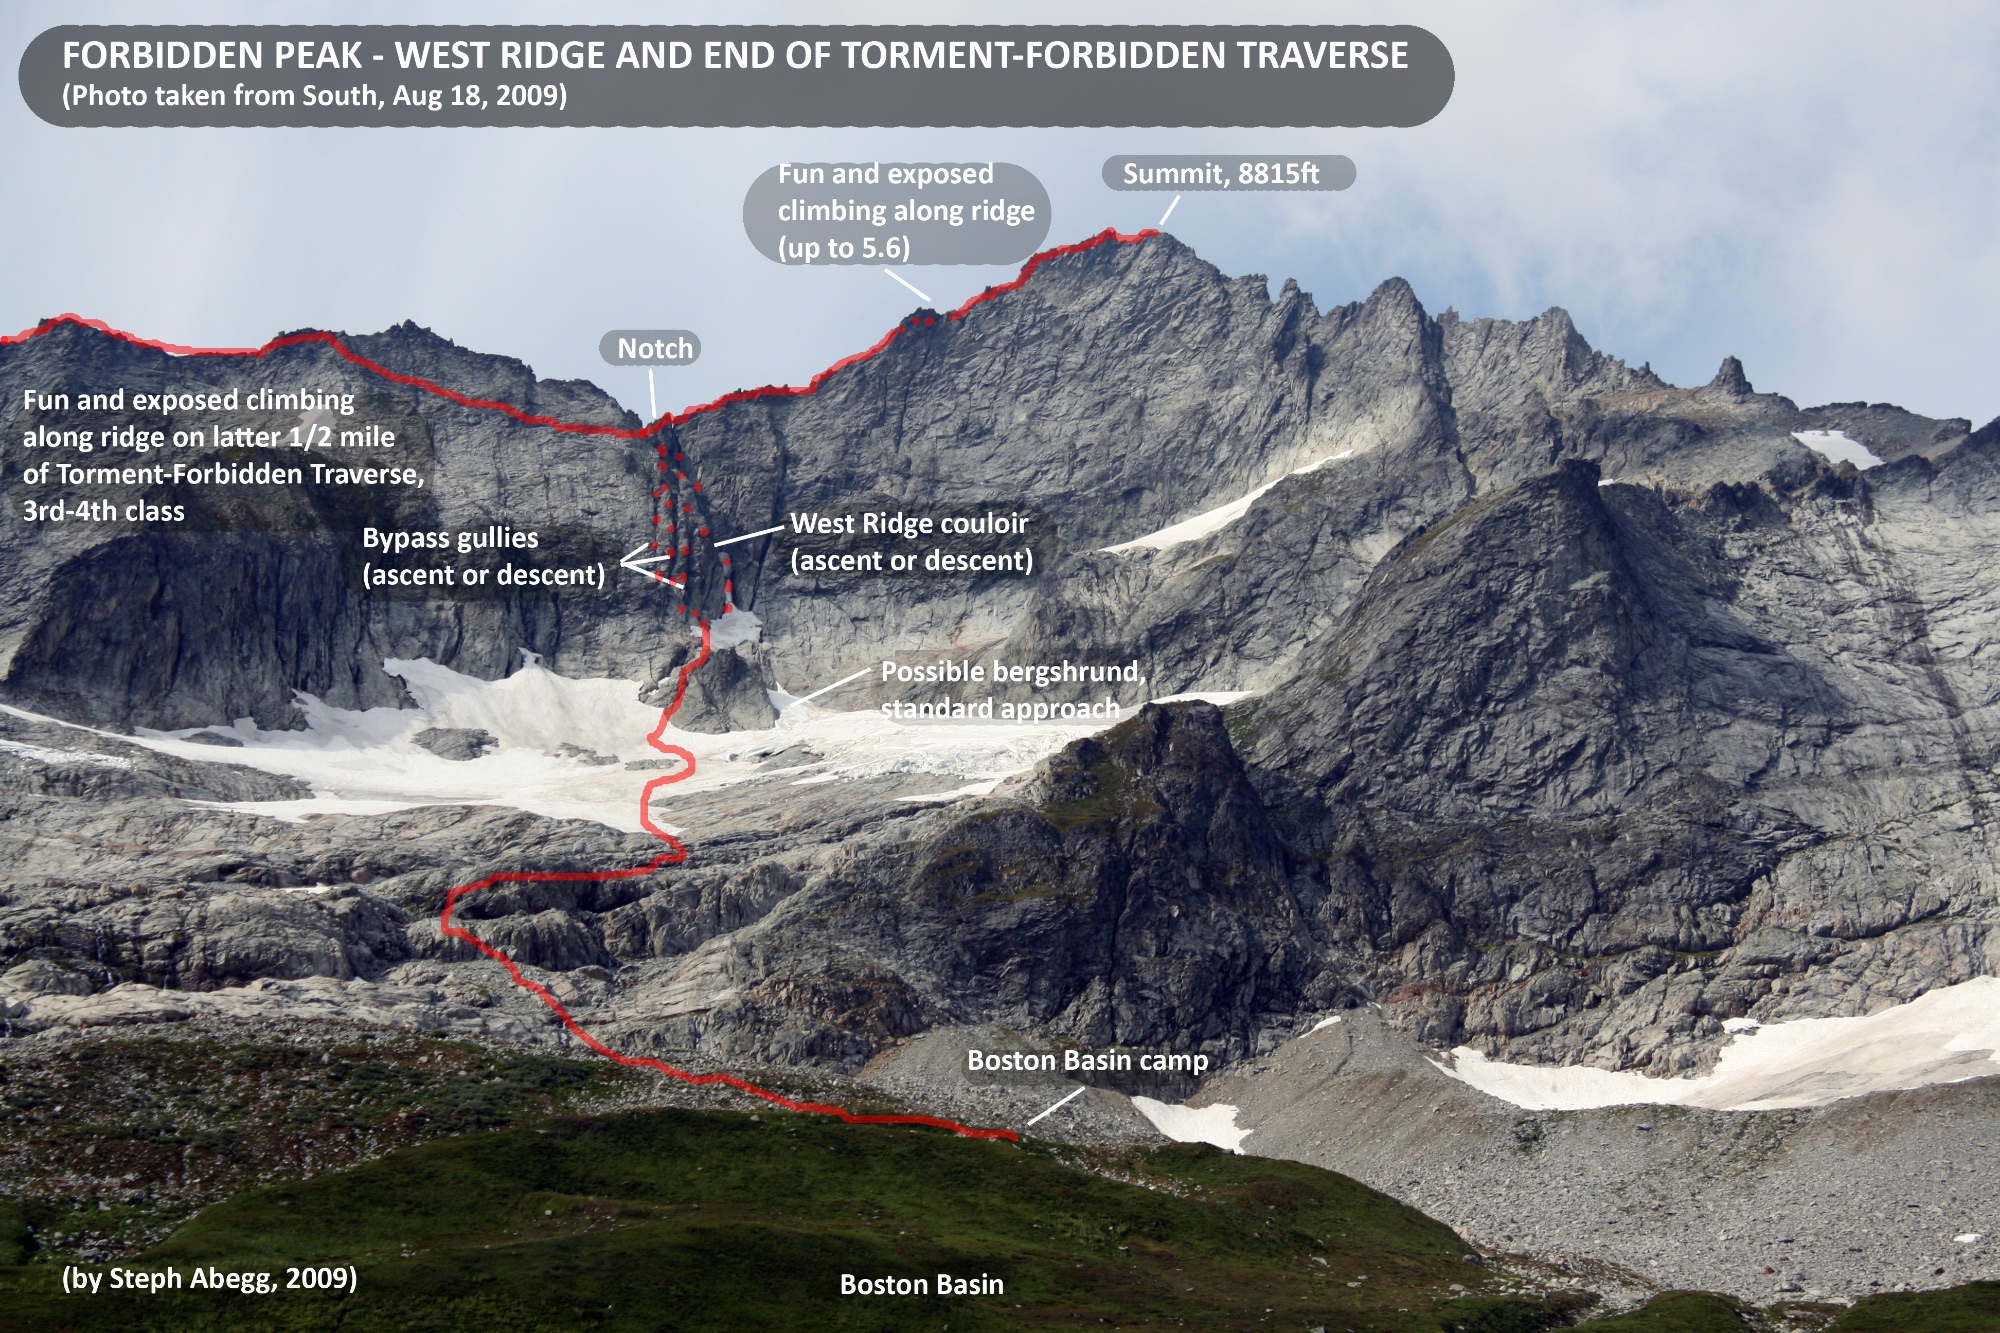
11. The route eventually reaches a section that bears a remarkable resemblance to a sidewalk that ends at a point just above the top of the approach gully for the West Ridge route on Forbidden Peak. A single rap on fixed anchors gets down to third class ledges that lead to the start of the West Ridge. Alternatively, it is possible to use fourth class ledges on either the north or south side to avoid the rappel.
This photo shows the exposed class 3/4 traversing that is the general theme of the second half mile of the traverse between the summits. Fun!
...end by climbing Forbidden....
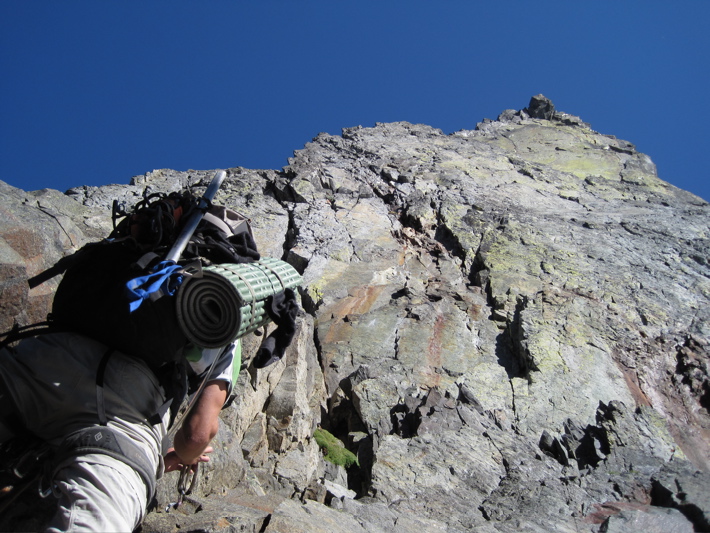
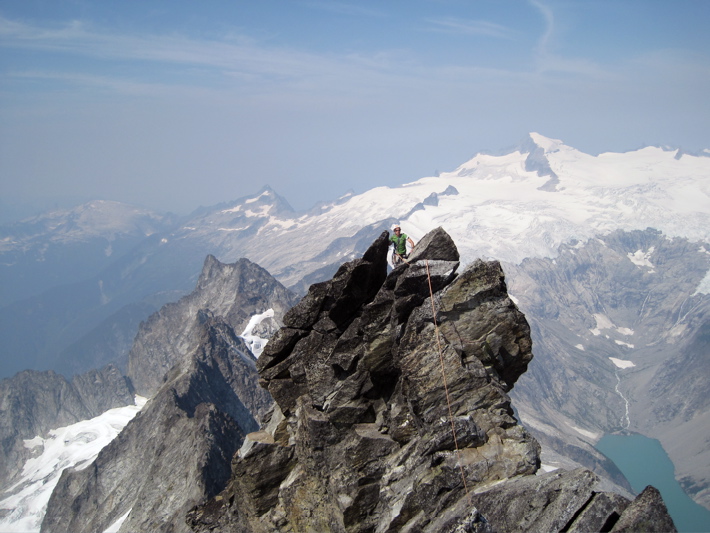
The traverse ends with the aesthetic West Ridge of Forbidden Peak, one of Steck and Roper's Fifty Classic Climbs. Now all the route cruxes are over and we could relax and enjoy the spectacular views while climbing a wonderfully exposed and moderate ridgeline. After this, we had to descend. We chose to downclimb the West Ridge and rappel the West Ridge gullies (the other descent option is the East Ledges, but this would have required climbing with our packs).
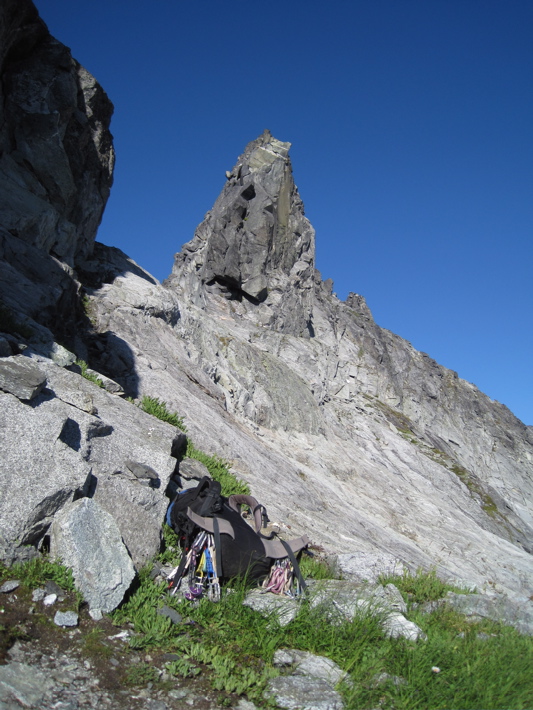
1. From the notch in the ridge, begin climbing directly up the West Ridge towards the summit. We dropped our packs here as we would come back here for the descent.
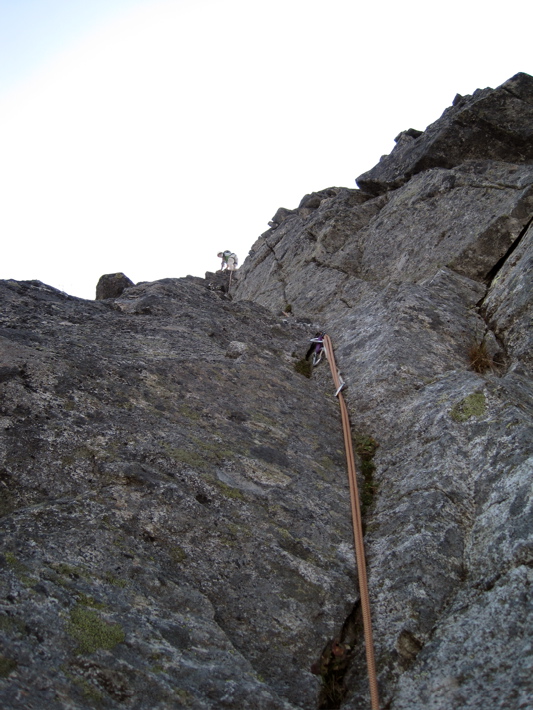
2. The route basically follows the ridge, staying on the crest where possible, or slightly on the north side where necessary, until a steep tower is encountered. The photo on the left shows some of the climbing somewhere along the ridge....
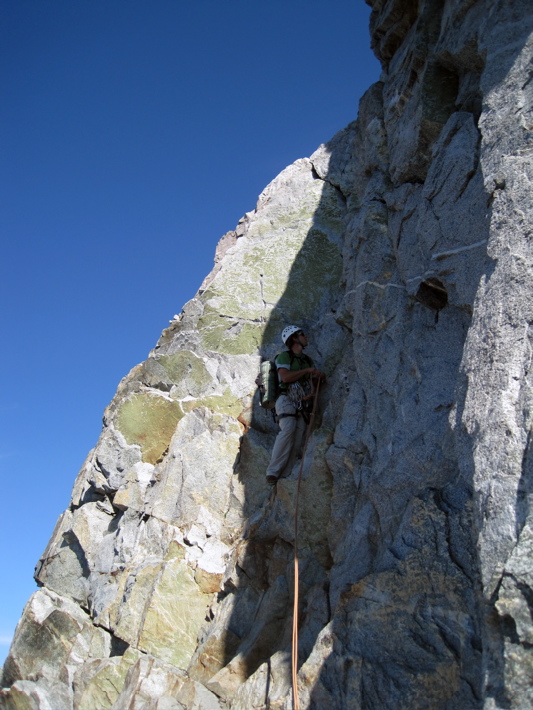
3. The tower (see photo to left) is passed via a left-facing 5.6 corner on the left (out of view in photo). This is the technical crux of the route. We climbed a 5.8ish liebacky flake/block just right of the 5.6 corner (upper middle of tower in photo), which was fun.
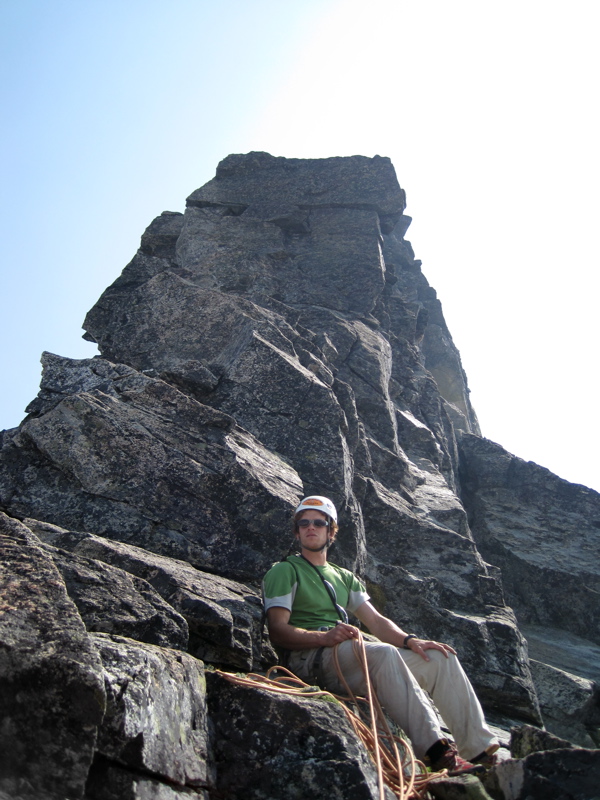
This photo shows Jason at the base of the steep tower.
4. From the top of the tower, the route is fourth class, again either on the crest or the north side. A short 5th class bouldering move is needed to descend the west summit to get to the higher east summit.
This photo shows Jason on the west summit of Forbidden, with the 5th class bouldering move just below him and Eldorado in the background.
5. Descend. There are two popular options: the West Ridge gullies or the East Ledges. We chose to descend via downclimbing the West Ridge (one rappel down the tower) back to the notch. From there, we downclimbed and rappelled the gullies (3 or 4 rappels) to the snow below.
There are about three parallel gullies to choose from, each with ample rappel slings. Having tried two of these descent lines, I liked the one that was furthest west best so far.
...and don't forget to enjoy the beautiful Boston Basin on the way in and/or out.
Hiking in Boston Basin, with impressive views of Johannesburg towering across the valley.
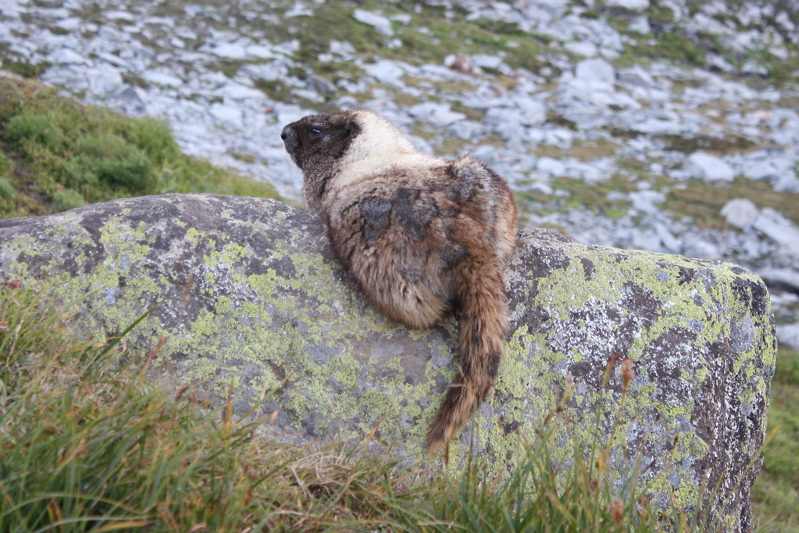
The ubiquitous Boston Basin marmot. Marmots are my favorite alpine critter, as they are friendly and photogenic rather than pesty.
Enjoying evening at camp in Boston Basin before the climb. Since the camps in Boston Basin are about 2 hours from the trailhead, it is possible to just approach from the car, but you can get much better sunset and sunrise photos from the beautiful basin!
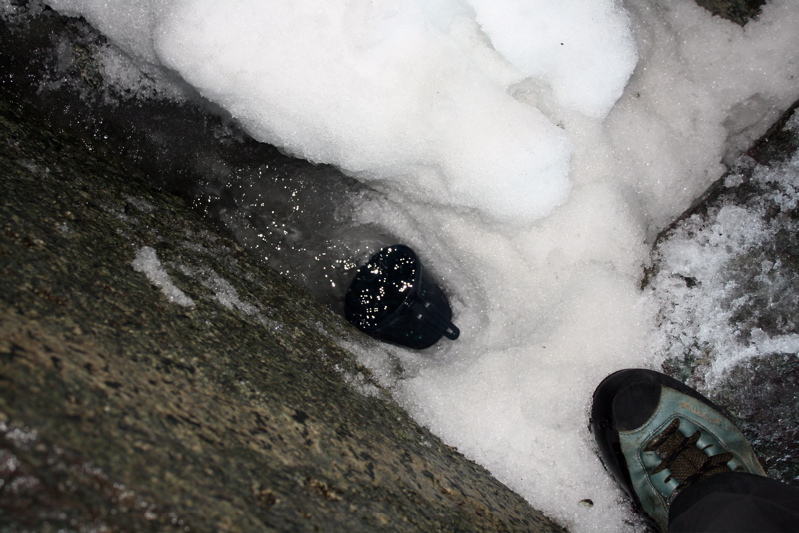
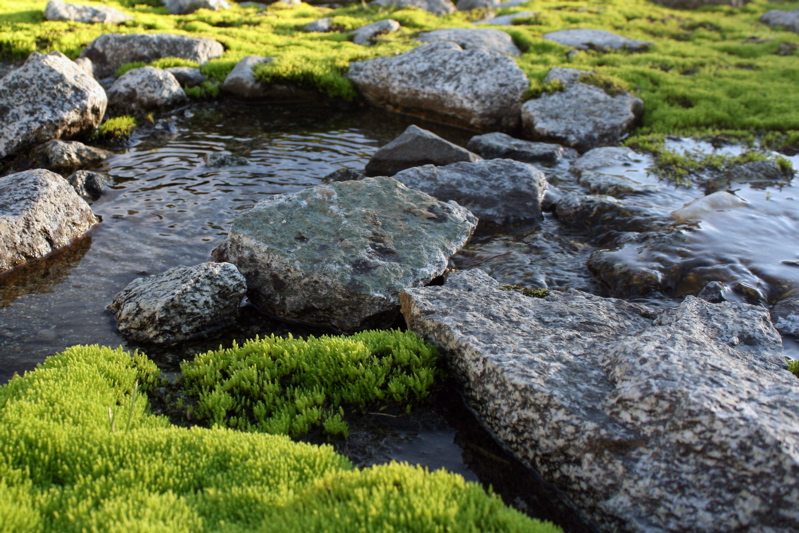
There's water everywhere in the basin.
A toilet with a view. Boston Basin is a beautiful area only a couple of hours from the trailhead, so it suffers from overcrowding. The toilet and limited permits help reduce the impact.
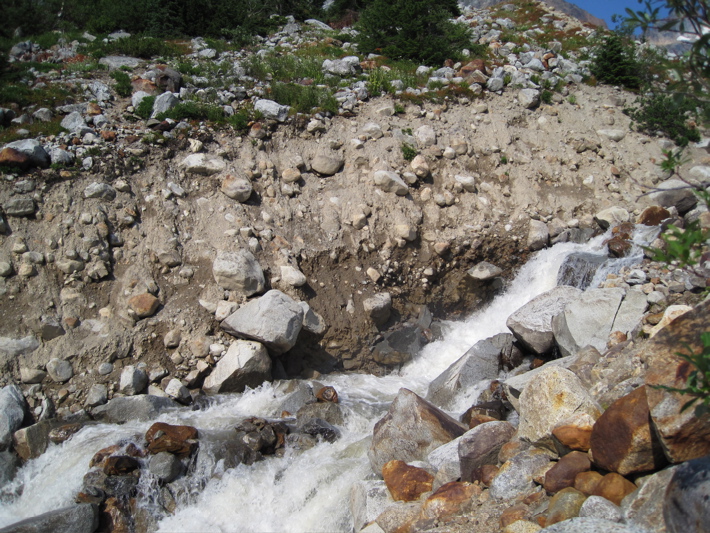
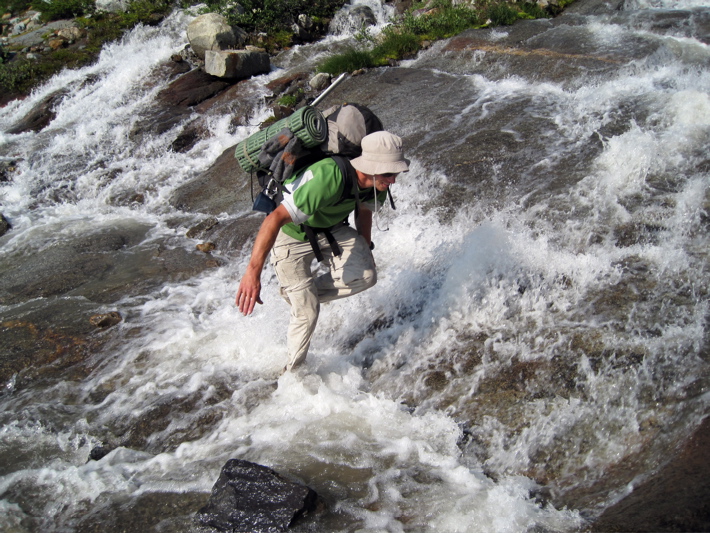
Heavy spring flow in Boston Creek in 2009 added significantly to the erosion along the north side, making it difficult to find a safe way to get to the other side. This photo shows a vertical 10-ft wall of loose till; the natural angle of repose for this sort of low-cohesion material is around 32 degrees, making a descent or ascent on this loose stuff at least mildly treacherous.
....so we ascended along the side of Boston Creek for about 1000ft and crossed higher. We thought running through would keep our feet dry.
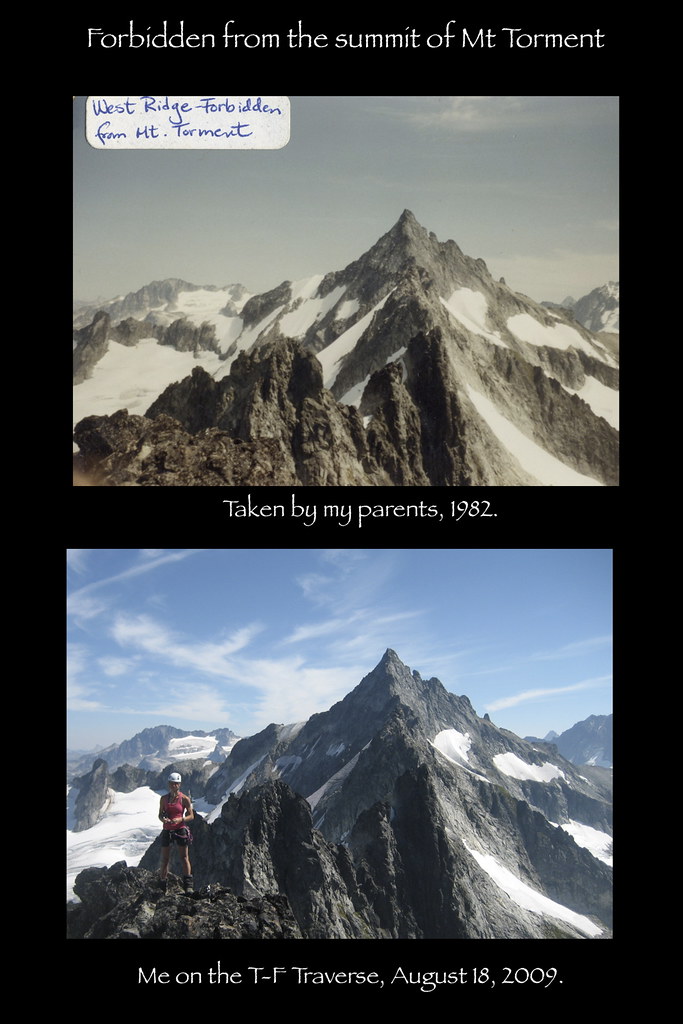
Photo Comparisons - Changing Conditions
Below I've provided a few photo comparisons that show how conditions on the traverse change with season and with time. I've compared a few of the photos I took during our August 2009 Traverse with photos my parents took in 1982 during their climb of Mt. Torment as well as with photos I found online showing the conditions of the north side ice/snow.
Useful beta. Updated route information. Corrections. Historical notes. Interesting facts. No fluff please. Please do not put links in your comment, as my spam filter will filter those comments out.