Teton Grand Slam 2012: Middle Teton North Ridge, Grand Teton Complete Exum, Owen Serendipity Arete, Grand Teton North Ridge, Teewinot Southwest Couloir, Symmetry Spire Southwest Ridge

Teton Grand Slam

Routes:

- Middle Teton, North Ridge (5.6)
- Grand Teton, Complete Exum (5.7)
- Mt. Owen, Serendipity Arête (5.9)
- Grand Teton, North Ridge (5.8)
- Teewinot, SW Couloir (4th)
- Symmetry Spire, SW Ridge (5.7)

An athletic and strategic link-up of some of the classic routes and iconic summits in Grand Teton National Park.

Region: Wyoming
Elev: 10,600-13,800 ft
Rock type: Gneiss & Schist
Type: 
Date(s): August 30 - September 7, 2012 (Thu-Fri)
Partner(s): Mark Thomas, "Teton Bill"

Route Overlays - Photos

Overlays by my partner and King of the Route Overlay Mark Thomas.

CLICK TO ENLARGE

Route Overlays - Map, Profile, Google Earth

Overlays by my partner and King of the Route Overlay Mark Thomas.

CLICK TO ENLARGE

Intro

THIS TRIP REPORT IS STILL MOSTLY IN THE EMBEDDED HTML FORMAT OF MY OLD WEBSITE.

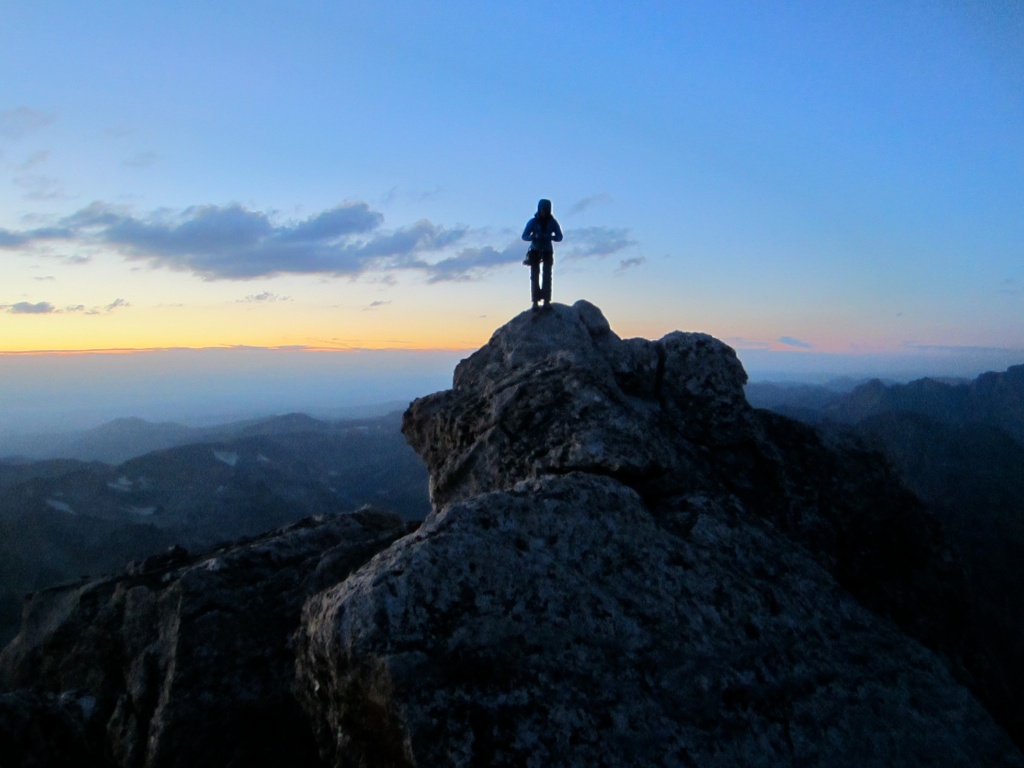
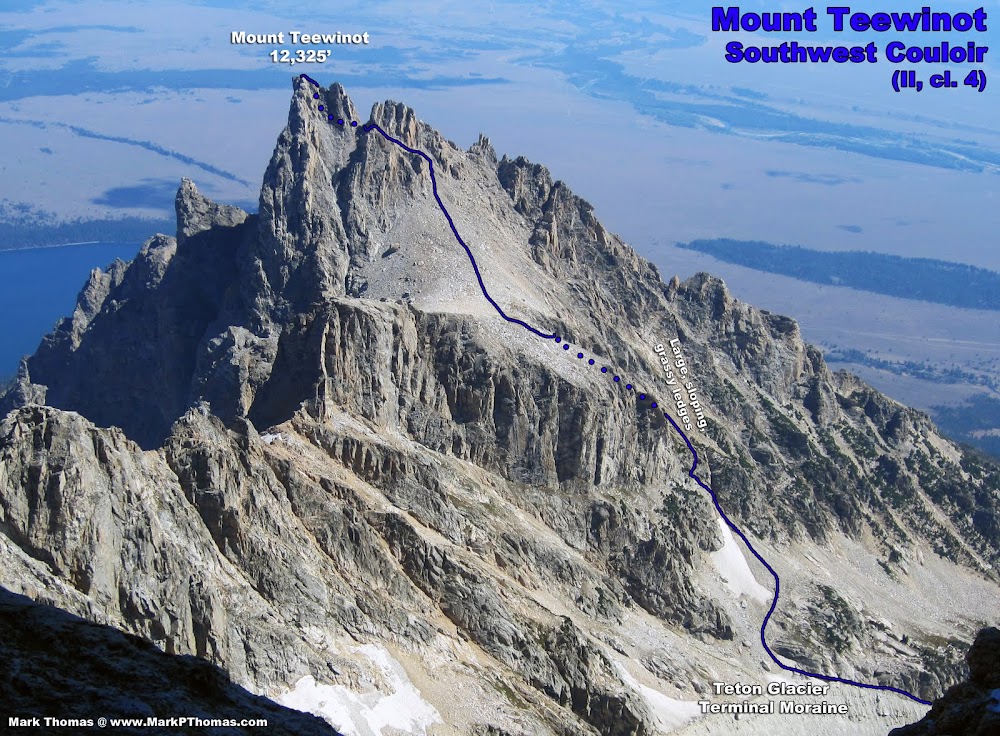
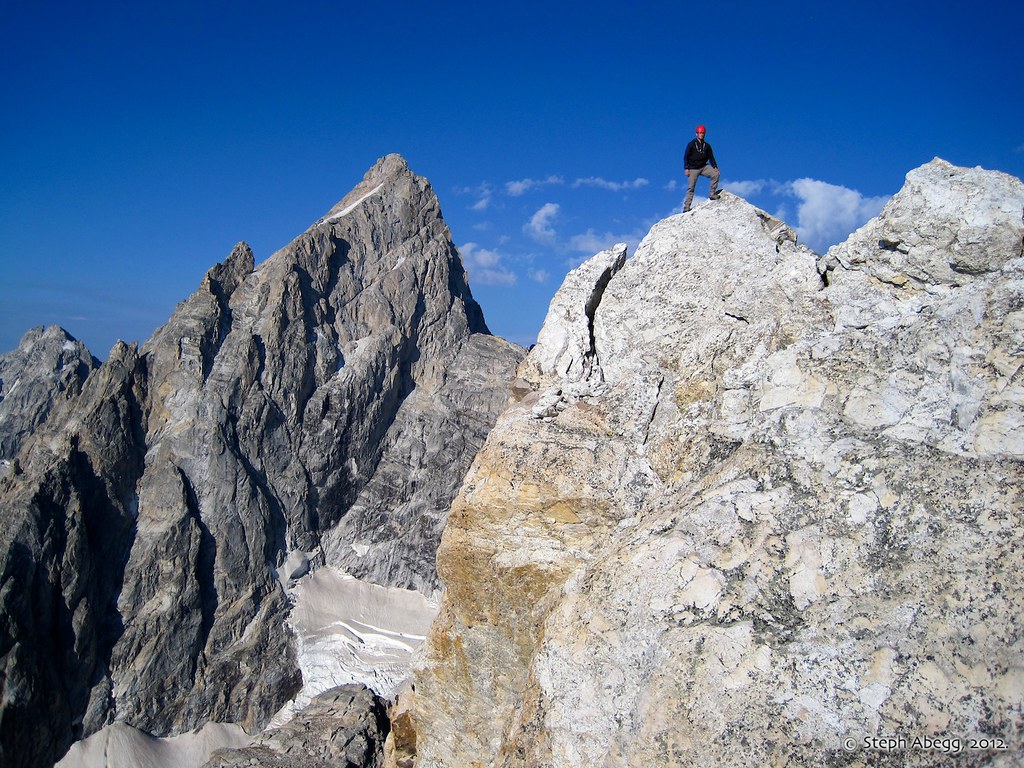
On the summit of Teewinot. Photo by Mark Thomas.
Ever since I climbed the Grand Teton via the 
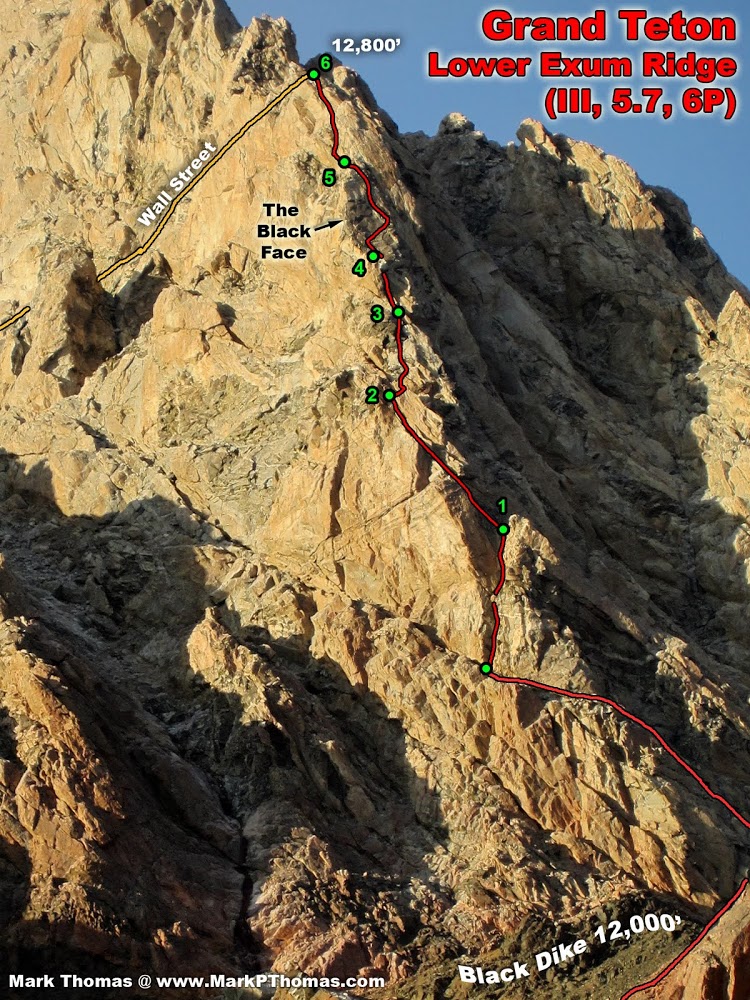
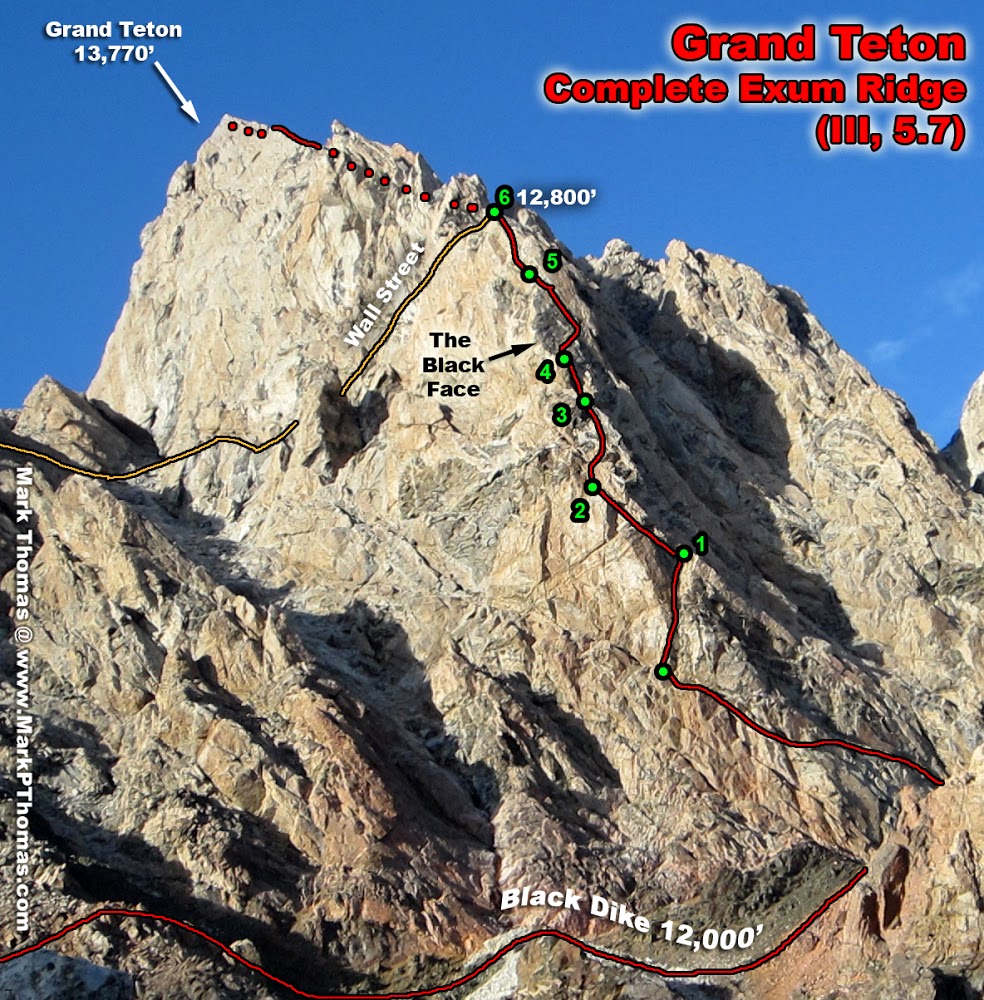
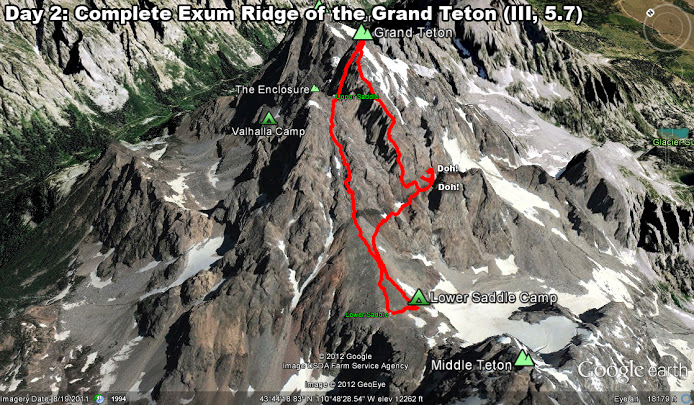
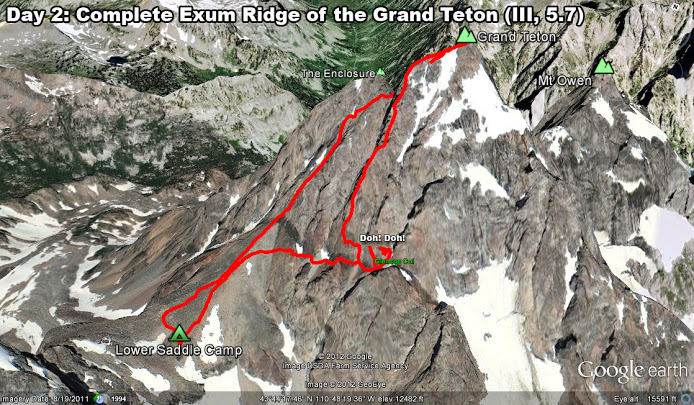
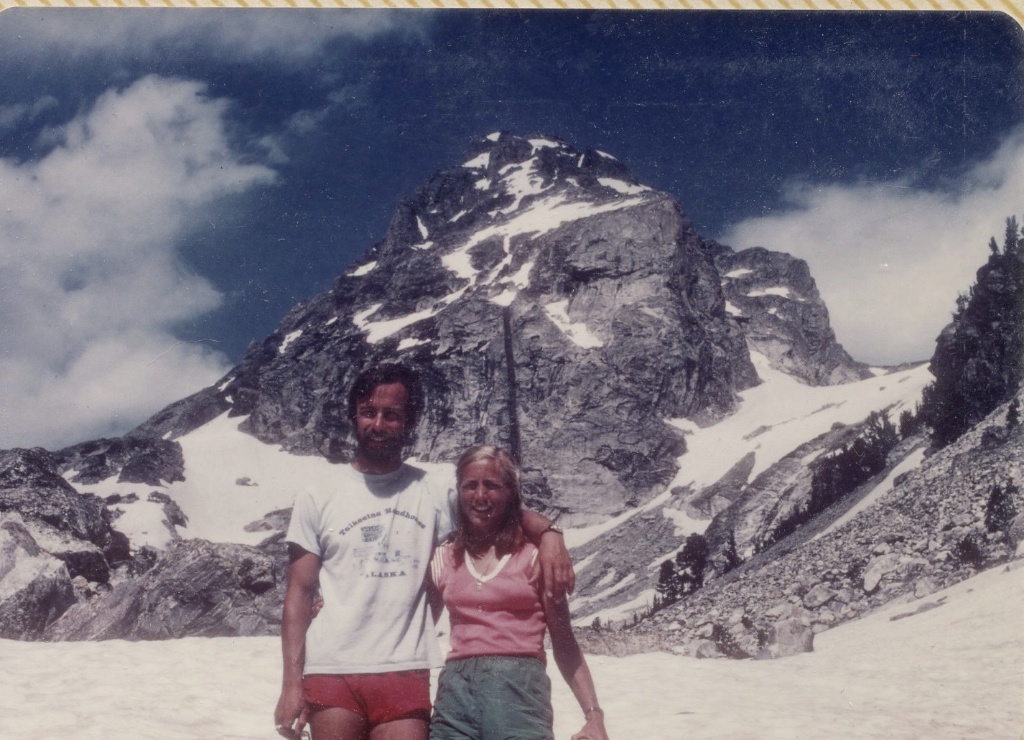
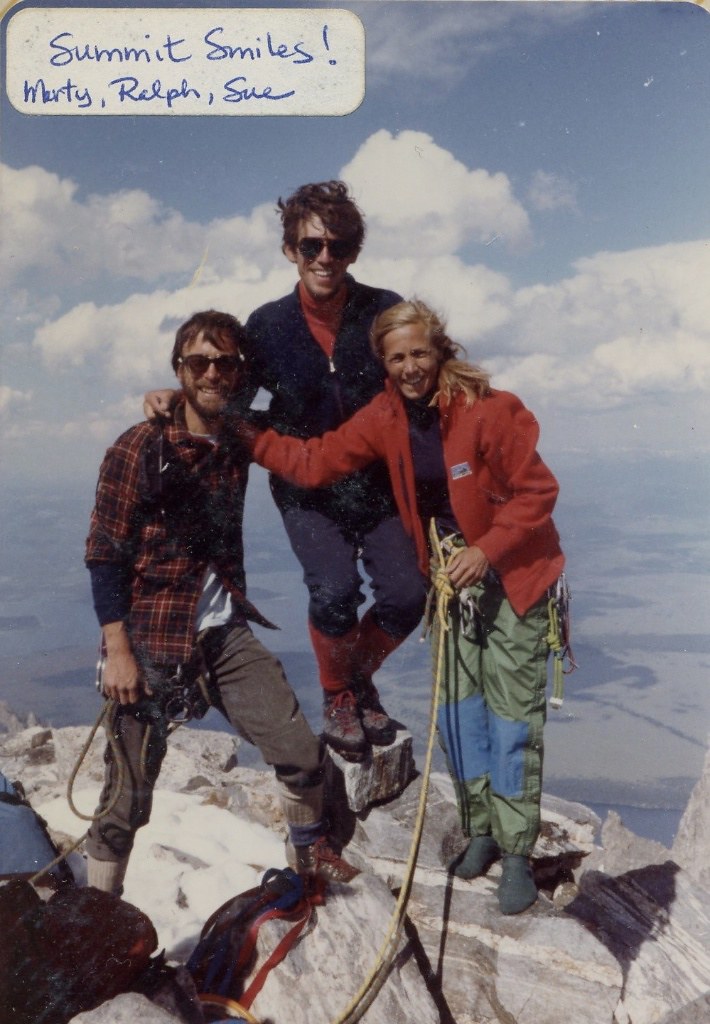
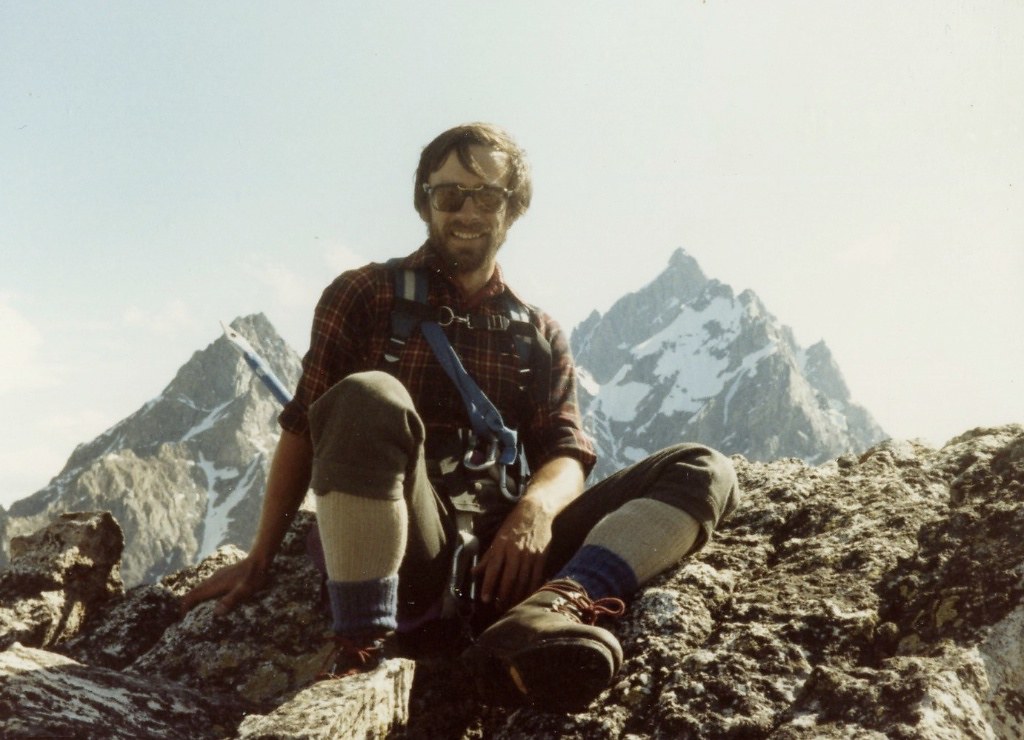
Owen-Spalding to Upper Exum Ridge in 2007 (click link to go to that TR), I have wanted to return and climb the classic Complete Exum Ridge. My parents climbed this route in 1982—interesting note: this was their last summer of full-time climbing since I was to appear on the scene about 10 months later—and remembered it as one of their favorite climbs. So, when my friend Mark Thomas proposed a late-summer climbing trip to the Tetons, I was eager to join.

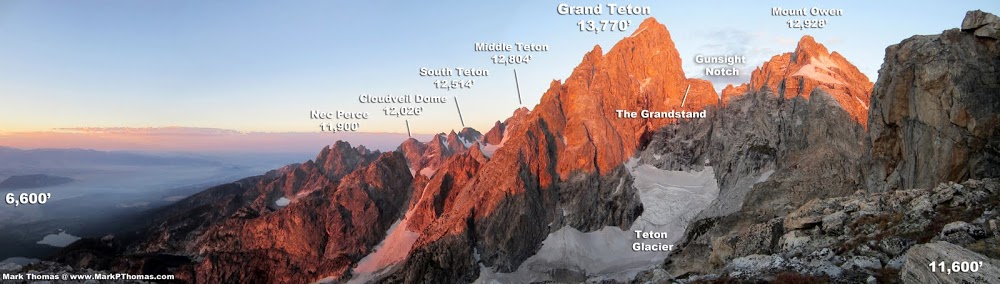
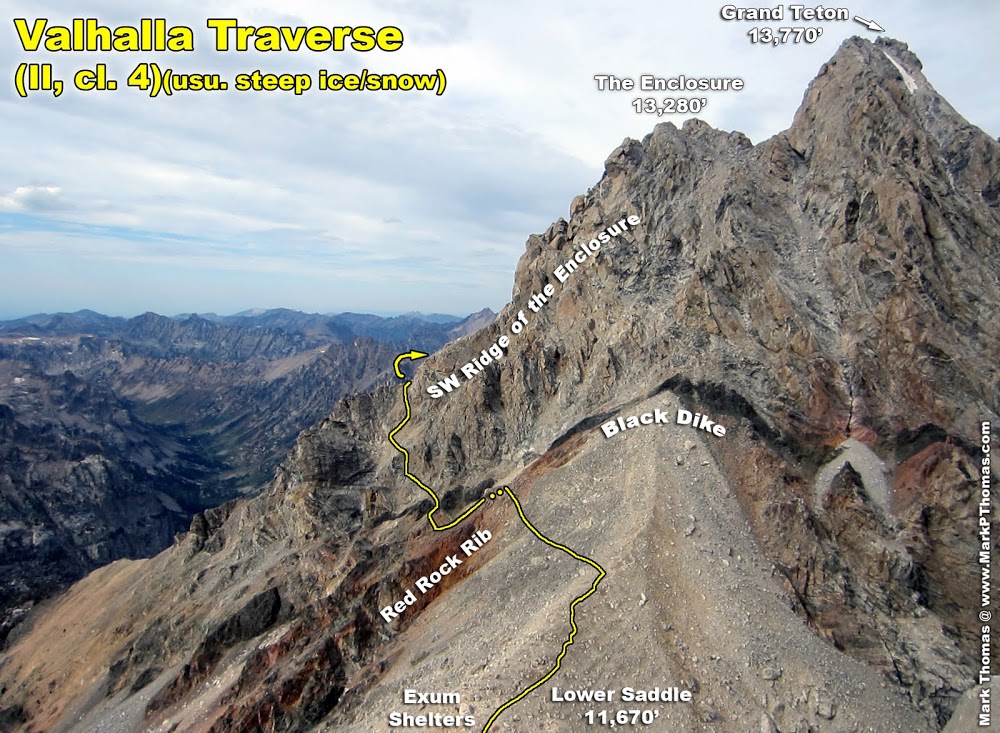
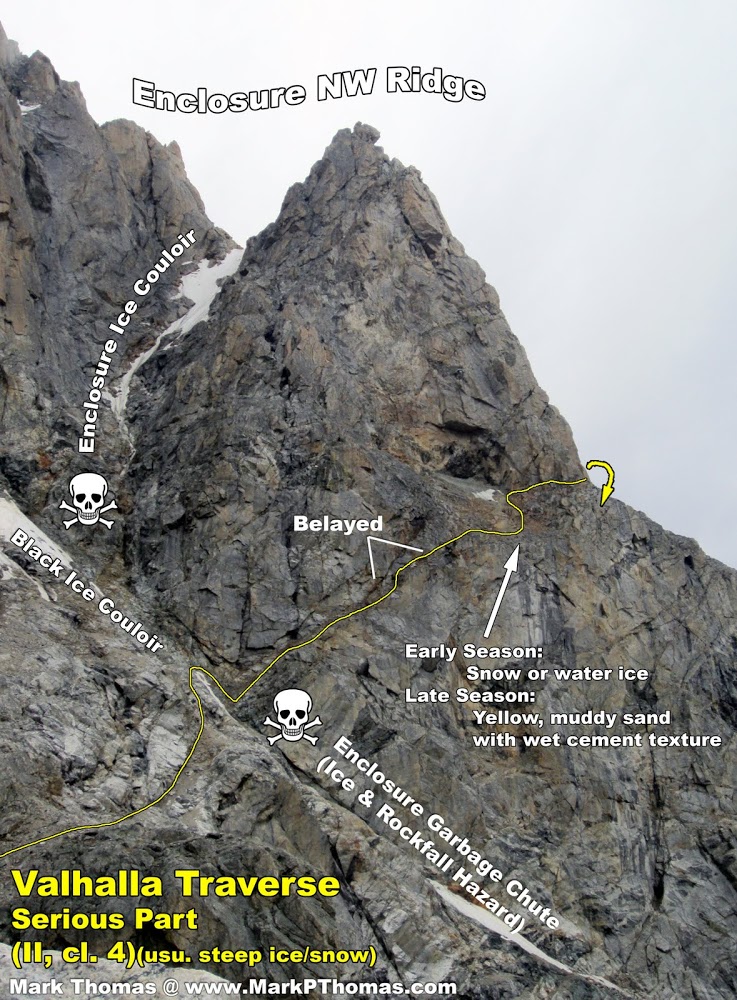
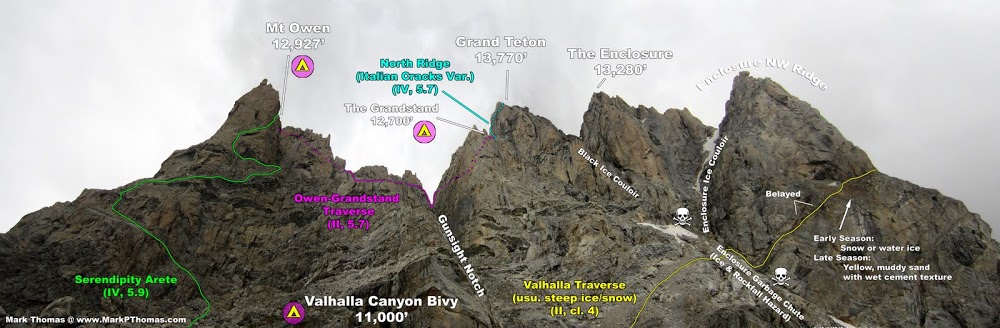
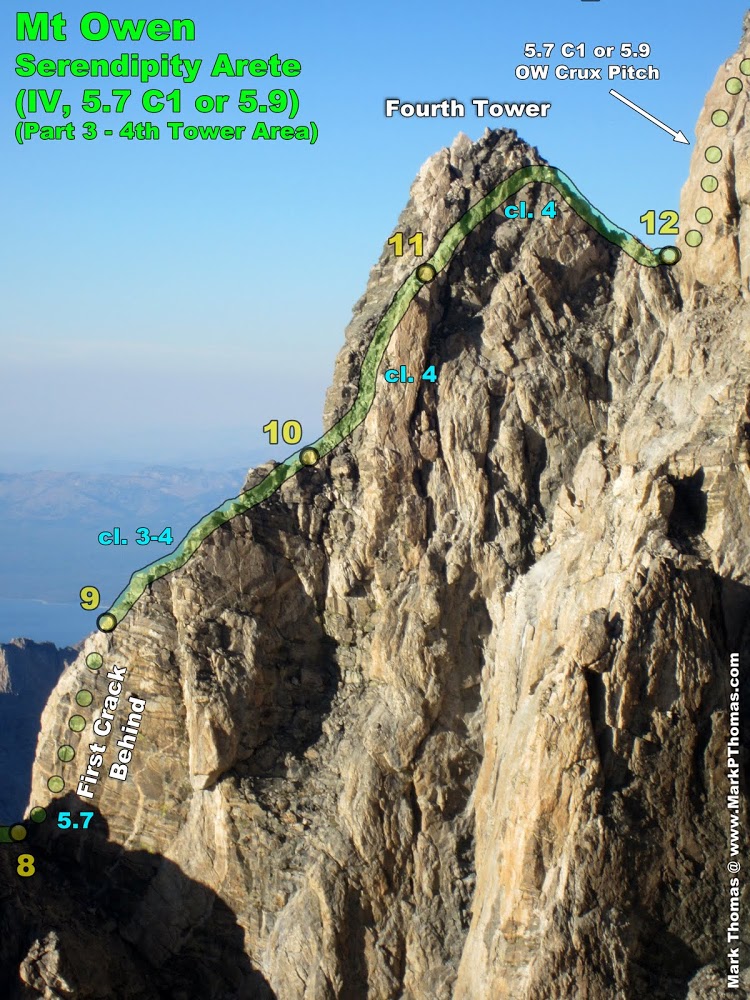
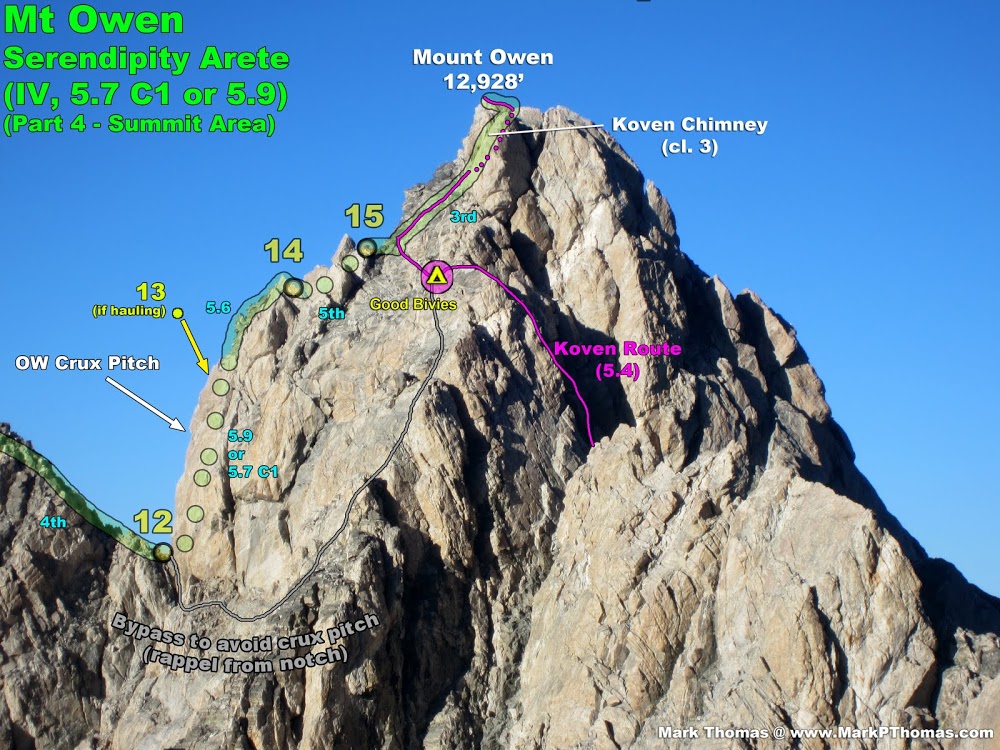
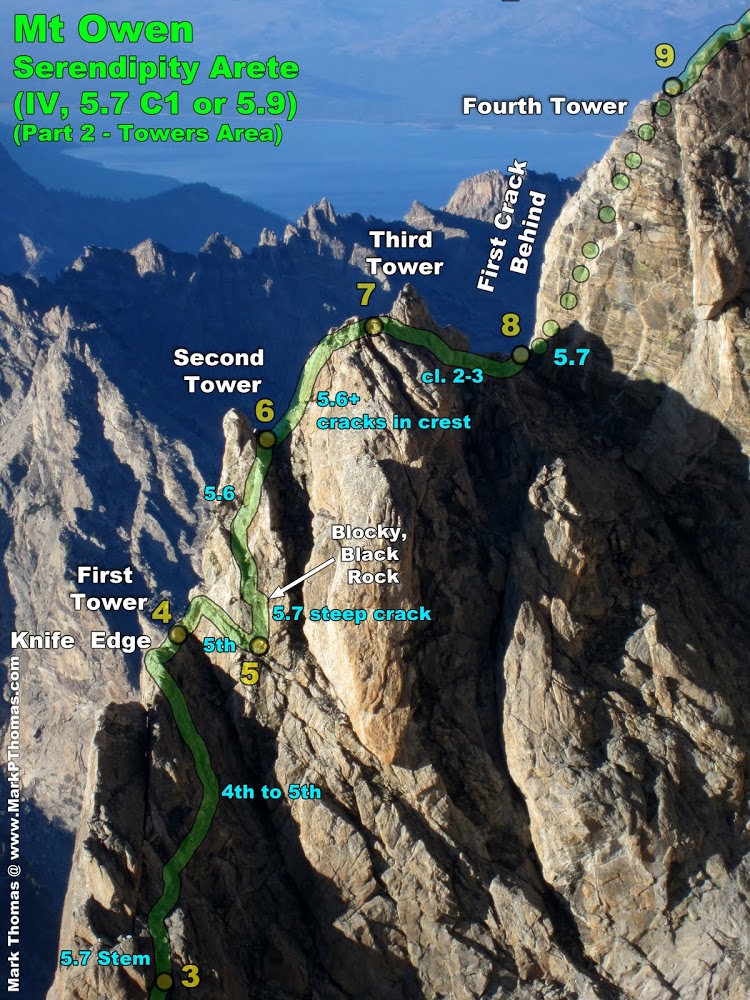
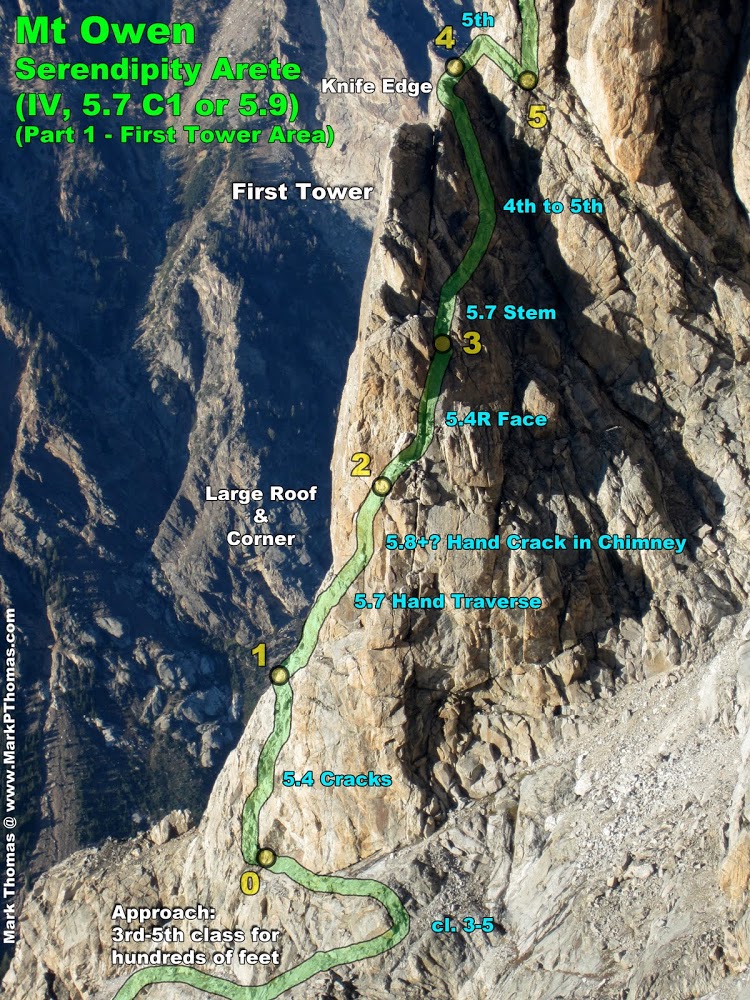
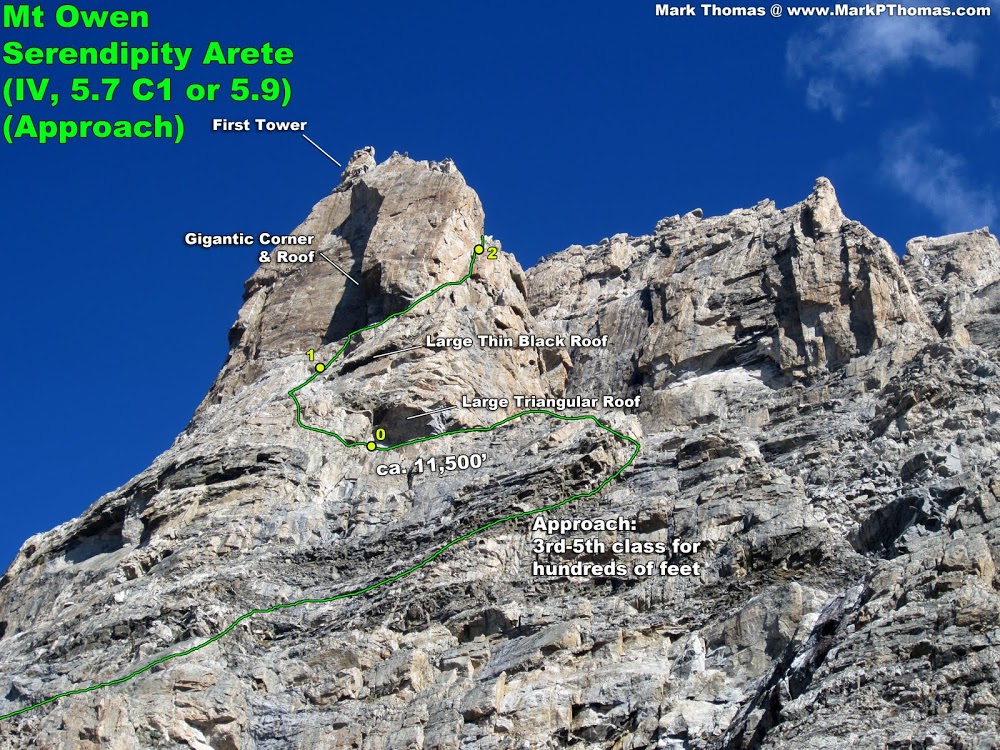
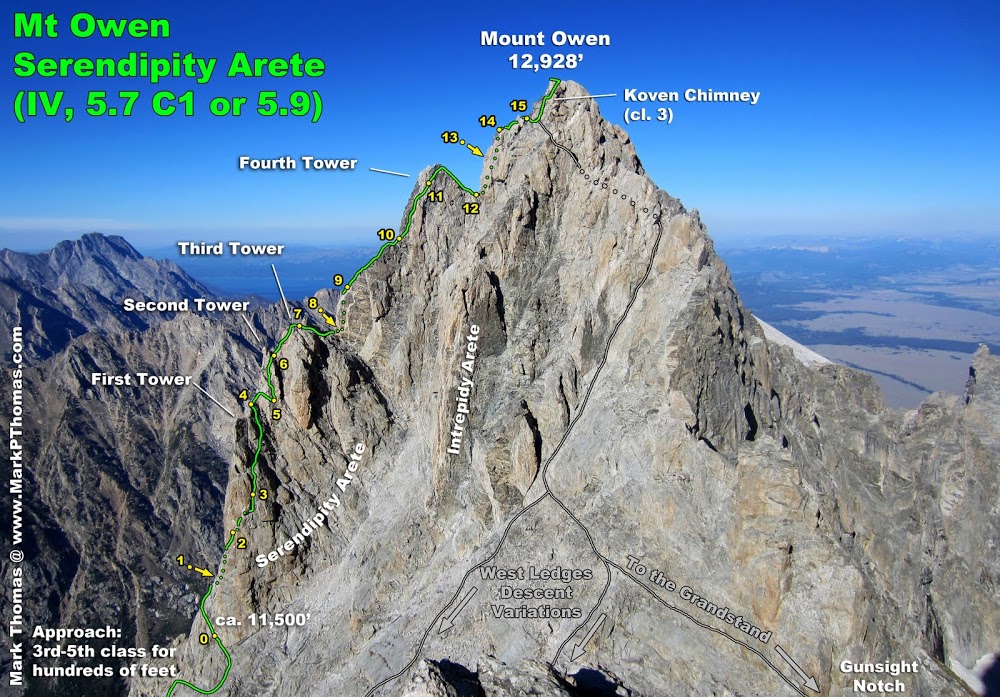
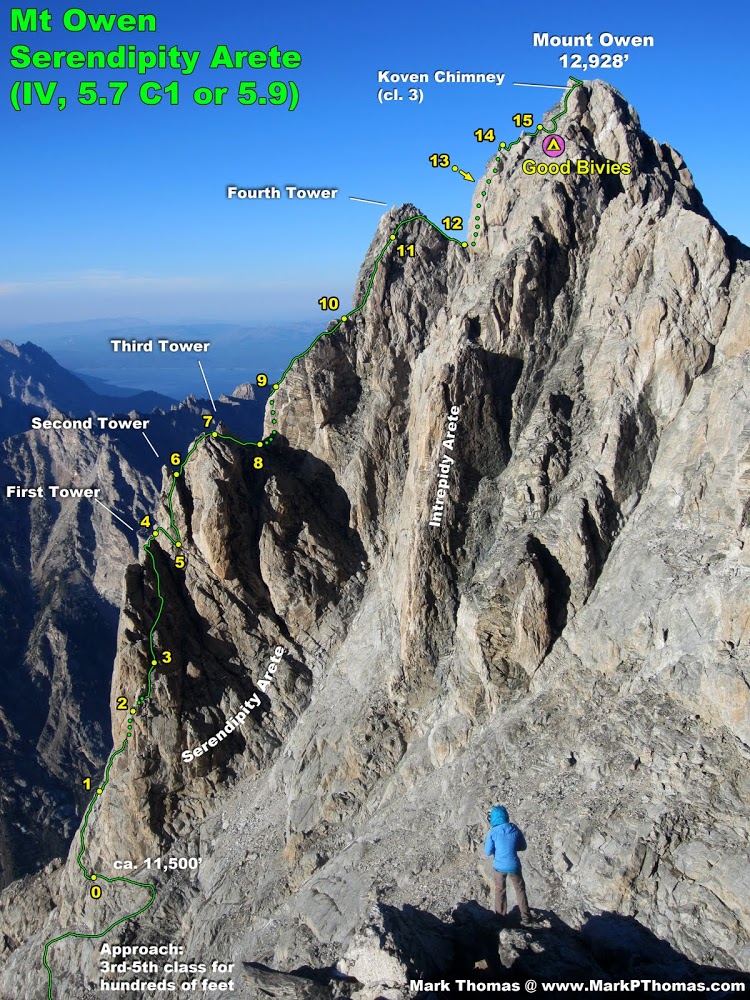
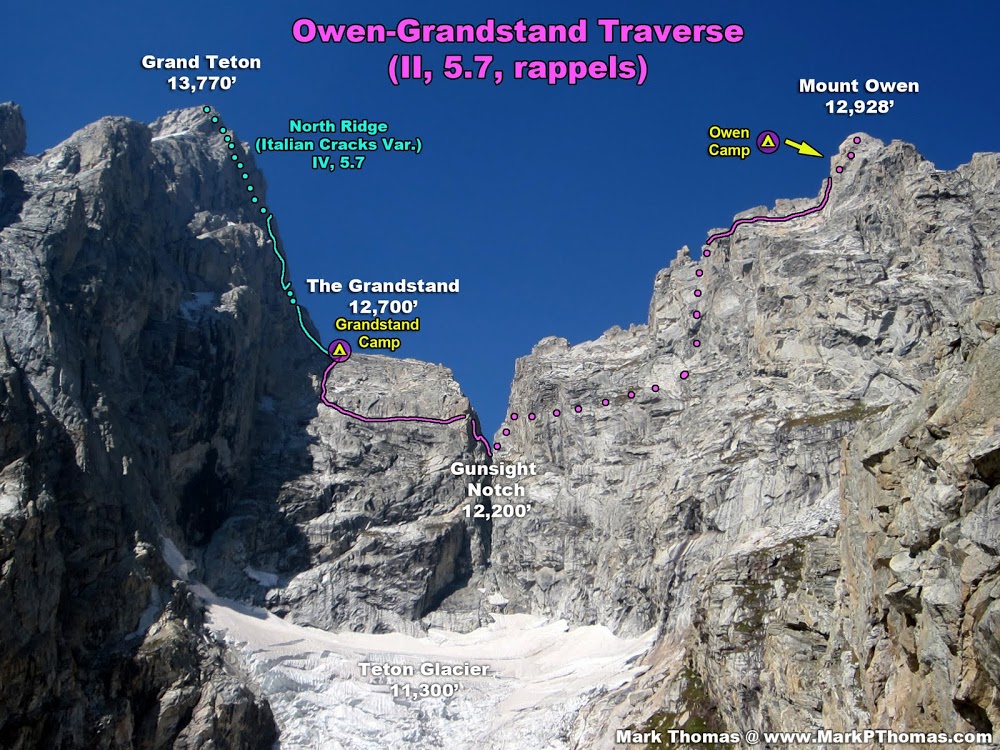
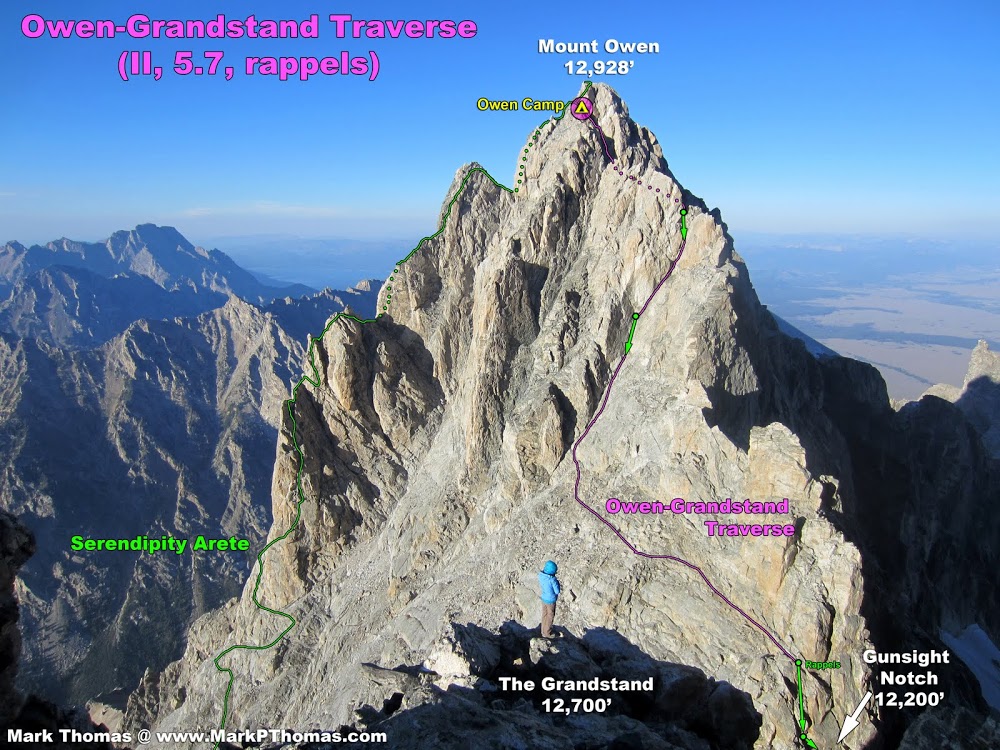
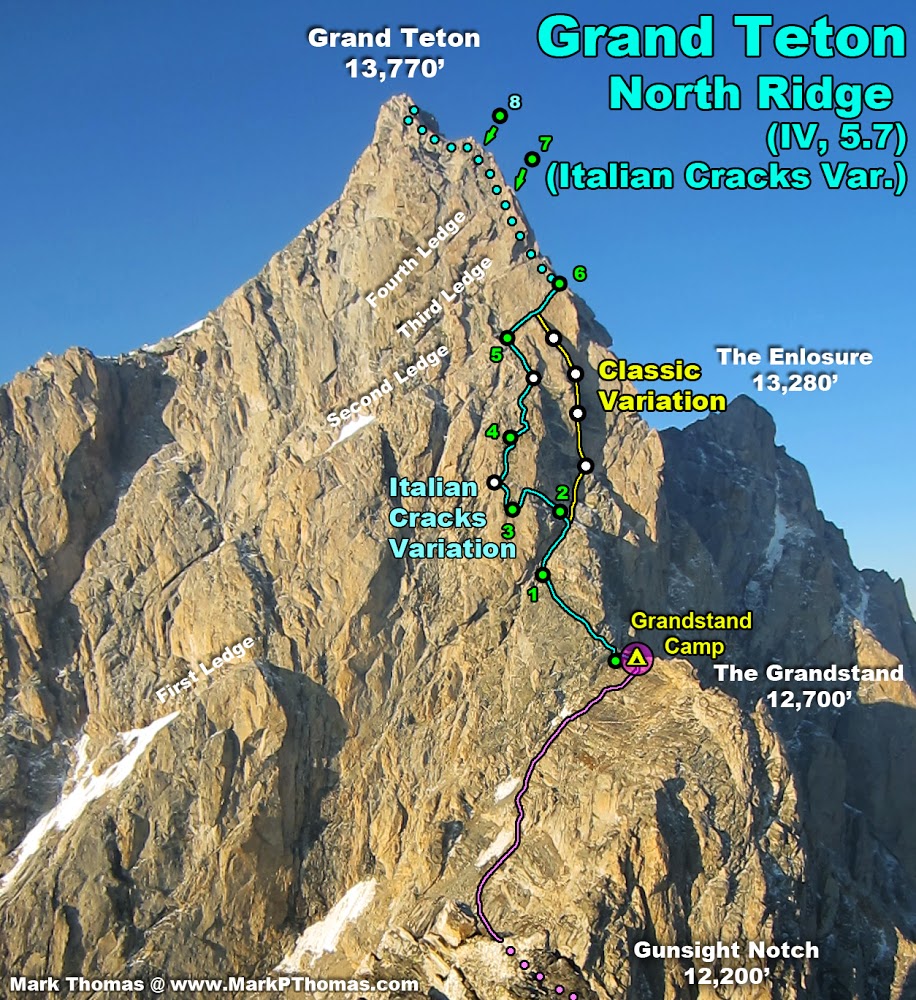
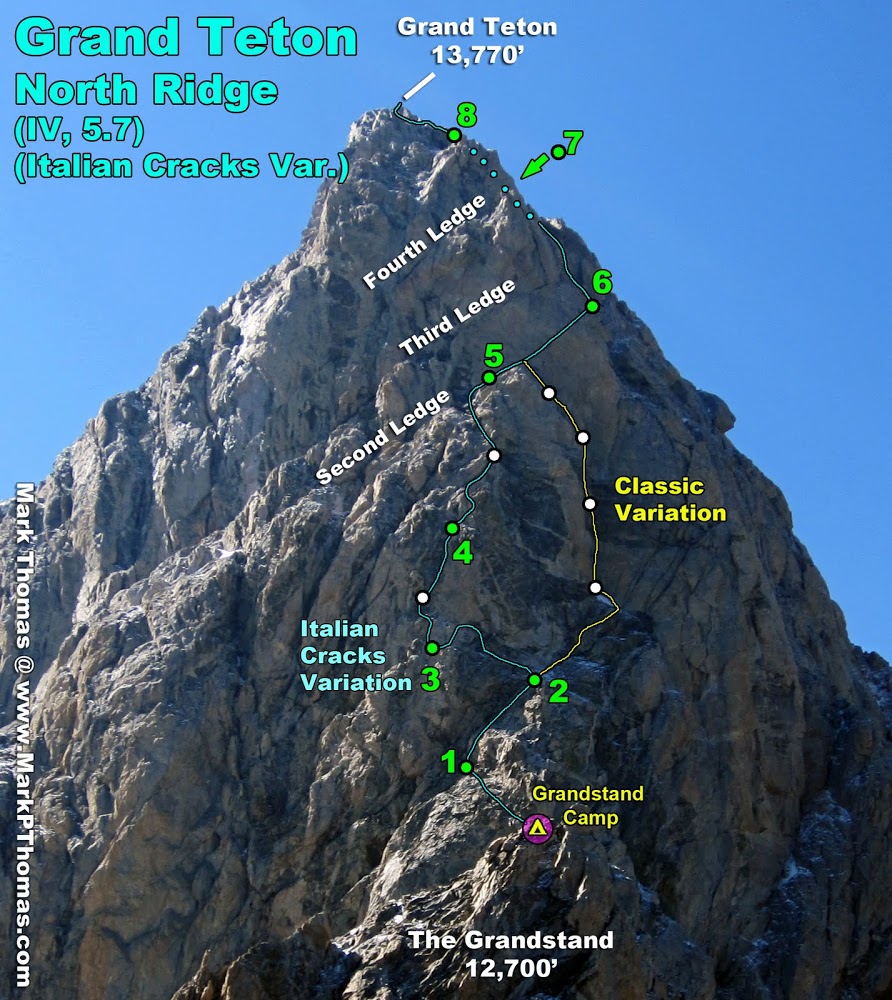
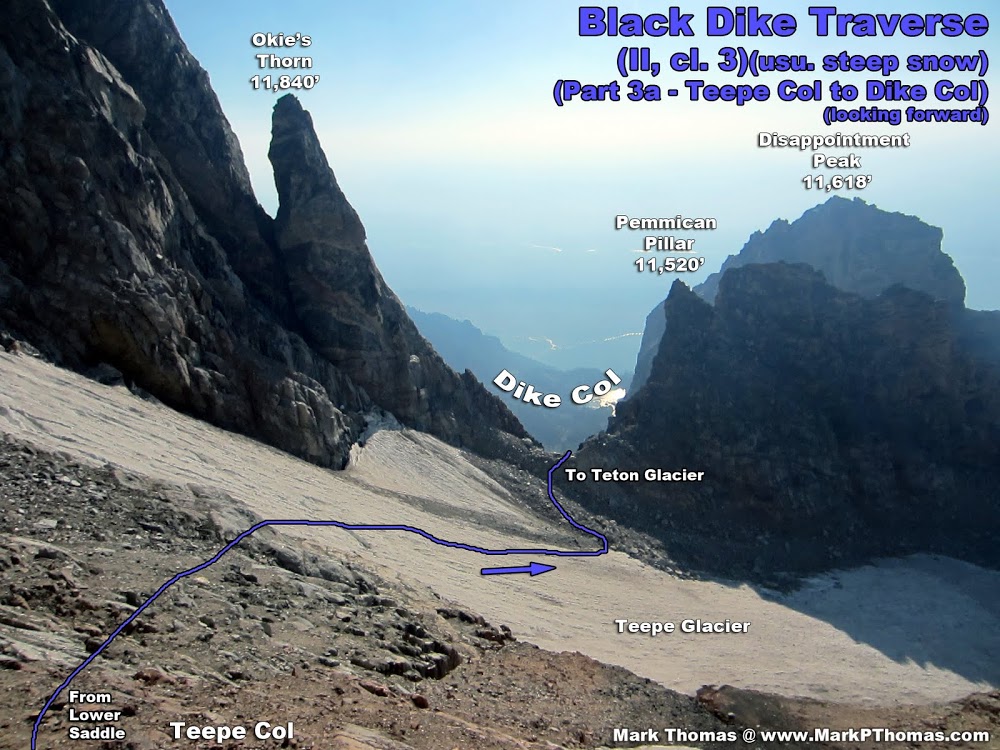
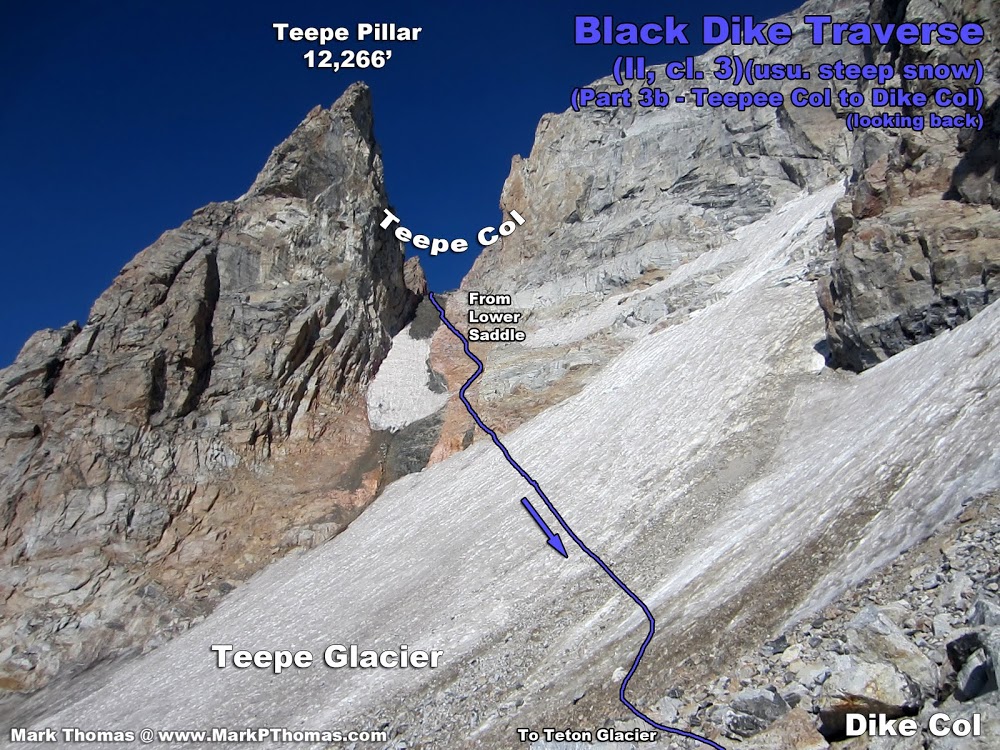
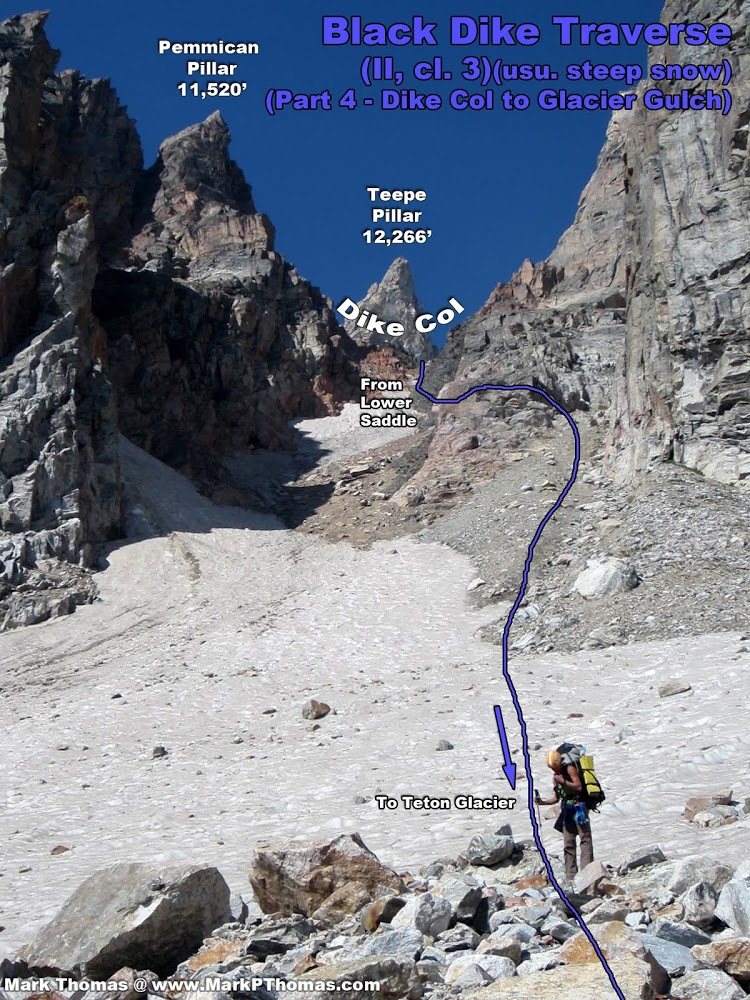
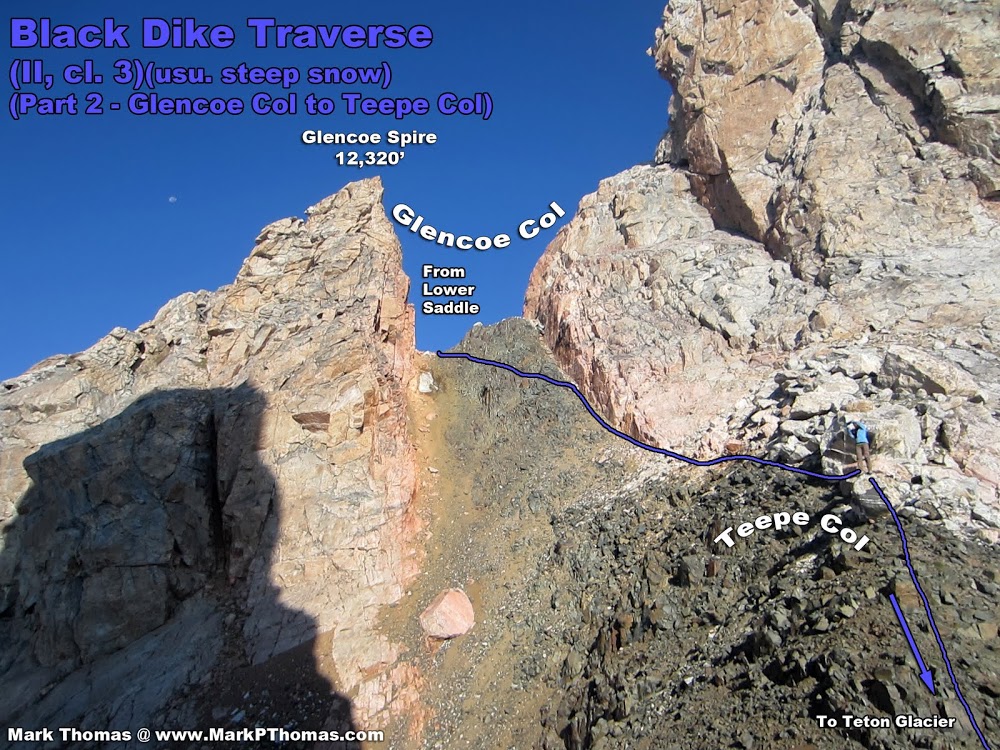
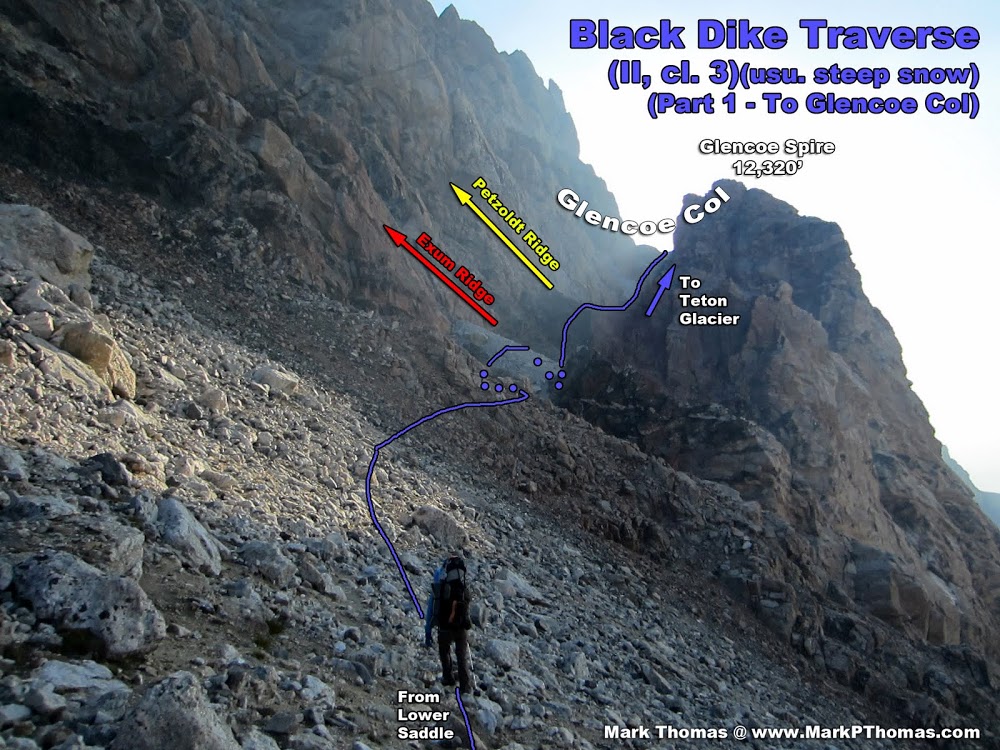
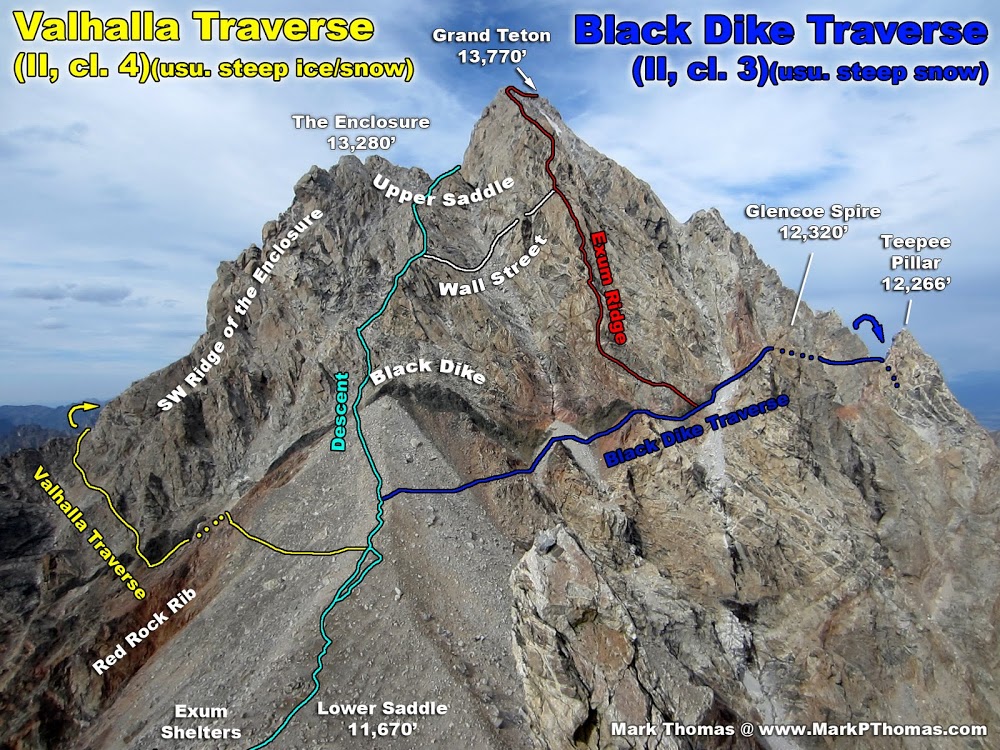
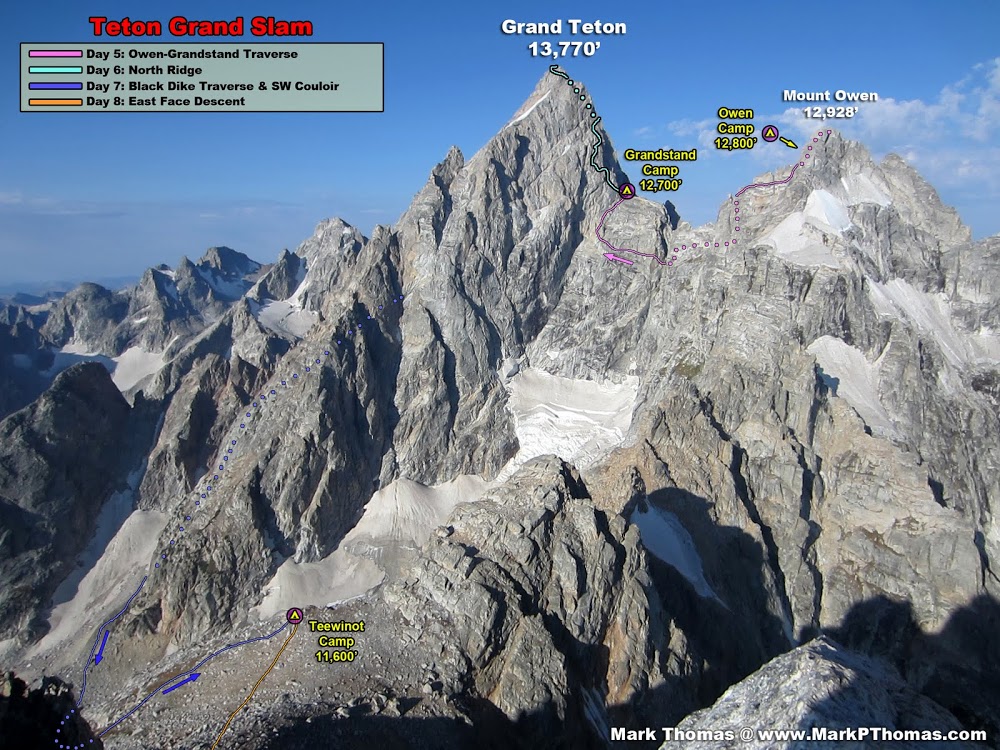
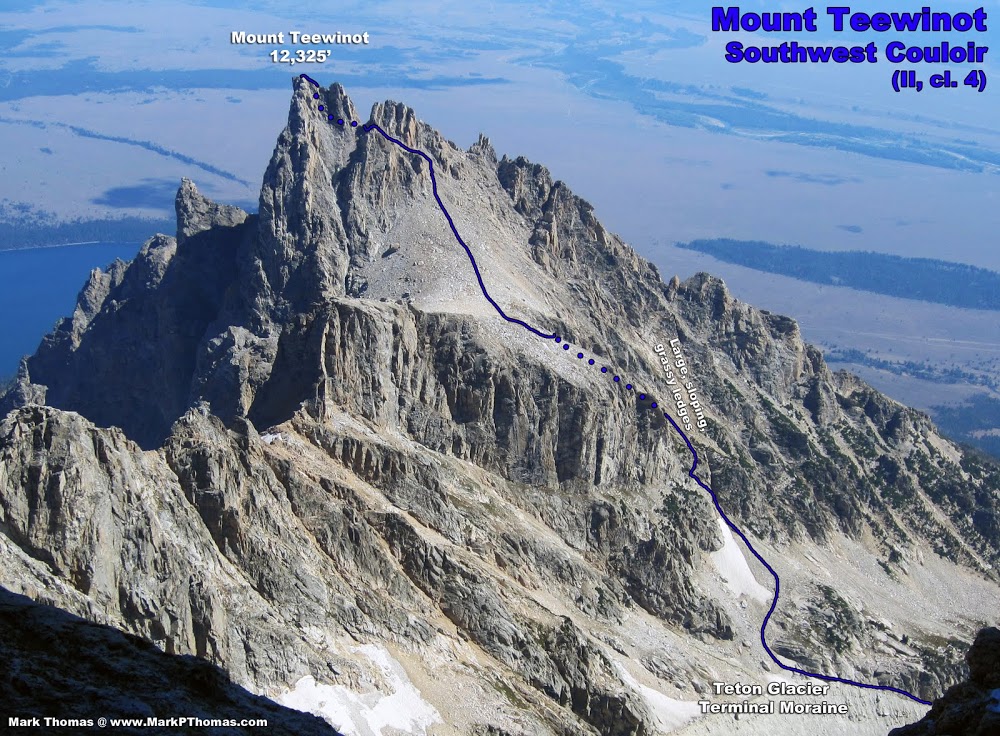
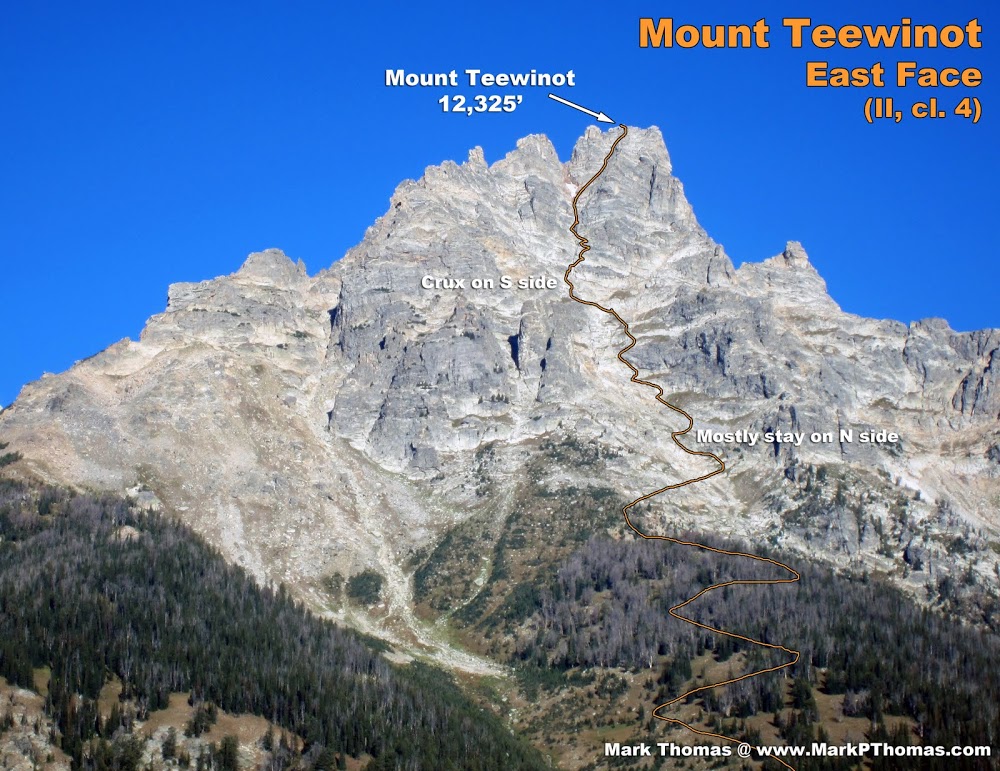
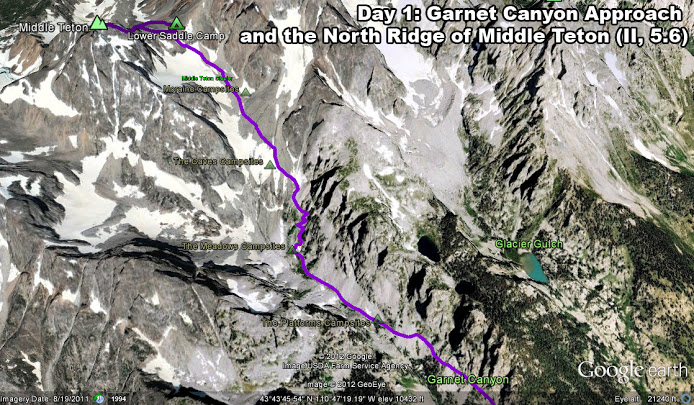
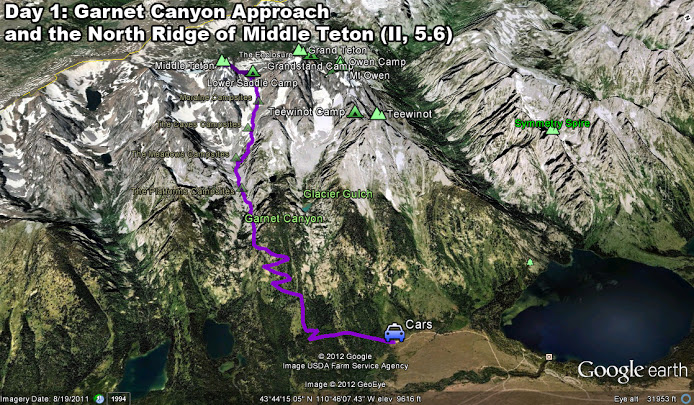
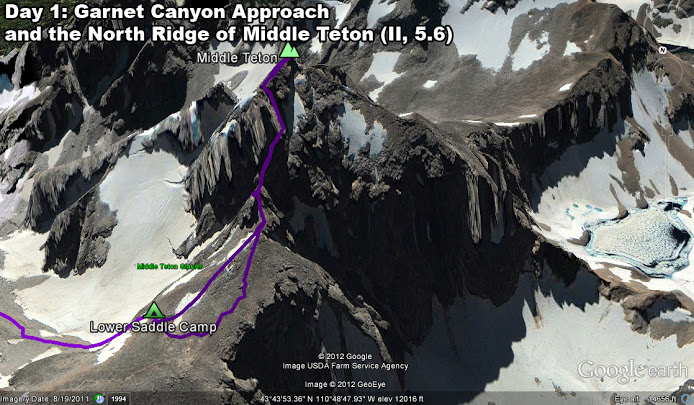
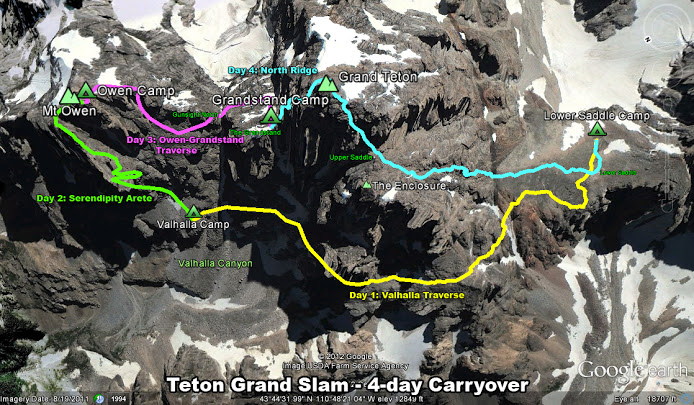
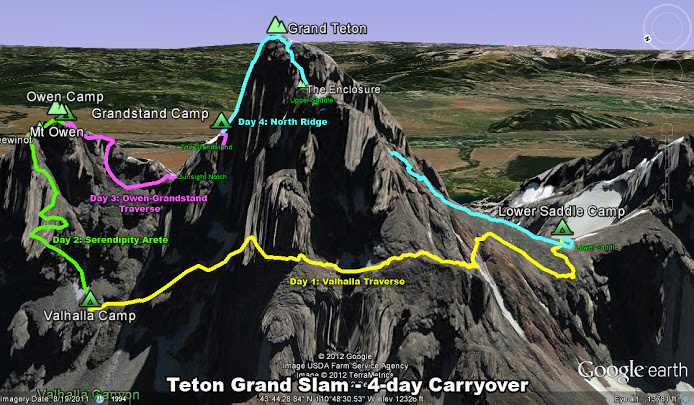
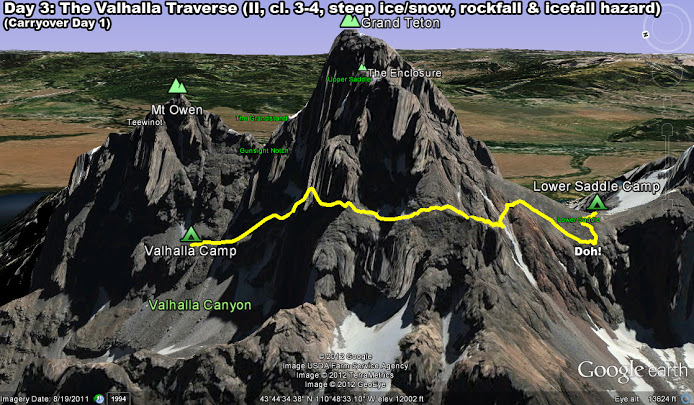
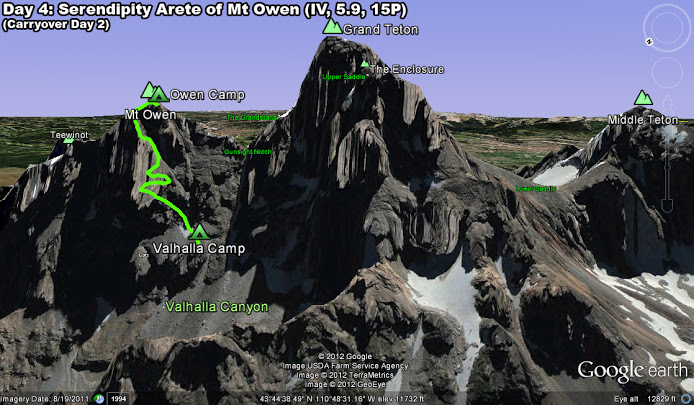
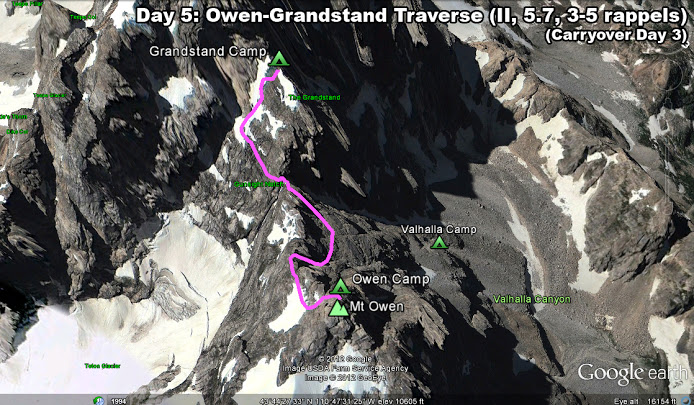
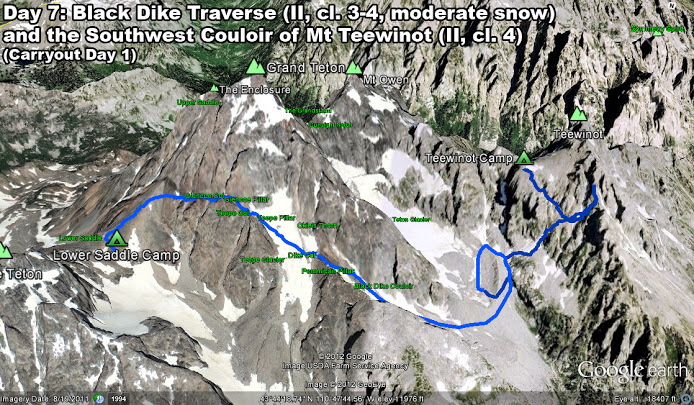
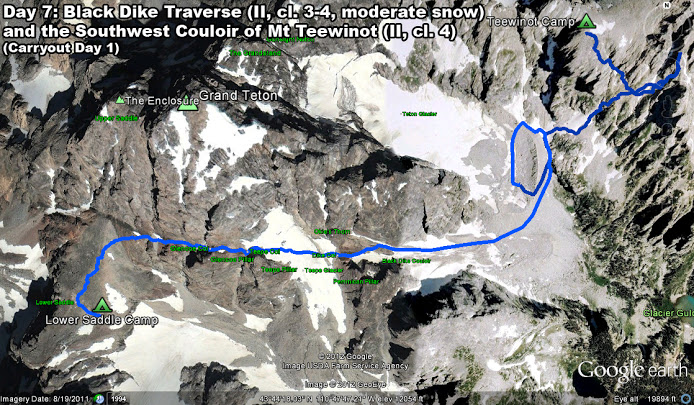
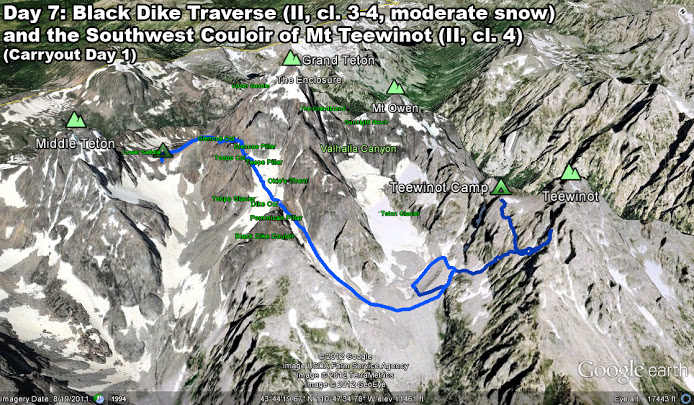
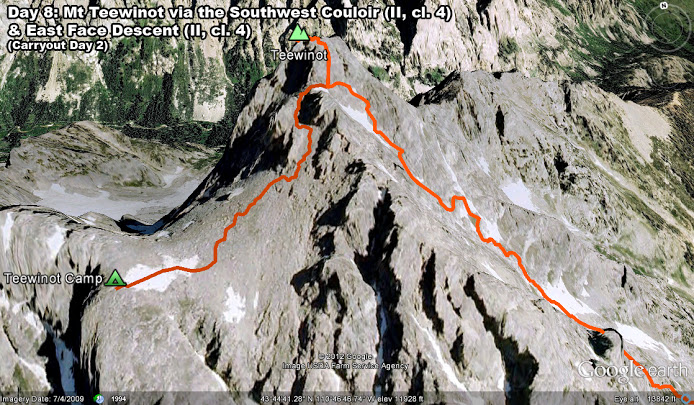
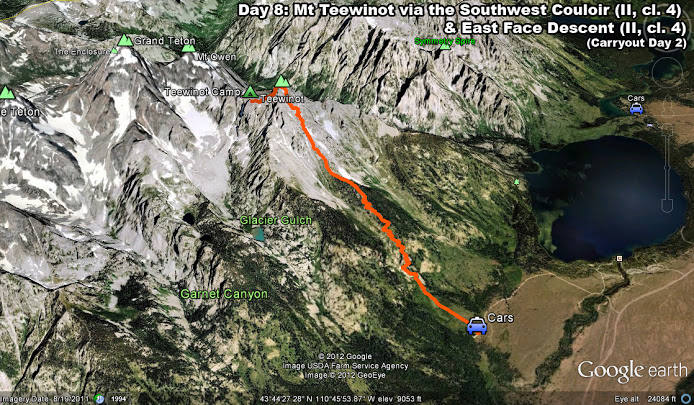
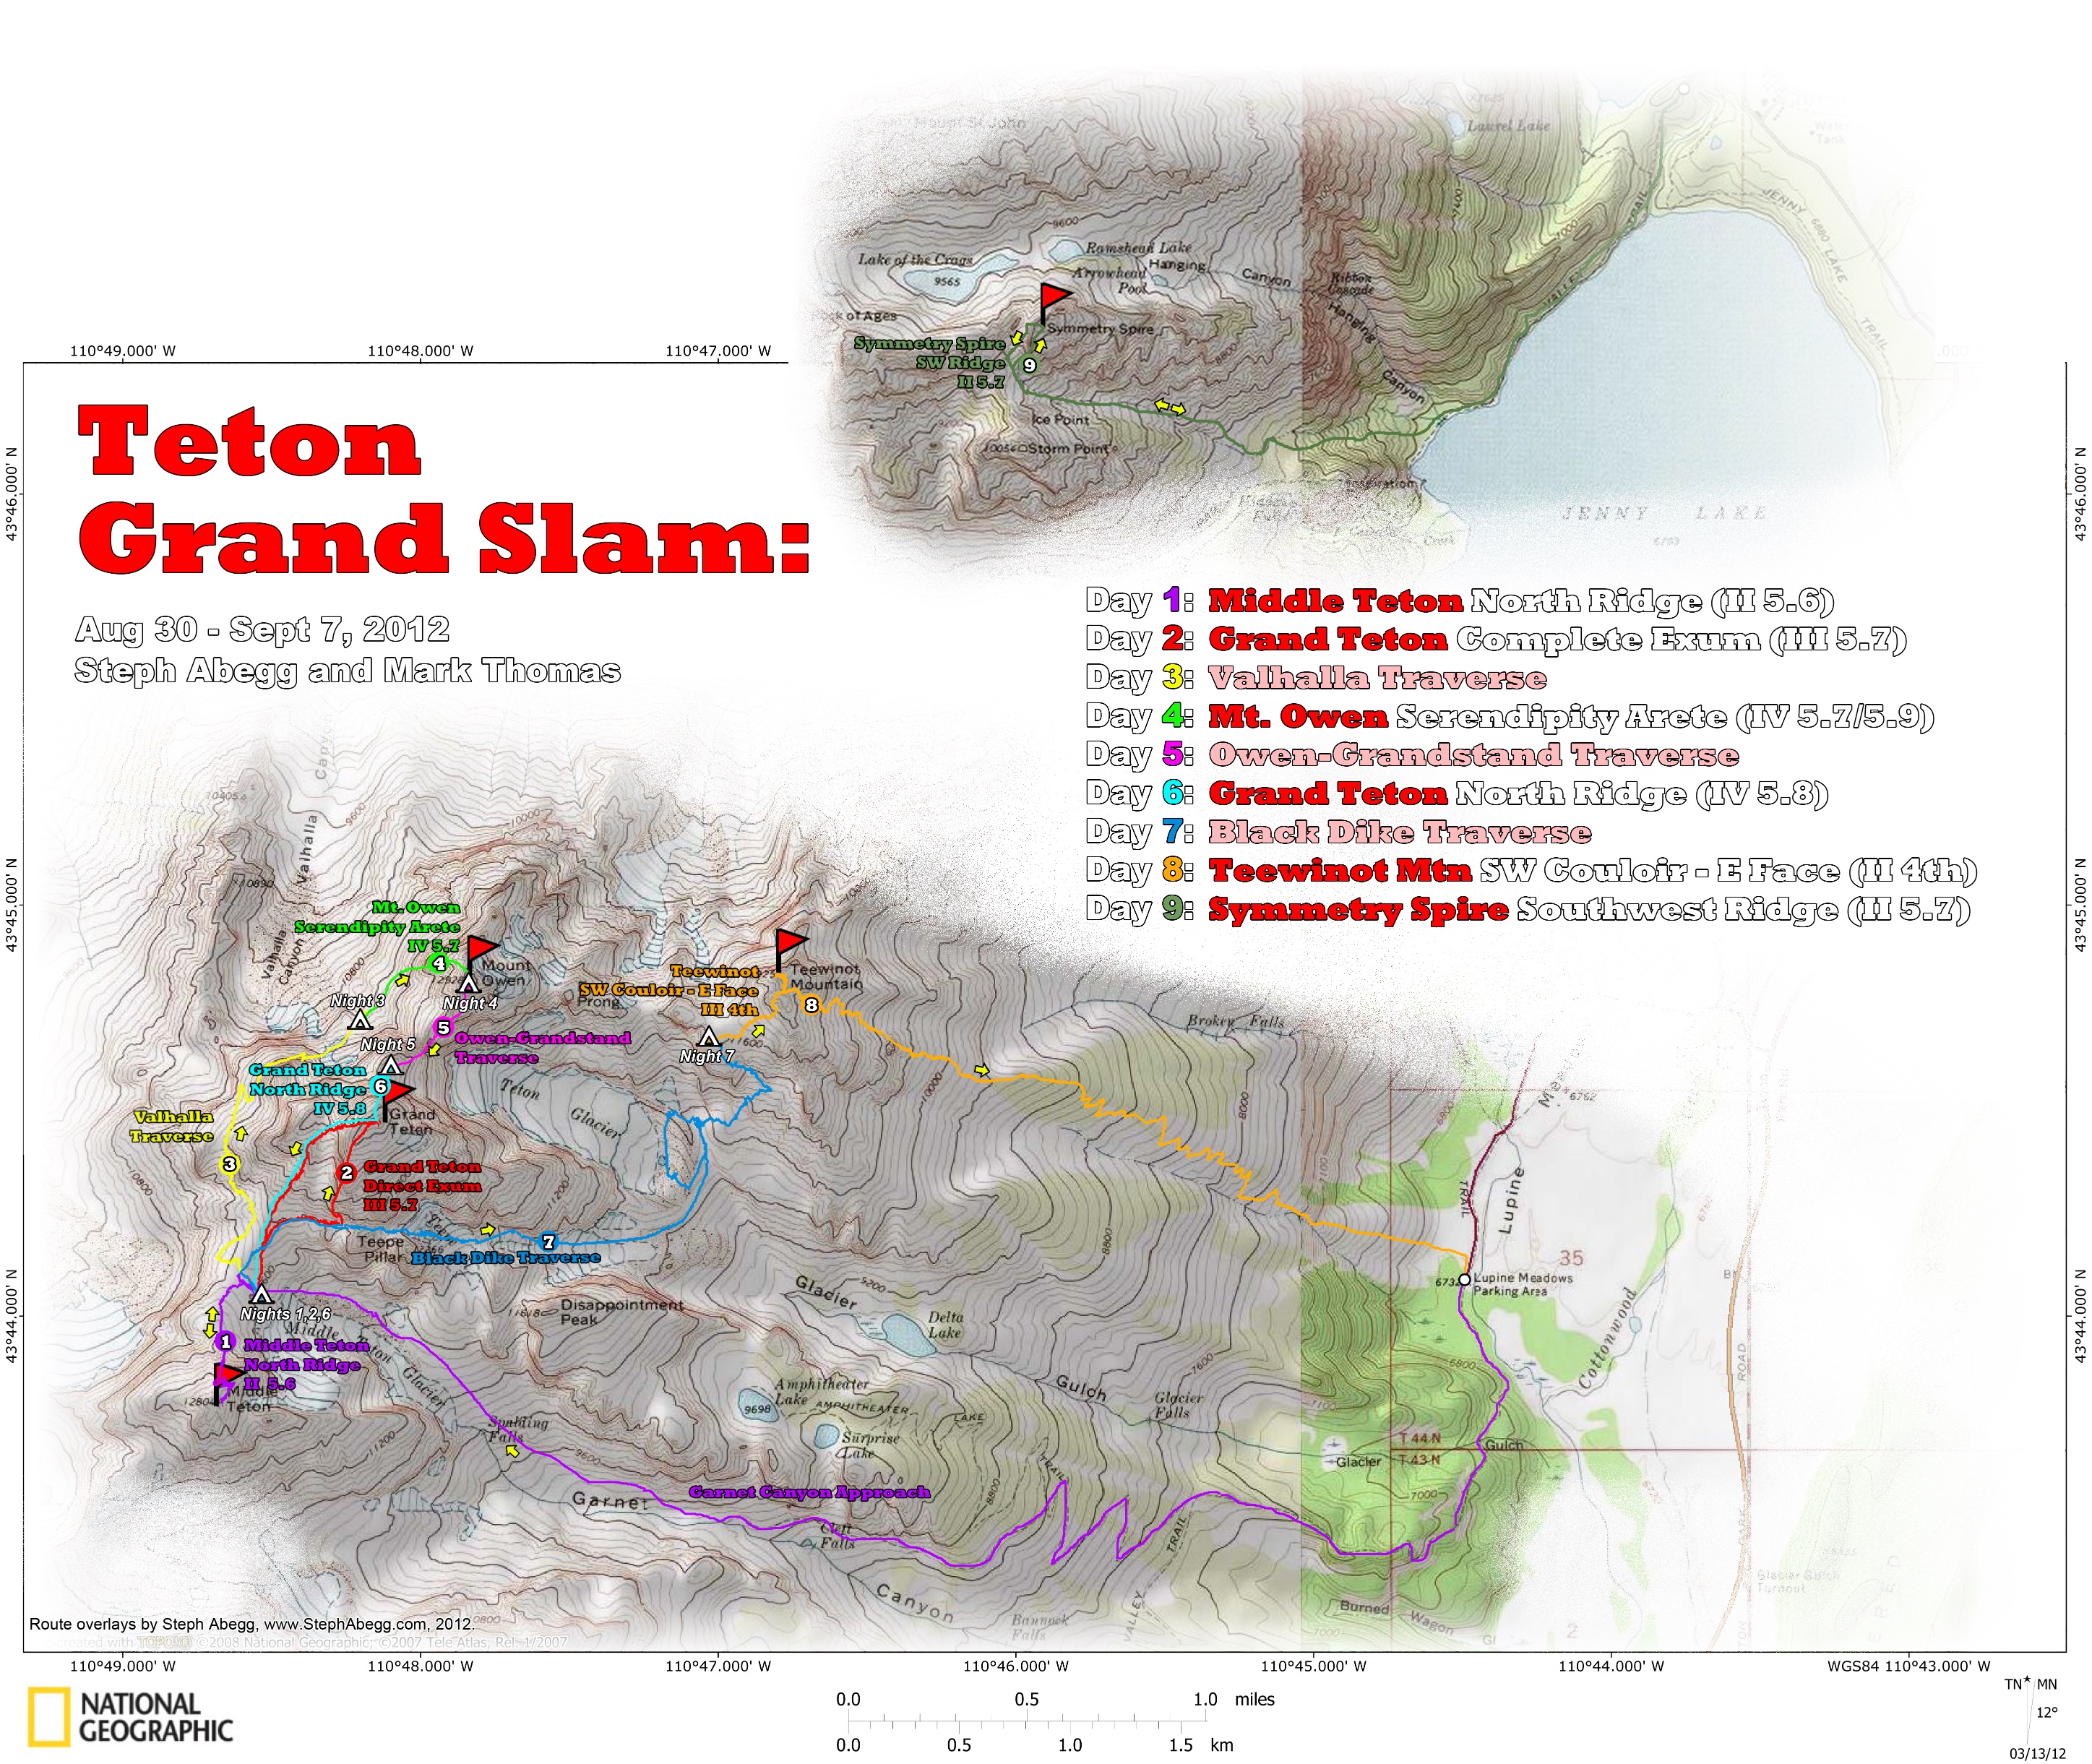
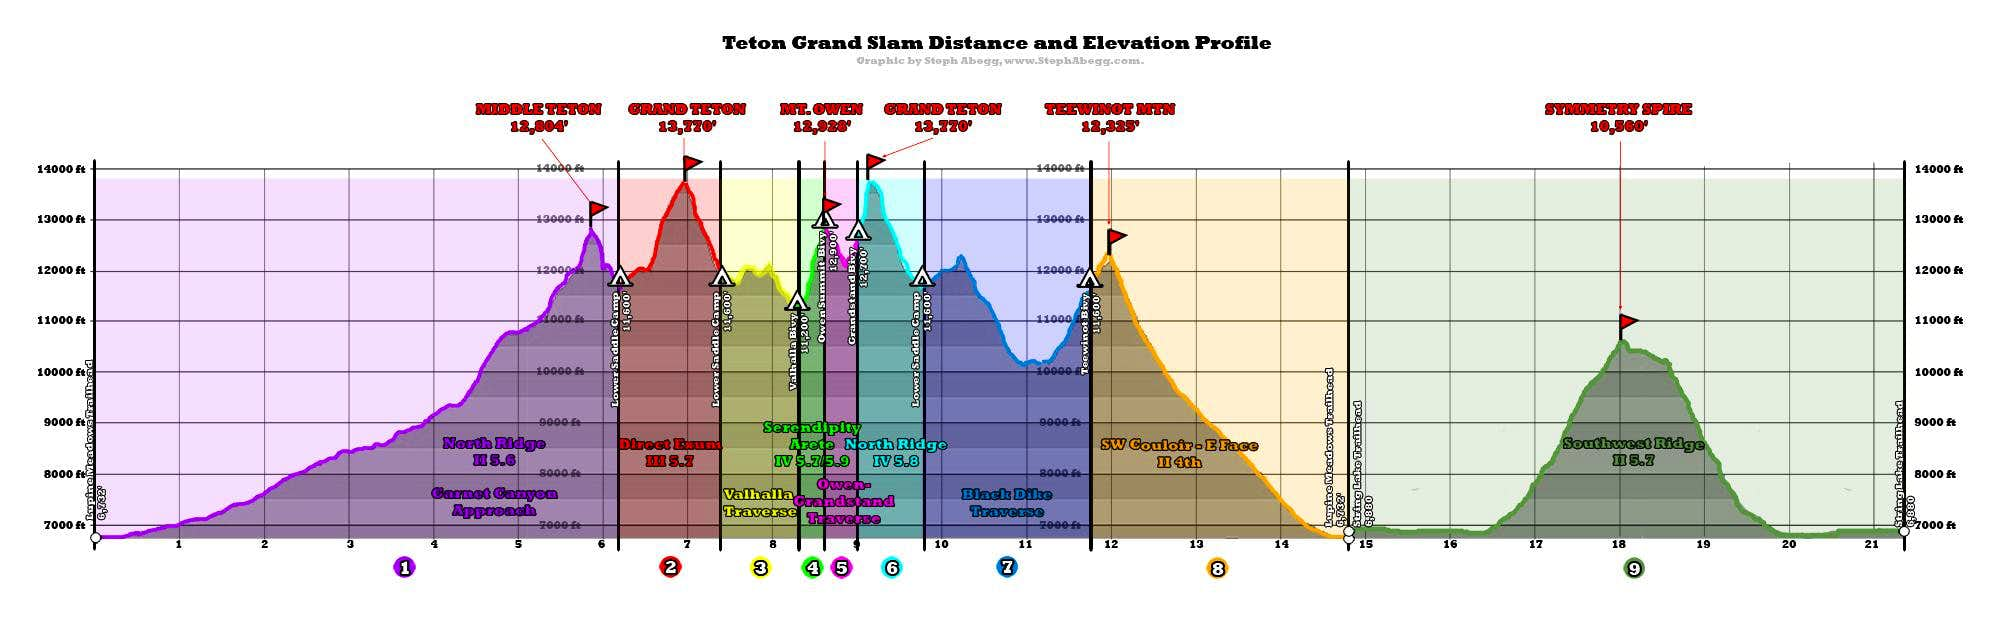
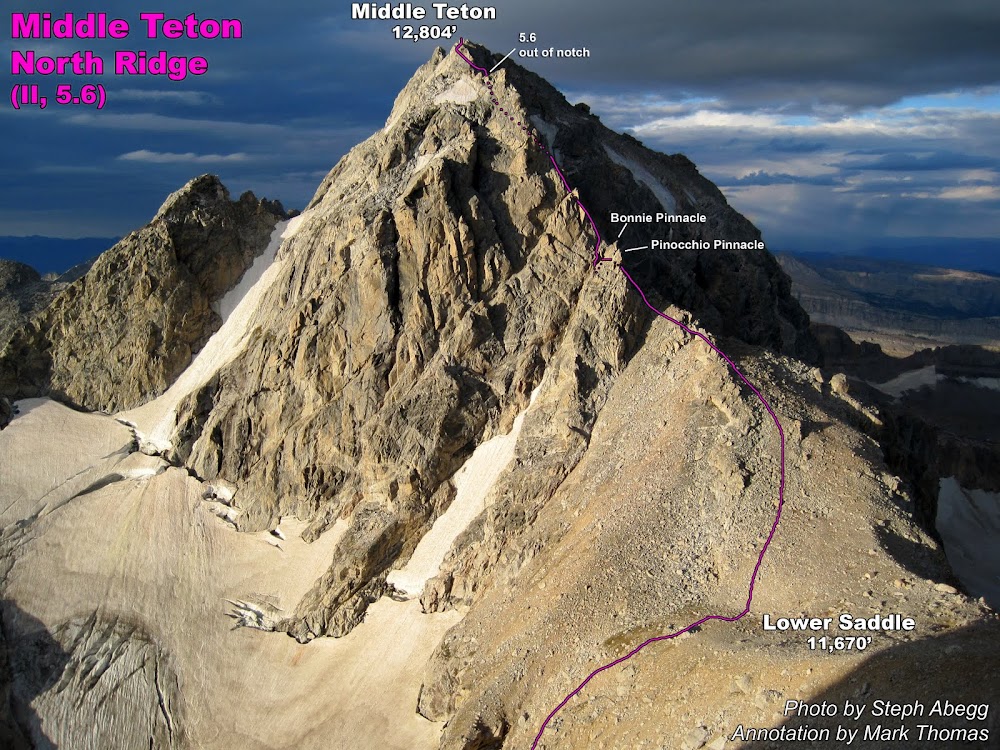
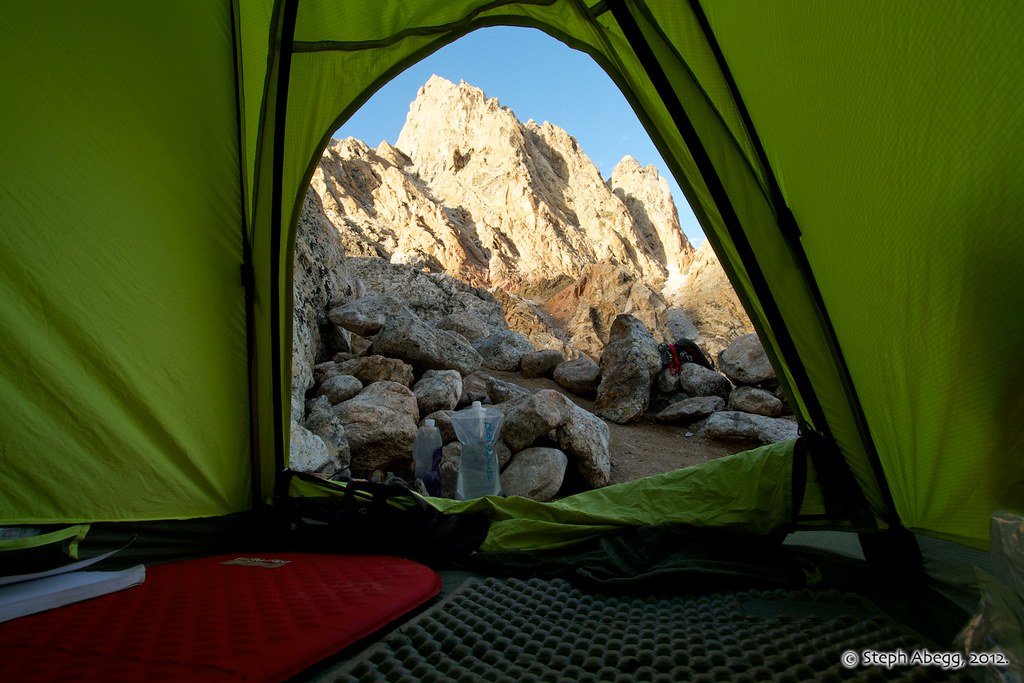
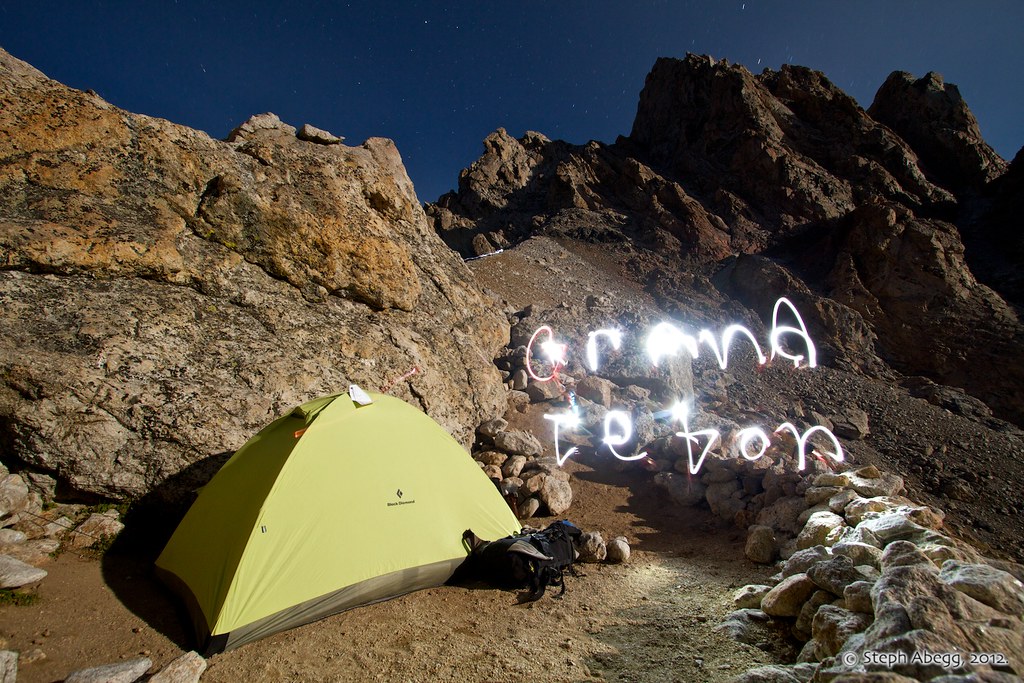
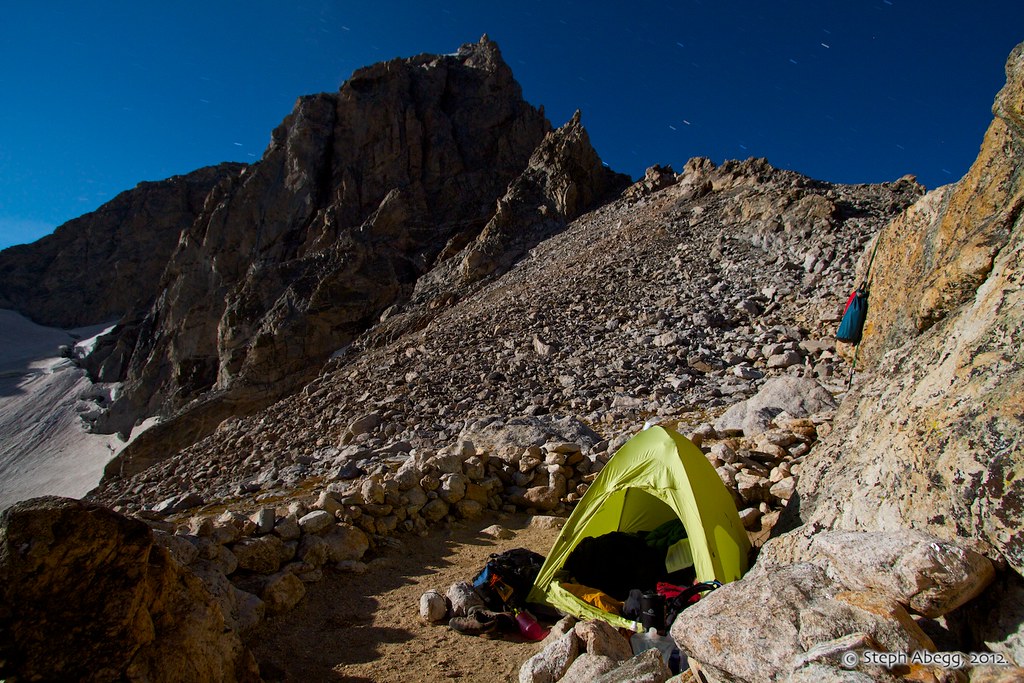
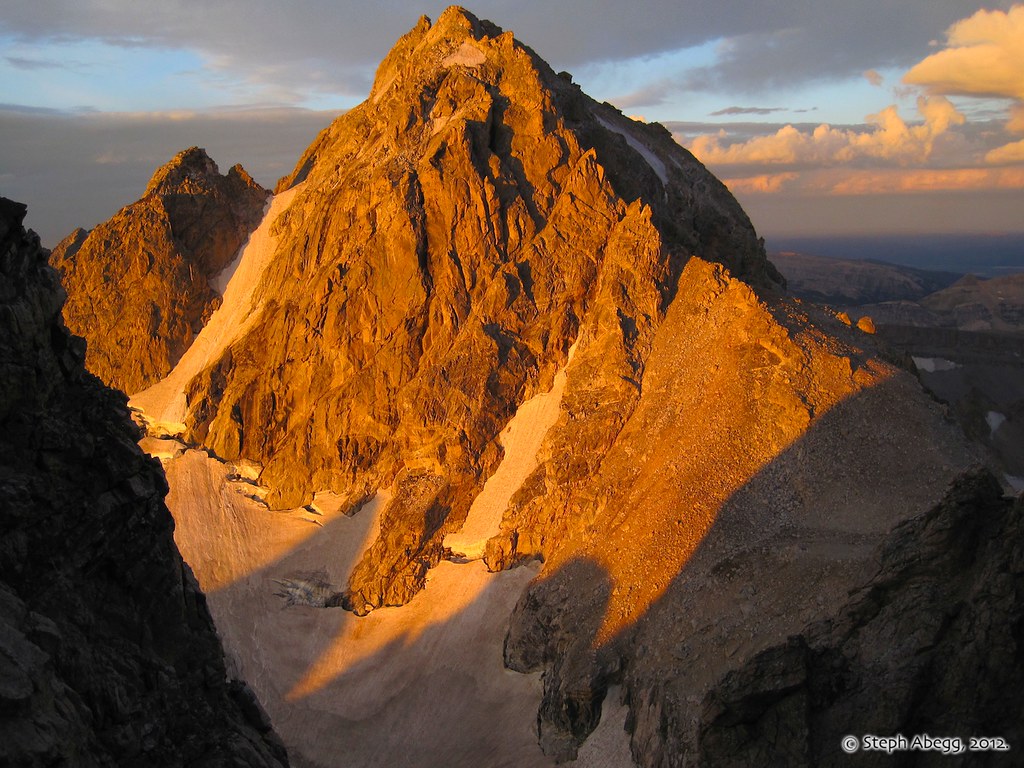
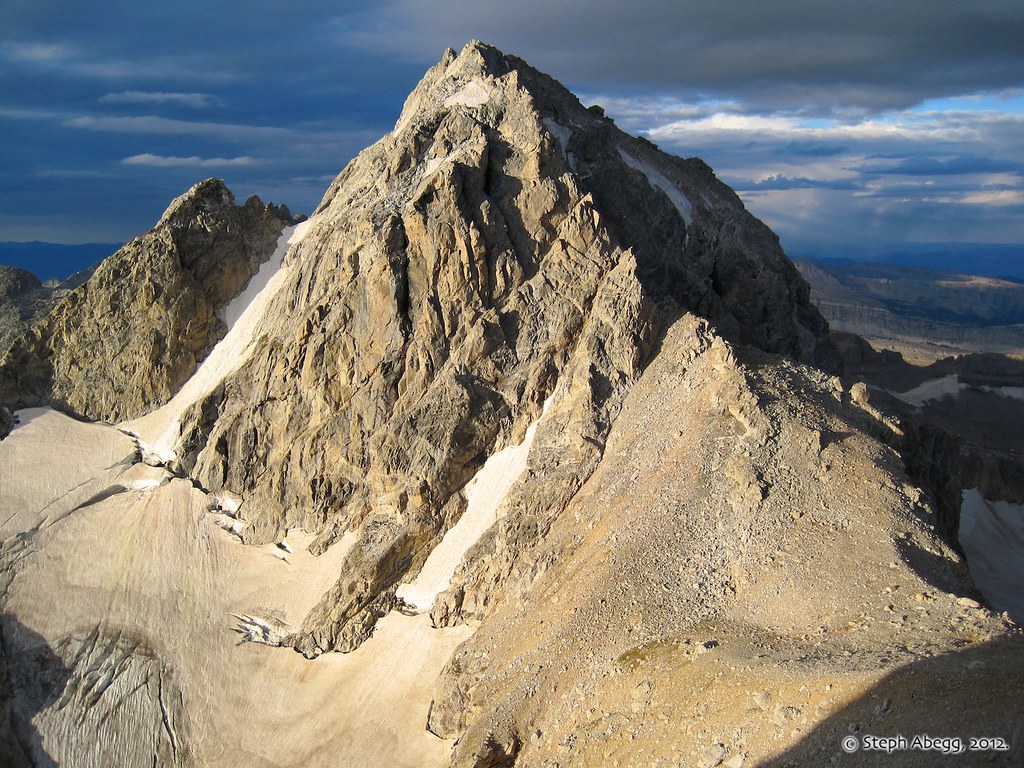
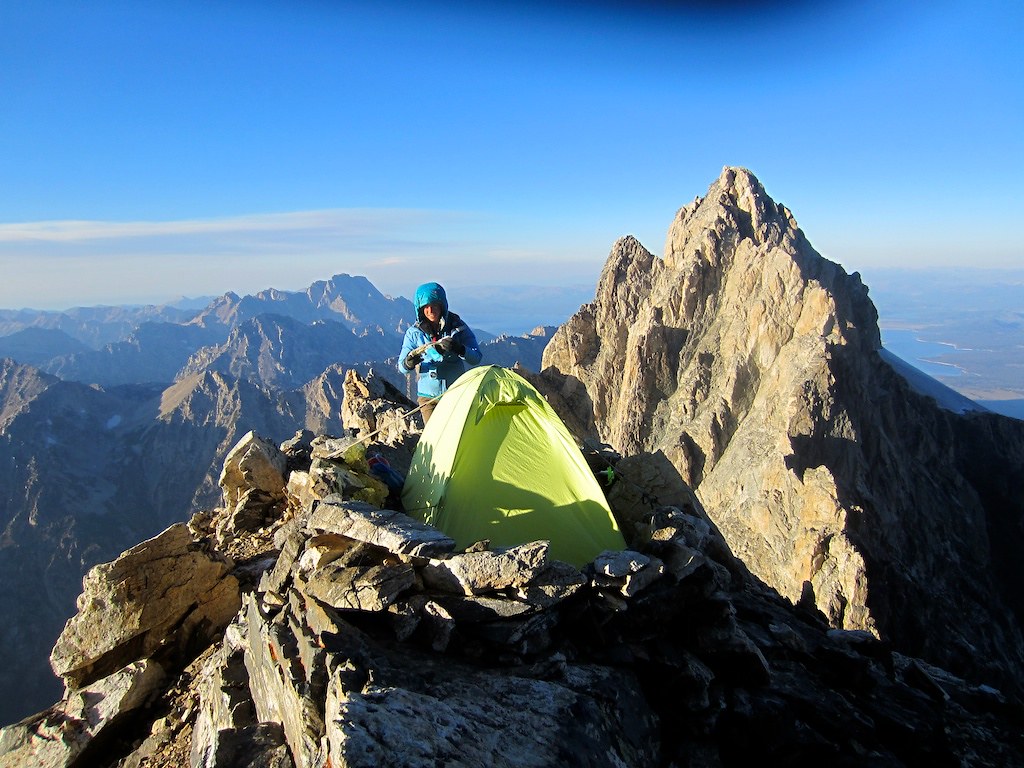
Of course, there are several great climbs we wanted to do in addition to the Complete Exum Ridge. So we developed a strategic multi-day link-up of a number of classic Teton climbs. First, we would establish a camp at the Lower Saddle below the Grand Teton; from here we would climb the North Ridge of the Middle Teton and the Complete Exum Ridge of the Grand Teton. Then we would pack up camp (leaving any extra food, fuel, batteries, etc. at the Lower Saddle), traverse around the Grand Teton's west side via the Valhalla Traverse, and carryover both Mt. Owen (via Serendipity Arête) and the Grand Teton (via the North Ridge) and end back to the Lower Saddle. After this, we would traverse around the south and east side of the Grand Teton via the Black Dike Traverse and establish camp on the Teton Glacier, from where we would climb the North Face of the Grand Teton. Finally, we would carryover Teewinot Mountain as we hiked back out to the car. It would certainly be a Grand Slam if we pulled it all off!

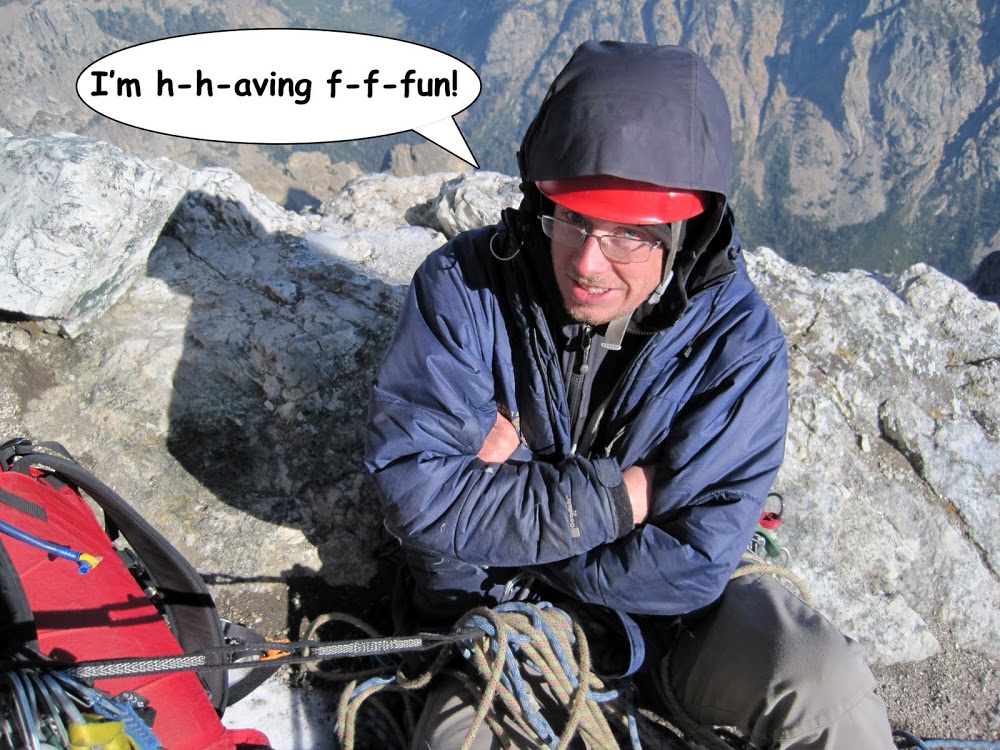
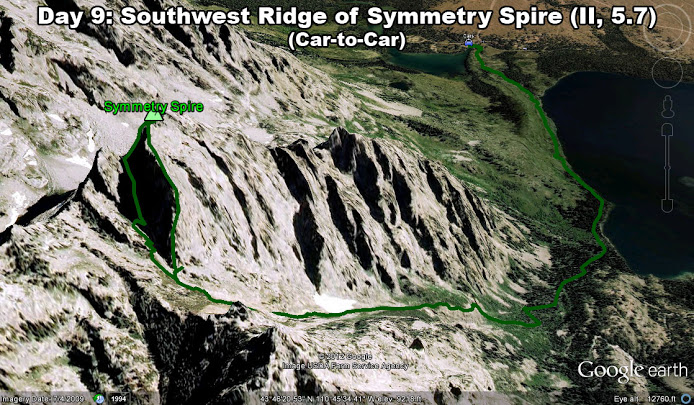
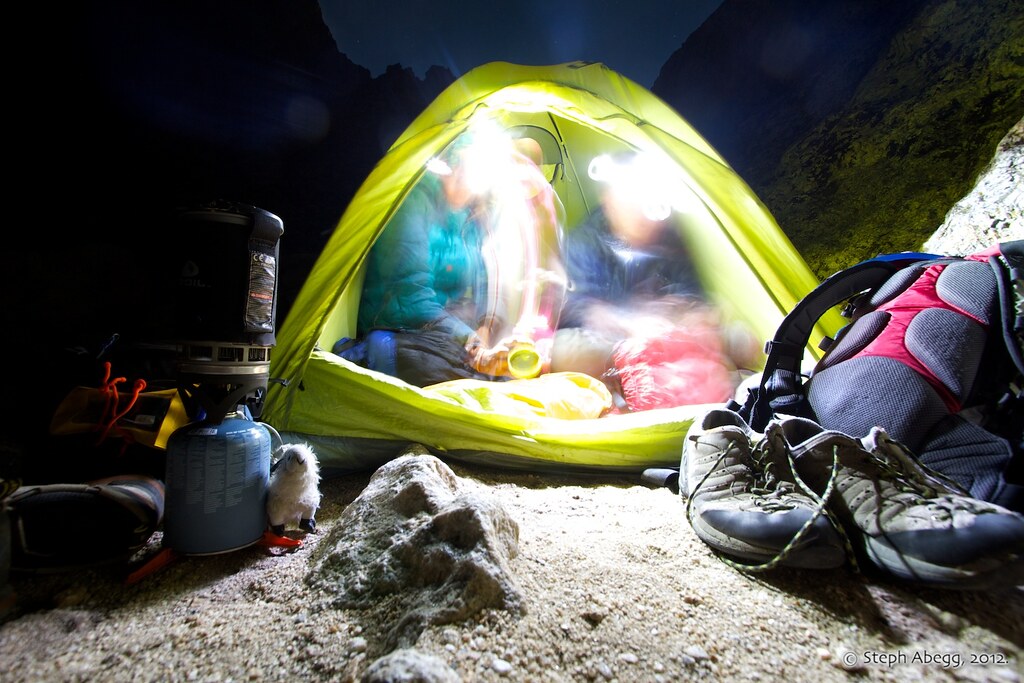
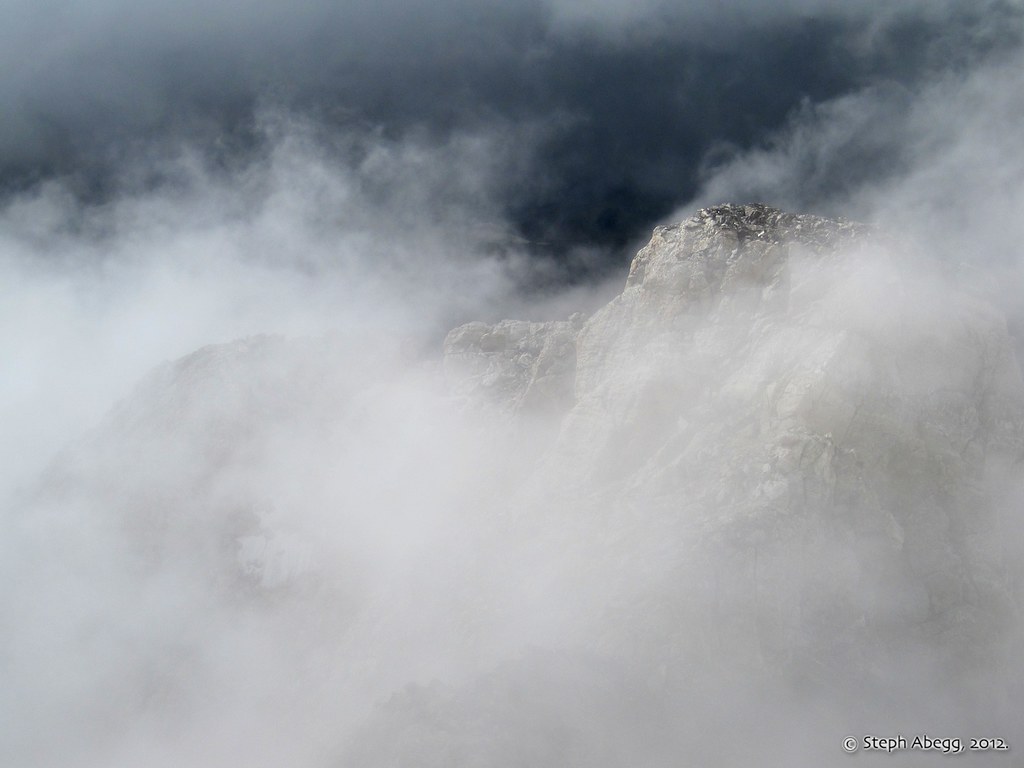
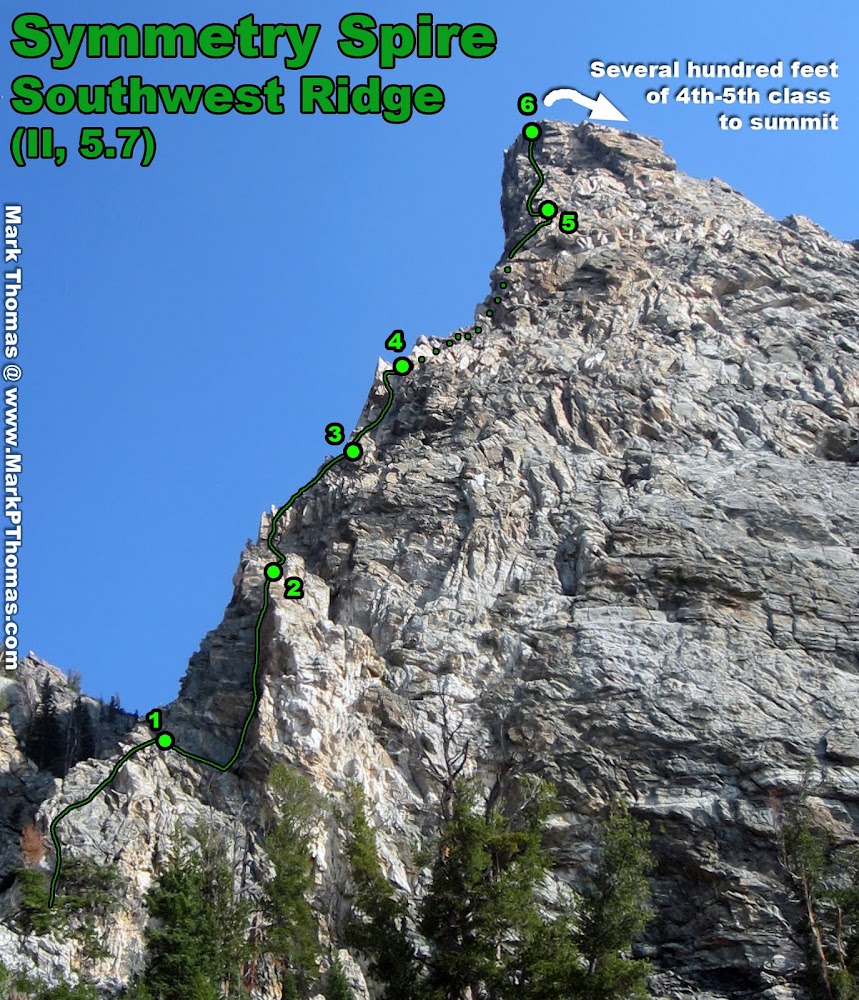
A constant concern in our trip planning was how weather and conditions could easily throw a hitch in our plans, especially since in the late summer the temperatures in the Tetons often dip below freezing and storms are a growing possibility. Indeed, a rather intense hail/snow storm hit the day we established our camp below Mt. Owen. The storm caused us to take an extra day on the carryover as well as deposited enough fresh snow on the north side of the Grand Teton that we decided to remove the now-icy North Face from our trip itinerary (we would replace it with a warmer day-pack romp up the Southwest Ridge of Symmetry Spire, a fun route my parents had also climbed on their 1982 trip). Even with the slight adjustment to our initial itinerary, our trip was still a smashing success. We climbed six 4-to-5-star Teton routes in nine days, and had a blast doing so.

The following page gives maps, route overlays, photos, and commentary of our Grand Slam adventures. Mark is the master of route overlays and has inspired many of my own route overlay styles, so I've included several of his overlays (as well as some photos) in this trip report as well. Make sure to scroll to the bottom of the page to see a rather impressive display of additional annotated photos and Google Earth overlays generated by Mark in the weeks following our trip.

Enjoy the armchair mountaineering about to ensue!

Also, a special note of thanks goes to the American Alpine Club since I had been awarded the "Live Your Dream" Climbing Grant for this trip. The grant helped fund my transportation to and from the Tetons, as well as provided another means to publish and share this trip report via the AAC submission guidelines.

Trip Report by Day

CLICK ON DAY TO DROP DOWN CONTENT

Day 1:

From the Lupine Meadows Trailhead, hike up Garnet Canyon, establish camp at the Lower Saddle, climb the North Ridge (II, 5.6) of Middle Teton.

L: Approaching Garnet Canyon and the Lower Saddle. Middle Teton dominating the view, Lower Saddle to the right.

R: My parents after a successful climb of Grand Teton in 1982 (must have been July given the snowcover), Middle Teton behind.

Steph passing by the fixed lines just below Lower Saddle. With climbing gear, cameras, and 8 days of food, our packs were pretty heavy! (Photo by Mark Thomas.)

After establishing our camp at the Lower Saddle, we bounded pack-less up the North Ridge of Middle Teton. Our climb—which took only an hour to the summit from the Lower Saddle—is described below.

Route overlay, Middle Teton North Ridge (II, 5.6), by Mark Thomas:

Route description, Middle Teton North Ridge (II, 5.6):
Text from "Teton Rock Climbs" digital guide:

    "Scramble from the west side of the first pinnacle (Pinocchio Pinnacle) through the notch between the two pinnacles, and gain a ramp on the east side of Bonnie Pinnacle.
    Follow the convenient ramp around the east side to a short downclimb into the notch separating Bonnie Pinnacle from the North Ridge.
    Climb a short easy 5th class section out of the notch to gain the North Ridge. The traditional route leads up and left (east) above the notch to gain ramps which lead past an incut alcove called the “Room.” An easier but less aesthetic alternative goes right (west) from the notch over a short loose section to gain the ramp system on the west side of the ridge.
    To follow the traditional route to the Room, traverse left (east) on a steep ramp above the notch.
    The ramp is 4th class with substantial exposure.
    After about 50’ up this ramp, turn back right (west) toward the ridge crest on another similar ramp.
    The Room will be found just before the ramp crosses the ridge crest.
    Either follow the narrowing ramp right (west) around the ridge crest, or drop down a few feet to some ledges, then traverse right (west).
    Immediately around the ridge crest, the ramp system on the right (west) side of the North Ridge will be found.
    Follow this ramp system which parallels the Northwest Couloir. Depending on which variation from the initial notch was taken, a short easy slab may be encountered. Regardless of which option was taken, continue on the right (west) side of the North Ridge on this ledge system.
    A short easy 5th class step connects two ramps.
    Continue traversing alongside the Northwest Couloir.
    Turn left (east) into an obvious eroded black dike. This dike may hold snow long into the summer.
    Hike to the top of this dike where it intersects the North Ridge.
    The technical crux of the route (5.6) lies in gaining the ridge above the notch. Climb the south wall out of the notch via the wall directly above the notch, or possibly easier (but often wet) terrain slightly right. There is a fixed anchor above this notch to facilitate descent of the North Ridge.
    Above the notch, scramble up blocky ground on the left (east) side of the broad ridge crest. Follow a ramp that contours along the left (east) side of the ridge.
    Continue on this ramp as it traverses toward the summit on easy terrain.
    DESCENT While the Southwest Couloir is the easiest and standard descent off the mountain, the North Ridge may be reversed to retrieve gear left in the north fork."

Mark on the short easy 5th class section (which we soloed) to gain the North Ridge from the notch behind Bonnie Pinnacle.

Steph on the North Ridge of Middle Teton. For the most part the route is 3rd and 4th class. We soloed all of the short low 5th class sections ("crux" was a short 5.6 section above the notch just before the summit). (Photo by Mark Thomas.)
Looking over at the NW Couloir of Middle Teton. We had planned on climbing this instead of the North Ridge if conditions allowed, but it was pretty melted out after a dry summer.
Feldspar on Middle Teton.
Billy's first Teton summit!
For the descent, we just reversed our route down the North Ridge. Here Mark is descending the loose 3rd class eroded black dike on the North Ridge route of Middle Teton.

We decided it was wise to go around (instead of jump) this chasm between Bonnie Pinnacle and Pinocchio Pinnacle.
As we descended the lower North Ridge of Middle Teton, we scrambled to the tops of Bonnie Pinnacle and Pinocchio Pinnacle, both short 4th class climbs. This is Mark on Pinocchio Pinnacle, Bonnie Pinnacle behind.
L: Camp at the Lower Saddle. Grand Teton inflamed in evening light.

R: My parents' camp at Lower Saddle in 1982, thirty years previous to our trip. No Exum Mountain Guide huts then!

Puffy white clouds above Middle Teton from camp near the Lower Saddle.
The Grand view from our tent door at our camp at the Lower Saddle. The (FIfty Classic) Complete Exum Ridge would be our next day's goal.
Headlight fun at moonlit camp at the Lower Saddle. Exposure: 2.5 min, f/7.1, ISO 250.
Another photo of our moonlit camp, with the Middle Teton behind. Exposure: 2.5 min, f/7.1, ISO 250.

DAY 2:

From camp at Lower Saddle, climb the Complete Exum Ridge (III, 5.7) of Grand Teton.


Route overlays, Complete and Lower Exum (III, 5.7), by Mark Thomas:

Route description, Complete Exum (III, 5.7):
Text from "Teton Rock Climbs" digital guide:

Lower Exum (III, 5.7):
    "From the Lower Saddle, walk north toward the obvious Black Dike and follow a trail that contours off to the right to meet the Dike under the first south ridge (Exum Ridge).
    Follow the Dike past the Exum Ridge, toward the last couloir (Stettner Couloir) before the highest point on the Black Dike (Glencoe Col). A short distance above the low point in the Black Dike, immediately before the Stettner Couloir, a ramp will be found that traverses back left (west) and up to gain the Exum Ridge.
    Scramble up this gradually widening ramp to where it crosses the ridge crest. The first pitch chimney noted from the Lower Saddle heads up the west side of the ridge from this ramp. One may also climb to this chimney directly from the Black Dike, adding a couple easy 5th class pitches to the route.
    PITCH 1: Climb the chimney on the west side of the ridge. Tunnel behind the appropriate chockstone.
    Continue above to where the chimney widens. The easiest path steps out to the exposed right face (5.6), then back to the top of the chimney. One may choose to stay in the chimney the entire way (5.7), or climb the face right of the chimney from the start (5.6). Belay on a good ledge above the chimney.
    PITCH 2: Scramble up and left toward the ridge crest over easy 5th class ledges, flakes and cracks.
    Stay on the right (east) side of the crest as the path of least resistance leads straight up, then steps right over steep rock before exiting onto a large, slanting ledge.
    PITCH 3: Move the belay to the back of the slanting ledge. An escape ramp heads left (west) around the ridge crest and traverses into the Wall Street Couloir. Climb a left-slanting hand crack (5.7) in light rock, then head right into black rock. The Gold Face variation (5.10-) starts from this ledge and ascends flakes and cracks right (east) of the regular route.
    Head up and right above the crack and face climb the black rock.
    Continue straight up, then slightly left to reach a short wide crack (5.6) to a small ledge at the base of a wide, left-slanting chimney, and belay.
    PITCH 4: Climb into the chimney.
    Stem the wide chimney as it steepens.
    Pull around the chockstone (5.7) capping the top of the chimney. Scramble to the base of the Black Face, just above, and belay.
    PITCH 5: Start climbing near the middle of the Black Face.
    Within 20’ of starting up, diagonal right (east) on face holds and cracks (5.7). Several pitons will be found on this pitch.
    Near the right side of the Black Face, a crack and flake system (5.6) leads up and slightly left. Follow this to a small but good belay stance.
    PITCH 6: A hand crack in light rock leads up and left from the belay to the edge of the ridge crest. From above this crack, the original route continues up the easy corner just left (west) of the crest and gains the boulder ledge at the end of Wall St.
    A more aesthetic variation steps right (east) over a delicate face move (5.7) to reach a hand crack. Climb this crack (5.7) to its end at the boulder ledge on the end of Wall Street.
    Many parties choose to summit via the upper Exum Ridge, in which case the standard descent follows the upper half of the Owen-Spalding route."
   
Upper Exum (II, 5.5):
    "ROUTE: The Golden Stair of knobby yellow granite (5.4) rises on the ridge crest directly above the boulder ledge past the end of Wall St. An alternative lies right (east) of the ridge crest and ascends hand/fist cracks (5.5). A rappel anchor may be found just above the Golden Stair leading back to Wall St.
    Scramble about 150’ over 4th class terrain to reach the next major wall.
    Turn right (east) at this obstacle to find the Wind Tunnel; a steep gully hidden behind a huge flake.
    Climb this easy 5th class gully for about 100’ to the first exit to the left.
    Pull through this break in the left wall and belay on a scree ledge.
    Scramble up the wide gully to where the rock steepens. From this open gully, the Friction Pitch is visible as the high point on the ridge crest.
    A variety of ways are available to gain the broad crest above this point. Most consist of easy 5th class climbing. Belay when necessary.
    Belay at the small ledge at the base of the Friction Pitch, a textured yellow ridge with minimal protection cracks. Start up on smooth dishes and small knobs, then step left to find larger features. This crux (5.5) is unprotectable.
    The difficulty eases back and protection may be found higher on the pitch. Belay where the crest meets a ledge on the right (east).
    Scramble along this black rock ledge to regain the ridge crest, now to the right (east). Snow is often present here. A small steep notch leads to the ridge crest.
    Continue scrambling for a few hundred feet along the left (west) margin of a slab (often snow-covered). 4th class climbing leads to the left (west) edge of this slab. A left-facing dihedral will be found on the left side of the ridge.
    Climb this dihedral, called the “V-pitch,” to the top of the ridge.
    Above the V-pitch, walk to a tower with some black rock, just left (west) of the crest. Climb the awkward, left-leaning crack/ramp from the black rock.
    Angle back right (east) on a ramp to regain the ridge crest.
    Another shorter tower on the crest is passed via cracks near its prow.
    Walk to the right (south) side of the summit block. Follow the 4th class trail through boulders to the summit."
   
Descent:
    "DESCENT FROM THE SUMMIT follows the upper half of the Owen-Spalding route. One should be familiar with this route to facilitate descent. From the summit, scramble west for a short way before angling left (southwest) across the fall line of the slabs. The Enclosure summit is a good point of reference to head toward. A short traverse left on a ledge leads to a one-rope rappel anchor at the top of the often-icy Sargent’s Chimney.
    Rappel here, or downclimb 5th class just north of the rap anchor: climb down a short “box” dihedral and step north to ease down to a platform, then walk 10’ south back toward the chimney and downclimb another short section to enter the chimney, where the scrambling gets easier. Continue down and left toward the Enclosure summit.
    Another rappel anchor will be found by looking left (south) at the edge of an outcrop directly above the Upper Saddle. A recently installed, bolted, two-rope rap anchor is 6’ north of the original slung horn rappel station. IMPORTANT: The slung horn rappel is 30m only when the rope is draped over the SOUTH edge of the platform (south is to your right when facing the summit).
    If any doubt exists, use two ropes, or use the alternate rappels a short distance to the south and descend a gully via two one-rope raps.
    From the lowest notch on the Upper Saddle, take a trail south down the broad gully, staying right of the major central rib. Do not descend the gully bordering the Grand (Wall St. Couloir). Lower down, another gully (Idaho Express) starts heading farther right along the base of the Enclosure; avoid this as well. Stay right of the main central rib to find the easiest path."

With afternoon thundershowers a threat, we wanted to get an early start on our climb of the Complete Exum Ridge. Here's a photo taken in the early morning darkness as we got ready. Exposure: 30 sec, f/7.1, ISO 250.
The standard start to the Exum Ridge is via a ramp from the right. We ended up traversing past the ramp and scoped out a number of dead-end ramps before we realized we had gone too far and backtracked to the correct ramp shown in this photo. I suppose we should have paid more attention to the nice cairn at the base of the ramp.

Looking up the Pitch 1 chimney of the Lower Exum Ridge of Grand Teton. (Photo by Mark Thomas.)
Middle Teton in morning sun as seen from the base of the first pitch of the Lower Exum Ridge of the Grand Teton.
By the time we had racked up and started climbing the first pitch, lighting on the Middle Teton had changed dramatically.
Looking up the Lower Exum Ridge of the Grand Teton from the belay between Pitches 2 and 3.
L: Mark leading the famous "Black Face" (Pitch 5) of the Lower Exum Ridge. The climbing is steep and sustained, and from below it looks more difficult than its 5.7 rating, but the rock is solid and the holds are good. A very fun pitch!

R: My mom climbing the Black Face in 1982. I took the photo of Mark at this same location.

L: Another photo of Mark on the Black Face, climbing where my dad is in the photo on the right. They even clipped the same piton.

R: My dad climbing the Black Face in 1982.

A nice view of the Lower Exum Ridge from the top of the Black Face. (Photo by Mark Thomas.)
Old pin on the Black Face pitch.
Old piton on the Black Face pitch.
Yellow-poncho-cloaked Mark at the belay between the Lower and Upper Exum routes on the Grand Teton. The final pitch was quite slippery when I climbed it, so it was fortunate that the rain held off until the moment Mark topped out at the belay ledge. Despite the rain, we decided to keep on climbing towards the summit, since the Upper Exum is easier climbing and was also familiar terrain (we had both climbed the Upper Exum on previous trips).
Mark: "I think it goes up." On the Upper Exum Ridge of the Grand Teton.
Mark climbing the crux (5.5) Friction Pitch on the Upper Exum Ridge.

Continuing up. Except for the Friction Pitch, we simulclimbed the Upper Exum. (Photo by Mark Thomas.)
L: Teton Bill's summit photo.

R: My parents (my dad Marty on left, my mom Sue on right) and friend Ralph (middle) on the summit of the Grand Teton thirty years previous to our trip.

The standard descent of the Grand Teton is via the Owen-Spalding route. Here Mark is making the first rappel (single rope) down Sargent's Chimney.
L: The second rappel of the standard descent is on a bolted anchor. It is a free-hanging rappel that requires two ropes. There are 1-rope alternatives, but I am not sure where these anchors are.

R: In 1982, the long rappel was not bolted and a bit off to the side.
Fresh snow on the Enclosure.
After a climb, just use your topos as toilet paper. Courtesy and park regulations would suggest packaging it all in a WAG bag.

DAY 3:

Move camp to the shoulder of Mt. Owen via the Valhalla Traverse.


Route overlays, Valhalla Traverse, by Mark Thomas:

Route description, Valhalla Traverse:
Text from  "A Climber's Guide to the Tetons" by Ortenburger & Jackson:

    "Because one of the principal uses of Valhalla Canyon is to approach the west or northwest routes on the Grand Teton or the north routes on the Enclosure, the discovery (on July 25, 1960, by Leigh and Irene Ortenburger) of a completely different route into the uppermost canyon via the Lower Saddle has proved to be both convenient and popular for experienced climbers. This access route, the Valhalla Traverse, requires only three to four hours, allowing one to camp at the Lower Saddle and return to the same camp after completing one of these climbs. This traverse is a serious undertaking, as even in the driest of conditions one can expect to find ice and wet rock. In certain sections the rock is of the poorest quality, and belay anchors and protection are difficult or impossible to obtain.
    From the Lower Saddle it should be possible to see the large cairn constructed at a principal step on the crest of the southwest ridge of the Enclosure; for the convenience of others, such cairns should be maintained. Hike north up the main trail from the Saddle and veer off to the west (a small trail can be found) at a point about halfway to the Black Dike. Contour around and down into a gully of red rock. Follow a faint trail across this gully and around two small ridgelets and then up the final gully which leads to the cairn (mentioned earlier) on the southwest ridge of the Enclosure. From the cairn contour north along the very broad shelf leading across the west face of the Enclosure to the far (north) end of this shelf at the northwest ridge of the Enclosure. Some icy snow patches will usually be encountered on this shelf. A bivouac site will be found at the base of the steep wall at this corner; water is usually available at the snow patches. The crucial continuation of the Valhalla Traverse ledge system starts at this corner. Continue around the corner for 75 to l 00 feet until a small ridgelet is encountered. The traverse becomes a very serious proposition from this point on. From this small ridgelet a small bowl can be seen immediately down and to the east. (In late season the climber will encounter in this bowl curious, yellow, muddy sand with the texture of wet cement; in early or late season the bowl will contain snow or even water ice.) Here the route splits depending on one's objective.
    If one wishes to gain access to Valhalla Canyon itself or the west face of the Grandstand for routes such as the North Ridge, West Face, and Northwest Chimney of the Grand Teton, climb carefully down into this bowl. At the bottom of the bowl a narrowing, scree-and-ice-covered ramp will be seen descending down and to the east. Continue (with great caution) down along this ramp to its lower end, where an expanse of ice or snow must be crossed to gain the shelves leading toward the Grandstand. This snowfield (in late season this will be ice) is immediately beneath the Enclosure Ice Couloir and the fall line of the Black lee Couloir on the north side of the Upper Saddle. Beware of rockfall at this point. Cross as rapidly as possible to the benches directly west of the Grandstand, where the selected ascent route can be started.
    If the objective is to descend into Valhalla Canyon, proceed down to the end of the ramp mentioned above and then down and across the ice/snowfield beneath the Black Ice Couloir (rockfall hazard). Continue several hundred feet down toward a broad, relatively flat promontory. From the promontory, scramble down to the northeast into the West Gunsight Couloir, the snow chute that descends from Gunsight Notch. Take the snow chute or the rocks along its southern edge all the way down to the floor of the Valhalla Canyon. Note that a high bivouac site is located 200 feet to the north along the base of the wall that forms the northern boundary of the snow chute."

The next day we packed up our Lower Saddle camp and embarked on a traverse around the west side of the Grand Teton towards Mt. Owen. The plan was to carryover Mt. Owen (via Serendipity Arête) and then the North Ridge of the Grand Teton back to the Lower Saddle a couple of days later. The traverse (which starts from the Lower Saddle) is called the Valhalla Traverse, which is notorious for being rather sketchy (see description above).....
(Photo by Mark Thomas.)
Here I am at the "principal step on the crest of the southwest ridge of the Enclosure" with the "large cairn" noted in the guidebook description. The Valhalla Traverse is pretty tame up to this point. (Photo by Mark Thomas.)
Now the Valhalla Traverse has attained its sketchy quality. Here is a photo of a narrowing, scree- (and sometimes ice-) covered ramp descending down and to the east. Due to the looseness and fatal consequences of a fall, we belayed this and set somewhat decent protection along the way for the follower. (Photo by Mark Thomas.)
The final section of the Valhalla Traverse towards Valhalla Basin involves crossing below the Black lce Couloir. Just before we were preparing to cross, a giant ice block came barreling down, confirming our assumption that this was definitely not a good area to take a snack or water break.
   The photo also shows the ramp we had descended.

As we reached the north end of the Valhalla Traverse, we were able to see the next day's objective: Serendipity Arête on Mt. Owen, which is on the skyline in this photo.
We established our camp at the north end of the Valhalla Traverse, on the shoulder of Owen below Serendipity Arête. There was water running down a nearby couloir that drained from Gunsight Notch on the ridge between Owen and the Grand Teton.

Just as we established our camp, the stormy weather that had been threatening us all day finally moved in full force. It was quite the show of rain, hail, snow, and gale-force gusts. This is our view from the tent during one of the calmer periods of the storm.     
The storm provided a good excuse to do some logic puzzles.

DAY 4:

Carryover Serendipity Arête (IV, 5.7/5.9) of Mt. Owen. Camp near summit.


Route overlays, Mt. Owen Serendipity Arête (IV, 5.7/5.9), by Mark Thomas:

Route description, Mt. Owen Serendipity Arête (IV, 5.7/5.9):
Text from "Teton Rock Climbs" digital guide:

    "Utilize the West Ledges route out of Valhalla Canyon to ascend to a point below and right (south) of the Serendipity Arête.
    Scramble up and left (north) toward the base of the arête. An easy but exposed traverse to the north begins about 200’ below the route on the southwest corner of the arête. This traverse ledge contours around the corner and onto the west face of the broad lower arête.
    Follow the ledge as it passes below and a bit beyond (north of) the huge roofs of the enormous left-facing dihedral. Scramble up and right until directly below the huge roof. Some exposed, easy 5th class terrain will be found on this approach.
    PITCH 1 The first pitch goes around the right corner of the arête, at the level where the steep rock right of the enormous roofs meets the slab.
    Traverse right (south) on easy 5th class cracks and ledges until a few feet right of plumb-line below the large roofs.
    A crack system leads up to a hand traverse (5.7) directly below the small roof just right of the huge roofs. Traverse around the right corner and belay on a ledge.
    PITCH 2 This long pitch heads straight up above the belay through an initial broken section to a short hand crack (5.7) on the right side of a very wide and shallow chimney.
    Higher in the wide chimney, climb the right (south) crack (5.6) instead of the wider left crack.
    Step to the left side of a leaning slab in the widening chimney. Climb easy 5th class directly up the slab, or the trough left of the slab. Belay above the slab.
    PITCH 3 Turn left (north) above the leaning slab and scramble to another slab.
        Avoid a steep hand crack just left of the slab by scrambling directly up the easy 5th class slab.
    Finger cracks (5.6) through a bulge above the slab lead to easier terrain.
    Move the belay over 4th class boulders to the top of the ridge crest. Stem across a horizontal chimney to reach the crest above the First “Tower.” One may avoid the knife-edge ridge crest by traversing below the crest to the Second Tower.
    PITCH 4 Set the belay about 40’ down from the notch on the south side of the Second Tower, on a small platform overlooking a steep gully. Climb easy cracks up and right in white rock to reach black rock.
    Go straight up the blocky, black rock.
    Switch cracks as needed on the steep terrain (5.7). Climb up and left of a roof (5.7) to reach easier white rock. A short scramble leads to the base of the next tower.
    PITCH 5 Scramble over a layer of black rock to reach a crack in the crest of the Third Tower.
    Climb the crack (5.6) to gain the top of this short tower.
    Scramble over 3rd class ground to move the belay to the north side of the Fourth Tower. Set the belay under the first crack on the north side of the tower on a loose and exposed ledge. This crack lies within 15’ of the crest.
    PITCH 6 Climb the obvious crack that leans slightly left (5.7).
    Step right above the crack and follow a flared crack (5.6) into easier terrain.
    Scramble over 4th class ground to the end of the rope, and belay.
    PITCH 7 This long pitch continues scrambling up and slightly right (south) of the ridge crest of the Fourth Tower.
    PITCH 8 Keep scrambling (easy 5th class) to the top of the tower. Move the belay down to the notch below the summit ridge, and below the crux chimney of the route.
    PITCH 9 Stem the chimney (5.9) to reach a jug, clip a piton, then continue up the right wall to a belay ledge.
    To avoid this chimney, downclimb or rappel about 30’ down from the notch (southwest) to gain an easy 5th class ledge system that traverses south. Scramble up an easy 5th class chimney, then head up and slightly left to reach the Koven Chimney that splits the west side of the summit block."

The weather had improved during the night, so we headed up to climb up and over Mt. Owen via Serendipity Arête. Getting to the base of the route involved a couple of hours of scrambling. We eventually roped up since we encountered a fair bit of low 5th class and it had some fresh snow on it from the storm the day before.

Light of the rising sun on the Grand Teton as seen from the lower Serendipity Arête on Mt. Owen.
Fresh ice on the "easy but exposed traverse" just below the official start of the route. Not so easy with fresh ice!

Throughout the trip, tricams often made good anchors in the Teton rock. In fact, they proved to be better than cams in icy cracks, like the one in this photo.  (Photo by Mark Thomas.)
Mark on the 5.7 hand traverse of Pitch 1. This was a pretty cool pitch, perhaps my favorite of the route.

Steph climbing a face section about midway up Serendipity Arête on Mt. Owen. (Photo by Mark Thomas.)
Steph walking across the knife-edge ridge at the First Tower. (There are four "Towers" on the route). (Photo by Mark Thomas.)
Second Tower.

Steph on the airy traverse that wraps right at the base of the Second Tower. (Photo by Mark Thomas.)
Up up up... (Photo by Mark Thomas.)
Third Tower.
Fourth Tower. (Photo by Mark Thomas.)
...up up up....
The crux of the route is a chimney just before the final scramble up the last summit tower. This chimney is rated as 5.9 or 5.7 A1 if you decide to pull on a sling attached to a piton. The crux section is actually more of an off-width than a chimney. Packs would make this pitch pretty difficult, so we hauled our packs here.
Billy got in on the hauling action.
Easier terrain above the crux chimney on final summit tower of Mt. Owen.

We arrived on the summit of Mt. Owen just after sunset. The fresh snow on the route, cold temperatures, and pack-hauling had slowed us down a bit more than we would have liked. We would not make it to the Grandstand below the North Ridge of the Grand Teton tonight. (Photo by Mark Thomas.)
We had spotted a number of bivy sites just below the summit on Owen's west side. We were able to squeeze our tent into one relatively-level spot. Now, the snow that had slowed us down came in handy for melting for drinking and cooking. We had planned on a potential extra night due to weather, so we had enough food and fuel.
Teton Bill secures the warmest spot in the tent.

DAY 5:

Traverse the ridge between Mt. Owen and Grand Teton and establish camp at the Grandstand.


Route overlays, Owen to Grandstand Traverse, by Mark Thomas:
   

Route description, Owen to Grandstand Traverse:
Text from "Teton Rock Climbs" digital guide and "A Climber's Guide to the Tetons" by Ortenburger & Jackson:

Owen to Gunsight Notch via upper Koven Route and West Ledges:
    "Downclimb the west (Koven) chimney from the summit to reach the upper south ridge that points toward the North Ridge of the Grand. Scramble down the south-facing cleft of the Koven Route to reach a ledge system on the left (east) side of the south ridge.
    Do not be tempted into rappelling west from one of several notches. Rappel slings indicate others’ errors. Downclimb steep 4th class around the right (west) side of the first step in the ridge.
    4th class ledges on the west side of the ridge lead south to a major notch in the ridge, and a gully descending to the west."

Gunsight Notch to Grandstand:
    "If one is traversing to the Grand from Mount Owen, then the top of the Grandstand can be gained using a different and better option out of Gunsight Notch. From the notch climb down to the left (east) on ledges for about 100 feet to the base of a crack system that leans to the right slightly, leading to a small notch. Ascend this crack (5.7) for 80 feet on excellent rock up to the notch. Scramble for 400 feet to the top of the Grandstand."

The goal of the day was to get from the summit of Owen to the Grandstand at the base of the North Ridge of the Grand Teton. The traverse is not trivial, involving some rappelling and low 5th class climbing. Even though it would take just half a day to do the traverse, we would camp at the Grandstand to give ourselves a full day to climb the North Ridge.
    This photo shows the Grand Teton glowing in the morning sun. The Grandstand is the flattish area on the North Ridge just above the centerline of the photo. The traverse to the Grandstand starts on the east (left) side of the ridge and moves to the west (right) side of the ridge before Gunsight Notch. (Photo by Mark Thomas.)
Coming from the north, we made three single-rope rappels into Gunsight notch.


Yellow lichen on rock.
There are a few options for gaining the Grandstand from Gunsight Notch, but the safest and most enjoyable seemed to be to climb straight up and south out of the notch. This involved two pitches of enjoyable and relatively solid low 5th class to 5.7 climbing.

Once out of Gunsight Notch, we traversed easily along the east side on ledges until we were below the Grandstand, at which point we headed up slabs and scree and 3rd-4th loose crap until we gained the Grandstand. (Photo by Mark Thomas.)
The bivy site on the Grandstand has great exposure and a grand view (Owen in distance in this photo). Better yet, it fits a small tent! (Photo by Mark Thomas.)
We arrived at the Grandstand camp at 1 pm, too late to continue on with the North Ridge but early enough that we had plenty of time to just sit at camp. Mark took the opportunity to make topos of our routes so far.
Mark walking up the Enclosure. The North Ridge of the Grand Teton towers above.
More photo fun near our Grandstand bivy. (Photo by Mark Thomas.)
Who needs comfortable rocks to sit on at camp?
Billy practicing his chimney moves for the North Ridge of the Grand Teton.
Then peak-bagging Billy proudly summited the tent.
Rock shadows on the tent wall. One of the rocks is rather furry.
Alpenglow on Mt. Owen from the Grandstand bivy. Serendipity Arête is on the left skyline.
Alpenglow Billy.

DAY 6:

Carryover the North Ridge (IV, 5.8) of Grand Teton and descend to Lower Saddle. Camp at Lower Saddle.

 
Route overlays, Grand Teton North Ridge (IV, 5.8), by Mark Thomas:

Route description, Grand Teton North Ridge (IV, 5.8):
Text from "A Climber's Guide to the Tetons" by Ortenburger & Jackson:

    "From the top of the Grandstand proceed up and south to a large block for the first belay. Climb behind the block and then out and left (5.7) past a few old fixed pins on steep rock for 20 feet or so. Continue angling up and left to a steep gully. Ascend the gully and belay just below an abrupt step. The next pitch continues up and right over steep black rock (5.7) to the belay at the base of the famous Chockstone Chimney The final portion of this lead often involves climbing a small ice sheet to the bottom of the chimney. Climb up the first part of the Chocks tone Pitch on gradually steepening rock until it is possible to swing into the subsidiary chimney on the left (5.8) and then gain the top of the main chockstone. One can also climb up and over the chocks tone using hand jams and then stem across to the opposite wall (5.8). The next lead is an enjoyable large chimney (5. 7) in an area of black rock and it brings one to the 80-foot slab pitch. This slab pitch can be extremely difficult when coated with ice, so consider weather conditions carefully before attempting this climb. Climb up and then to the left across the slab (5.7) to the very exposed corner of the ridge and then continue up and right to the west side of the ridge. This point marks the west end of the Second Ledge of the north face. Three possibilities for the completion of the climb are now present: (1) Two obvious chimneys of moderate difficulty lead up just to the right (west) of the ridge crest to a point where the Fourth Ledge on the north face joins the north ridge. If this alternative (the most direct) is chosen, the remaining fairly difficult pitch ascends a 25-foot face just to the right of the crest. Above this pitch, easy scrambling leads to the summit. (2) One can avoid the upper ridge by traversing right (south) toward the Great West Chimney and from there scrambling quickly to the summit. (3) If it is late or the weather is bad, a fast descent can be made without going to the summit, by making a traverse almost horizontally south all the way over to the OwenSpalding route. It may prove easier to climb about 100 feet before making a slightly descending traverse past the Great West Chimney to the Crawl of the Owen-Spalding route."

Italian Cracks Variation (IV, 5.7):
(Because of ice in the chimneys we had to do this variation)
    "This important variation of the original North Ridge route lies around the corner and out on the north face, providing an excellent alternative for the famous Chockstone Pitch. Since it is a crack climb, however, the character of the North Ridge route is then completely changed. If one has climbed the original route, this variation on good rock is a recommended option for the second time. Climb the first two pitches of the original route up from the top of the Grandstand to a large belay ledge. Now move out left (east) along this ledge to the base of a crack in the wall above. Three pitches, almost straight up a sequence of cracks, now lead to the Second Ledge. The first lead of 150 feet includes the passage of a small overhang (5.7) just below the next belay ledge. Face climbing (5.7) up and to the right of a second short overhang makes up the second pitch. The third shorter pitch (70 feet) is easier face climbing onto the Second Ledge. Traverse right on the ledge to rejoin the standard North Ridge route at the corner."

Billy tied in and ready to tackle the North Ridge of the Grand Teton.
At a glance it appears as if a climber fell head first into this crack. Not sure what the story is behind these rather nice boots and crampons we found just below the North Ridge of the Grand Teton.
Mark leading up the first pitch of the North Ridge. From below and basking in the morning sun, the route looks deceptively warm and dry....

The detached flake on the first pitch of the North Ridge. (Photo by Mark Thomas.)
But what we couldn't see from below was all the fresh snow and ice on the route. Most of it had probably been deposited a couple of days before during the big storm that blew through when we were camped below the base of Mt. Owen. We wondered if we would have to bail, but figured that even in these conditions it was likely easier/safer/quicker overall to just continue up and over the Grand Teton than to try to descend the north side and traverse back to our gear at the Lower Saddle. (Photo by Mark Thomas.)
Due to the icy/snowy conditions on the North Ridge, we decided to traverse east towards the Italian Cracks variation (5.7, about the same difficulty as the chimneys) to avoid the standard-route chimneys which are noted to become icy after a storm.

Looking up the Italian Cracks variation on the North Ridge. Even these had some ice in them at times, but they were bound to be less icy than the chimneys on the regular route. (Photo by Mark Thomas.)
Oh well, too cold to want to drink anything anyway. (Photo by Mark Thomas.)
You know it's cold when you arrive at the belay to find your climbing partner using the rope as a blanket. (Don't be deceived by the sunny weather, it was cold and very windy, perhaps some of the coldest conditions I've rock climbed in.)
It's kind of difficult to get a 5.7 hand jam when the 5.7 cracks are full of ice.
Near the top of the Italian Cracks variation, we traversed a bit to the right to avoid some ice and ended up looking down upon the regular route's slab pitch. When we saw the sheet of ice coating the slab draining into the chimneys below, we were glad we had not gone that way!

We were so cold we took a break on the Second Ledge to brew up some hot water. (Photo by Mark Thomas.)
Hot water never tasted so good.
Back on the regular route above the Italian Cracks and heading up the final section of chimneys. Wondering if we will need to use the crampons after all....

Yep, ice in the upper chimneys. Here the ice has enveloped a sling. It was a bit difficult to set good protection with all the cracks and crevices filled in. (Photo by Mark Thomas.)
The higher we got, the more ice there was in the cracks and chimneys...
Last pitch of the North Ridge. Needless to say, we abandoned our plans to climb the N Face on this trip after seeing these conditions. (Photo by Mark Thomas.)
Finally, the final scramble to the summit of the Grand Teton! (Photo by Mark Thomas.)
Mark and Billy after a long and tiring day on the North Ridge of the Grand Teton.
Chimneys and puffy jackets don't mix well. Test case #1.
Chimneys and puffy jackets don't mix well. Test case #2..
Descending the lower Owen-Spalding route back to the Lower Saddle. Motivated by visions of steaming hot chocolate, we got down to the Saddle in just over an hour from the summit, knocking a whole hour off our descent a few days previous.

DAY 7:

Pack up camp and do the Black Dike Traverse and climb the first half of the SW Couloir (II, 4th) route on Teewinot. Camp high on Teewinot and do night photography of the Tetons.


Route overlays, Black Dike Traverse, by Mark Thomas:

Route description, Black Dike Traverse:
Text from "A Climber's Guide to the Tetons" by Ortenburger & Jackson:
(described in reverse from our route)

    "It is frequently desirable to return to a camp on the Teton Glacier or Surprise Lake from the Lower Saddle via the Black Dike, which cuts across the south side of the Grand Teton; this interesting and direct traverse is also occasionally used from Glacier Gulch to reach the Lower Saddle before an ascent of the Grand Teton. To take this Black Dike Traverse, ascend the long snow couloir leading southwest out of the bowl between Disappointment Peak and the Grand Teton; an ice axe is essential here. This couloir ends at the Dike Col between Pemmican Pillar and Okie's Thorn; the col is on the divide between Glacier Gulch and Garnet Canyon. To continue to the Lower Saddle, make an upward crossing of Teepe Glacier to Teepe Col, which separates Teepe Pillar from the southeastern cliffs of the Grand Teton. In late season the snow covering may disappear and this "glacier" (technically, just a snowfield) will show bare ice. The dike itself passes beneath the glacier and reappears at Teepe Col. Now follow the dike to the Lower Saddle, crossing over Glencoe Col on the way. In general, the loose rock encountered on this traverse is most stable at the extreme right (north) edge, immediately beneath the walls of the Grand Teton, and a faint trail can be found there. There are no great difficulties in this traverse, but it is a bit time-consuming, and an ice axe and the knowledge of how to use it are definitely recommended for safety. Early in the day, when the snow is frozen hard, crampons may be found useful on both Teepe Glacier and the Dike Col Couloir."

The result of having a structural engineer set up the tent (it's windy at the Lower Saddle, actually it's windy in the Tetons in general).

Mark explains his structural reasoning: "The aim is to provide a transverse restraint to the top of the tent to reduce wind-induced oscillation. However, the clients desired to keep the sun platform to the east clear of any structure.
     The solution was to create a tensegrity structure using a tension-only member (alpine sling), anchored to the rock with an SLCD, and a compression-only member, (telescoping hiking pole). Uplift from the wind would cause the hiking pole to fall off of the rock, so the restraints of the compression member were reinforced by post-tensioning the system by telescoping the pole in order to reduce uplift on the compression member. The tent is rigid enough against longitudinal oscillations that no external out-of-plane restraints were necessary."
We packed up camp and began traversing around the south side of the Grand Teton via the Black Dike Traverse. In this photo, we are approaching Teepee Col.
Crossing Teepee Glacier after passing through Teepee Col (Teepee Pillar on left). The Black Dike runs through the cols on this route, hence the name of the Black Dike Traverse. (Photo by Mark Thomas.)
Heading down and east from Dike Col on the Black Dike Traverse. This time of year, it is mostly just loose rocky 3rd class scrambling.


Route overlays, Teewinot Southwest Couloir (II, 4th) and East Face (II, 4th), by Mark Thomas:

Route description, Teewinot Southwest Couloir
(II, 4th) and East Face (II, 4th):
Text from "A Climber's Guide to the Tetons" by Ortenburger & Jackson:

SW Couloir (II, 4th):
    "The usual approach to this route is from Amphitheater Lake, but the direct route up Glacier Gulch can also be used. From the lower section of the Teton Glacier, climb out over the north edge of the terminal moraine where it abuts against the walls of Mount Owen. Contour east for several hundred feet before turning up to the high, flat plateau west and slightly south of the summit of Teewinot. Some of the couloirs leading to this plateau are difficult and require careful routefinding. Once the plateau is reached, climb the easy slopes to the northeast to reach the small west ridge of the first large tower south of the true summit. Some scrambling is necessary to cross this ridge to the north and to reach the couloir that leads east to the large main notch just south of the summit. Avoid turning up from the plateau too soon, that is, too far south, or else the south ridge of Teewinot will be reached south of the large tower. This final tower of the south ridge is separated from the summit by the large notch and is somewhat difficult. From the large main notch descend easily 100 feet down the east side and reach the summit by the East Face route. Or, instead of climbing all the way up to the large notch from the west, from slightly west of and below the notch climb northward to the summit ridge only a short distance east of the summit. The rock here is steep but not difficult."

East Face (II, 4th):
(described in reverse from the way we did it as a descent)
    "From the vicinity o[Jenny Lake the most prominent mountain of the Teton Range is Teewinot, and its east face is the most obvious route, attracting many climbers. For some this route serves as a good one-day conditioning climb, requiring the ascent and descent of 5,600 feet. In early season experience in the use of the ice axe is required to climb this route safely From the Lupine Meadows trailhead take the Apex trail ( unmaintained) leading west from near the north end of the parking area. This trail continues past slabs and through the trees, and after some 18 switchbacks it leads to the Apex, the top of the triangular, treed, lower east slope of Teewinot.
    From the Apex the climbers' trail continues up and right (north) to get into the main couloir, passing first below and then on the north of the Idol and the Worshipper. Climb either up the snowfields, avoiding the center (where rockfall may occur), or up the rocks on either side of the couloir. In early season even this second alternative is mainly covered with snow and will involve step kicking. In late season when the snow remnants can be avoided it is a scramble up scree and ledges with an occasional short chimney. During most of an ordinary season, the climb is somewhere between these extremes, but careful routefinding is essential. Keep in mind that the summit is to the right (north) as the main notch in the summit ridge is approached. About 100 feet below this notch, turn right up easy ledges to the summit. Cross a short knife-edge to the summit monolith. On the long descent continual care must be taken with the small, exposed scree-covered ledges on both sides of the main couloir."

Now that we had decided not to climb the North Face of the Grand Teton (the icy conditions on the North Ridge had given us little hope for enjoyable conditions on the North Face), instead of establishing camp on the Teton Glacier we headed for a high camp on the southwest shoulder of Teewinot Mountain.
    This photo shows the terrain on the SW Couloir route of Teewinot. Our route description ambiguously noted that choosing a couloir to the plateau "requires careful routefinding." For those who like having a more definite description to follow, I would advise: "go up above the snow in the photo and then cut 90° left into the first major gully."

Based upon an hour of interactive real-time route-finding research, we determined that this gully is the "best/easiest" SW Couloir for gaining the plateau on the southwest shoulder of Teewinot. As mentioned above, it is actually the first major gully one comes to on the standard ascent.

Since it was late in the season, the upper slopes of Teewinot would be dry and we had to carry up an evening's and next day's worth of water. Inspired by hot chocolate and coffee, I packed 9 L (20lbs) of water up. My pack didn't quite meet my physiotherapist-prescribed-sub-30-lbs load for my first summer back in the mountains after my broken leg. (Photo by Mark Thomas.)
Cool rock on Teewinot. To see this particular rock outcrop, you need to be quite far from the "best" ascent route we discovered.
We established high camp on the plateau on the southwest side of Teewinot. Mark's Google Earth research previous to our trip had shown that this location would be a great place to see all the summits we had climbed on the trip (Middle Teton, Grand Teton, Mt. Owen, Teewinot itself) as well as be a great place to do some night photography (interesting historical note: I had first "met" Mark in September 2009 when he contacted me with some night photography questions).
   
Here the late afternoon sun is shining over the North Ridge of the Grand Teton. Mark was right, this was a nice view. Good thing we had carted along all of those extra batteries for this last night of photography!
Star trails over Teewinot. Exposure: 20 min, f/6.4, ISO 800.
Starry night over a glowing camp on the SW shoulder of Teewinot. Grand Teton and Mt. Owen in distance. Exposure: 15 min, f/7.1, ISO 800.
Turns out Billy is a nocturnal creature, which explains his glassy stare during the daylight hours. Exposure: 3 min, f/8, ISO 250.
These clouds seemed to form from and radiate out from behind the Grand Teton and Mt. Owen. Exposure: 10 min, f/7.1, ISO 250.

DAY 8:

Carryover the Southwest Couloir (II, 4th) route of Teewinot and descend the East Face (II, 4th) route to the Lupine Meadows Trailhead.

Brewing the morning Via. Grand Teton and Owen in distance. 15 second exposure.
Morning sunlight on the Grand Teton and Mt. Owen.
Another photo of morning light on the Grand Teton and Mt. Owen, with our shadowed camp in the foreground.
Heading up the SW side of Teewinot from camp. This was an easy hike along a climbers' path to the main col, where we intersected the East Face route and scrambled Class 3 and 4 to the summit. (Photo by Mark Thomas.)
Steph hanging out on a block near the summit of Teewinot. (Photo by Mark Thomas.)
Mark on the wonderfully-exposed summit of Teewinot. Teewinot has a great view of the North Face of the Grand Teton.
Mark downclimbing the short Class 4 section on the East Face route of Teewinot.

Hiking down the East Face of Teewinot to the Lupine Meadows parking lot. This is a popular accessible day climb, so the trail is good.

My stuffed buddy Billy in 9 days worth of PowerBar wrappers nest.

DAY 9:

Climb the Southwest Ridge (II, 5.7) of Symmetry Spire car-to-car from Jenny Lake, trying to recreate photos my parents had taken when they climbed the route in 1982.


Route overlay, Symmetry Spire SW Ridge (II, 5.7), by Mark Thomas:

Route description, Symmetry Spire SW Ridge (II, 5.7):
Text from "Teton Rock Climbs" digital guide:

    "APPROACH Walk around the north side of Jenny Lake to the “horse trail” located a few hundred feet north of the west shore boat dock, or take the boat from South Jenny Lake.
    Turn right onto a climbers’ trail just before the Symmetry snowmelt stream (dry in late season) crosses the horse trail. Follow it through dense undergrowth and over talus to the headwall above.
    Gain the top of the headwall well right of the seasonal falls by scrambling up the 4th class left wall of a “dead end” gully.
    Traverse left along the cliff top and continue on the steep trail as it crosses the early to mid-season runoff stream. Head up to the shattered rock of the upper gully, staying left to avoid the large snowpatch in early to mid-season.
    Scramble up and right at this point to reach the apron of the buttress. The Southwest Ridge is the left (west) side of the triangular buttress.
    PITCH 1 The route starts just right of the base of the ridge very near a tree. The upper pitches can be seen from the base of the route, and should be noted for routefinding higher on the climb. Incipient cracks and face climbing lead the way to the first dihedral of the route.
    The first pitch ends near the base of the first definite dihedral of the route. This open dihedral is 30’ to 40’ in length.
    PITCH 2 Climb the open dihedral (5.5) and continue above via an easier crack to a steep but broken left-tending ramp.
    A confusing “dihedral layer” will be visible from this left-tending ramp. Stay on the left-tending ramp until nearly on the ridge crest to pass through this section.
    The route passes through the dihedral layer just right of the ridge crest via short double cracks (5.6).
    Continue up on easier, blocky terrain and belay at a clean dihedral capped by a triple roof.
    PITCH 3 This clean dihedral has been called the “nose” pitch. The crux of the climb (5.7) is the shallow, right-facing, clean dihedral just right of the ridge crest under the “triple roofs.” One may choose to avoid the crux by stepping down and right about 15’ to climb a crack in a less aesthetic left-facing corner (5.6). Additionally, one may step right from the shallow dihedral to join the 5.6 variation.
    Pass the triple roofs on the right and continue up on easier rock
    Step right under a minor roof: the ridge crest will be seen above. Continue up on jumbled but mostly solid features to a clean upward right-tending ledge in light-colored rock, and belay.
    PITCH 4 Pull through a small cleanly fractured blocky roof (5.6) of light-colored rock right above the ramp. This roof may look harder than it is.
    Continue up easy 5th class in the light-colored rock layer.
    Climb through a dark-rock layer with an easy crack to yet another light colored layer.
    Climb to a trough behind the left side of a flake right of the crest in the next light rock section. Follow a steep, left-tending ramp in the dark layer just above the light rock flake until the prominent flake feature of the last pitch is seen, and belay.
    PITCH 5 Steep, easy 5th class cracks and some face holds lead to the “flake” feature visible from below.
    Climb either the chimney (5.6) on the inside of the flake.
    Or the outside left of the flake, where an excellent crack (5.6) will be found. Exit right at the top of the flake.
    The climbing eases in difficulty above the flake. Continue up toward the top of the ridge crest.
    SCRAMBLE along the 4th class ridge to a pseudo-tower which blocks easy travel.
    Pass the small tower via an inobvious ledge just right of the notch in the ridge.
    Walk along the 4th class ridge to the summit ridge crest. To descend without reaching the summit, use an anchor for a one-rope rappel located in the notch at the base of the serrated summit crest. To reach the summit, a ramp leading to the summit crest starts about 50’ right (east) of the notch. The ramp traverses back up to the left to the crest.
    Scramble up the 4th class summit crest to the summit.
    DESCENT Regardless of the descent option taken from the summit ridge (rappel or scramble), the gully immediately west of Symmetry Spire provides access back to the base of the spire
    From the summit, walk down the north side toward Ramshead Lake for a short bit, following the climbers’ trail as it switches back to the left (west) toward the Southwest Couloir.
    Scramble down switchbacking ledges leading to the top of the Southwest Couloir.
    Walk down the gully toward the base of the spire."

Since we had an extra day because of having to forgo our plans for the now-icy North Face of the Grand Teton, we decided to climb the Southwest Ridge of Symmetry Spire, which my parents had climbed in 1982, their last summer of full-time climbing before I was born. The 2-hour approach began at Jenny Lake (either the north or south shore approaches work) and the followed a climbers' trail heading up the valley in the photo. The SW Ridge is on the skyline on the right side of the valley.

L: Symmetry Spire, with SW Ridge on left skyline and Durrance Ridge (another popular route) on right in front of shadow.

R: A photo taken by my parents when they climbed the SW Ridge of Symmetry Spire in 1982.

Steph leading off the first pitch on the SW Ridge of Symmetry Spire. (Photo by Mark Thomas.)
L: Looking up the first half of Pitch 3 (which I split into two pitches) on the SW Ridge of Symmetry Spire. (Photo by Mark Thomas.)

R: Thirty years ago, my mom climbed right past where I am waving in the photo on the left.


L: Climbing on Pitch 5 on the SW Ridge of Symmetry Spire. In the spirit of climbing the same route my parents climbed 30 years previous, I am wearing my mom's old pants and carried her ice axe and pack. (Photo by Mark Thomas.)

R: My mom climbing on the upper southwest ridge of Symmetry Spire. The roof above is identifiable in both photos.

I also brought along one of my parents' old hexes and placed that a couple of times on the route too.

Old pin on the SW Ridge of Symmetry Spire.
L: Me on the summit of Symmetry Spire. Owen and Grand Teton behind. For fun, I am wearing my mom's old pants and carrying her ice axe here. (Photo by Mark Thomas.)

R: My dad on the summit of Symmetry Spire 30 years previous.

Teton Bill on the summit of Symmetry Spire. Looks like he's starting to warm to Wyoming life.
Just like a peanut butter and jelly sandwich, yum.
The descent involves a scramble down the SW Couloir of Symmetry Spire. This would be steep and icy snow earlier in the summer (which explains why my parents had ice axes along on their climb, which were unneeded for us.)
We found a pullout to camp before Mark and I parted ways the next morning. It was nice spot—quiet without any other cars around.

Mark's Version of our Grand Slam Adventures

Mark has posted his detailed, multi-paged, heavily-graphiced version of our trip on SuperTopo.com. Check it out!.

Comments Pertaining to this Page / Trip Report

Useful beta. Updated route information. Corrections. Historical notes. Interesting facts. No fluff please.
Leave a Reply

Your email address will not be published. Required fields are marked *