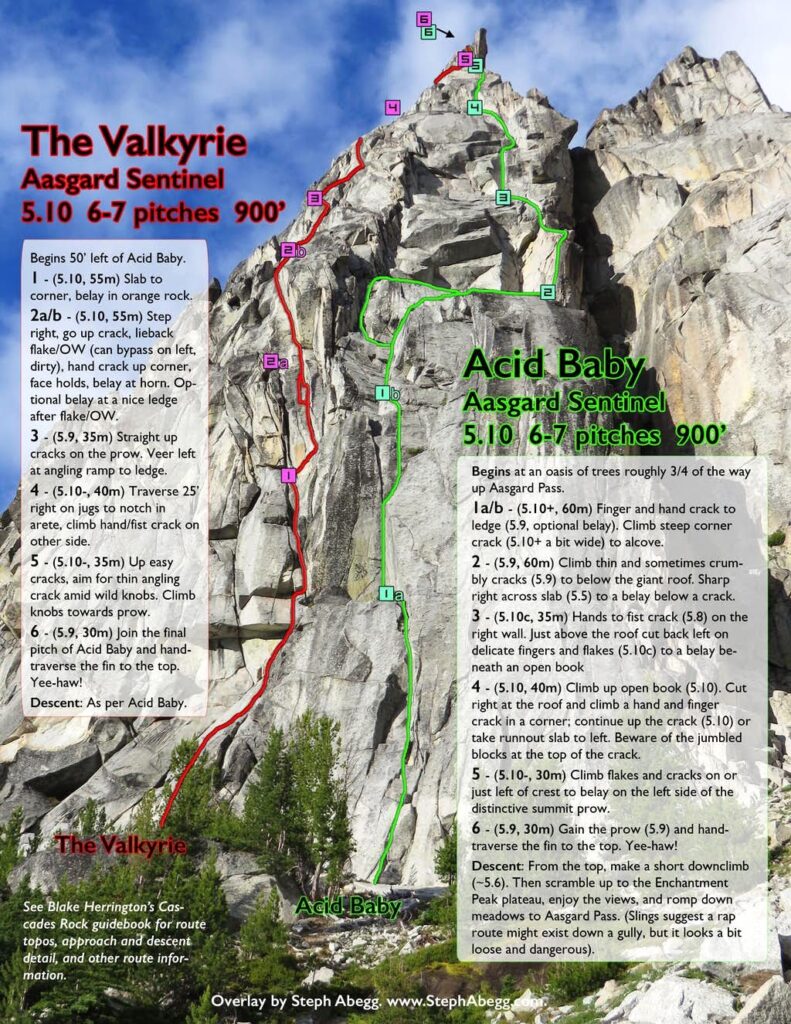
Pitch descriptions: (Pitch numbering as per Blake Herrington's Cascades Rock guidebook) | Photos: | Photo descriptions: | |
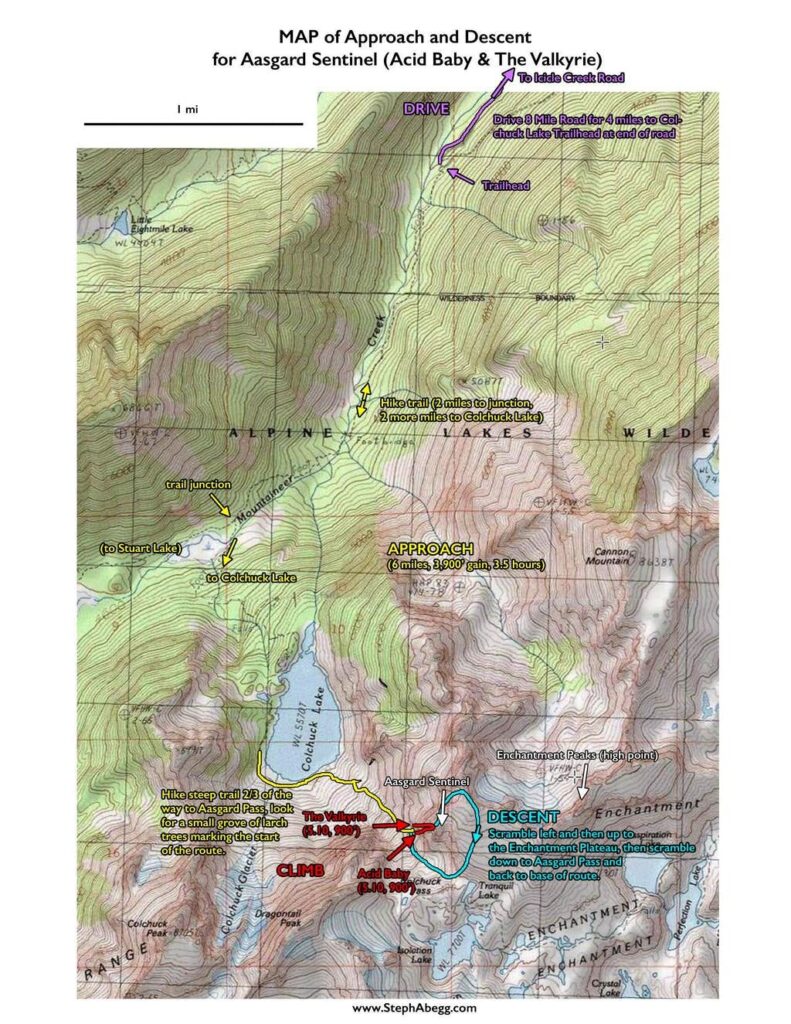
Approach | ~3 hours Begins at an oasis of trees roughly 3/4 of the way up Aasgard Pass, ~50ft left of Acid Baby. | a. Early morning at Colchuck Lake. Colchuck Balanced Rock massive is on the left. Aasgard Pass is on the right. Since it was August, there was no snow to deal with. b. I found a nut tool at the base of the route. Maybe from the 2012 FA? c. View of Dragontail from the base of Aasgard Sentinel | |
Pitch 1 | 5.10, 55m Slab to corner, belay in orange rock. | 1a. Janet starting up the slab of Pitch 1. The corner is above and right. 1b. Janet went a bit too high and left on the slab, and slipped while downclimbing and sliced a finger on the rough rock. She lowered, taped up, and went right back into the lead without batting an eye. Impressive! 1c. Janet leading the crux corner. The climber on the right side of the photo (is that a sword on his harness?) is on the first pitch of Acid Baby. 1d. A closer view of the corner on Pitch 1. The climbing is quite good, but difficult. We felt that the climbing on the route was pretty sustained 5.10 from the corner to the top of Pitch 2. 1e. Did I mention the rock is rough? Probably should take the belay jacket off when you climb this pitch. Along with the blood from Janet's finger, all evidence points towards a goose massacre on Pitch 1. Maybe by the guy with the sword. | |
Pitch 2a | 5.10, 30m Step right, go up crack, lieback flake/OW (can bypass on left, dirty), optional belay at a nice ledge after flake/OW. | 2a. Looking up at Pitch 2. This pitch goes right from the belay, then up a crack to layback/offwidth (a #5 cam might fit). There was just enough lichen on the rock that I was not trusting my feet to commit to a 10-foot unprotected layback, so I was able to step left and bypass the layback on dirtier but more protectable terrain. 2b. Looking down at Janet climbing the first half of Pitch 2. She is just below the layback/offwidth. Like me, she bypassed it by stepping left where the rope is in the photo. | |
Pitch 2b | 5.10, 30m Hand crack up corner, face holds, belay at horn. | 2c. Looking up the corner on the second half of Pitch 2. I set an intermediate belay at a nice ledge right below this corner. There is a steep handcrack in the corner. This is a sustained section but really good climbing. It makes sense to set a belay here, since the pitch is long and sustained and eats up enough gear that I pretty much used my whole rack on each half-pitch. 2d. Looking down the corner. 2e. Pitch 2 finishes with a bit of face. There are just enough holds to make it climbable. I recall that small- to medium- cams protected it well (I think I set the green and yellow and red aliens). | |
Pitch 3 | 5.9, 35m Straight up cracks on the prow. Veer left at angling ramp to ledge. | 3. Looking up the 5.9 cracks. This pitch had some of the most straightforward and easiest climbing on the route. Fun, non-heady climbing. | |
Pitch 4 | 5.10-, 40m Traverse 25’ right on jugs to notch in arete, climb hand/fist crack on other side. | 4a. Janet at the end of the rightward traverse at the notch in the arete. The traverse is quite juggy and not too hard. Witches Tower in background. 4b. This is a pretty cool pitch because you traverse across this face not knowing what you are getting yourself into (unless you read the route description of course), you get to the notch in the arete, and you look up and lo and behold there is a splitter hand/fist crack stretching up above you! | |
Pitch 5 | 5.10-, 35m Up easy cracks, aim for thin angling crack amid wild knobs. Climb knobs towards prow. | 5a. Looking up at Pitch 5. The pitch goes through the knobby face with the diagonal crack running across it. The climbing is fairly easy up until that face. 5b. Janet climbing the wild (and steep!) knobby face (I had set an intermediate belay just below). The technical crux of this pitch is probably around where the green alien is in the photo (midway through the crack), but the mental crux is the 15-foot unprotected lead through the steep knobs. The crack takes good gear. Our highest piece before the crack petered out was a 0.75 cam. A yellow alien is nice to have between the green alien and 0.75 cam. 5c. View of Dragontail from the belay below the knobby face. | |
Pitch 6 | 5.9, 30m Join the final pitch of Acid Baby and hand-traverse the fin to the summit. Yee-haw! | 6a. Me leading the final traverse to the summit along the fin. Since I had climbed Acid Baby the year before, I remembered that the easiest way onto the block I am on top of in the photo is just to mount the block (from the right side) as if it were a horse. 6b. Looking back at Janet at the belay on the fin. The actual belay as per the route description is lower than this, but as Will and I had concluded when we climbed Acid Baby, it is nice to have the belayer just before the fin traverse. Not only is there a nice belay seat with decent gear, but this way you can communicate (if something were to go wrong here, it would be very difficult for the belayer to do anything about it if they were located at the belay in the route description). And, most importantly, you can get awesome photos of each other on this pitch. This is probably the most aesthetic pitch of the route. | |
On top! | a. Janet on top! What a cool summit. Witches Tower and Dragontail behind. The 5.6 downclimb off the top is on the right where the rope is in the photo. b. Dragontail Peak. | ||
Descent | ~1 hour to base From the top, make a short downclimb (~5.6). Then scramble up to the Enchantment Peak plateau, enjoy the views, and romp down meadows to Aasgard Pass. (Slings suggest a rap route might exist down a gully, but it looks a bit loose and dangerous). | | a. This photo was taken from the base of the 5.6 downclimb off the top of the route. The usual descent is to scramble up this slope in the photo to the Enchantment Peak plateau, and then romp down beautiful terrain to Aasgard Pass and then back down to your packs at the base of the route. b. Nearing the end of the 3rd class scramble up to the Enchantment Peak plateau. Colchuck Lake far below. c. Taking a break and enjoying the late afternoon lighting on the flank of Enchantment Peak before descending to Aasgard Pass. Little Annapurna in distance and Upper Enchantment Lakes. d. Left to right: Witches Tower, Dragontail Peak, Colchuck Peak, Mt. Stuart. e. Left to right: Little Annapurna, Witches Tower, Dragontail Peak, Colchuck Peak, Mt. Stuart. Upper Enchantment Lakes and Aasgard Pass are below. Photo by Janet. f. McClellan Peak in distance. g. Collecting water at the beautiful Aasgard Pass. h. A pinnacle of rock between Aasgard Sentinel and Aasgard Pass. New route potential? (Update: I talked to John Plotz about this feature, and he claims THIS is actually Aasgard Sentinel that Beckey named, and that that Acid Baby and The Valkyrie are actually on a feature called Spineless Prow. In 2004, John and Kyle Flick climbed this feature in the photo. Here is a link to his trip report along with some photos. i. "Hey, what are those 2-legged beasts doing out here...?" he seems to ask. |