Mt. Stuart, North Ridge Direct w/ Gendarme (5.9, 3000′) (& Sherpa Peak West Ridge, 5.5)
Mt. Stuart (& Sherpa Peak)
Routes:
- Mt. Stuart, North Ridge Direct w/ Gendarme (5.9, 3000')
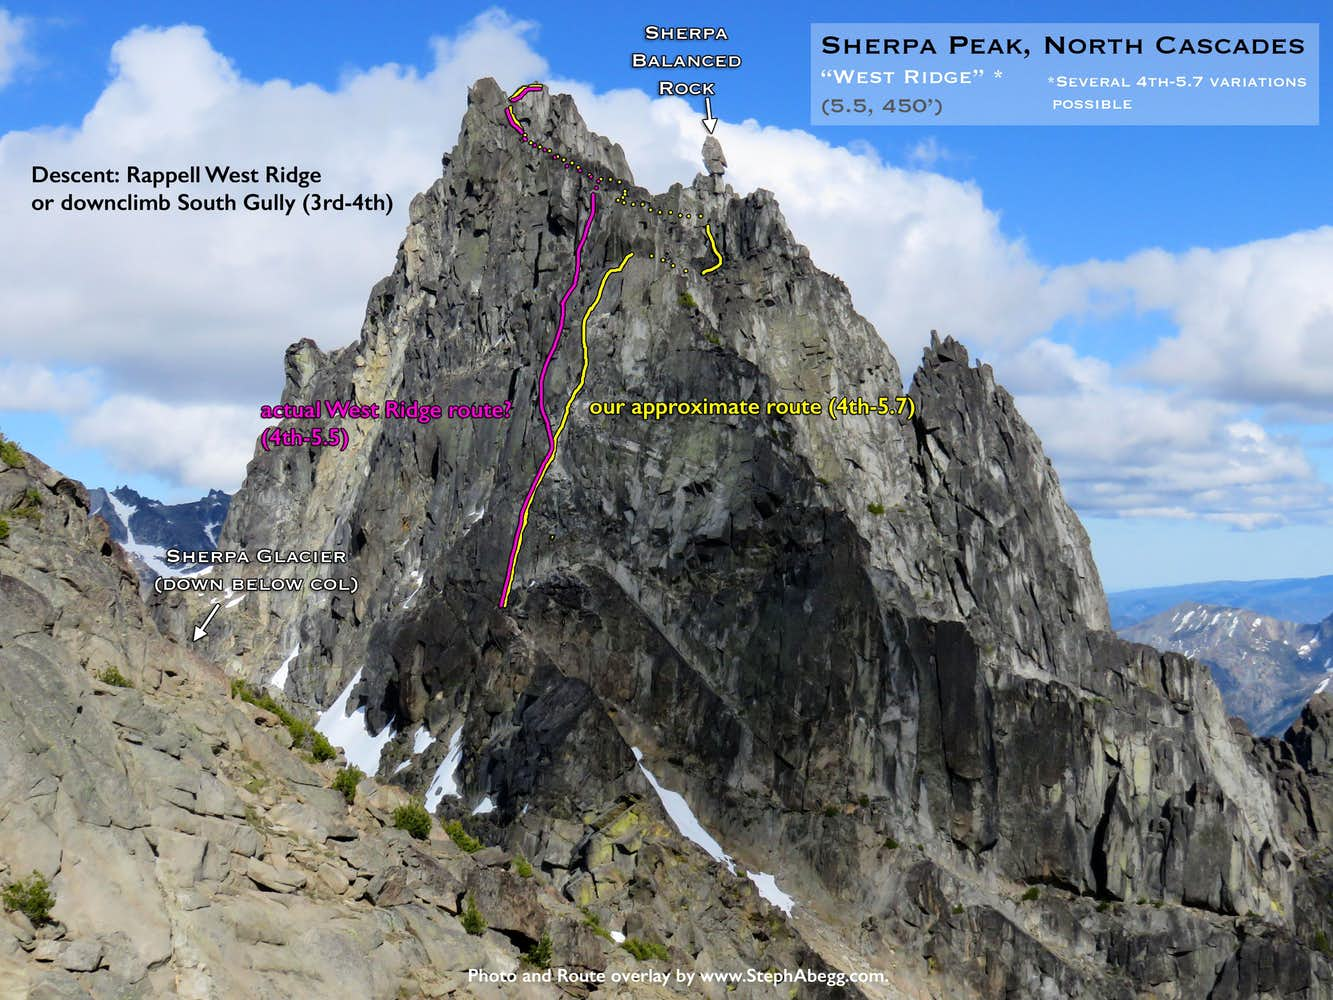
- Sherpa Peak, West Ridge (5.5, 450')
Mt. Stuart's North Ridge is one of my favorite all-time alpine climbs, and certainly my favorite in the North Cascades. The first time I climbed this route, it was one of my first major alpine climbs, and we ended up bivying near the summit and spent a full day descending the west ridge with no water and one brownie. The second time I climbed this route—almost exactly a decade later—I injured myself the first pitch of the day but we still plugged upward and got to the summit in early afternoon and continued over to tag the summit of Sherpa Peak as well.
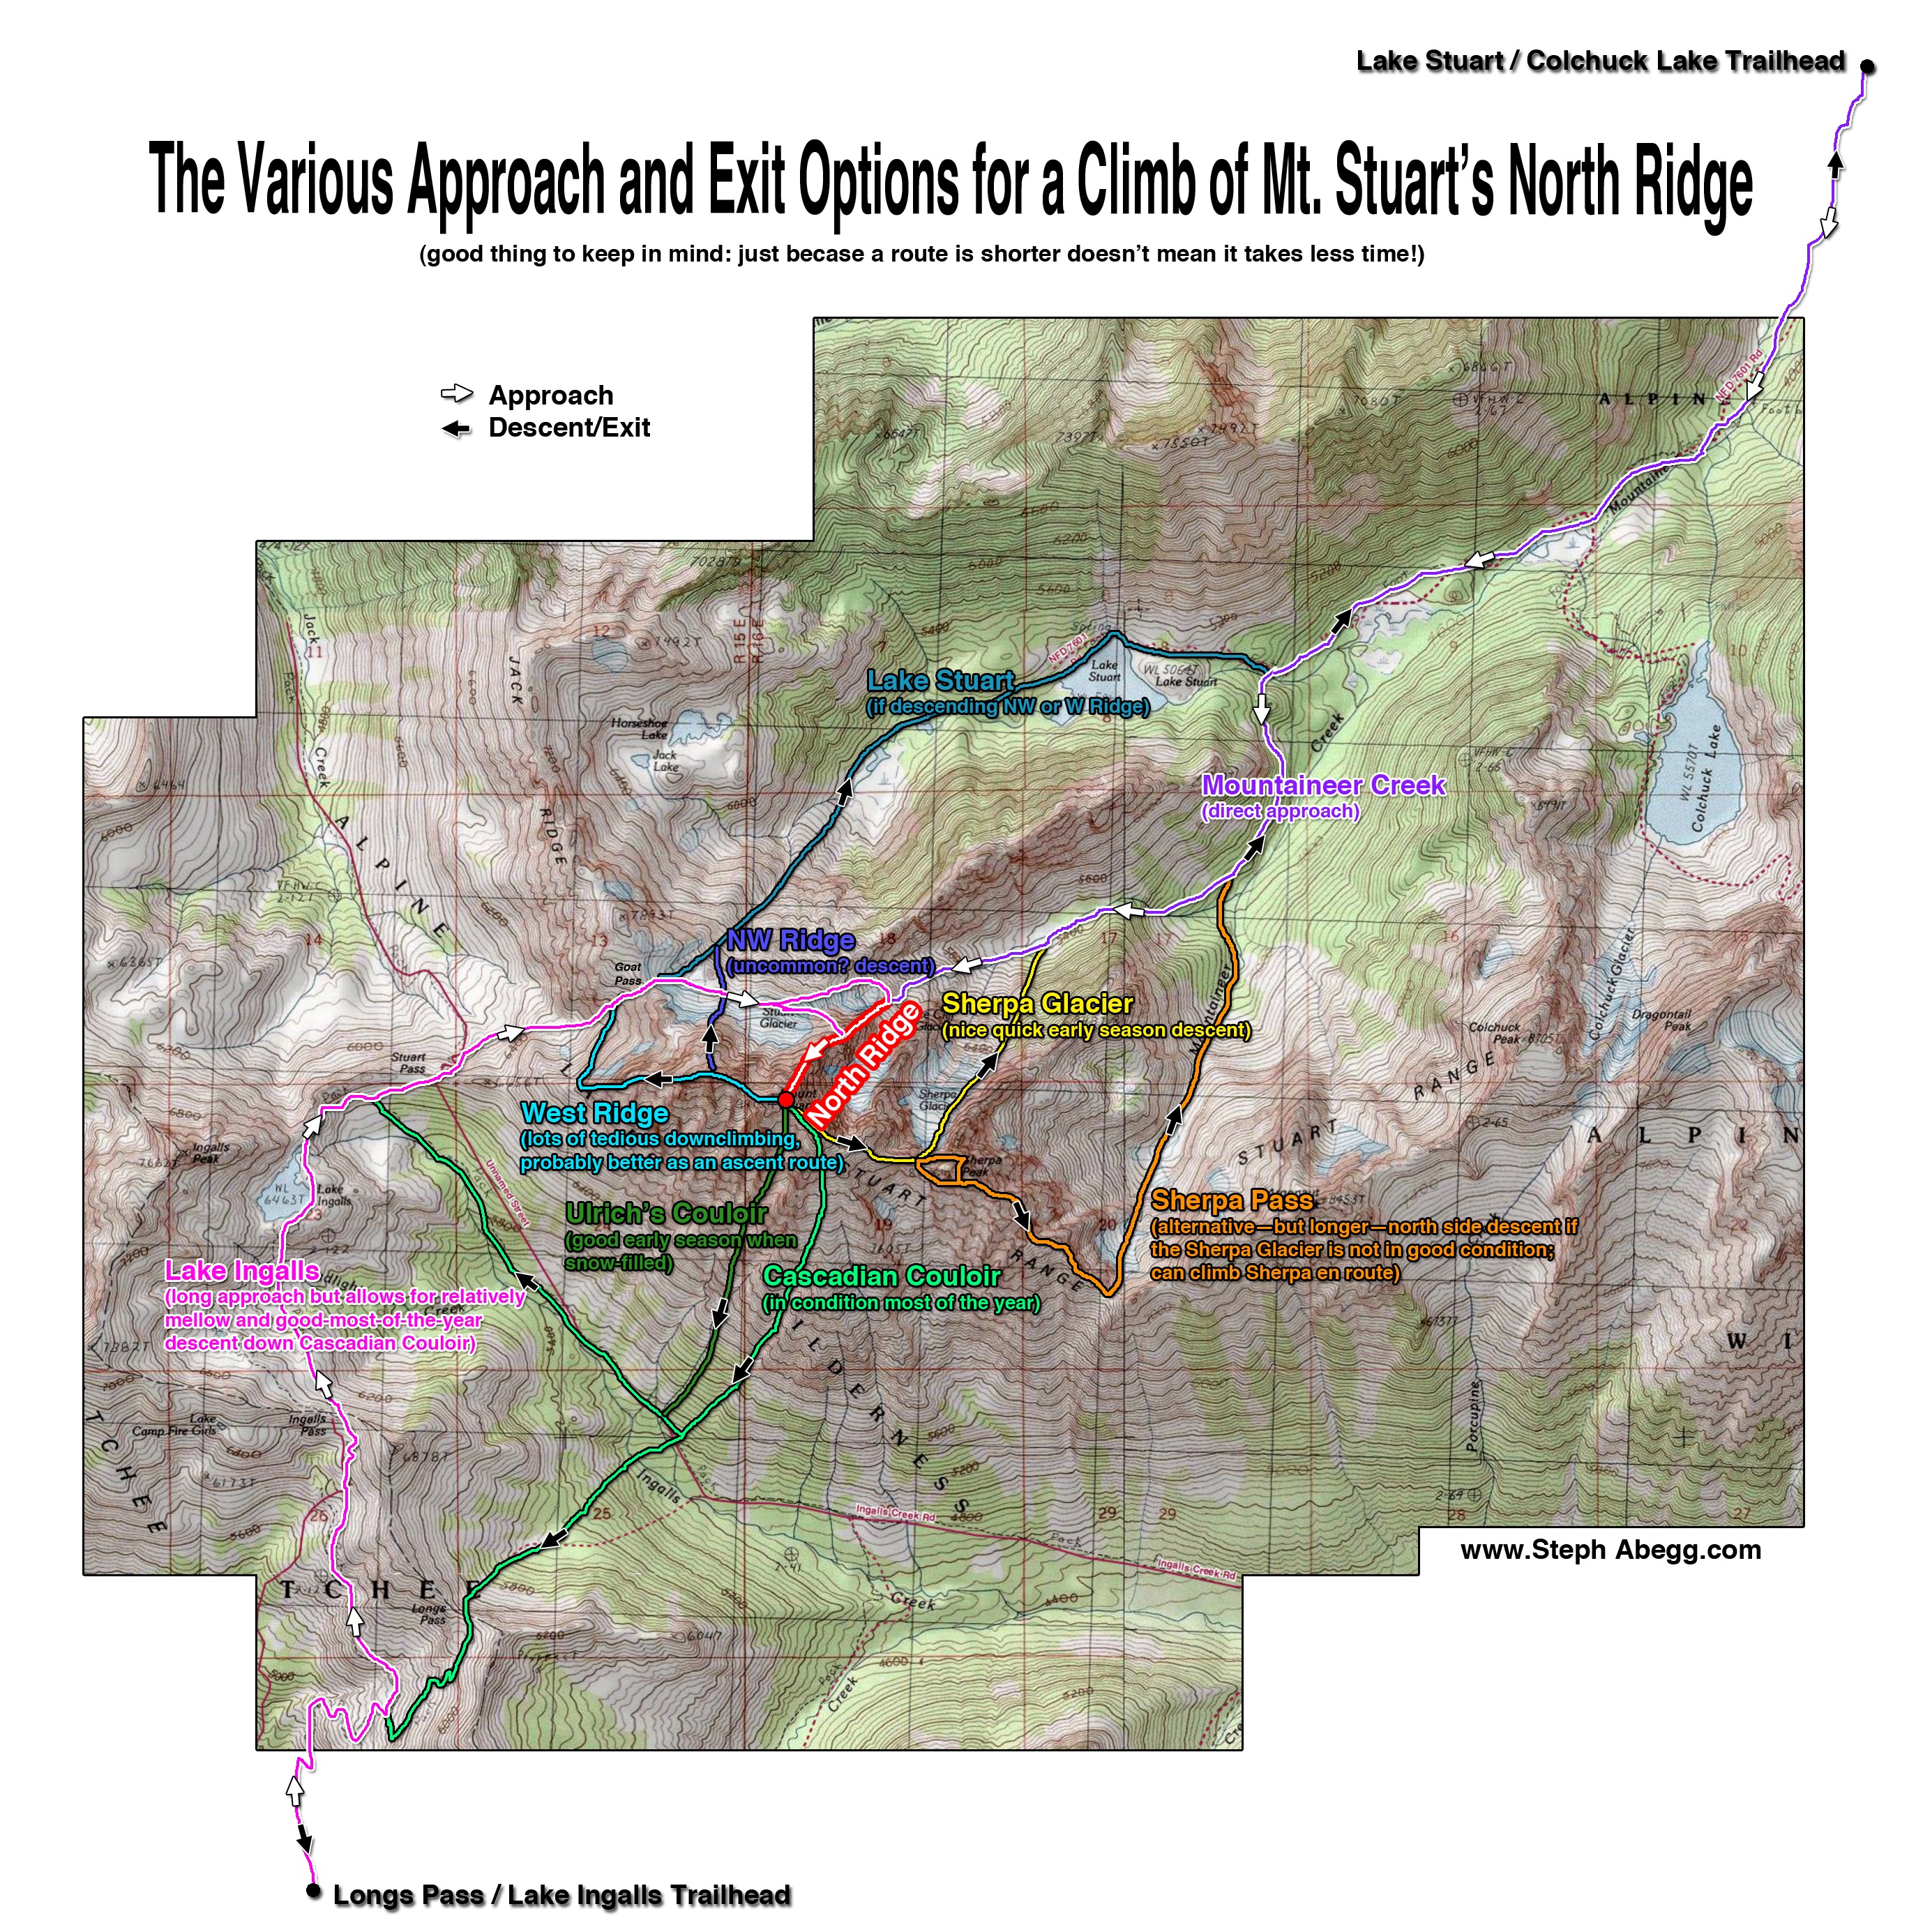
The Approach-Exit Dilemma for a climb of the North Ridge of Stuart
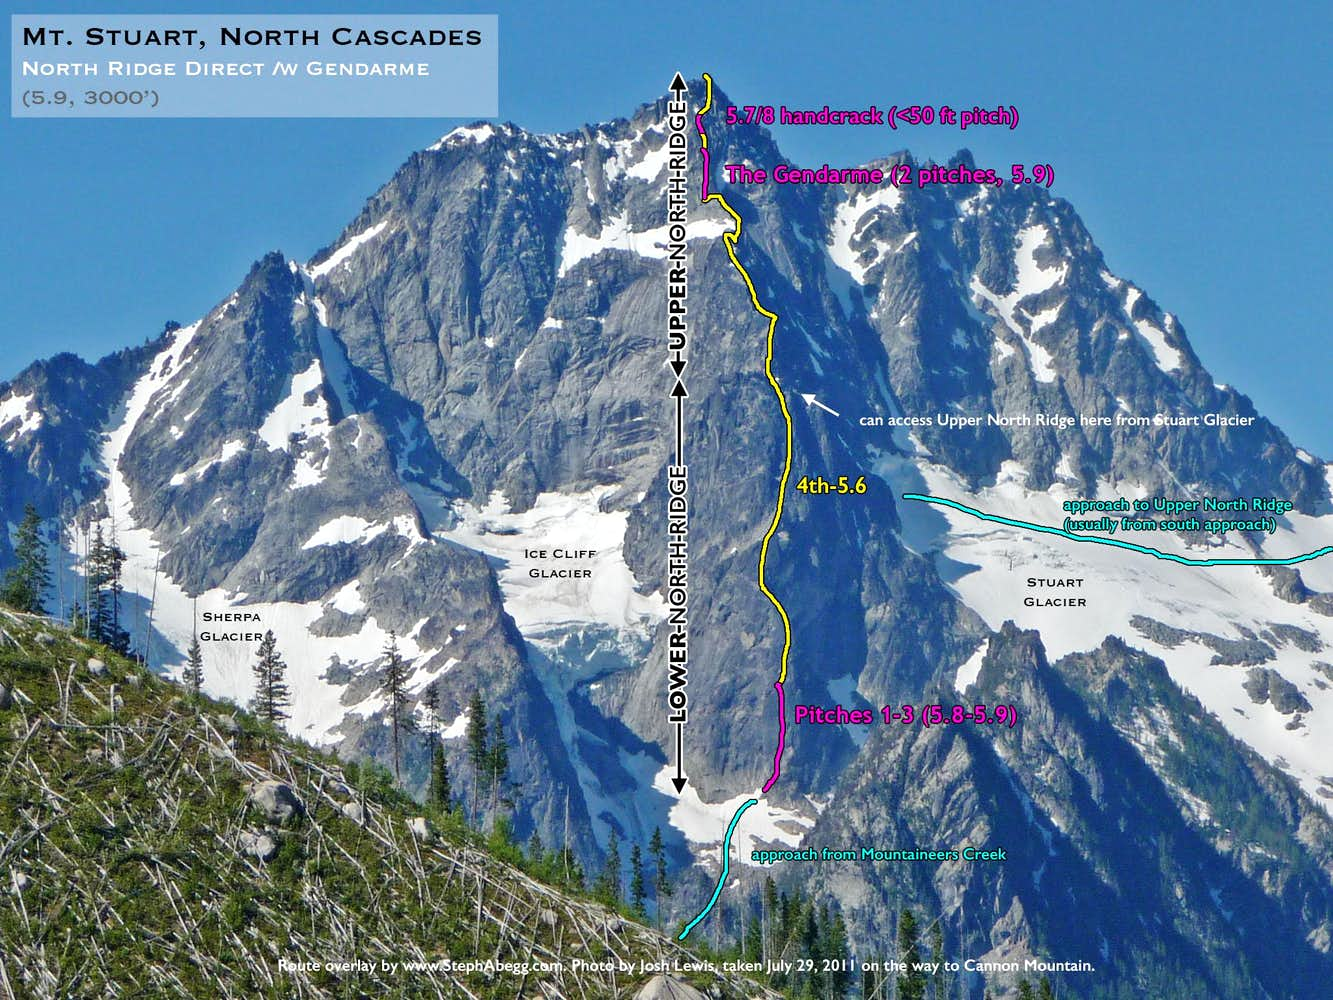
Climbing the North Ridge of Stuart poses a bit of a strategy problem. The most nontechnical descent (snow slope in early summer, scree in later summer) is the Cascadian Couloir, which is on the south side of the mountain. But the climb is on the north side of the mountain. So this forces the climber to wrap half-way around the mountain before or after the climb, which can take several hours and for many parties necessitates a bivy before or after the climb.
Another option is to use the Sherpa Glacier (accessed via a col between the summit of Stuart and Sherpa) as a descent route. Not only is the Sherpa Glacier on the north side, but it also provides the quickest and most direct way down. However, this descent route requires some experience with glacier travel and also is only a feasible route in the early summer.
In July 2016, my partner and I tried out a different north side descent route that ended up being quite straightforward and would provide a nice alternative to the Sherpa Glacier. Instead of going the Sherpa Glacier, we traversed 3rd class terrain around the south side of Sherpa Peak to Sherpa Pass on the east side of Sherpa. (We detoured briefly to climb Sherpa via its West Ridge.) From Sherpa Pass, it was an easy glissade down a snowslope to the headwaters of Mountaineers Creek which eventually brought us down to the approach path to the North Ridge. This descent route is slightly more time and foot travel than going down the Sherpa Glacier (there is quite a bit of terrain to cover between Stuart and Sherpa Pass), but it is less technical, should be mellow even in late summer, and allows a possible ascent of Sherpa if you have time. It is feasible for fast parties to use this descent option as part of a one-day car-to-car ascent of Stuart from the north.
No matter what approach and descent routes you choose, combined with the climb itself, Stuart is a big endeavor and covers a lot of terrain. But the athleticism required to climb Stuart is part of what makes climbing Stuart equally compelling and rewarding.
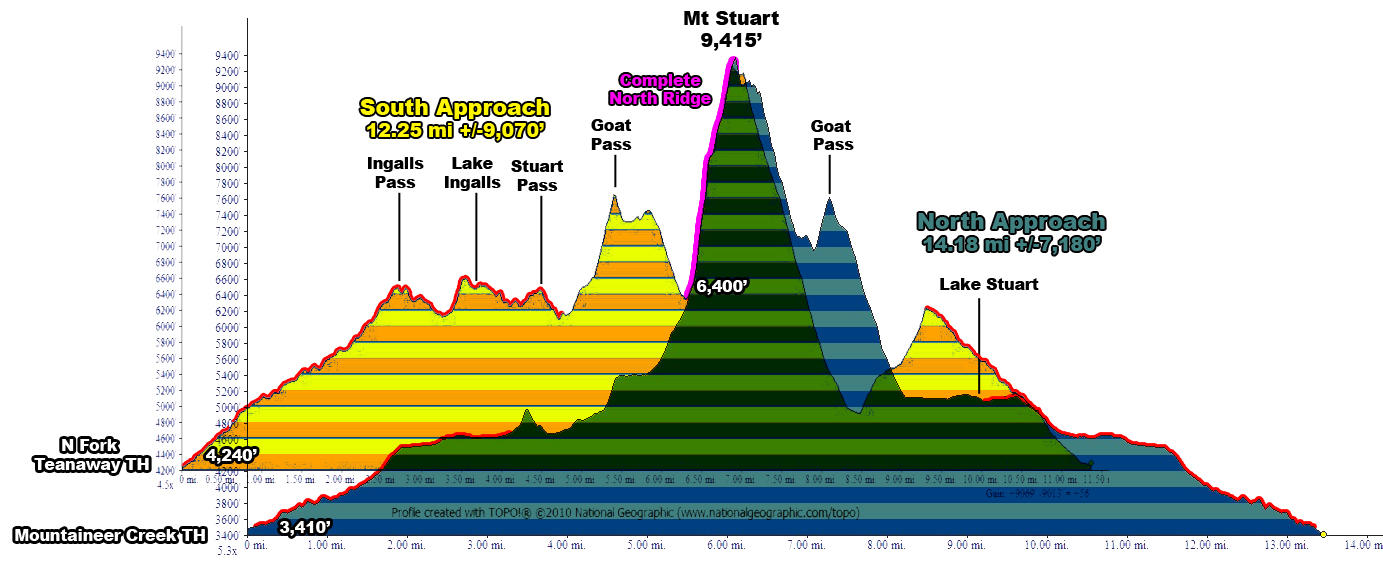
I have summarized the various approach and descent options (that I know if at least) in the map above.
When Clint and I climbed the North Ridge in 2006, we chose to approach from the north and then descend the West Ridge, go through Goat Pass (a high pass on the west side of the mountain, which you would have to come through if you approached from the south), and hike cross-country back to the Lake Stuart trail and trailhead. I probably wouldn't recommend this descent, since it took all day to do.
When Jon and I climbed the North Ridge in 2016, the plan was to do a giant linkup of the entire ridgeline (Stuart-Sherpa-Argonaut-Colchuck-Dragontail) which would get us away from any of the standard Stuart descent routes. We climbed in late June, so most of the parties on the route with us were planning on coming down the Sherpa Glacier. We ended up cutting our grand plans short and coming down a snowfield on the north side of Sherpa Pass, which was an incredibly mellow descent and should be considered as a feasible descent option from Stuart, especially in the later summer when the Sherpa Glacier is in treacherous condition.
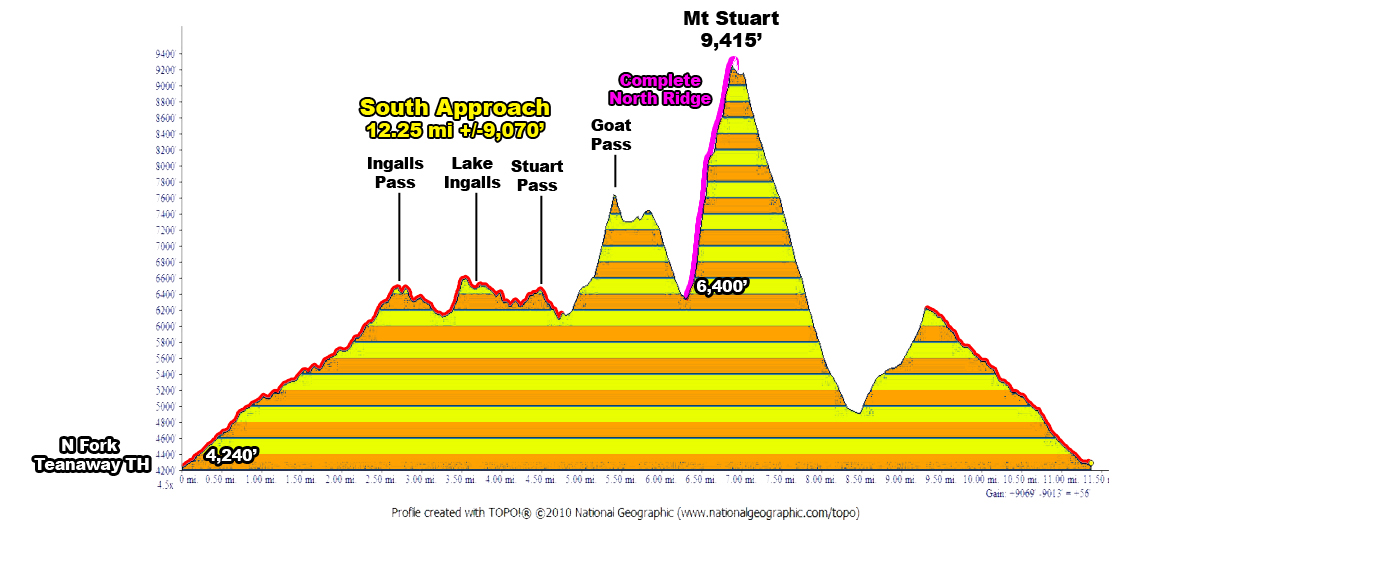
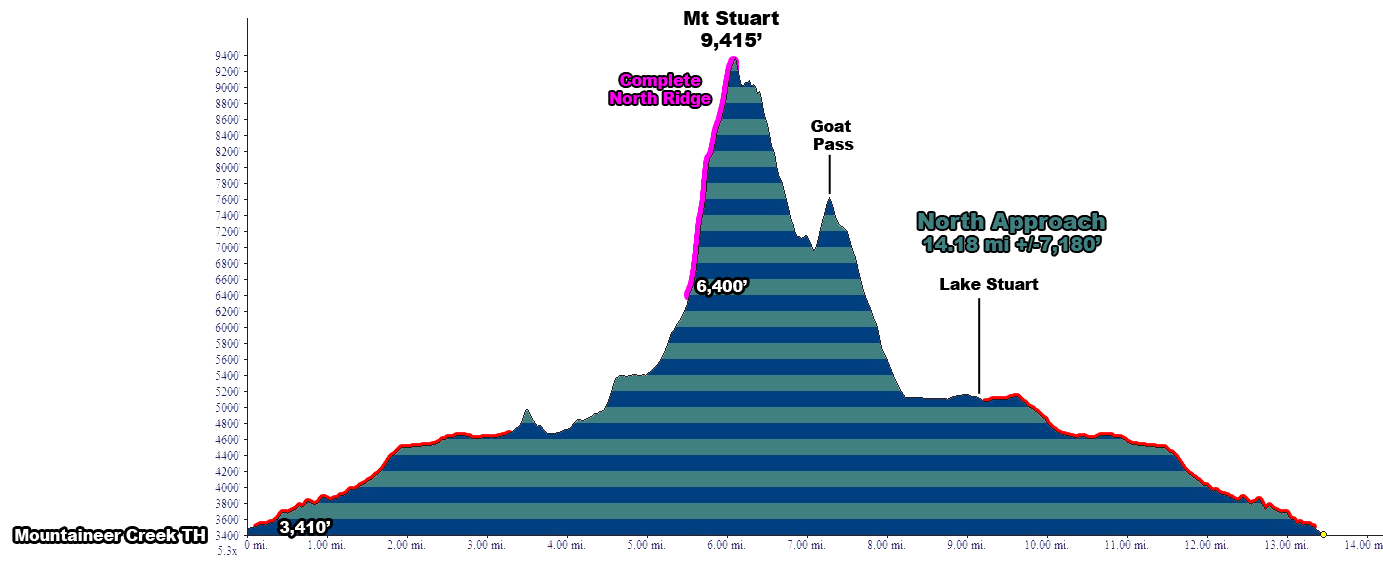
Bonus! I also include some elevation profiles (courtesy of my friend Mark Thomas in August 2013, who was trying to decide which approach to take) of the north approach along Mountaineer Creek (blue) and south approach from Lake Ingalls (yellow), plus a comparison of the two approach profiles. In both cases the descent is via the Cascadian Couloir. For the north approach, less effort getting to the climb results in a relatively long slog getting back to the car, while for the south approach, more effort getting to the climb results in a relatively mellow descent back to the car. Hence, the south approach is probably a better choice for those planning to bivy at the base, while the north approach might be good for those trying to go car-to-car in one push.
Trip Reports
CLICK ON TRIP REPORT TO DROP DOWN CONTENT
THIS TRIP REPORT IS STILL MOSTLY IN THE EMBEDDED HTML FORMAT OF MY OLD WEBSITE. MOBILE Tip: Try Landscape mode. It is generally more mobile friendly.
With its classic exposed knife-edge north ridge and moderate rock pitches, Mt. Stuart has been on my "to-climb" list for a long time. When Clint Cummins, who I had met in the alpine club at my university, told me he would be in the Seattle area in early July and would be interested in doing some climbing, Mt. Stuart was certainly one of the first options that popped into my mind. Clint had soloed Stuart's north ridge some 30 years ago, but had always wanted to go back and climb the Great Gendarme 500 ft below the summit; the gendarme maintains the true ridge, but many parties avoid this intimidating 200 ft block by descending and traversing below. So Clint and I decided to plan our 9-day climbing trip in the Leavenworth area, since the south face of Prusik Peak was also a climb we were interested in doing (after Prusik, we headed north to Washington Pass to cooler weather and two stellar climbs: the East Buttress of South Early Winter Spire and the West Face of North Early Winter Spire.)
Since the weather forecast was perfect, we decided to start our trip with our climb of Stuart. We wanted to travel as light as possible on the climb, so we packed minimal gear, which meant leaving our sleeping bags in the car, even though we knew a bivy was likely given the length of the climb. We each brought 2 L of water, some food, a jacket and hat, boots, climbing gear, headlamp, and an ice axe.
Friday (July 7) night we slept in the Stuart Lake parking lot, and Saturday (July 8) morning at 5:45am we were on the trail to Stuart Lake.
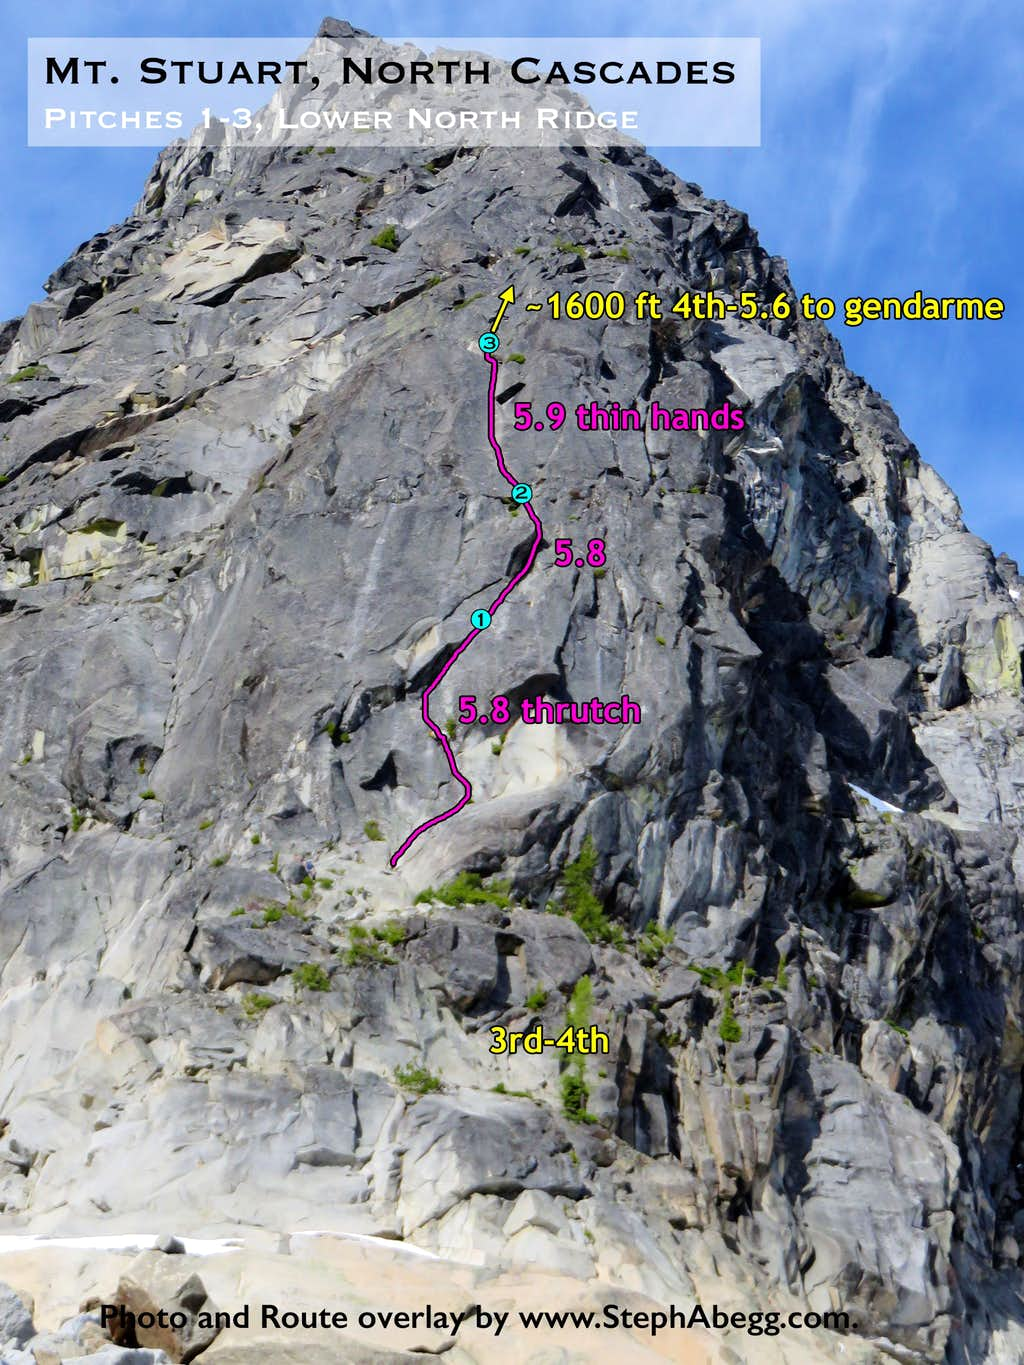
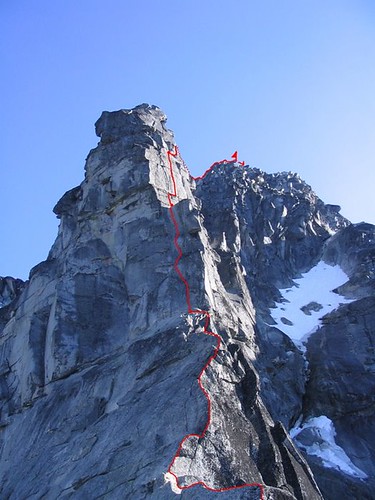
After 1.5 hours, before reaching Stuart Lake, we turned off the trail and headed up along Mountaineer Creek. There were a lot of mosquitoes, even this early in the morning. For two hours we followed a faint climber's trail through the trees and talus to the moraine at the base of the north ridge. From here we ascended the edge of the moraine to reach the bottom of the rocky north ridge around 10:30am. Here, at the base of the direct north ridge climb, it was at about 6,600 ft, just a little less than 3,000 vertical feet below the summit. The photos below, respectively, show (1) the entire route up the north ridge as seen from the base of the moraine and (2) the technical 4-pitch route up the lower toe of the ridge.
At 11am, Clint was leading the first pitch up the north ridge. Pitch 1 involved a 5.7 lieback to an awkward 5.8 squeeze slot. Pitch 2 involved 5.6-5.7 face climbing. Pitch 3 was a fun 5.8-5.9 crack. Pitch 4 was a short section of 5.7. Fortunately, Clint likes to take photos, so I have several of me climbing.
After this we were able to simulclimb. For several hours we followed the ridge line leading up to the Great Gendarme. Stuart's north ridge is known for its exposure, and it was amazing to climb along the ridge, with the Ice Cliff Glacier far below on the left and Stuart Glacier far below on the right.
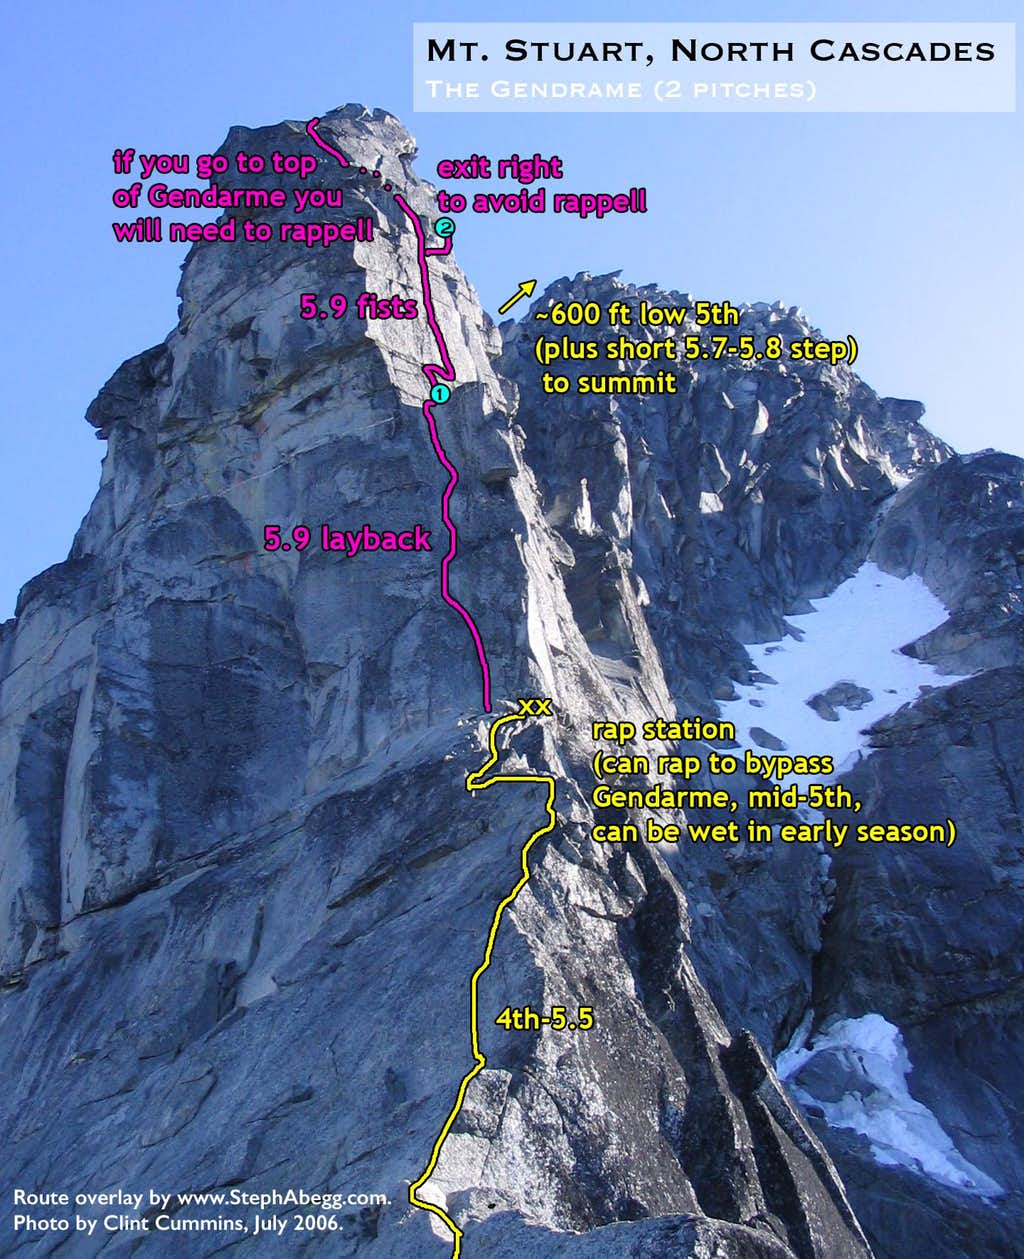
We reached the base of the Great Gendarme at 6:45pm. This is about 500 ft below the summit. We knew at this point that we would be bivying somewhere shortly after the summit. The direct climb via the gendarme was the best technical climbing on the route (the alternative is to rappel down 75 ft from the base of the gendarme to an easier traverse to the west of the ridge). Clint led the gendarme pitches. The first pitch was a stellar 5.9 lieback to the top of a pillar. The second pitch was a 5.9 offwidth which had looked intimidating on the topo but turned out to have plenty of solid holds and jams. The third pitch made an airy 5.5 traverse to the notch before the final ridge climb to the summit, where there was an initial 5.8 move and then a low Class 5 scramble to the summit. The photos below show the route on the Gendarme and Clint hanging out at the belay above the second pitch.
As we were climbing the Gendarme we saw the only other two climbers we saw that day. They had come up from Stuart Glacier and were planning on bivying at the base of the Gendarme that night. (A week later, Clint and I met one of these guys just ahead of us on the West Face of North Early Winter Spire!).
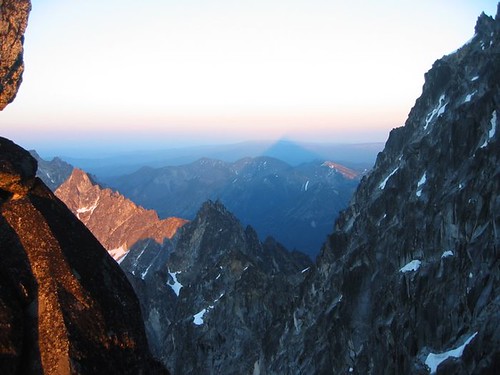
The sun was setting as we reached the final notch below the summit. This was a great position to see the sunset colors and shadow of Stuart on the mountains to the east. We made it to the summit at 10pm under a fading twilight. Luckily for us, the moon was full, offering enough light for us to begin our descent.
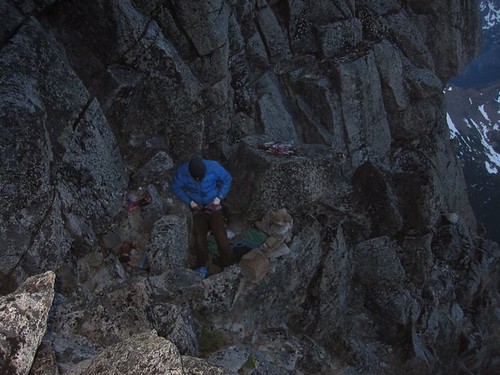
We had decided on the West Ridge as our descent route, so we started to pick our way down. Ideally, we wanted to find a bivy site by a melting snowfield, since each of us had only about 1 cup of water left and had less than 3 L the entire day (we each brought 2 L, and had filled up at the top of Mountaineer Creek before heading up the ridge). But after descending for about an hour, we were finding it too difficult to find the route or see the frequent rappel slings. Finally we reached a point where we could not find where the route went. We decided to build a bivy here and assess the situation in the morning. Below is a picture of our tiny bivy.
Without sleeping bags, we were rather cold and neither of us got too much sleep. I found that if I crawled into my pack I was a bit warmer. Thankfully, the night was short, and at 4:30am it was light enough to start to look for the descent route again, which we found jogged north over a cliffy looking feature on the ridge. We then drank what was left of our water and at 6:15am were heading down again. Thankfully, it was a beautiful morning. The photo below shows the sunrise colors on the West Horn below our bivy.
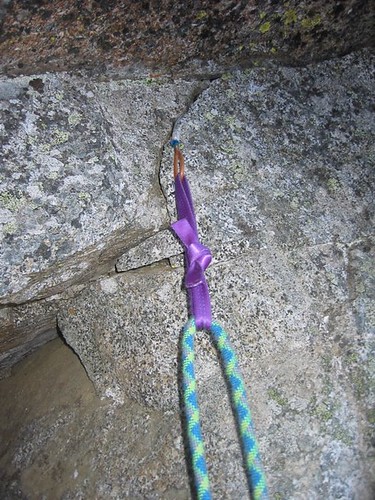
The descent down the West Ridge seemed to take forever. We faced numerous rappels, loose descent paths, and sketchy sections of downclimbing. I would suggest trying a different route down Stuart, like rappelling down the Northwest Buttress (disadvantage is that it is steeper and potentially dangerous if you get off route) or sliding down one of the class 3 couloirs (Cascadian is probably the best choice) (disadvantage is that the couloirs put you on the southeast side of the mountain, and if you need to get back to the Stuart Lake trail you then have to traverse around quite a bit). There really seems to be no easy or comfortable route down Stuart, unfortunately. Overall, for us the descent was an incredibly tedious 14 hours. It didn't help that on the entire West Ridge we found no water, and the only food we had between the two of us was three fruit bars and a brownie. The photo below shows one of our sketchiest rappels, where we rapped off a single nut. But at this point I didn't care - I just wanted to get down!
Finally, at 12:15pm we arrived on the sloping ridge above Stuart Pass. We still had not found water. We quickly traversed northeast over to Goat Pass (traverse took me about 1 hour). On the way over we were able to collect a small amount of water off dripping rocks in the snowfields. I found a small pool of dirty water in a depression of a boulder and drank that.
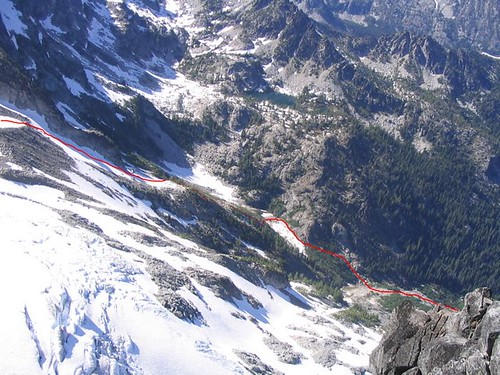
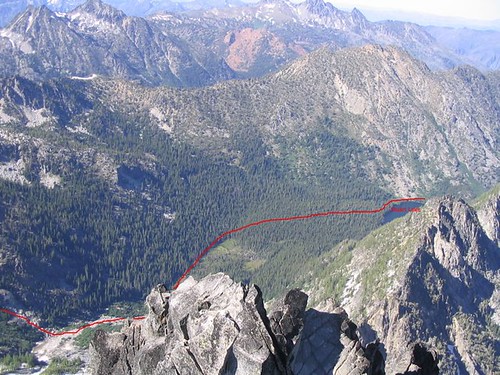
We glissaded down the snow fields below Goat Pass. This was the fastest and easiest part of the descent, and we were overjoyed to find a few small streams of snowmelt. Water never tasted so good! At the base of the snow slopes, we reached a cliffy area of steep heather and trees. For at least an hour we picked our way carefully down (I found an efficient thought slightly damaging way was to glissade down the heather). Eventually we were able to get to the gully after a final rappel off a tree. From the gully we found a faint trail and followed this to Stuart Lake, which we reached at around 5:15pm. The photos below show our descent route from Goat Pass.
We were exhausted, and the bugs were quite bad, but it was nice to finally have a trail. Just past Stuart Lake a party of friendly hikers offered us some extra gorp after hearing of our long day. This was just what I needed. After devouring a couple of cups of gorp, I hustled down the last couple of miles, arriving at the car at 6:45pm. Clint arrived an hour later. We had spent almost 40 hours on the mountain, but it was certainly worth it! What an amazing climb!
A few hours later, our bellies full with McDonalds burgers and warm in our sleeping bags, we fell into a deep sleep. The next day we rested, and then onto our next climbing objective, the south face of Prusik....
THIS TRIP REPORT IS STILL MOSTLY IN THE EMBEDDED HTML FORMAT OF MY OLD WEBSITE. MOBILE Tip: Try Landscape mode. It is generally more mobile friendly.
(Somewhat Long) Intro
In the decade following my first climb of the Direct North Ridge of Stuart, I have climbed countless classic routes all over western North America. But few—if any, apart from maybe some climbs I had done in the Bugaboos—have quite measured up to the Direct North Ridge of Mt. Stuart. The Direct North Ridge has it all: 3000 vertical feet of rock climbing in the 3rd-5.9 range, an amazing position on an exposed ridgeline, excellent alpine granite, and a committing and athletic quality, all the while surrounded by spectacular North Cascades scenery. What more can you ask for in a climb?
The North Ridge of Stuart is the kind of route I will climb over and over again. So by Summer 2016, I was definitely feeling past due on another lap up the route. My friend Jon Pobst was an eager partner. He had climbed the route four or five times and was happy to climb it again. "I'd climb the North Ridge every summer," he mentioned at one point.
Instead of a quick car-to-car North Ridge up, Sherpa Glacier down bid, our plan became grander: we planned to reach the summit of Stuart by early afternoon, and then continue along the ridgeline to the east, ticking off the summits of Sherpa, Argonaut, Colchuck, and Dragontail before hitting the Enchantment Basin. Once there, we could either hike out via the trail down from Aasgard Pass, or if time and energy allowed we could continue on to Prusik. We brought lightweight sleeping bags and enough food for two full days.
But we did not (could not) predict two things: (1) that an early summer storm would blow through and deposit fresh snow and rime on the upper mountain in the couple of days before our planned ascent and (2) that I would strain a muscle (in the area just in front of my right armpit) on the very first pitch when my foot slipped as I was trying to free myself from another party's rope (a visit to the doctor later that week confirmed a badly strained intercostal muscle—I ended up having to take 3 weeks off from climbing just as my summer vacation had begun...bummer...).
Despite the unpredicted wrenches thrown into our plans, we still climbed the North Ridge at a good click, getting from base to summit in just under six and a half hours. We had been a bit worried about the 8-party traffic jam at the base when we arrived—5 parties ahead of us, 2 parties behind us—welcome to a Fifty Crowded Classic Climb on a sunny summer Saturday! But we were able to get to the head of the pack fairly quickly by linking the first three pitches into one long pitch (with 20 m of similclimbing) and soloing the ridge above that. During the climb, we only roped up for the first three pitches (5.8-5.9) of the lower North Ridge, the two pitches of the Gendarme (5.9), and a short step of steep climbing (5.7-5.8) immediately after the Gendarme. The Gendarme pitches were wet and somewhat icy because of the recent storms, but Jon hardly batted an eye and he led them excellently (in approach shoes nonetheless!). Apart from the roped pitches, we soloed the remaining ~2400' of the route, which features 3rd-5.6 climbing on an amazing exposed ridgeline. Being free of a rope was a quick and enjoyable way to climb the ridge. But there is definitely some no-fall terrain, and the stabs of pain caused me to move even more gingerly than usual. (It is pretty impossible to climb with only one arm I discovered....) The slightly wet rock and occasional snow patch made things a bit more interesting at times.
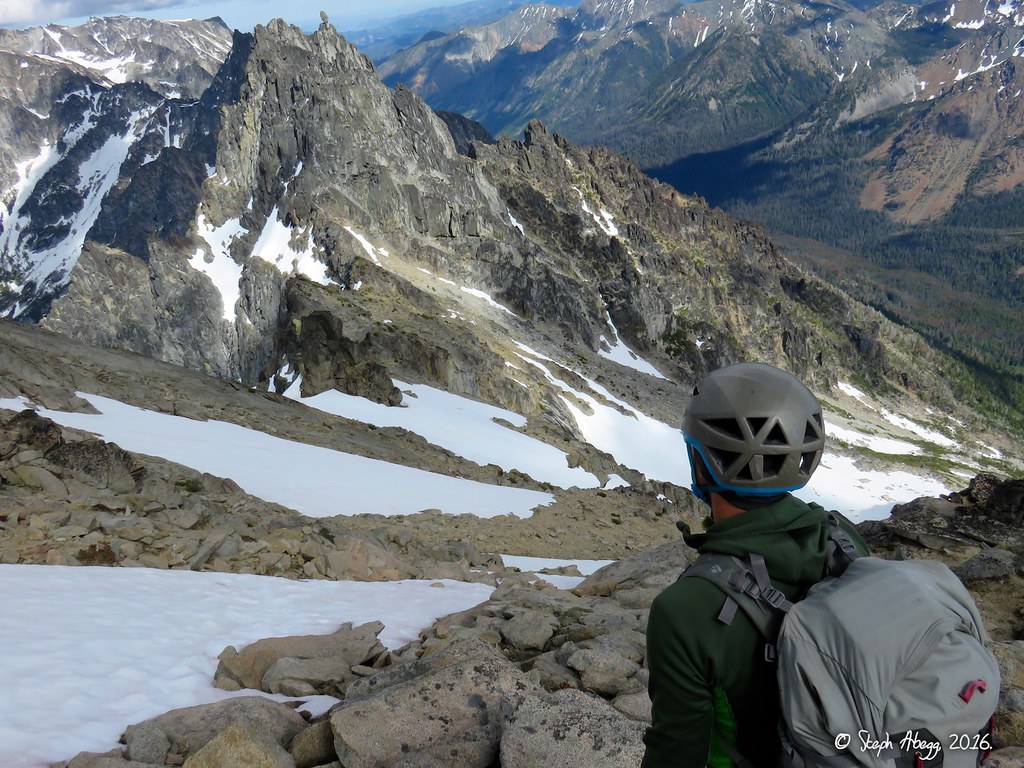
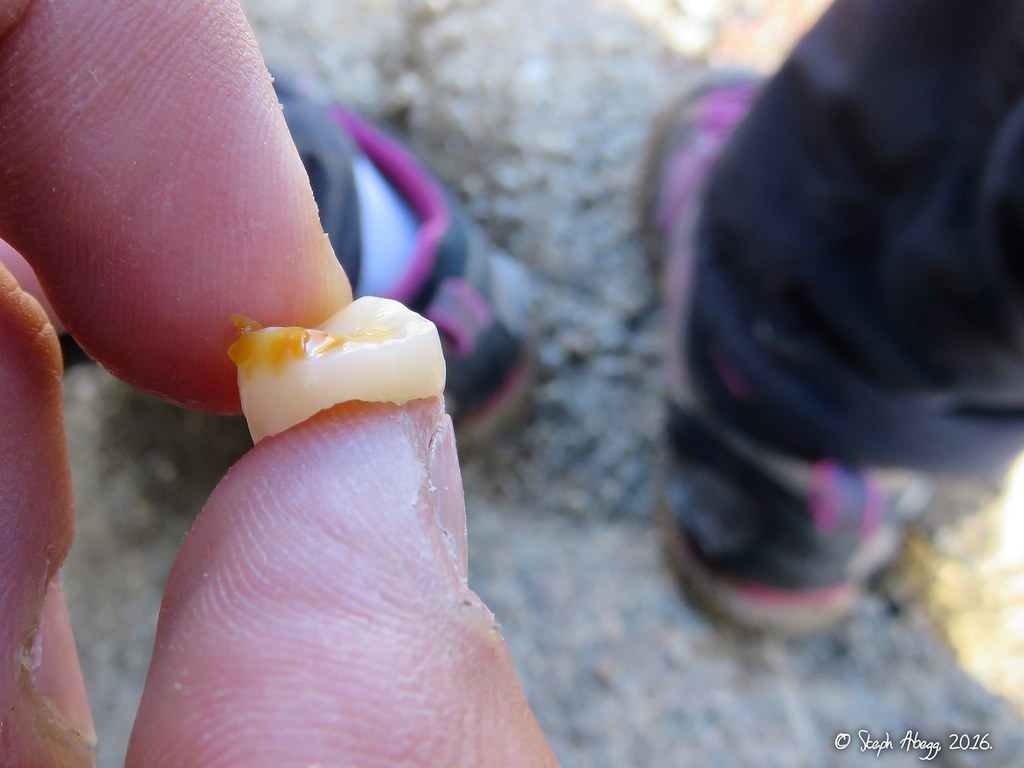
We arrived on the summit of Stuart in the mid-afternoon. We headed down the ridge toward the col above the Sherpa Glacier. Now we had to make a decision. We could descend the Sherpa Glacier and be back at the car in a few hours, well before dark. Or, we could continue with our plans to traverse along the ridgeline and just find a place to bivy when it got dark. The thought of tagging more summits and exploring new terrain trumped the pain, plus I knew Jon wanted to continue. So we headed towards Sherpa. On the way, I popped a coffee Nips in my mouth and the next thing I knew I was spitting out a couple of tooth fragments and inspecting a piece of candy with a crown embedded in it. Compared to my other injury, this seemed like a minor inconvenience. So I gave a crazed chuckle, plucked the crown out of the candy, popped the candy in my mouth, and shoved the crown in my pocket. (I can only imagine what Jon was thinking by now about his climbing partner who was yelping in pain every time she did a 5th class move, pulling out her teeth, and then beelining for the next peak on the ridge yelling "let's climb it!")
An hour later, we were on top of Sherpa. We had climbed the West Ridge (or some variation thereof). It was a fun climb, involving mostly 4th to low 5th climbing with a few moves (probably avoidable) of mid-5th, on blocky terrain with reasonably good rock. We did not rope up. This climb is worth doing if you are passing by or at Sherpa Col and want to tag Sherpa's summit. But if your only goal is to climb Sherpa, the longer North Ridge might be a better choice. From the summit of Sherpa, we scrambled down the South Gully and continued eastward along the ridge. At 8pm, we walked right into a bivy site on the ridge that was too good to pass up. It was perfectly flat and sandy, like it was made for two sleeping bags. Sherpa Pass was not far below us, and beyond this stretched the jagged ridgeline containing Argonaut, Colchuck, and Dragontail. This gave us two options for the next day: we could descend to Mountaineers Creek via Sherpa Pass and be back at the car in a few hours or we could continue the traverse and collect three more summits and intercept the hikers' trail at Aasgard Pass. We delayed the decision to the next day and instead just enjoyed a beautiful starry night high on a ridgeline in the North Cascades.
When we dropped down to Sherpa Pass the following morning, we were pleasantly surprised to see that the descent to Mountaineers Creek was a mellow 20 minute glissade. Despite the fact that both Jon and I wanted to continue, we both felt that the smartest decision given my injury would be to take this free pass out. (As a side note, the slopes on the north side of Sherpa Pass are a valid north side descent from Stuart that is probably pretty mellow all year round, so Sherpa Pass is a feasible—albeit longer—alternative to the Sherpa Glacier descent which can be quite sketchy in later summer.) A couple of hours later, we were at the car. Jon headed to Leavenworth for a cold beer, and I headed back to Bellingham to get some icepacks and Vitamin-I and schedule a dentist appointment.
All in all, it was a good adventure. I felt bad for being the reason to cut our grand plans short (sorry Jon! we'll have to try again!), but even so we did manage to climb the North Ridge of Stuart in style, tick off the summit of Sherpa, spend a night high in the North Cascades under a blanket of stars, and make one of the most mellow descents possible down from the north side of Stuart. Also, I am so grateful to Jon for being an excellent and understanding partner and for putting up with my manic shouts of "oh man that hurts!" to "wow this is awesome!"
Below are some route overlays and photos from our adventure.
Time Stats
Leave Stuart Lake / Colchuck Lake Trailhead: 5:24 am Turnoff to climbers' trail up Mountaineer's Creek: 6:29 am (1:05 since leaving car) Base of Lower North Ridge: 8:37 am (3:13) Start climbing: 8:55 am (3:31) Base of Gendarme: 12:36 pm (7:12) Summit of Mt. Stuart: 3:20 pm (9:56)
Col above Sherpa Glacier: 4:52 pm (11:28)
Base of Sherpa Peak's West Ridge: 5:37 pm (12:14) Summit of Sherpa Peak: 6:43 pm (13:19)
Camp between Sherpa and Sherpa Pass: 7:58 pm (14:34) Leave camp: 7:00 am Sherpa Pass: 7:52 am (0:52 since leaving camp) Turnoff to climbers' trail up Mountaineer's Creek: 10:32 am (3:32) Stuart Lake / Colchuck Lake Trailhead: 11:50 am (4:50)
Sections
NorthRidge of Mt. Stuart
Route Overlays
Photos
Photos
Photo descriptions
1.
2.
3.
4.
5.
6.
7.
8.
9.
10.
11.
12.
13.
14.
15.
16.
17.
18.
19.
20.
21.
22.
23.
24.
25.
26.
27.
28.
29.
30.
31.
32.
33.
34.
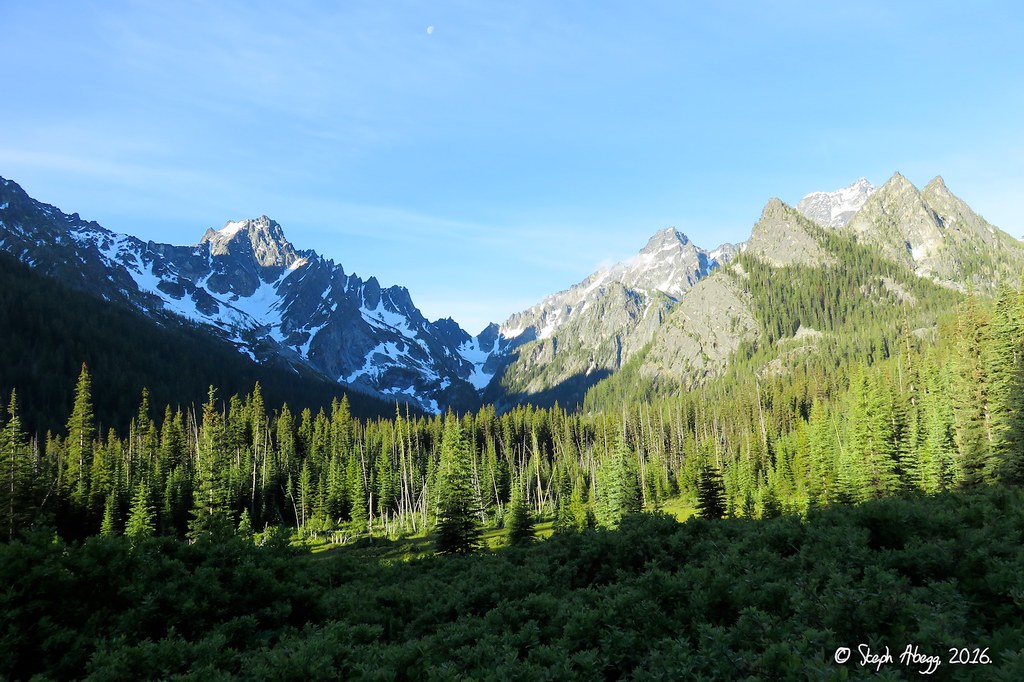
1. The view up Mountaineer's Creek on the approach on Stuart Lake trail. Argonaut on left, Sherpa on right.
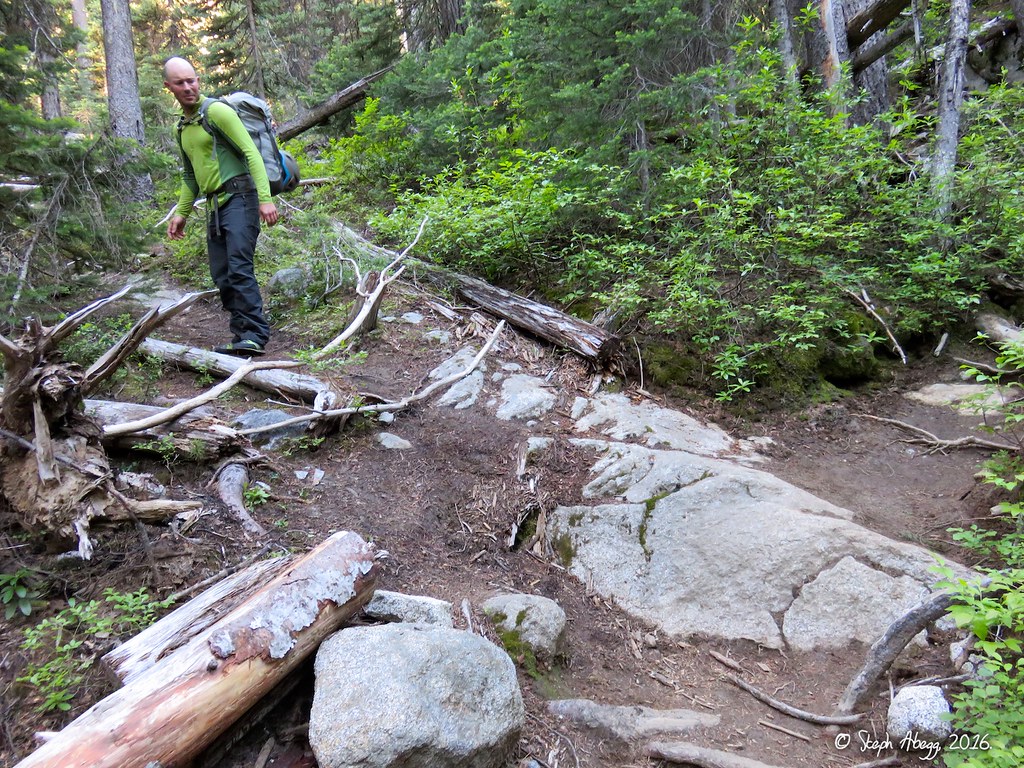
2. At the point where the climbers' trail up Mountaineer's Creek cuts off the main trail to Stuart Lake. Took us 1:05 to get here from the car but we were moving pretty fast on the way in (on the way out, it took us longer—1:18—since there were quite a few people on the trail and we did not jog at all).
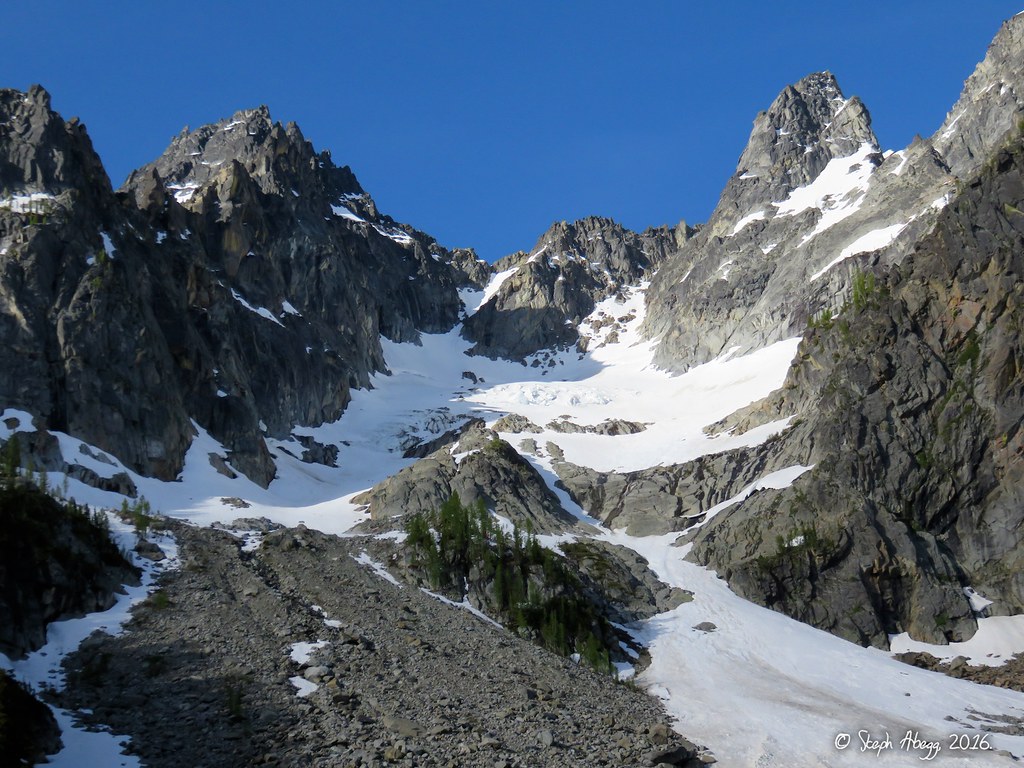
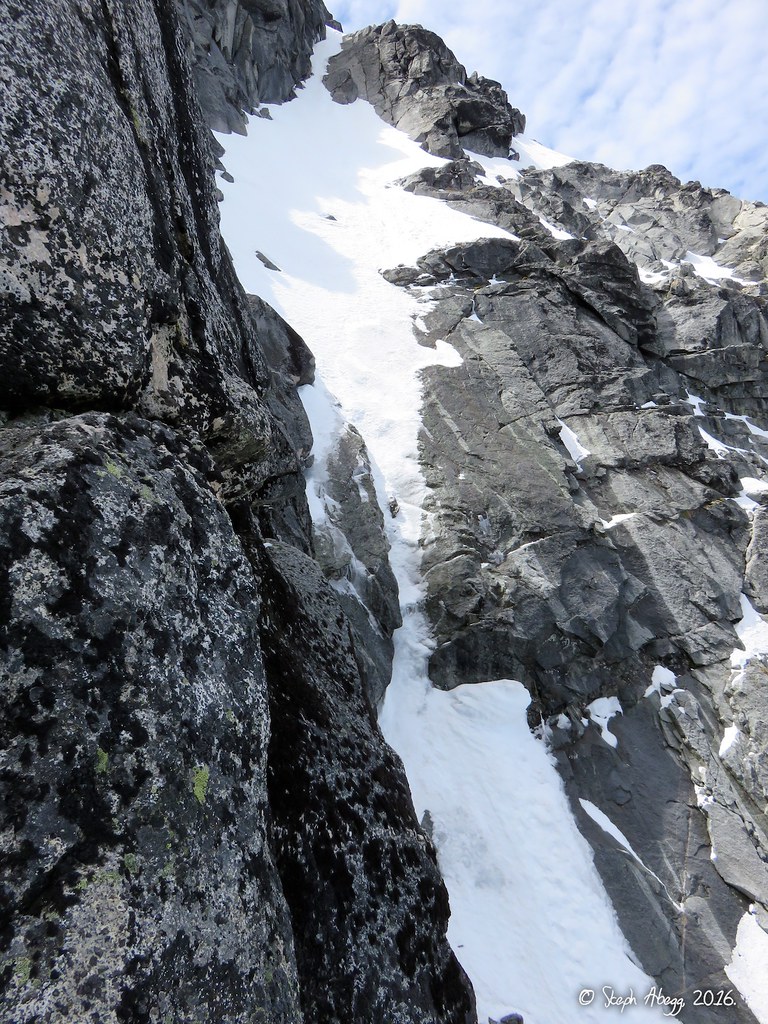
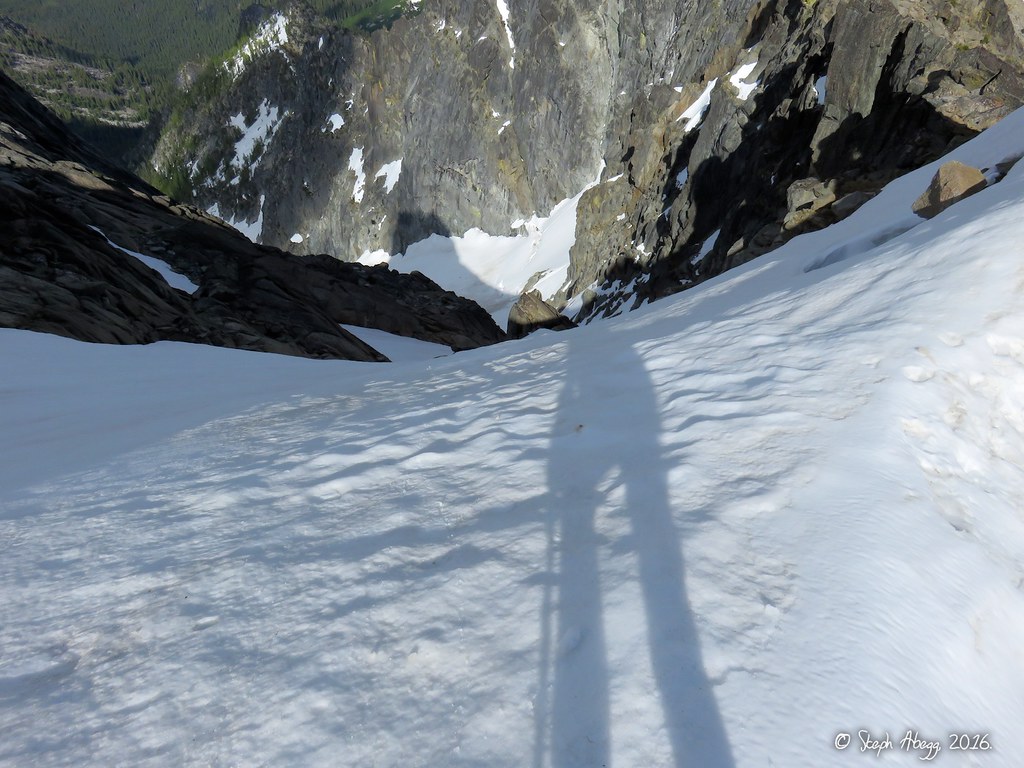
3. Looking up at Sherpa Glacier. This is the most common north side descent in the early summer. Most of the parties on the route with us were planning on going down this way. A couple more weeks of summer weather, and this descent route would become much more difficult.
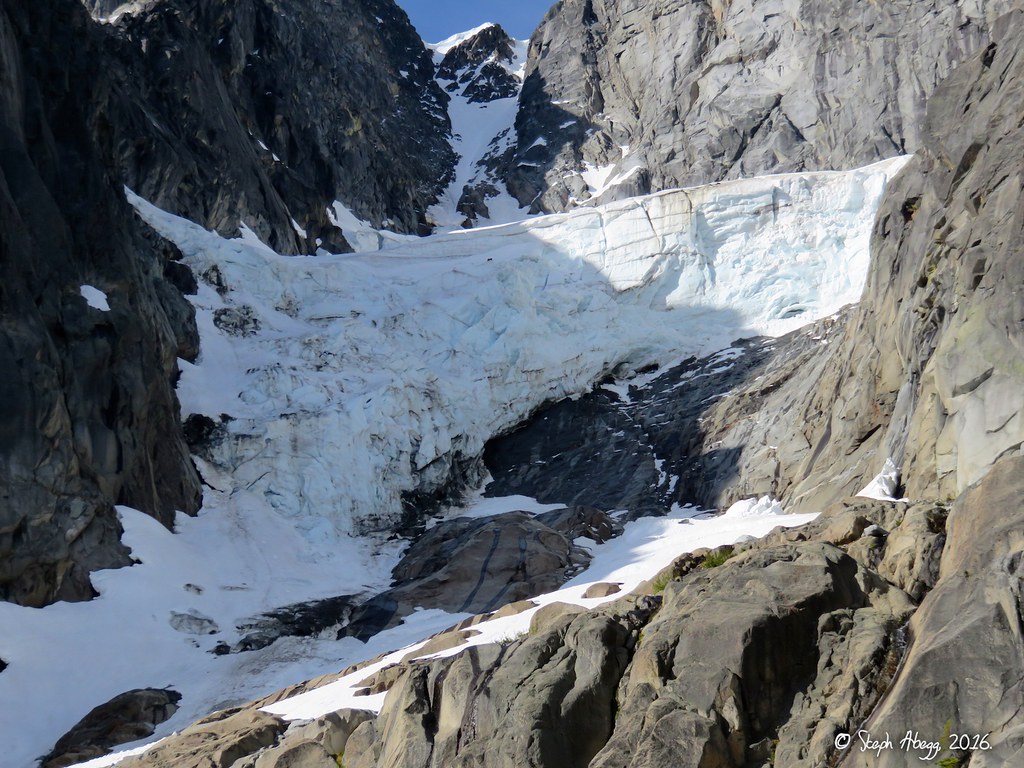
4. Looking up at the Ice Cliff Glacier. Some large chunks calved off as we were climbing.
5. Jon scrambling the 3rd-4th class steps up to the base of the roped climbing.
6. Beginning Pitch 1. The first three pitches of the route are 5.8-5.9 terrain so we roped up. We had planned on linking the first two pitches but instead we linked all three pitches into one long pitch with about 20 m of simulcimbing. There were 8 parties on the route that day (welcome to a Fifty Crowded Classic on a sunny summer Saturday!), so this helped us get to the head of the pack quickly.
7. Climbing on Pitch 2 (5.8). Our rope is the red rope.
8. The 5.9 thin hands crack on Pitch 3. Our rope is the red rope. The climbers of the green rope were graciously letting us pass them; unfortunately, they crossed over our rope a couple of times rather than staying below our rope, resulting in a bit of a tangle to weave through. (Just above this section my ice axe got tangled up as I tried to weave in and out of the green rope. My foot slipped as I was struggling to free myself, and I caught myself but felt something give in the area just in front of my armpit. The entire rest of the climb I was in quite a bit of pain. A visit to the doctor later that week would confirm a badly strained intercostal muscle and I ended up unable to climb for nearly 3 weeks.)
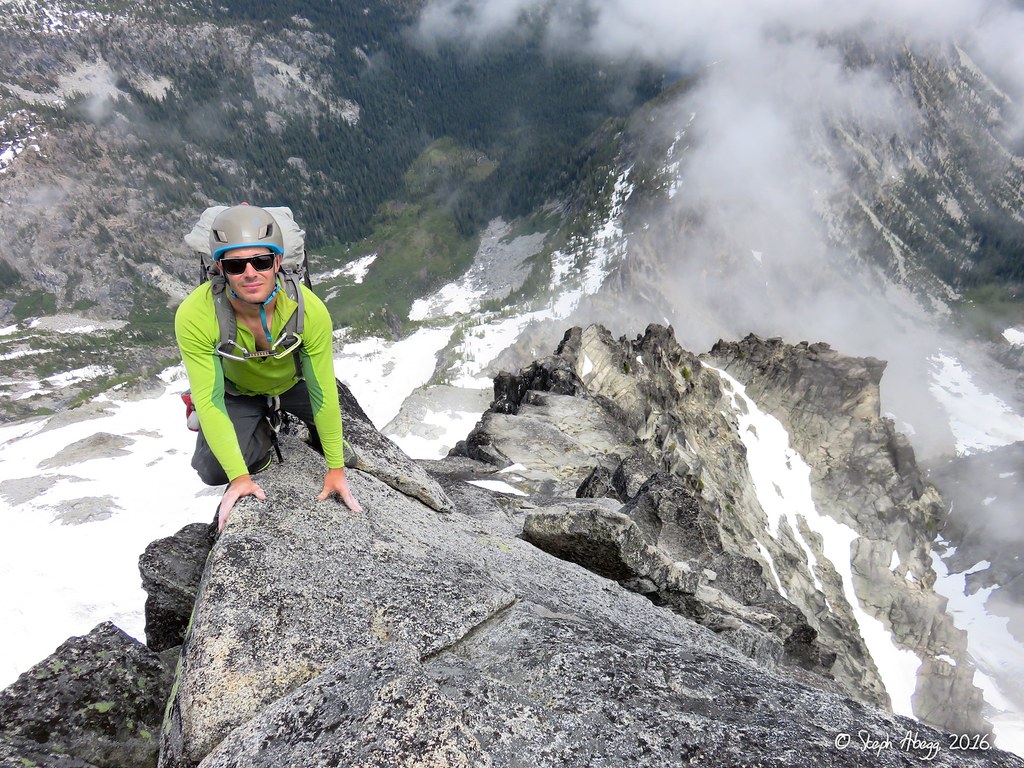
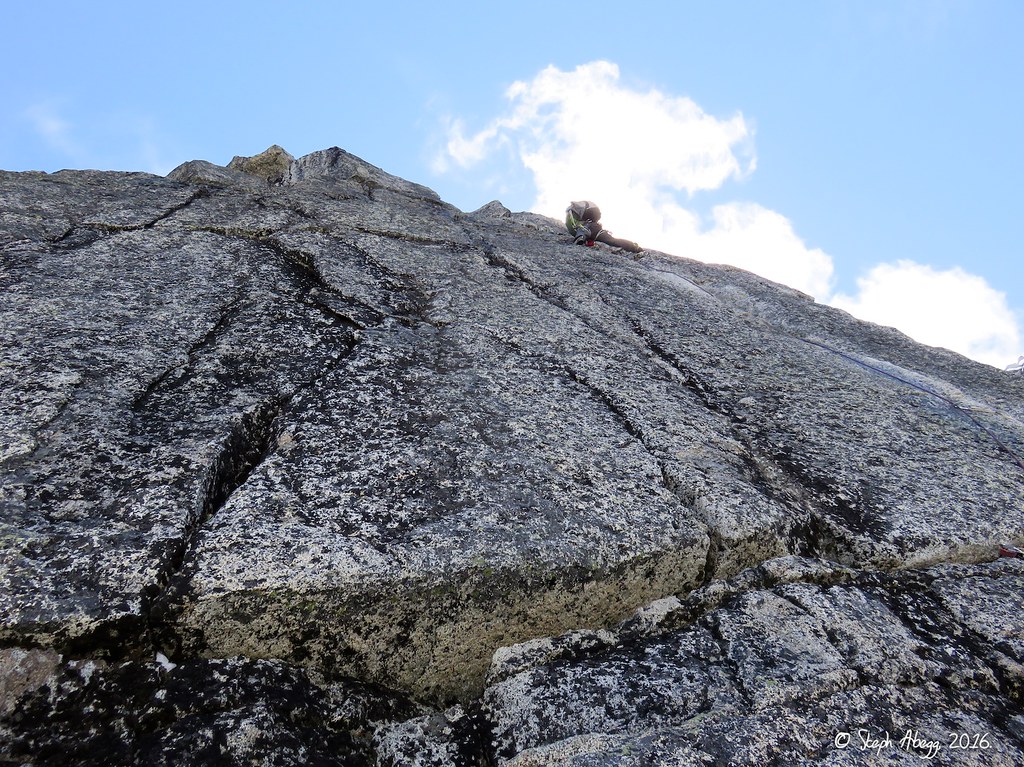
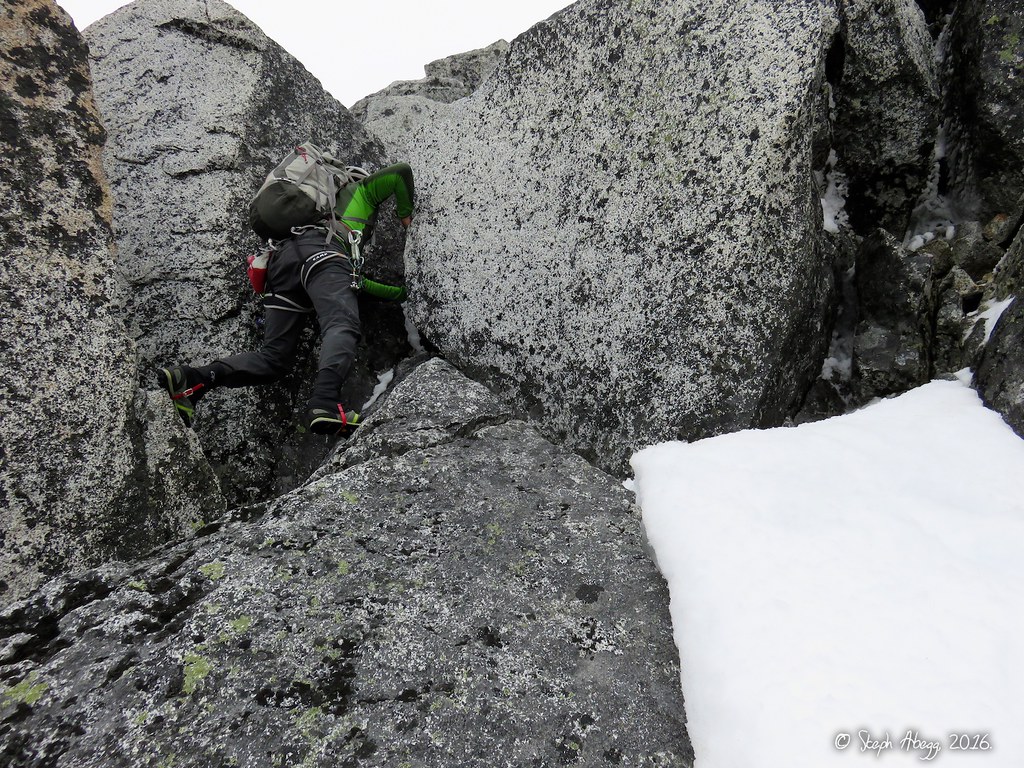
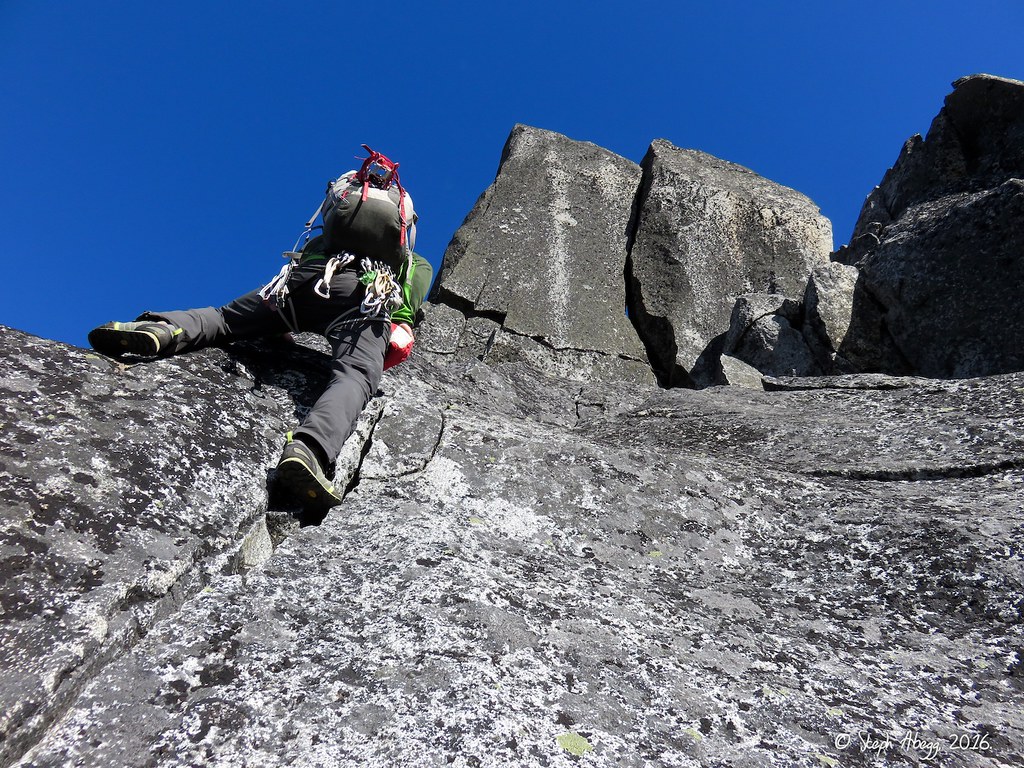
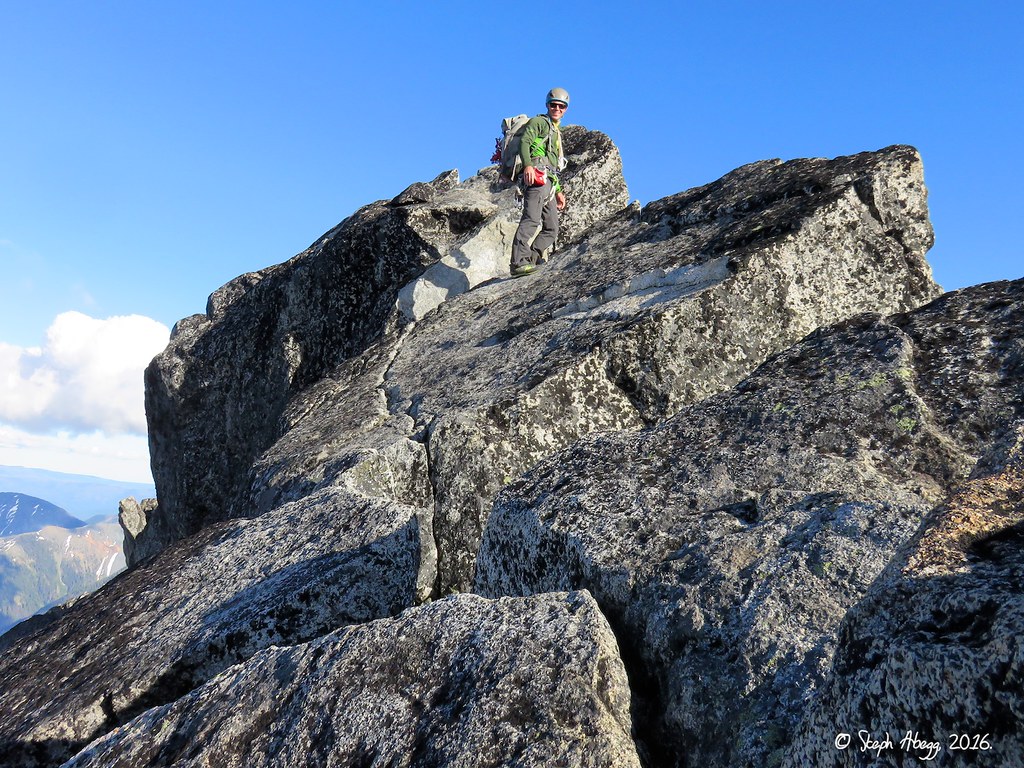
9-10. Above the first three pitches on the lower North Ridge, we unroped and soloed until the Gendarme. This is about 1600 feet of 3rd to 5.6 climbing. There is definitely some no-fall terrain. My pain caused me to move even more gingerly than usual.
11-12. As we got higher on the ridge, we encountered more and more snow patches. We had hoped to find running water, but nothing was flowing well enough to collect liquid water.
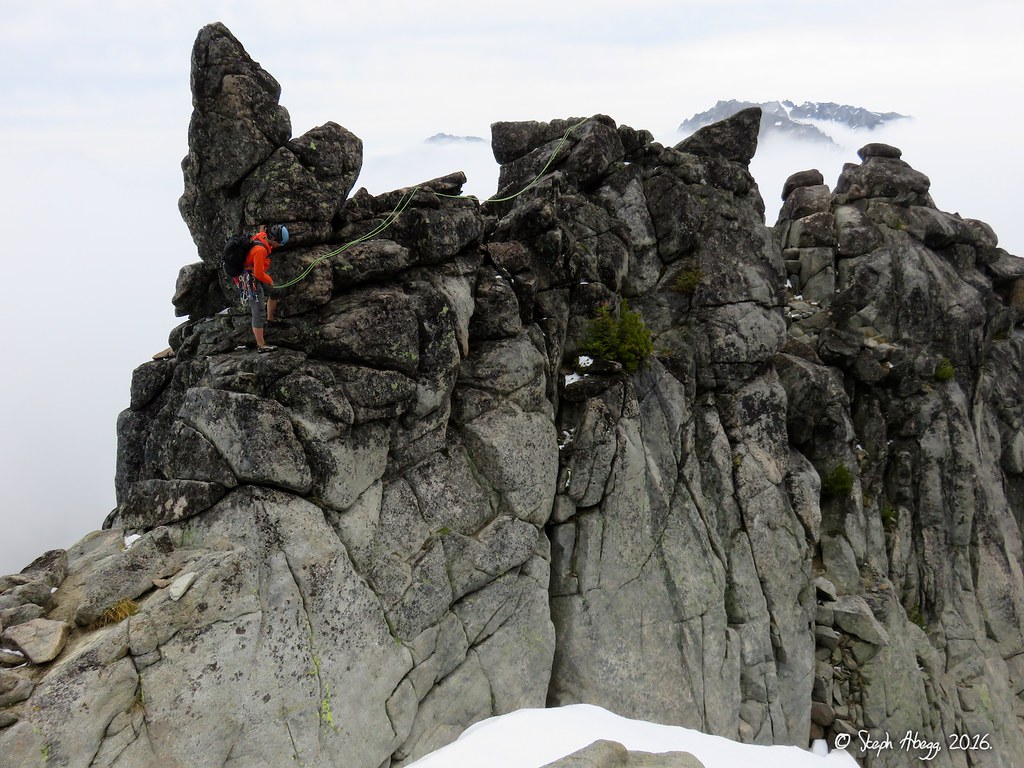
13. Looking back down the ridge. The pair of climbers in the photo nearly kept up with us even though we were soloing. The rest of the parties we had passed we never saw again.
14. Looking back down the ridge. What a spectacular position!
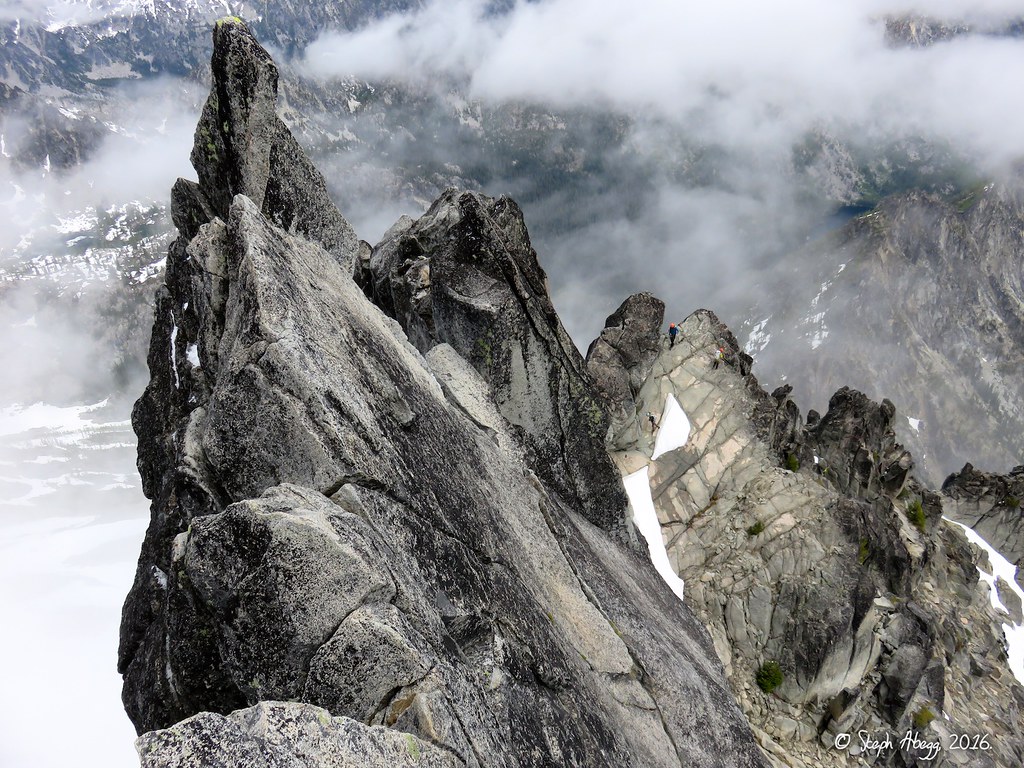
15-16. Soloing on the upper North Ridge, getting closer to the Gendarme.
17. A fun slab on the ridge. The Gendarme looms above.
18. A short knife-edge section.
19. On the final stretch before the Gendarme.
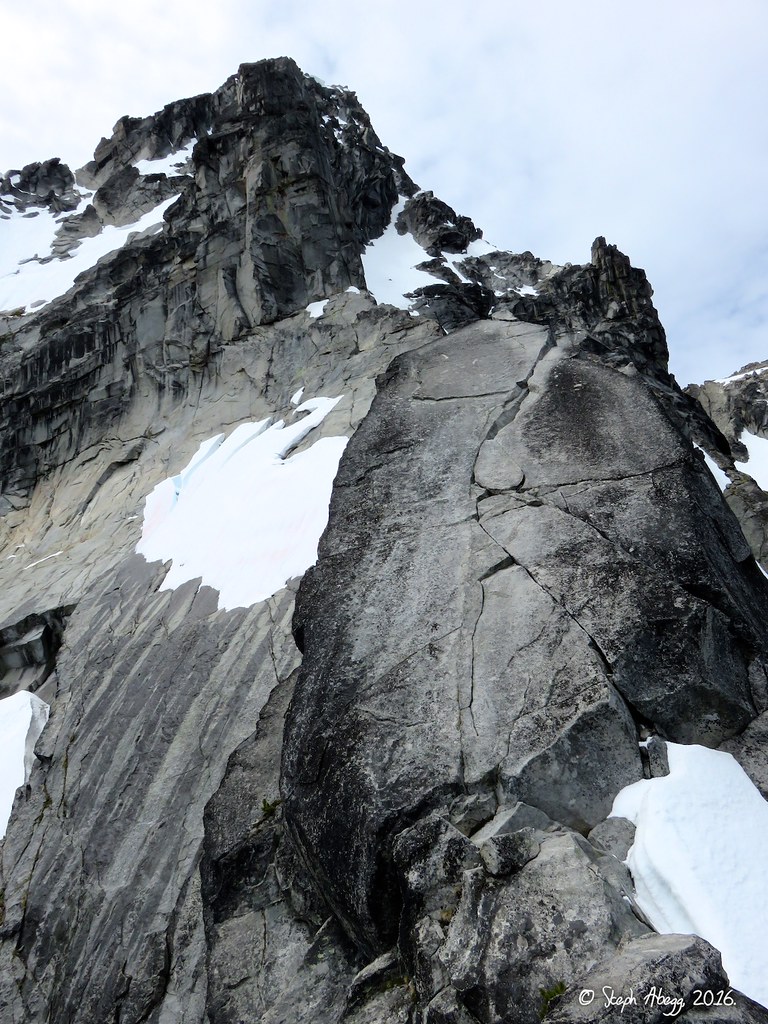
20. There is a bolted rap anchor at the base of the Gendarme. It is possible to rappel here and climb around right of the Gendarme. Apparently the climbing is a bit easier down there.
21. Looking over at the "easier" route that allows you to bypass the Gendarme. Not really a good option in early summer! (Anyway, the Gendarme is such good alpine climbing with great position that it would be a shame to bypass it anyway, even in the later season when the bypass slopes are dry.)
22. Looking back down the ridge from the base of the Gendarme. As evidenced by the photo, the stretch of climbing/belaying on the Gendarme is shady and chilly until afternoon. We put on our down jackets here, whereas up to this point I had been comfortable in a t-shirt.
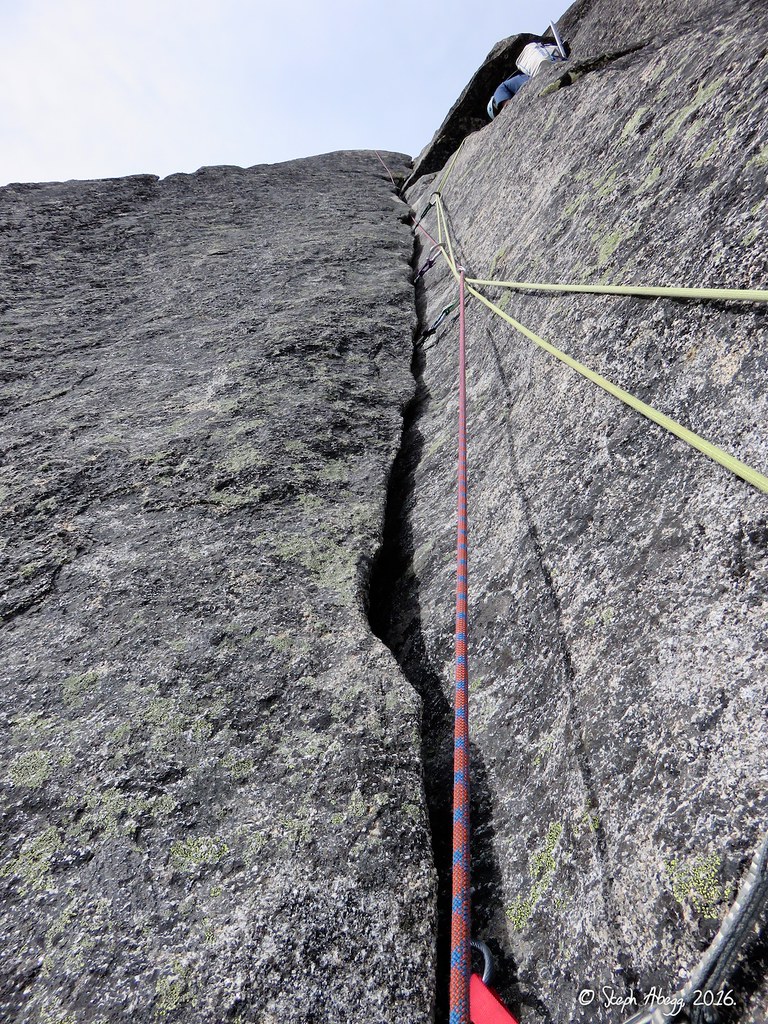
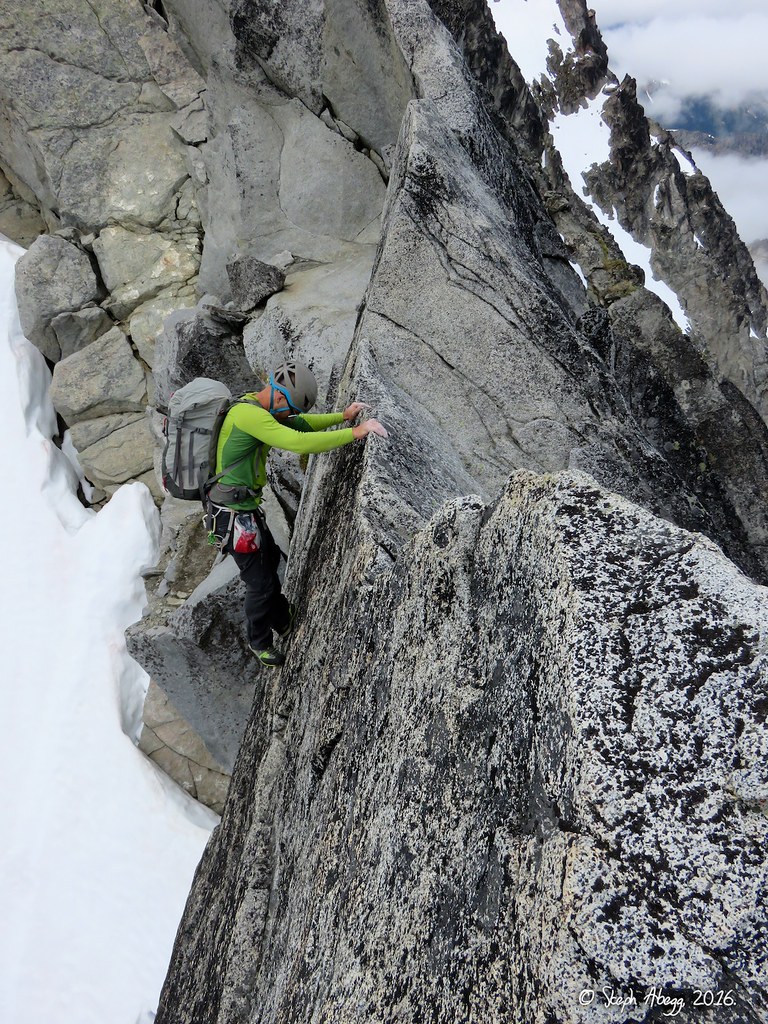
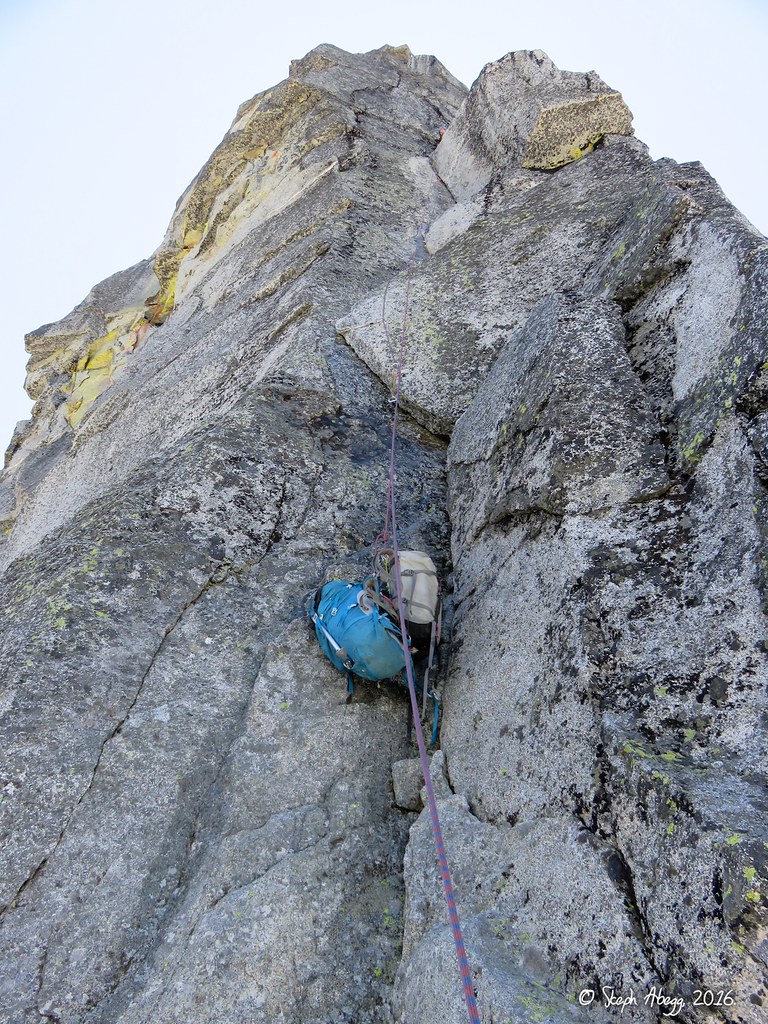
23. Looking up Pitch 1 of the Gendarme. The climbing is a 5.9 layback but the crack and left wall were wet and somewhat icy, making the climbing a bit more challenging. This is an easy pitch to haul packs on, so that is what we did. Jon tackled the somewhat icy layback in approach shoes, hardly batting an eye.
24. Looking up the 5.9 handcrack/lieback on Pitch 1 of the Gendarme.
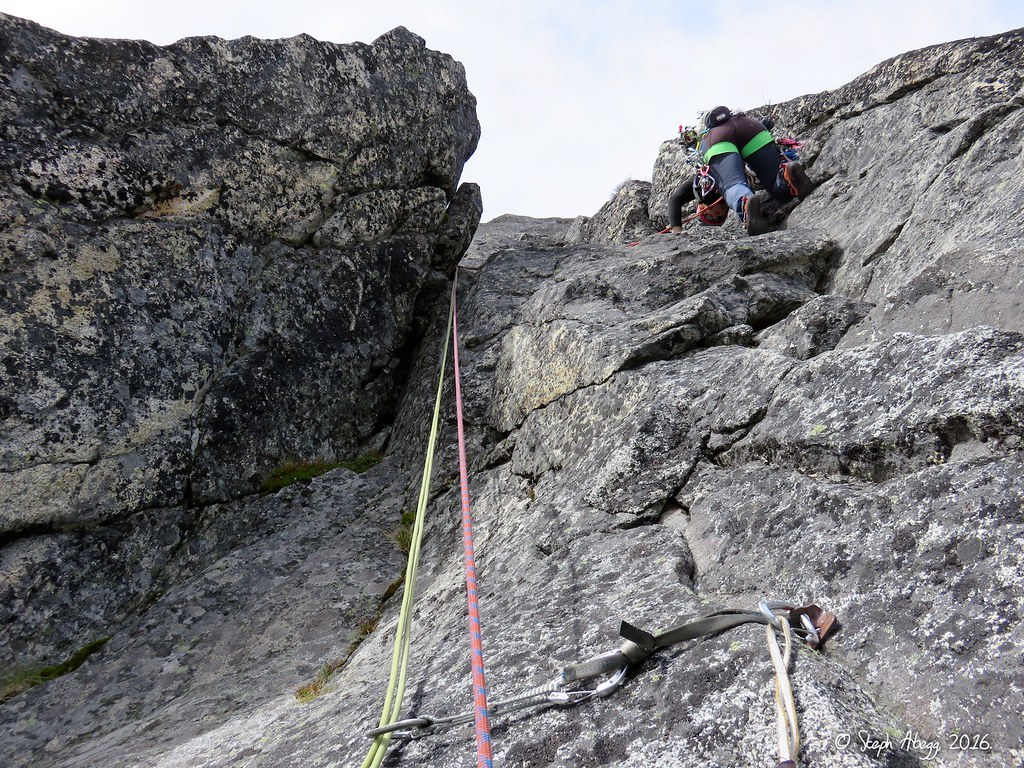
25. Jon leading Pitch 2 of the Gendarme. This climbs a 5.9 fist-crack/offwidth. We did not haul our packs on this pitch since it is a longer and more devious pitch. Another excellent lead by Jon.
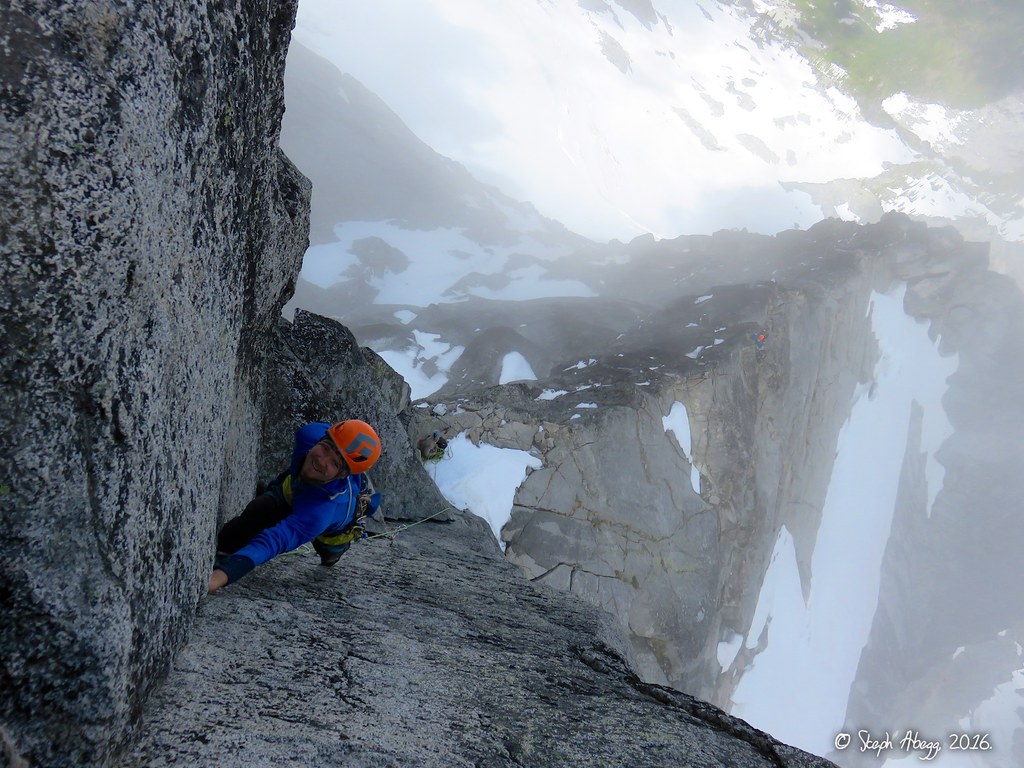
26. Climber coming up Pitch 1 with the North Ridge streching below him.
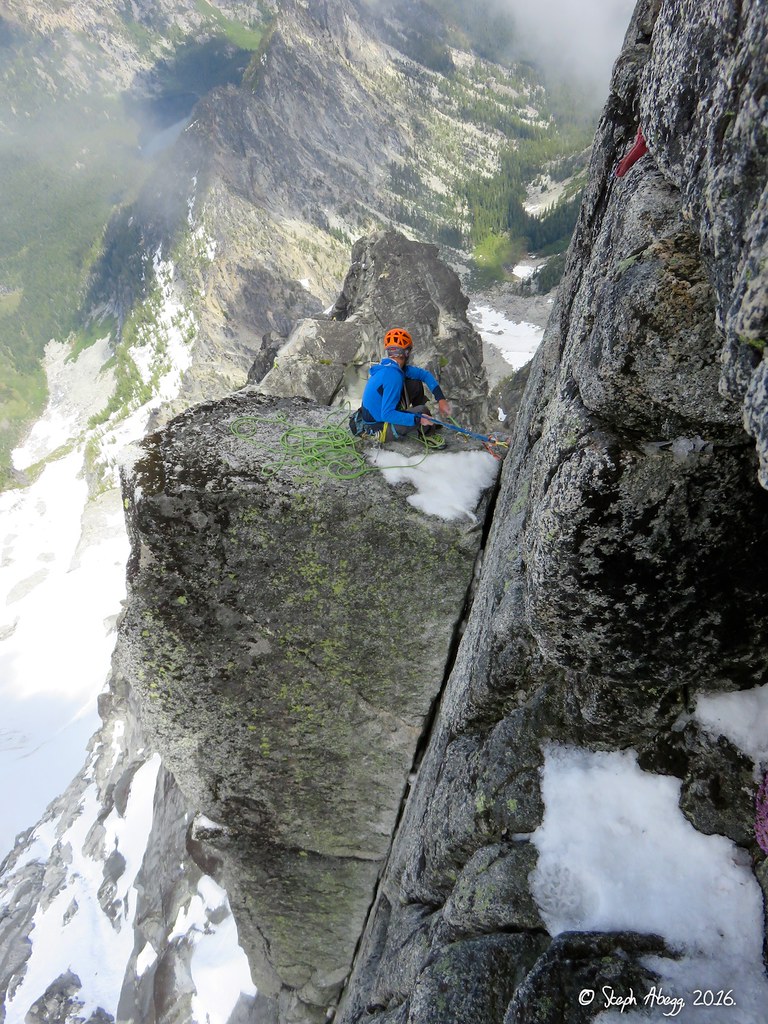
27. Climber at the nice belay perch at the top of Pitch 1.
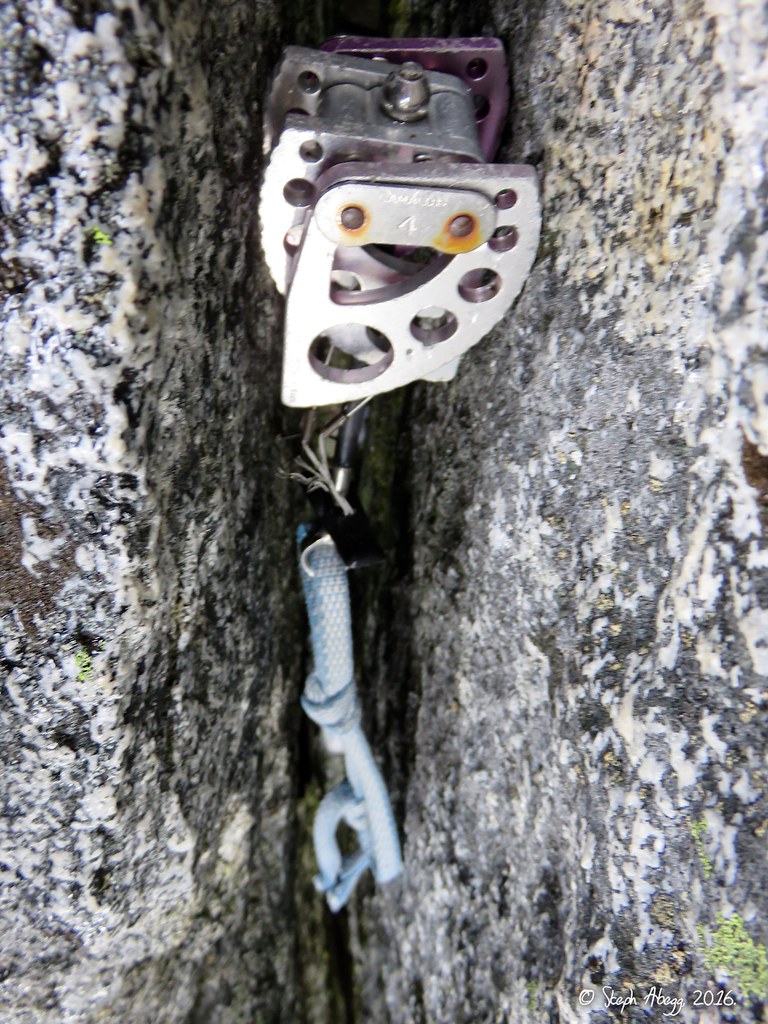
28. A fixed #4 cam in the fist-crack/offwidth on Pitch 2 of the Gendarme. There was also a fixed #1 cam near the beginning of Pitch 2 and a #3 cam in Pitch 1 (I had almost gotten the #3 cam out by the time my "5 minute rule" ran out, so I don't think the #3 will stay fixed much longer).
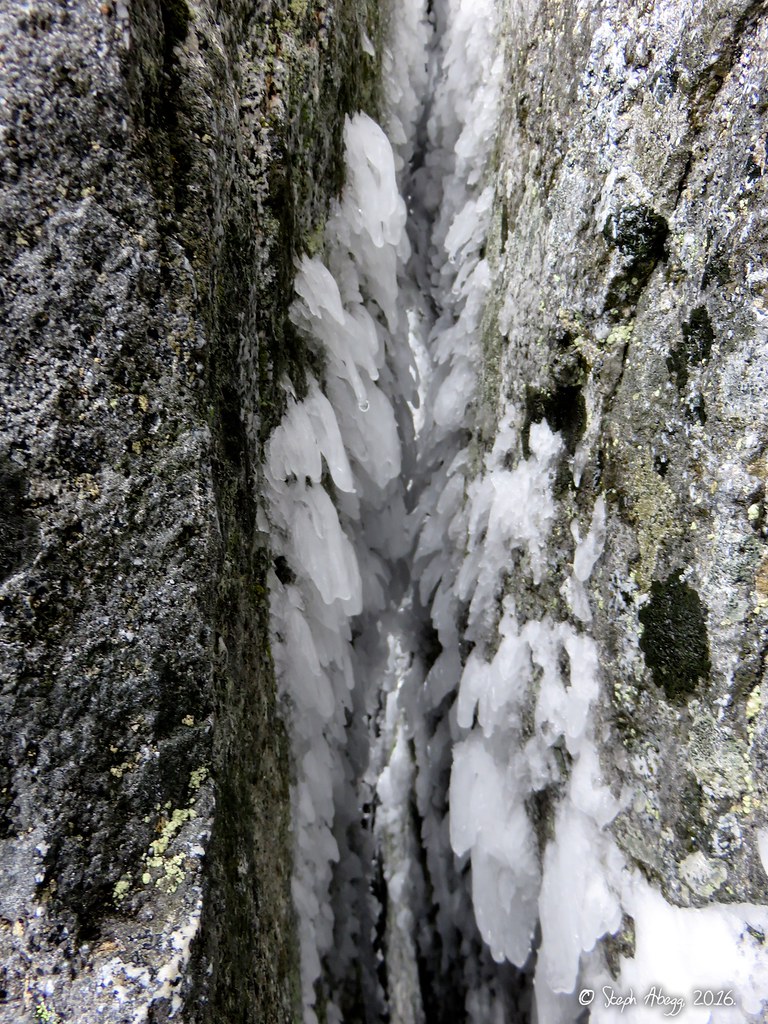
29. Rime ice inside the fist-crack/offwidth on Pitch 2.
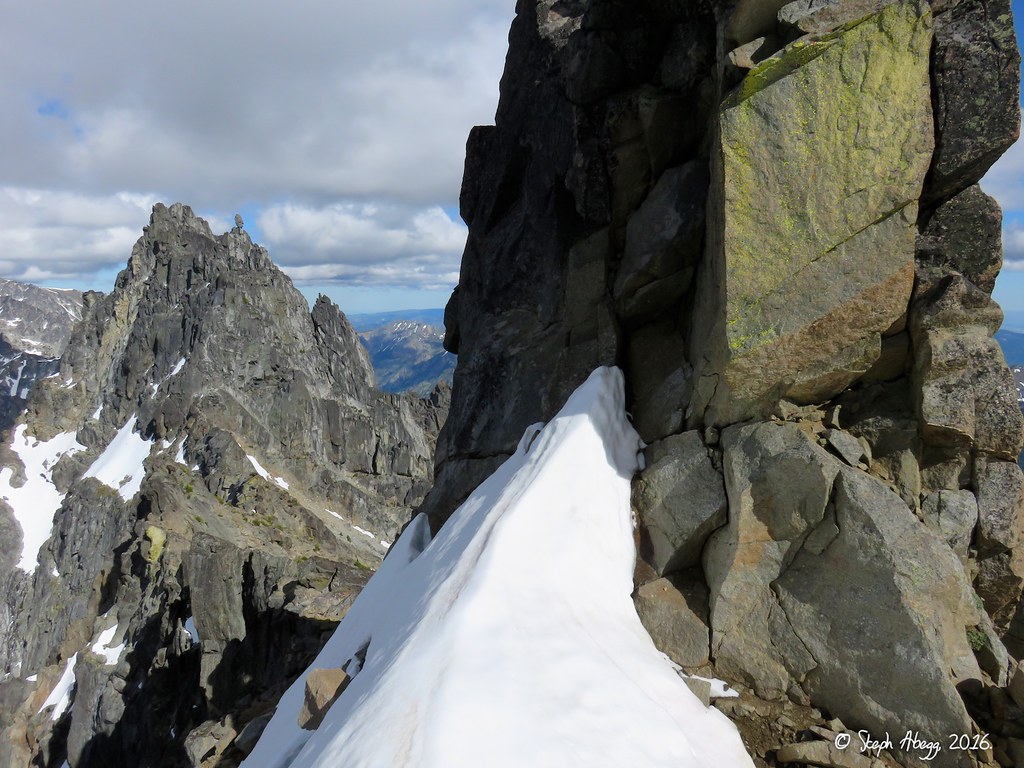
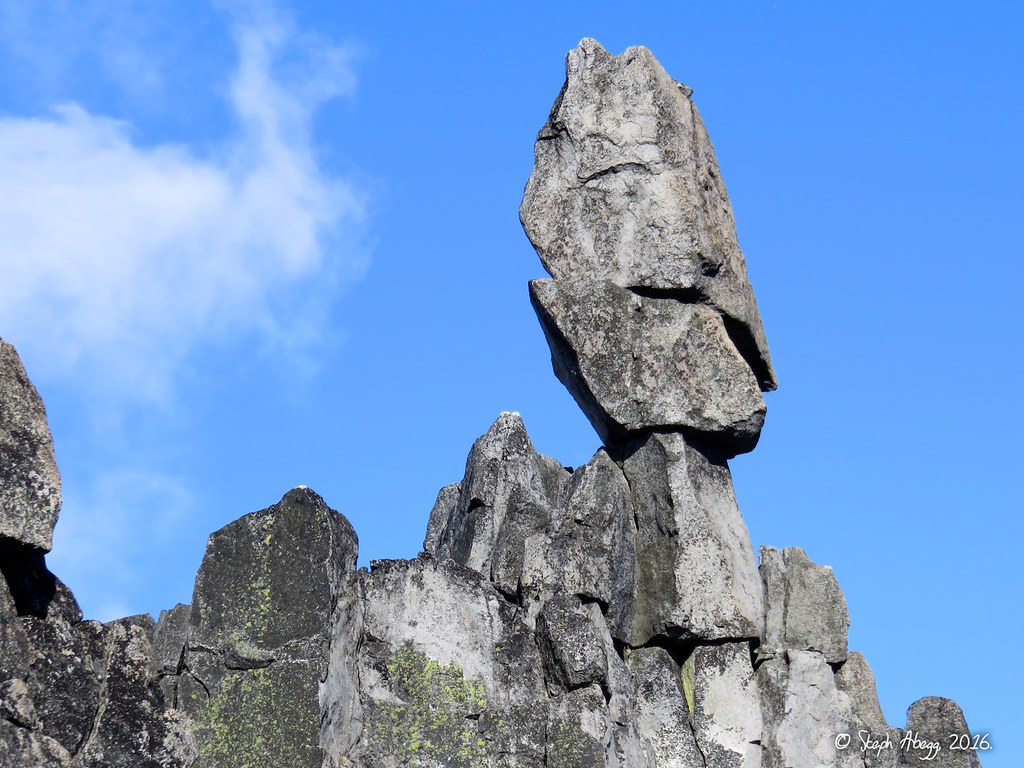
30. A view of Sherpa Peak (and Sherpa Balanced Rock) in the clouds.
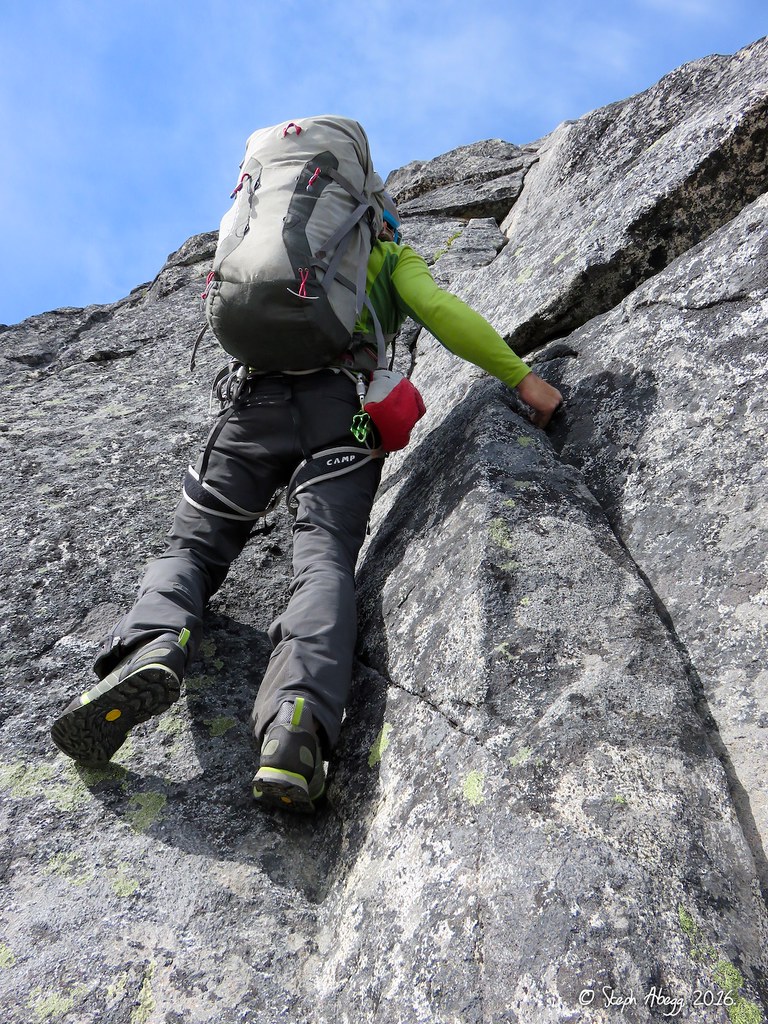
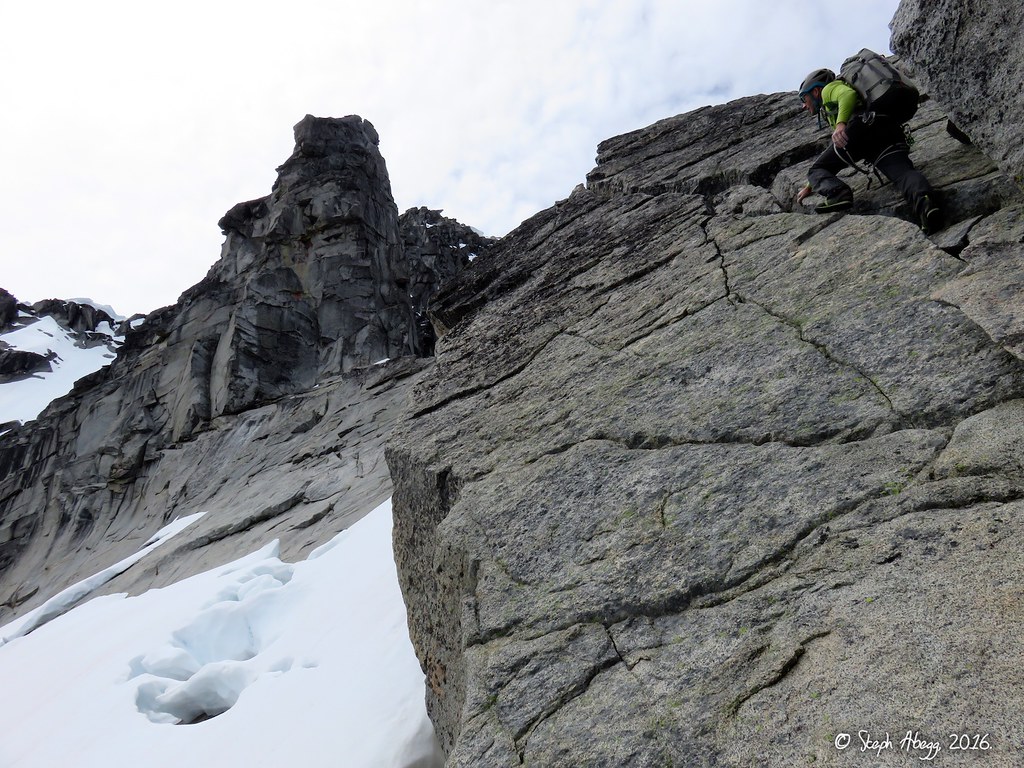
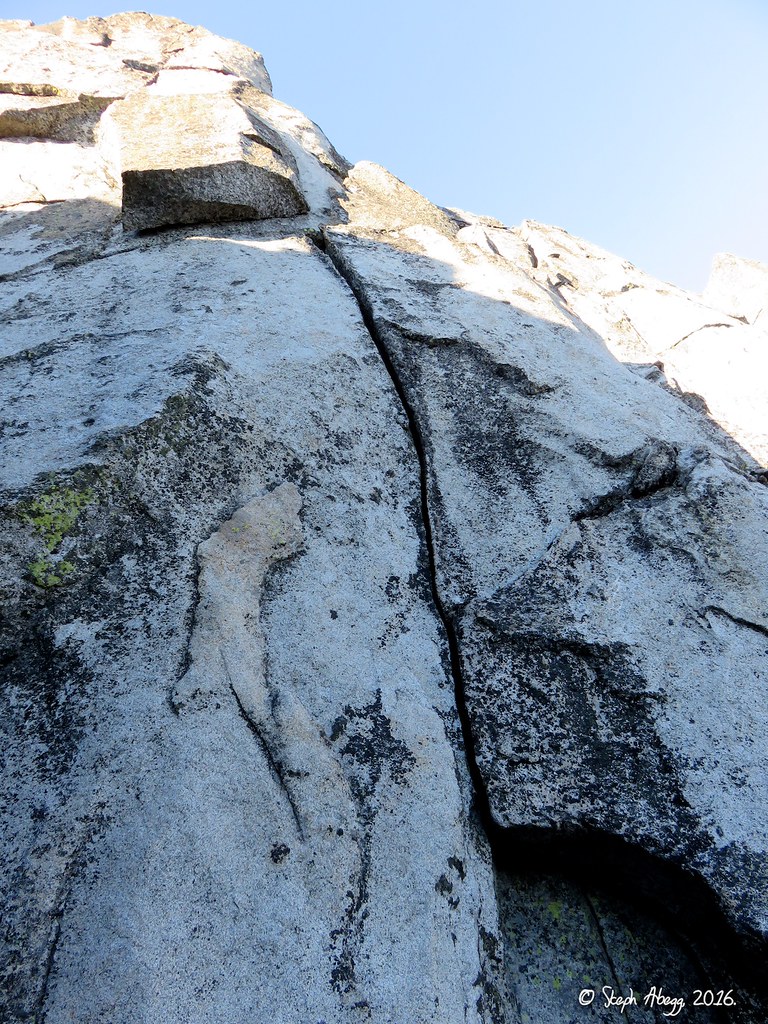
31. Not long after the Gendarme there is the final steep section. We climbed up the aesthetic cracks in the photo, which are 5.7-5.8. Because of the steepness we roped up for this short pitch. Apparently you can also bypass this section by climbing around it.
32. A cool tower on the upper North Ridge.
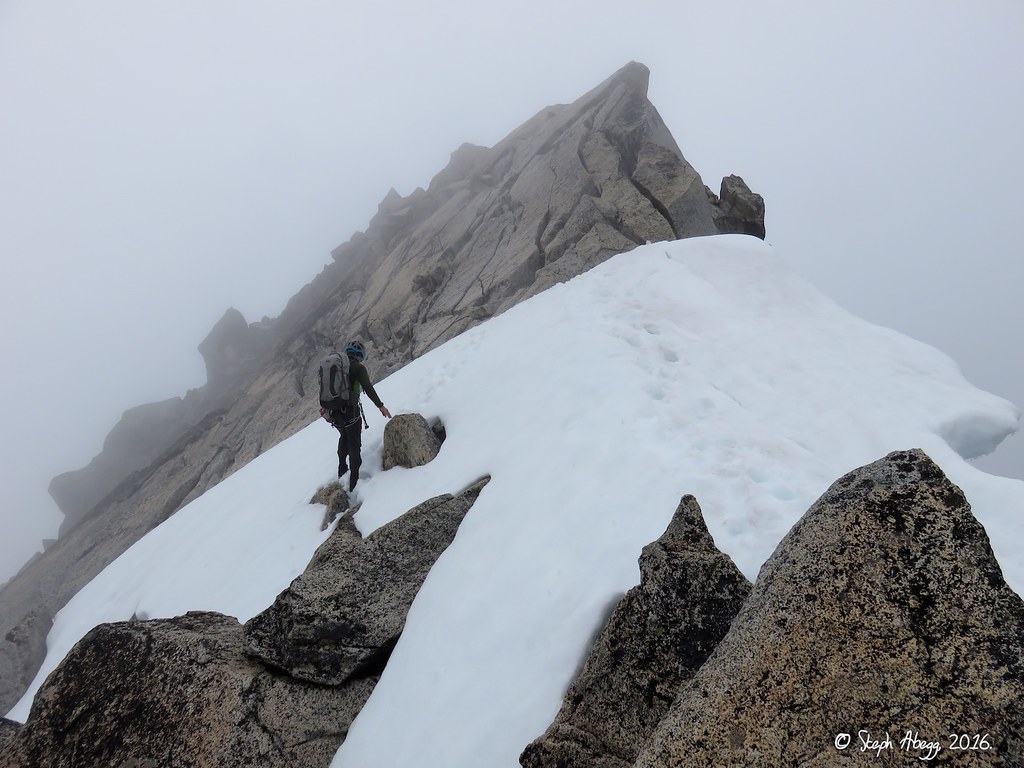
33. As we neared the top, there was more and more snow to deal with between the rock.
34. Jon approaching the summit! 6 and a half hours after we started up!
Scramble Between Stuart and Sherpa
Photos
Photos
Photo descriptions
35.
36.
37.
38.
39.
40.
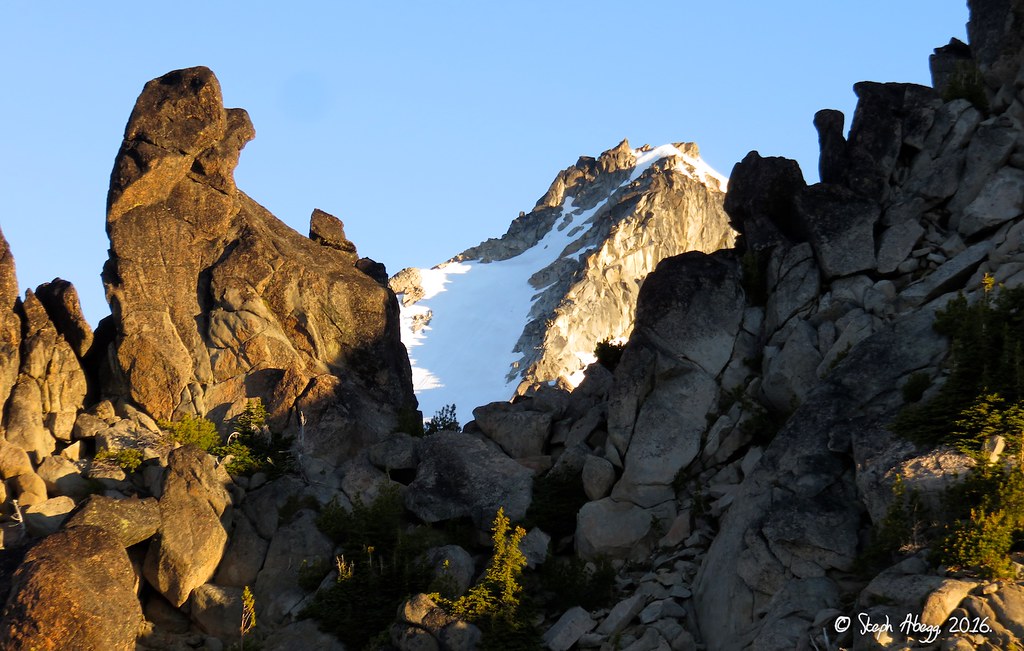
35. On the scramble between the summit and the col above Sherpa Glacier. I think this slope is at the head of Ulrich's Couloir. We were surprised at the lack of snow on these slopes, but I guess it is the south side. The scramble to the col above the Sherpa Glacier feels mellow after climbing the North Ridge.
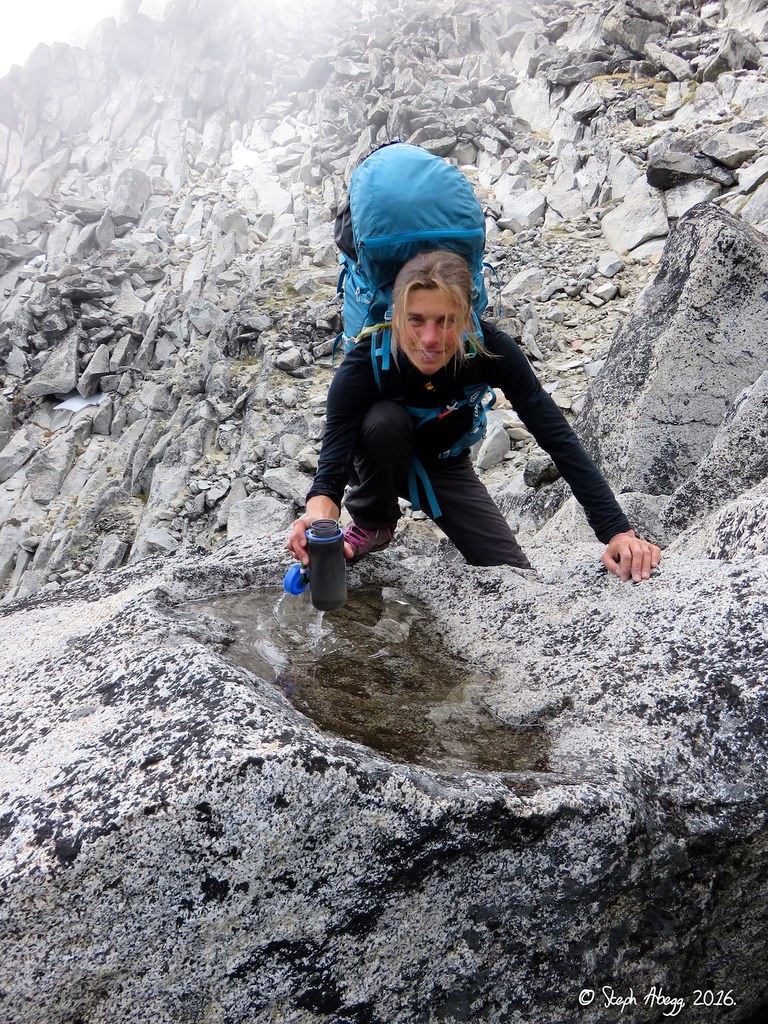
36. We found a pool of rainwater on a boulder. We had not found any running water on the North Ridge; in fact, we did not find any running water on the entire ridge between the summit and Sherpa Pass (on the other side of Sherpa) the next day. Meltwater from all of the snowpatches must just seep into the ground.
37. We had to cross a couple of snowfields en route to the col above Sherpa Glacier. The snow was firm enough that we were happy for our aluminum crampons. I had a lightweight axe too and was happy to have it on the snow. Jon had only his bare fingers (no axe or gloves!).
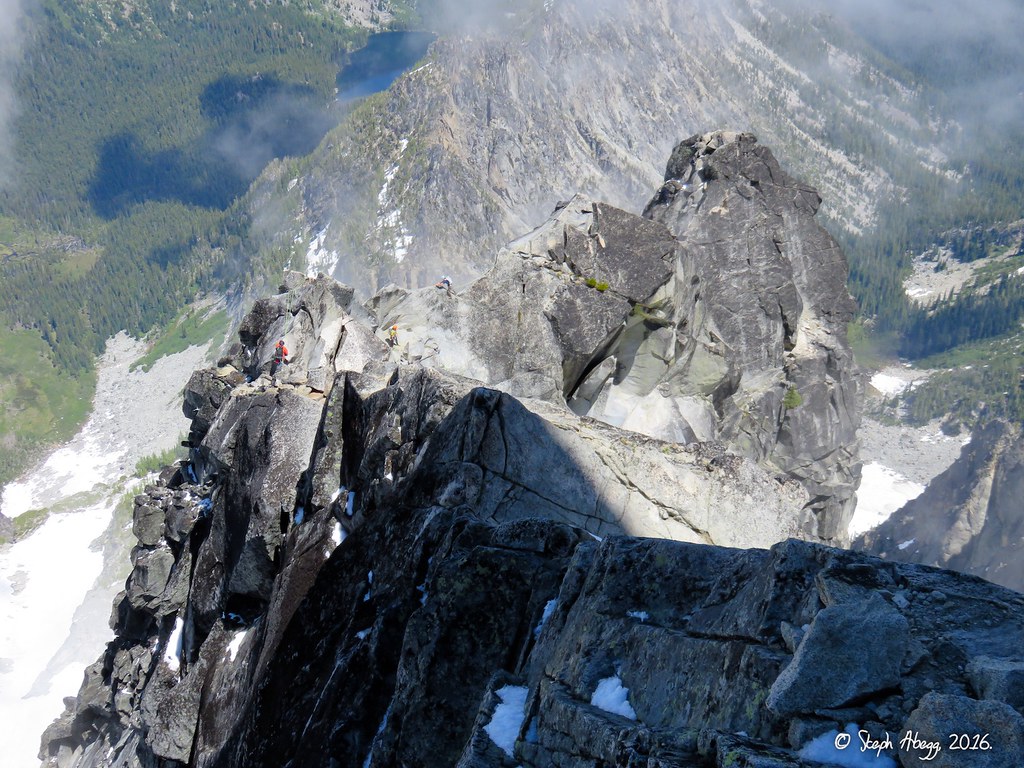
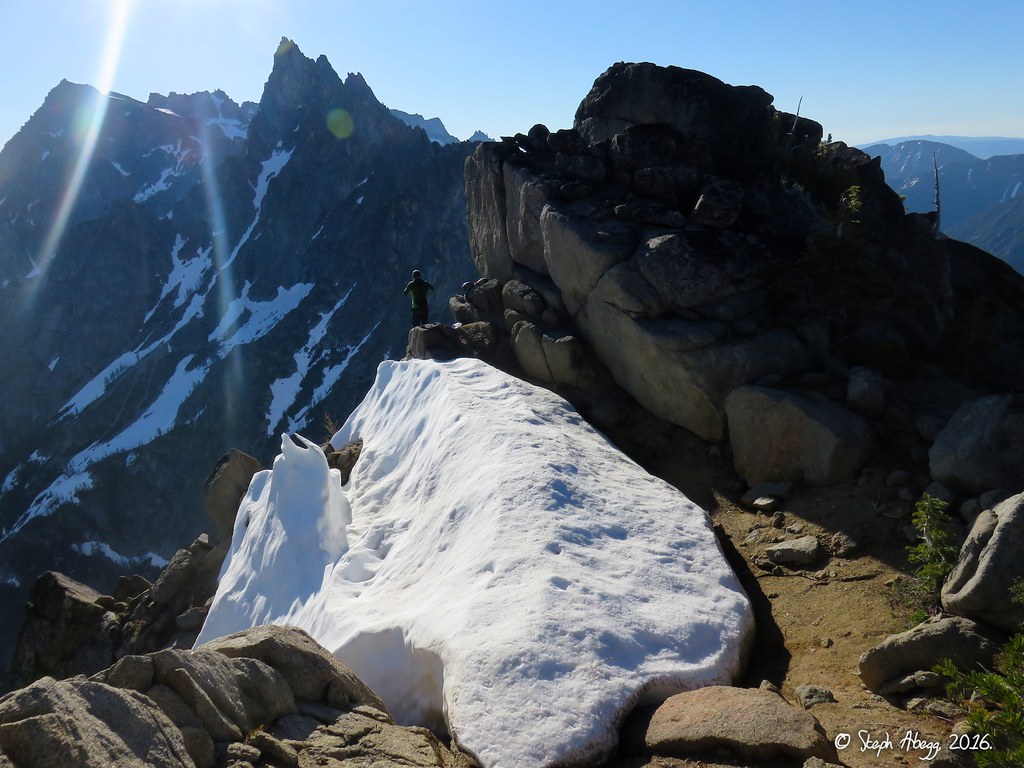
38. Looking ahead at the terrain between us and Sherpa Peak (our next destination). The col above the Sherpa Glacier is the low point in the ridge before Sherpa.
39. Looking down the Sherpa Glacier from the col. The snow looked a bit steep and icy, but there was still enough of it to make this a reasonable descent route. Most of the parties on the route with us that day had come in via Mountaineer's Creek and were planning to descend this way.
40. Looking towards Sherpa Peak from the col. The large tower in the foreground on the right is an obvious landmark for the start of the Sherpa Glacier descent.
West Ridge of Sherpa Peak
Route Overlay
Photos
Photos
Photo descriptions
41.
42.
43.
44.
45.
46.
47.
48.
49.
50.
51.
52.
53.
41. On the way over to Sherpa, I popped a coffee Nips in my mouth and the next thing I knew I was spitting out a couple of tooth fragments and inspecting a piece of candy with a crown imbedded in it. Compared to my other injury, this seemed like a minor inconvenience. So I gave a sarcastic chuckle, plucked the crown out of the candy, popped the candy in my mouth, and shoved the crown in my pocket. We continued onwards towards Sherpa.
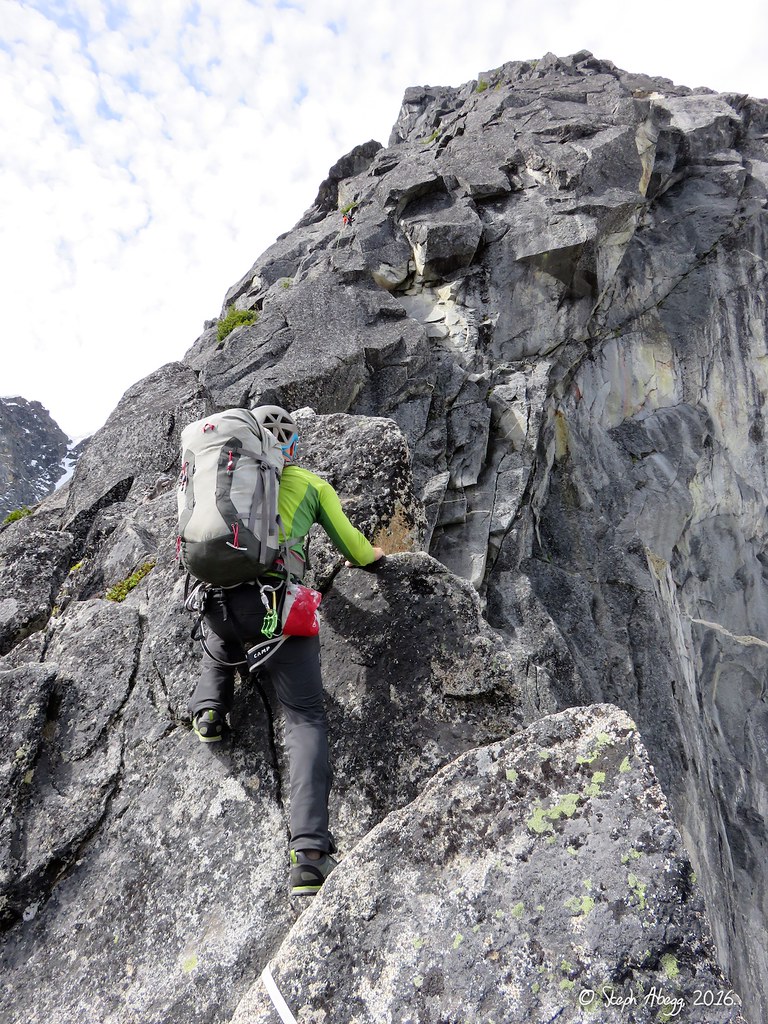
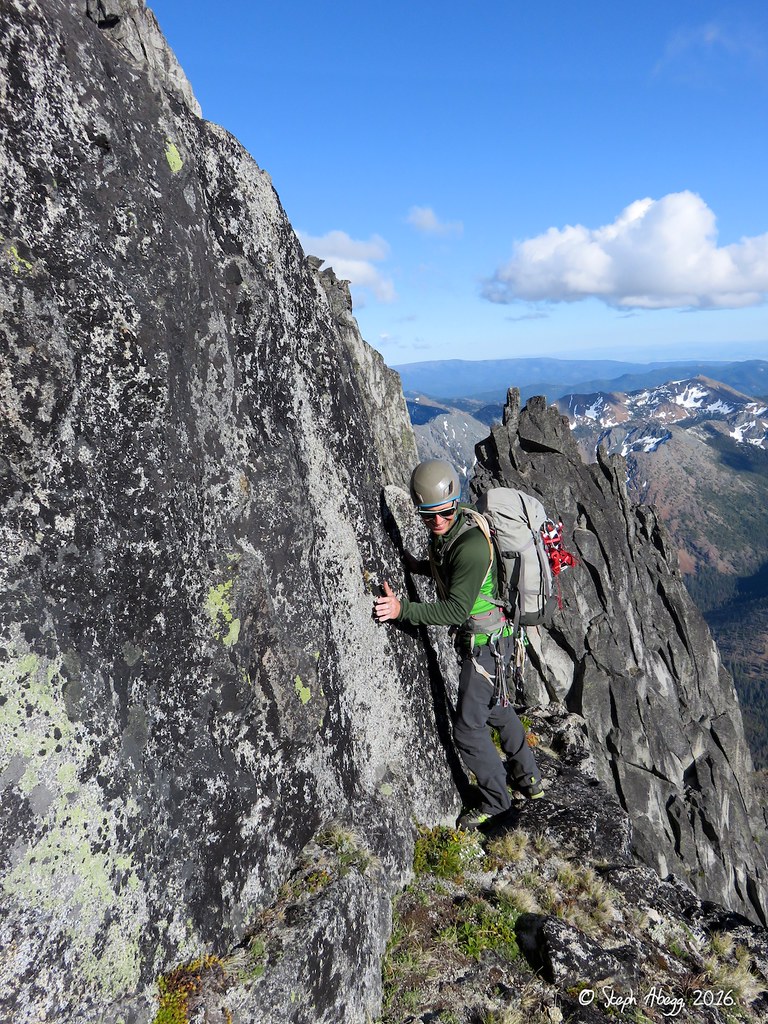
42. Looking up the west side of Sherpa. We climbed the West Ridge route, or at least our variation of it. The Cascade Alpine Guide rates it at 5.5, and for the most part we kept it at this grade. The climbing is blocky and the rock is generally good and it seems like there are several route options.
43. Climbing one of the steeper sections on the West Ridge. This crack seemed more like 5.7 so perhaps the "real" route goes off left a bit of this.
44. We found lots of flakes and boulders slung with tat on this climb. We suspect that the West Ridge is more often done as a descent by parties who climb up the North Ridge.
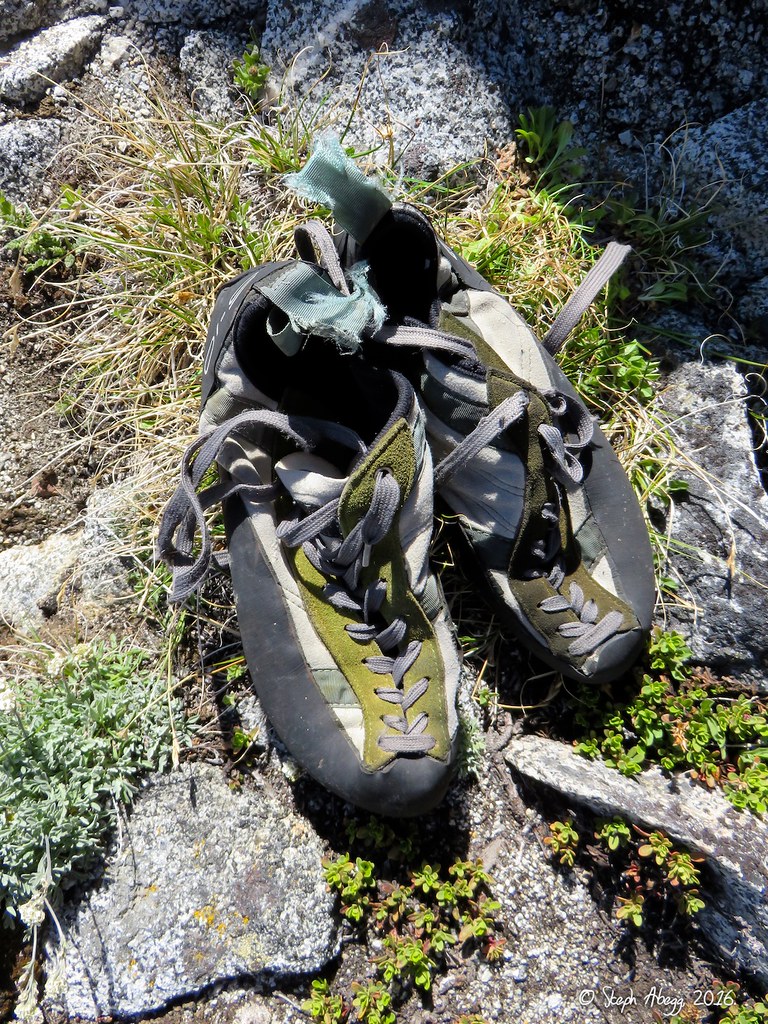
45. We found a pair of climbing shoes a climber had probably accidentally left when they took a break on a ledge. The shoes looked like they had been up there at least one winter.
46. Climbing on the West Ridge.
47. A ledge traverse on the West Ridge route. This ledge traverse is mentioned in the route description in the Cascade Alpine Guide.
48. On the summit of Sherpa Peak! It took us about 1 hour to get there from the base. We never roped up.
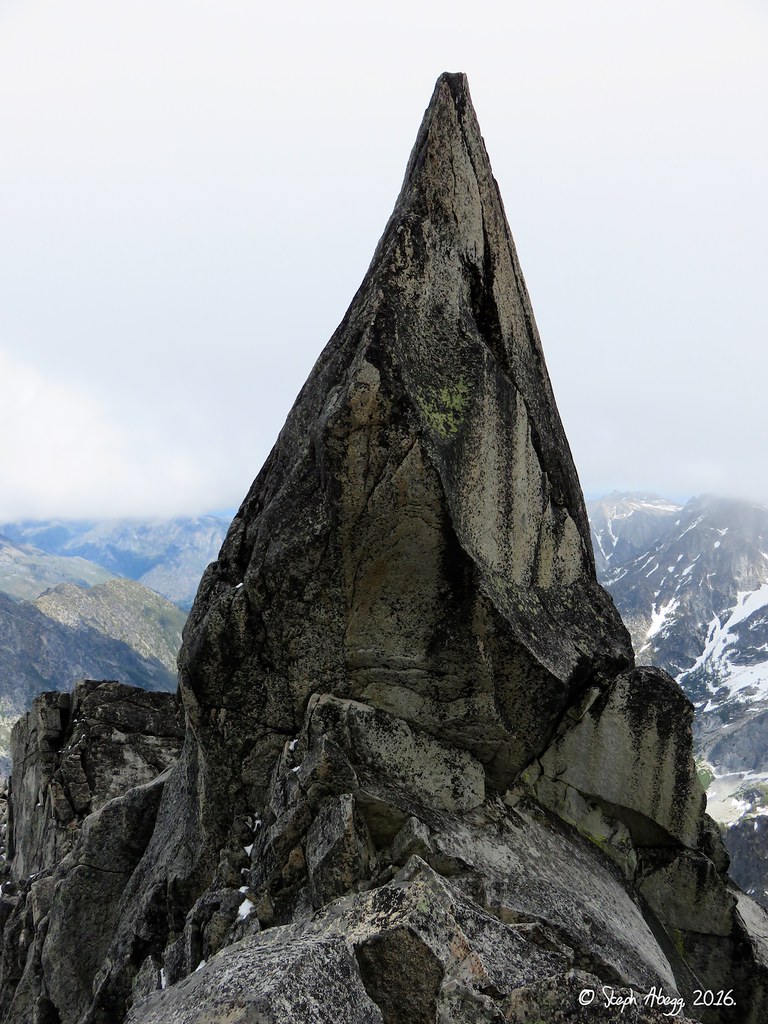
49. The balanced rock (from the west). I have always wanted to climb the balanced rock, but today wasn't the day. The description from the Cascade Alpine Guide: "Shoulder stand or rope throw over a pedestal point gains the E side pedestal, then, with bolt protection, frictioning gains the top. Class 5.7." Sounds wild!
50. Mt. Stuart as seen from the summit of Sherpa Peak.
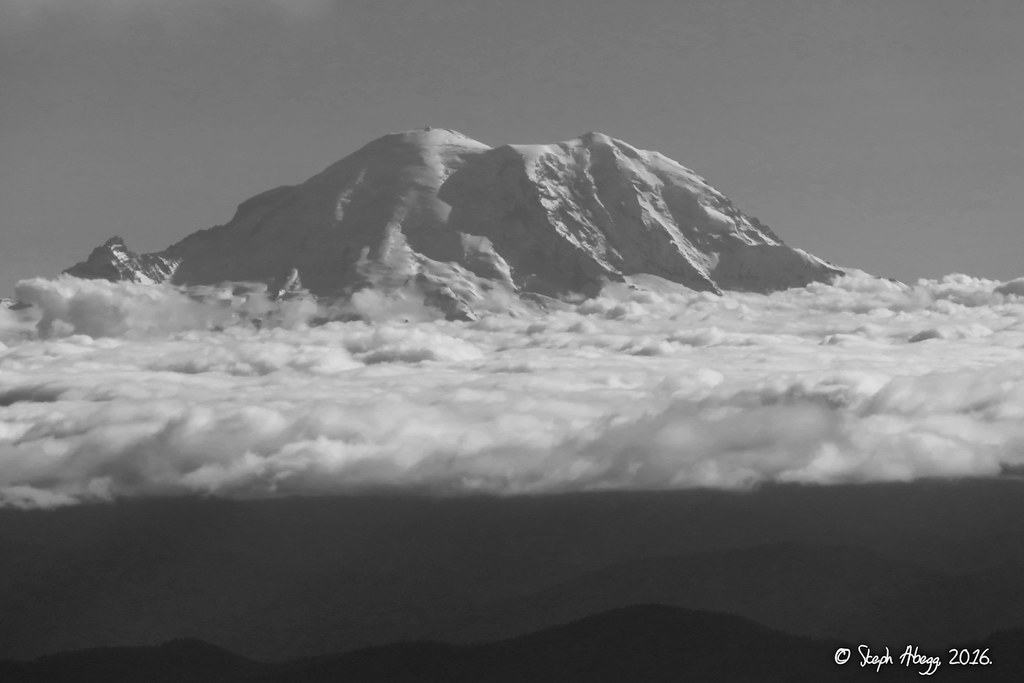
51. Rainier in the distance to the south, as seen from the summit of Sherpa Peak.
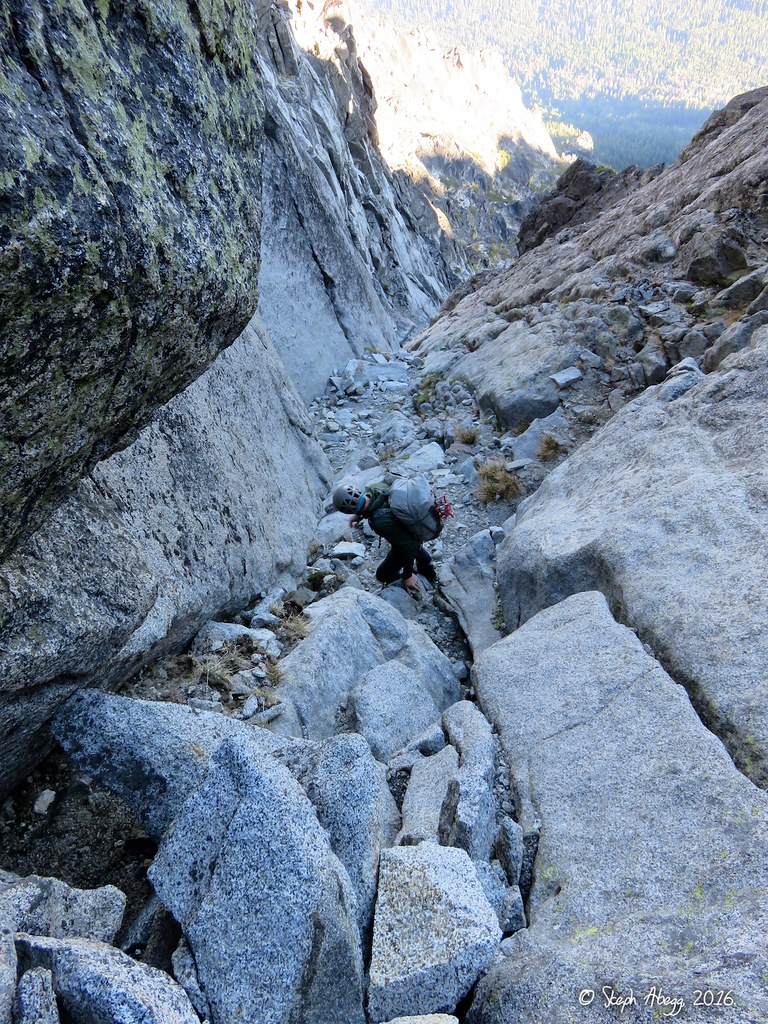
52. We descended via the South Gully, which is a 3rd-4th class scramble.
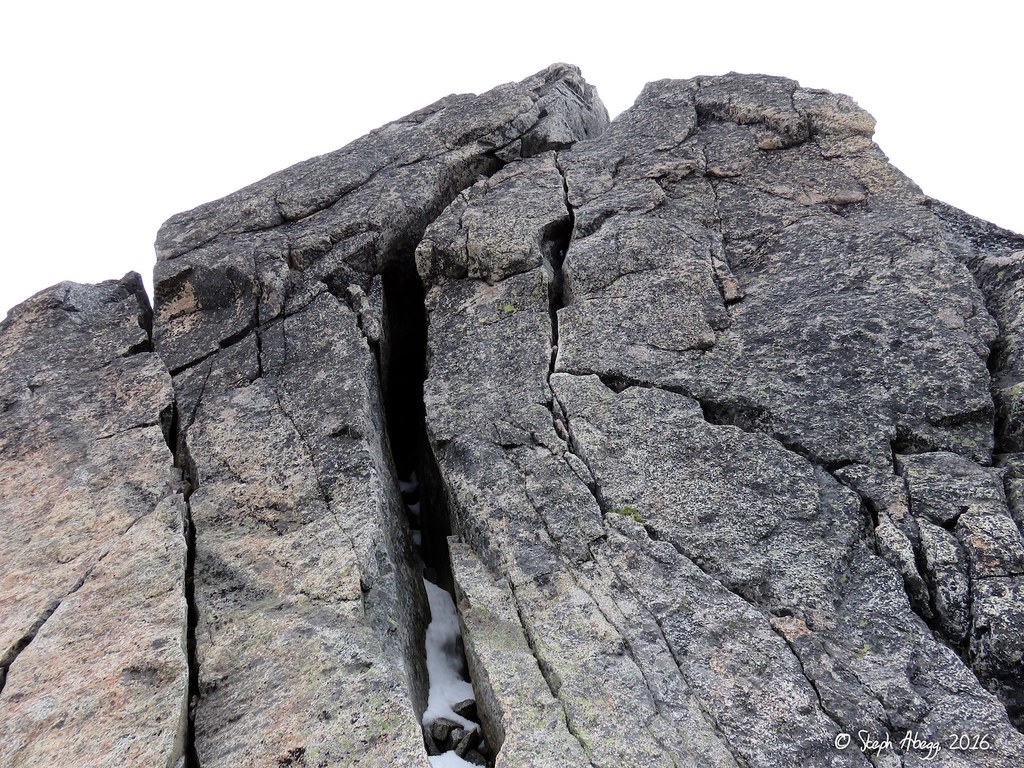
53. A splitter offwidth on Sherpa alongside the South Gully route. Wonder if anyone has ever had the time/motivation to climb it?
Hike Out via Sherpa Pass
Photos
Photos
Photo descriptions
54.
55.
56.
57.
58.
59.
60.
61.
62.
63.
64.
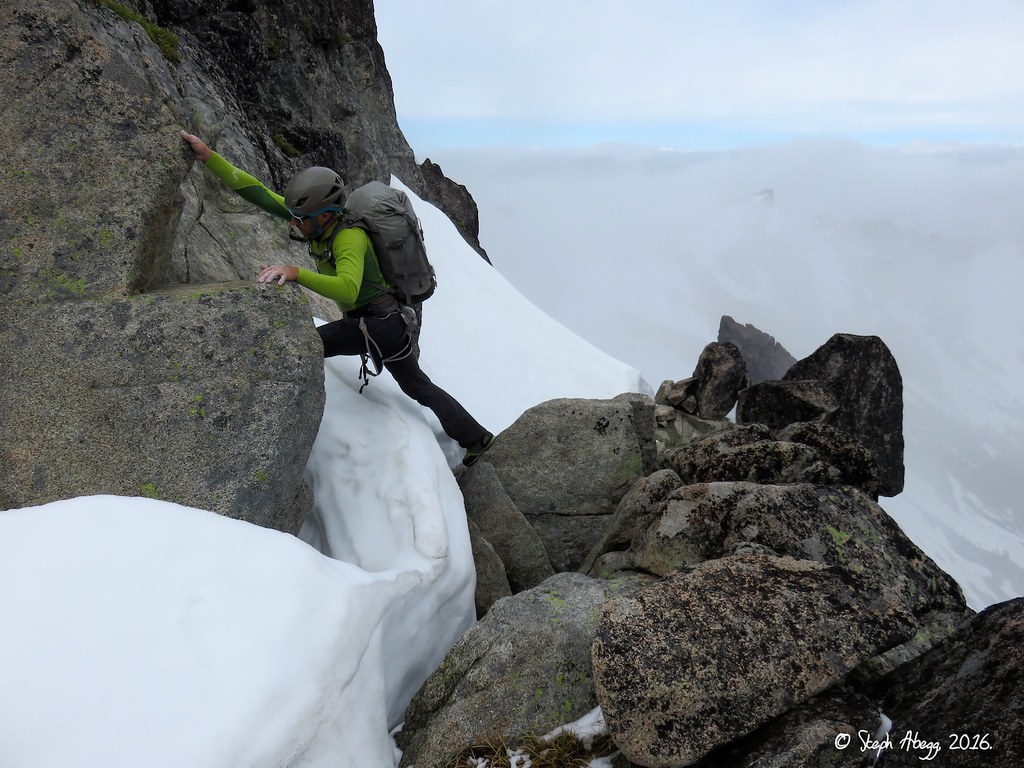
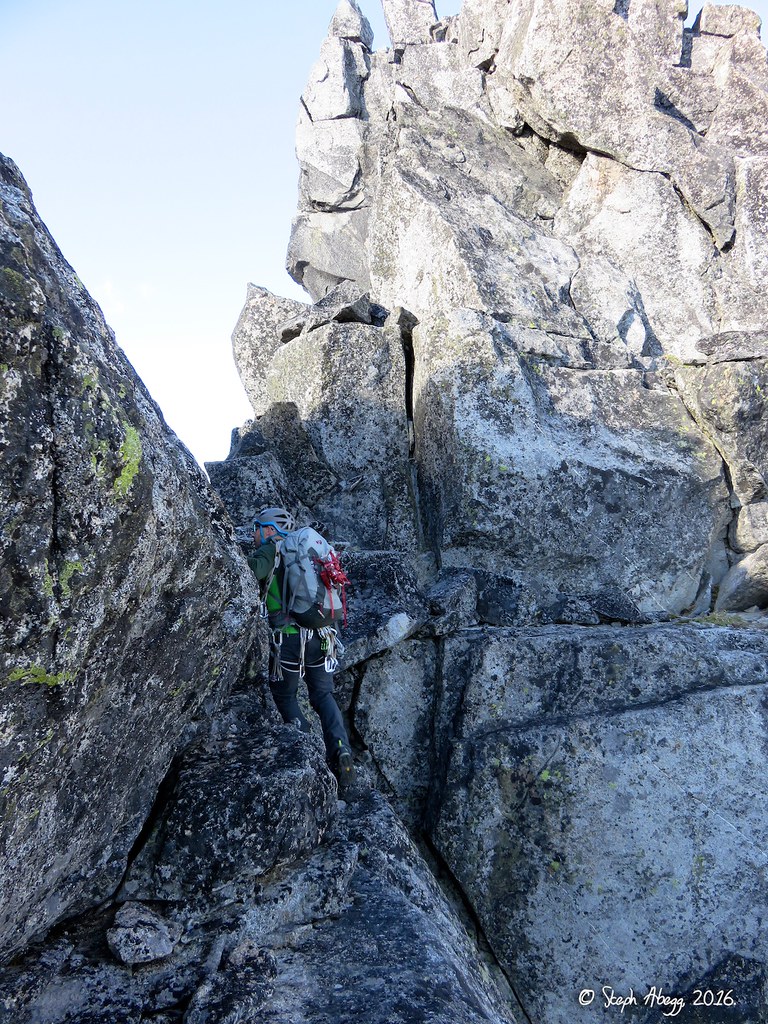
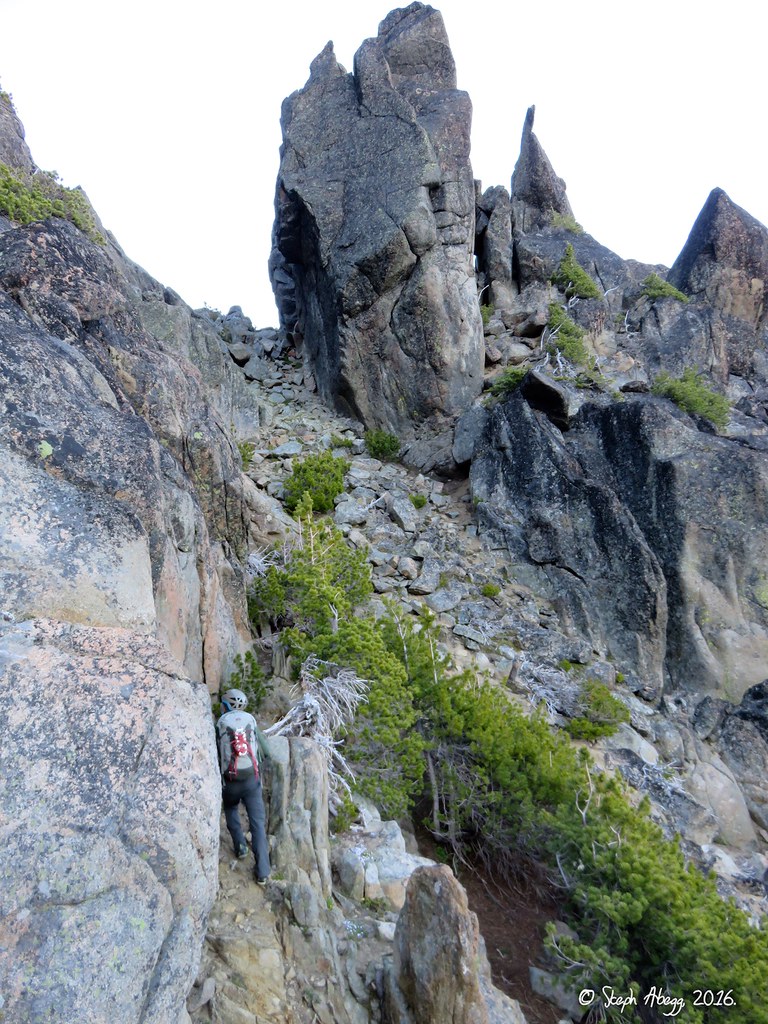
54-55. From Sherpa Peak we continued heading eastward towards Sherpa Pass. The original plan had been to traverse over Argonaut, Colchuck, and Dragontail, but with my injury it was looking likley we would just descend back into Mountaineers Creek via Sherpa Pass. The terrain between Sherpa and Sherpa Pass was mostly just 3rd class, with some cool passageways through notches in the ridge.
56. Argonaut.
57. Just before 8pm, we found a bivy site that was too good to pass up. It would have been possible to make it to Sherpa Pass and get down into Mountaineers Creek before dark and head out to the car via headlight, but there is something appealing about spending a night high on a ridge in the North Cascades (we had hauled bivy gear up here, after all!). Also, I had the crazy hope that my injury would dissipate overnight and we could continue the traverse across Argonaut, Colchuck, and Dragontail. (This photo was taken in the morning.)
58. Morning light on the east side of Stuart, as seen from our bivy site.
59. Continuing the traverse between our bivy site and Sherpa Pass. Argonaut in the distance.
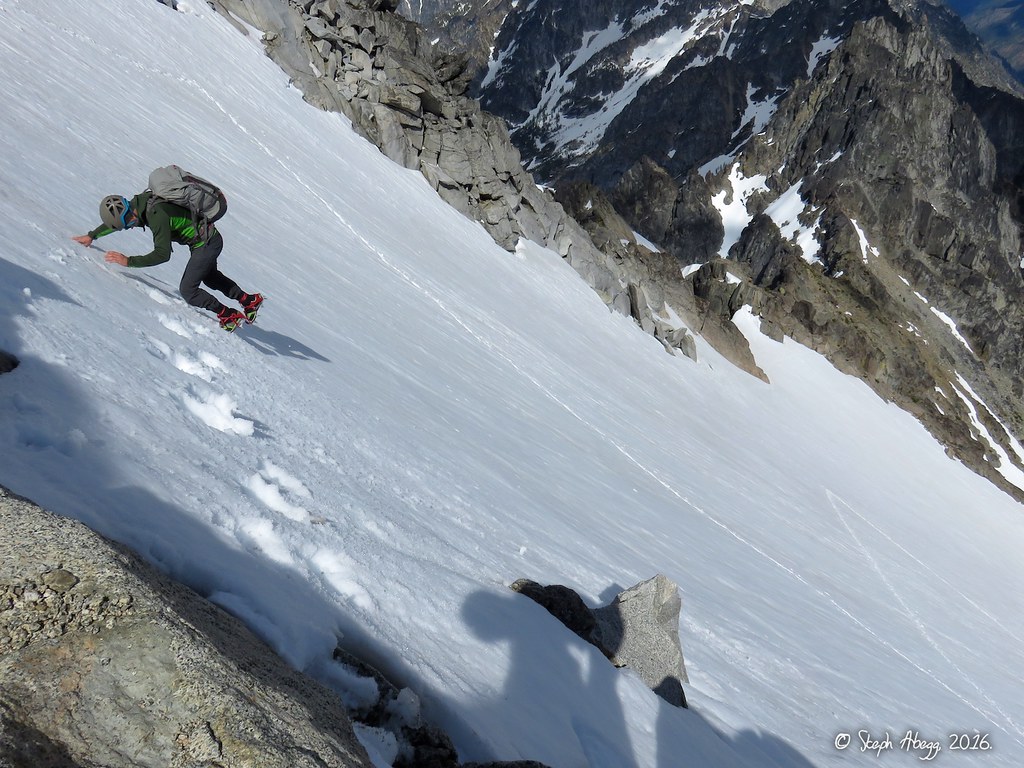
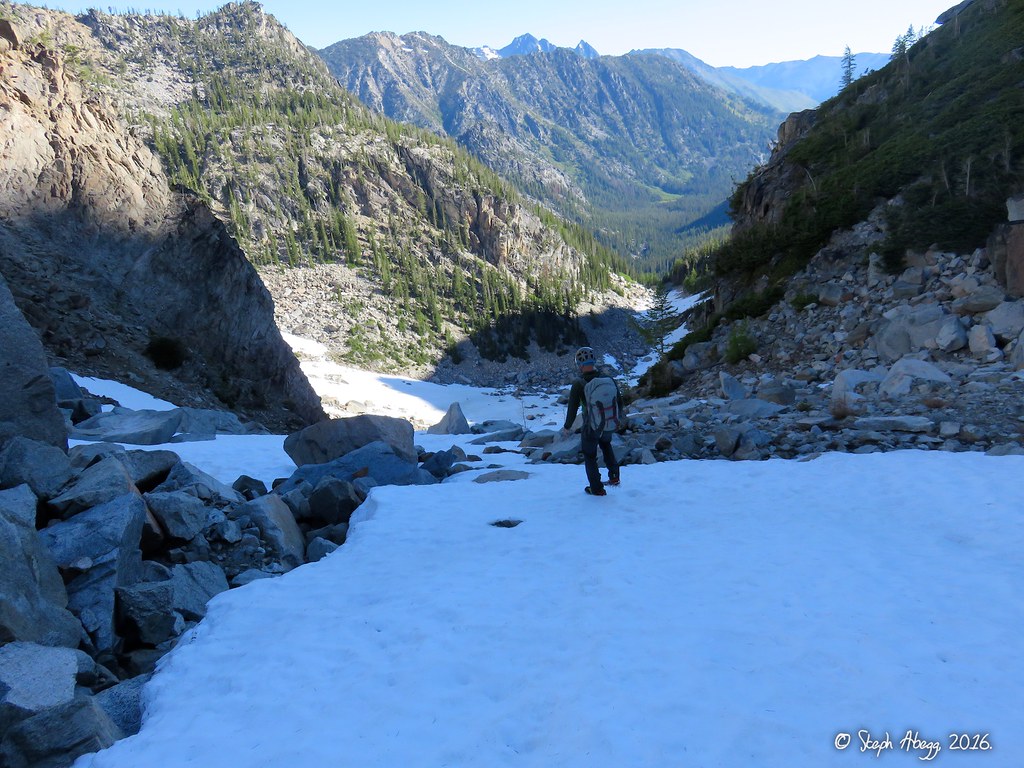
60. Looking down the mellow snow field from Sherpa Pass. My pain was even worse today so we decided it was best to head out, especially when we saw how mellow this descent was going to be.
61. Descending the mellow snow slopes towards Mountaineer Creek. This descent is an excellent option for parties wanting to avoid the Sherpa Glacier in later season. It takes a bit longer to get to Sherpa Pass, but it would be possible to get out this way in one day, especially if you did not climb Sherpa Peak en route. Or climb Sherpa Peak too, all the better.
62. Looking back up at Sherpa Pass (left) and Sherpa Peak (right).
63. After coming down from Sherpa Pass, I decided to add this as another possible north side descent route to my map of approaches and descents to the North Ridge of Stuart (see my note on "Approach-Exit Dilemma at the beginning of this page).
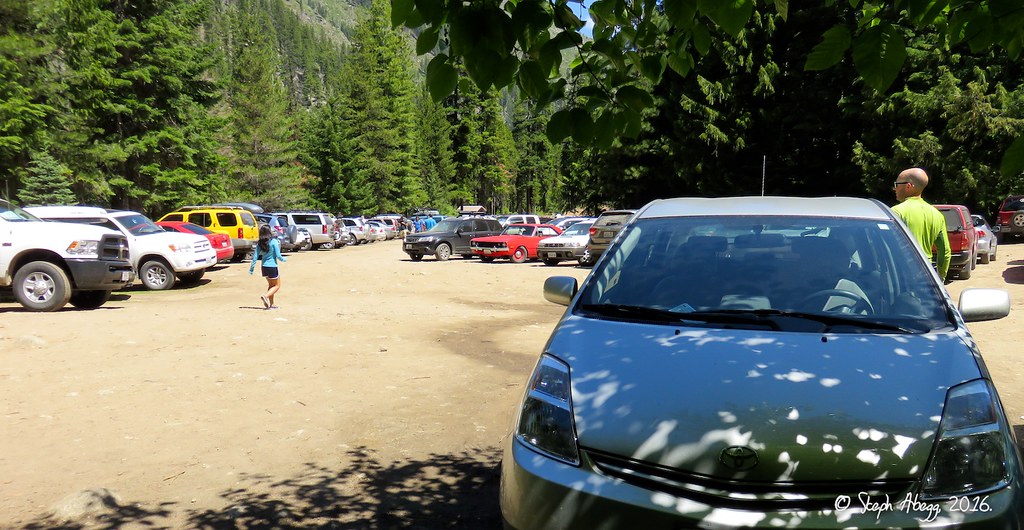
64. Back at the Stuart Lake / Colchuck Lake trailhead, one of the busiest trailheads on a sunny summer weekend. Cars were parked about 0.25 mile down the road.
Useful beta. Updated route information. Corrections. Historical notes. Interesting facts. No fluff please. Please do not put links in your comment, as my spam filter will filter those comments out.